0
0Bee Swarm Simulator Planters Guide: Best Fields, Nectar, Growth Times, and Buying Order
- WYNN
- Share
- Bee Swarm Simulator
- 06/21/26
- 1214
Planters are not set and forget items. Used badly, they give random loot and slow growth. Used properly, they farm nectar, waxes, glues, stingers, micro-converters, puffshrooms, and rare drops while you play normally.
The core rule is simple: planter + field + rotation = value.
If you keep placing the same planter in the same field, you lose efficiency. If you match planters to the right fields and rotate them, your rewards become much more consistent.
- Bee Swarm Simulator Planters: What They Do
- Planter Basics
- All Planter Growth Times
- How to Get Every Planter
- One-Time Planters
- Permanent Planters
- Best Planter Buying Order
- How to Make Planters Grow Faster
- Favorite Field Bonuses
- Nectar Types by Field
- Planter Nectar Bonuses
- All-Nectar Multipliers
- Best Fields for Every Planter
- Puffshroom Chances from Planters
- Best Special Drops to Farm
- Wax Drops Worth Knowing
- Field Degradation: The Mistake That Slows Everything
- Simple Rotation Example
- Best Nectar Setups by Hive Color
- Blue Hive Planter Setup
- Red Hive Planter Setup
- White Hive Planter Setup
- Mixed Hive Planter Setup
- Best Places to Put Planters So You Don't Lose Them
- FAQ
- What is the best planter to buy first in Bee Swarm Simulator?
- Is Plastic Planter worth buying?
- What planter is best for puffshrooms?
- How do I avoid field degradation?
- Which planter is best for rare drops?
- Summary
↖ Bee Swarm Simulator Planters: What They Do
Planters are inventory items placed in flower fields. You can place 3 planters at once, each in a different field.
When harvested, a planter can give:
- Nectar
- Pollen
- Item drops
- Puffshroom chance
- Honey conversion if your backpack is full
Planters grow only while you are online unless you use an Offline Voucher. Make sure you actually claim the voucher effect. Do not waste it on the Sticker Stack.
↖ Planter Basics
| Mechanic | What It Means |
|---|---|
| Max active planters | 3 |
| Same field allowed? | No, each planter needs a different field |
| Offline growth | Requires Offline Voucher |
| Best harvest timing | Near full growth, especially for puffshrooms |
| Main value | Nectar, materials, special drops |
↖ All Planter Growth Times
Growth time affects your route. Short planters are easier to cycle. Long planters are better for planned farming.
| Planter | Growth Time | Use Type |
|---|---|---|
| Paper Planter | 1 hour | One-time |
| Ticket Planter | 2 hours | One-time |
| Plastic Planter | 2 hours | Permanent |
| Sticker Planter | 3 hours | One-time |
| Festive Planter | 4 hours | One-time |
| Candy Planter | 4 hours | Permanent |
| Red Clay Planter | 6 hours | Permanent |
| Blue Clay Planter | 6 hours | Permanent |
| Tacky Planter | 8 hours | Permanent |
| Pesticide Planter | 10 hours | Permanent |
| Heat-Treated Planter | 12 hours | Permanent |
| Hydrophonic Planter | 12 hours | Permanent |
| Petal Planter | 14 hours | Permanent |
| Planter of Plenty | 16 hours | Permanent |
Practical rule:
If you play short sessions, use faster planters. If you farm for hours, longer planters pay off better.
↖ How to Get Every Planter
↖ One-Time Planters
| Planter | How to Get It | Best Use |
|---|---|---|
| Paper Planter | Pro Shop: 25,000 Honey + 1 Seed | Early use |
| Ticket Planter | Dapper Bear, Retro Swarm, Sticker Sprout, Sticker Stack, Samovar | Guaranteed smoke |
| Sticker Planter | Sticker Sprout, shop, Sticker-Seeker quests | Guaranteed smoke |
| Festive Planter | Beesmas shop, Bee Bear catalog, quests, Robo Party | Seasonal loot |
↖ Permanent Planters
| Planter | Location | Main Value |
|---|---|---|
| Plastic | Dapper Bear Shop | Cheap, puffshrooms |
| Candy | Dapper Bear Shop | Glues, gumdrops, jelly beans |
| Tacky | Dapper Bear Shop | Items, nectar |
| Pesticide | Dapper Bear Shop | Nectar, bitterberries, materials |
| Planter of Plenty | Dapper Bear Shop | Endgame rare drops |
| Red Clay | Red HQ | Red extracts, stingers, waxes |
| Heat-Treated | Red HQ | Red hive planter |
| Blue Clay | Blue HQ | Blue extracts, micro-converters |
| Hydrophonic | Blue HQ | Blue hive planter |
| Petal | White HQ | High-value all-rounder |
Heat-Treated needs 150 Riley Bee quests.
Hydrophonic needs 150 Bucko Bee quests.
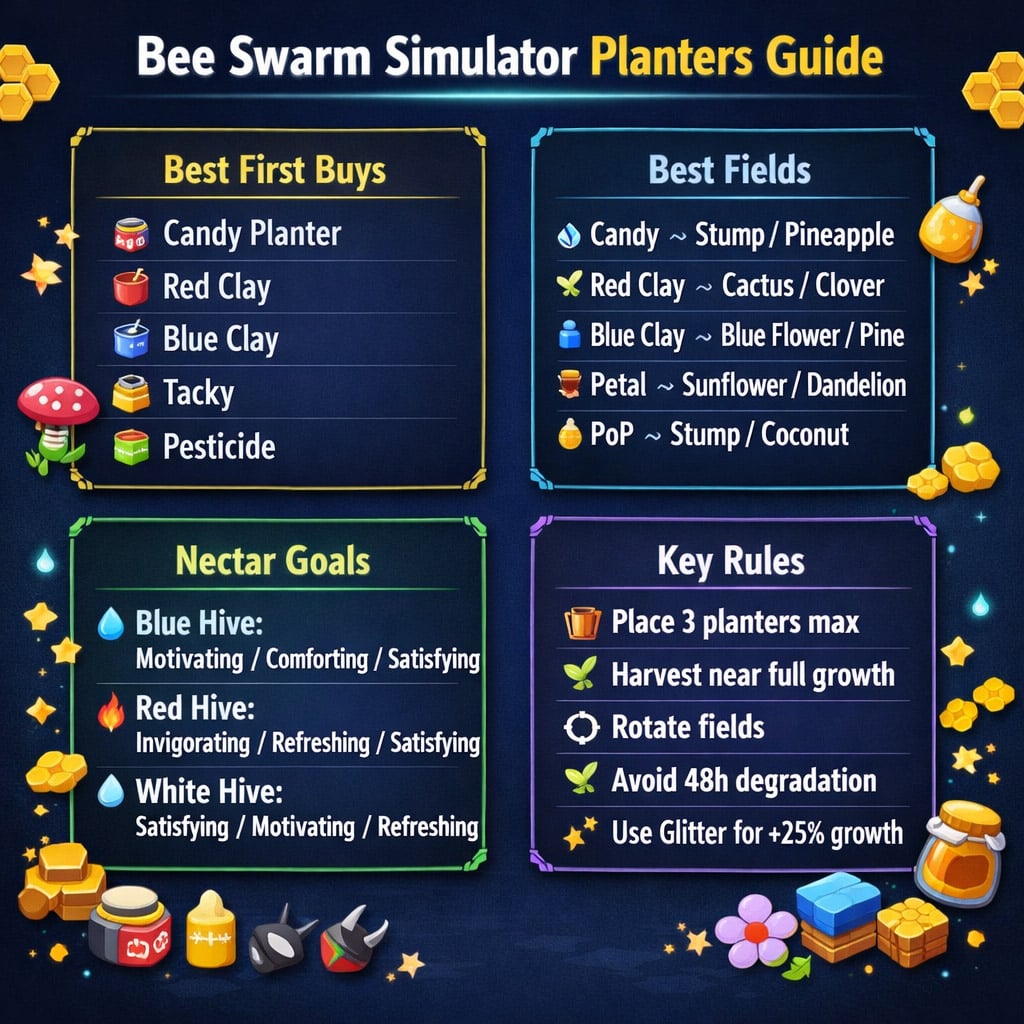
↖ Best Planter Buying Order
Do not buy planters just because they are available. Buy what fixes your current bottleneck.
| Priority | Planter | Why It Matters |
|---|---|---|
| 1 | Candy Planter | Best early value: glues, gumdrops, jelly beans, nectar |
| 2 | Red Clay Planter | Stingers, waxes, red extracts |
| 3 | Blue Clay Planter | Micro-converters, honeysuckle, blue extracts |
| 4 | Tacky Planter | Strong item farming |
| 5 | Pesticide Planter | Great nectar and material value |
| 6 | Petal Planter | One of the best planters in the game |
| 7 | Heat-Treated / Hydrophonic | Buy based on hive color |
| 8 | Planter of Plenty | Expensive endgame goal |
Skip rushing Plastic Planter for value.
It is cheap, but its loot and nectar value are weak. Buy it mainly for puffshroom access or completion.
↖ How to Make Planters Grow Faster
Growth speed matters because faster harvests mean more nectar, more loot, and more special drop attempts.
| Method | Bonus |
|---|---|
| Glitter | 25% faster growth |
| Cloud Vials | 8% growth per cloud, up to 20% |
| Favorite fields | Usually 25%–50% faster |
| Bee sipping | Adds growth and nectar |
| Shy Bees | Sip 100% more often, collect double nectar |
| Polar Power | Better bee energy, better sipping value |
Real player tip: do Polar Bear quests. More bee energy makes planter sipping more useful. It is not flashy, but it adds up.
↖ Favorite Field Bonuses
| Planter | Best Condition | Bonus |
|---|---|---|
| Candy | Strawberry, Pineapple, Coconut | 25% faster |
| Red Clay | Red fields | 25% faster |
| Blue Clay | Blue fields | 25% faster |
| Tacky | Starter zone | 25% faster, 100% more pollen |
| Pesticide | 5 Bee Zone | 30% faster, 50% more pollen |
| Heat-Treated | Red fields | 50% faster |
| Hydrophonic | Blue fields | 50% faster |
| Petal | White fields | 50% faster, 50% white pollen |
| Planter of Plenty | Pepper, Stump, Coconut, Mountain | 50% faster |
↖ Nectar Types by Field
Nectar is the main reason serious players care about planters. Field choice decides nectar type.
| Nectar | Fields |
|---|---|
| Satisfying | Sunflower, Pineapple, Pumpkin |
| Refreshing | Blue Flower, Strawberry, Coconut |
| Invigorating | Clover, Cactus, Mountain, Pepper |
| Motivating | Mushroom, Spider, Stump, Rose |
| Comforting | Dandelion, Bamboo, Pine Tree |
↖ Planter Nectar Bonuses
| Nectar | Planter Bonuses |
|---|---|
| Refreshing | Blue Clay 20%, Hydrophonic 40% |
| Satisfying | Red Clay 20%, Tacky 25%, Pesticide 30%, Petal 50% |
| Invigorating | Red Clay 20%, Heat-Treated 40% |
| Comforting | Blue Clay 20%, Tacky 25%, Hydrophonic 40%, Petal 50% |
| Motivating | Candy 20%, Pesticide 30%, Heat-Treated 40% |
↖ All-Nectar Multipliers
| Planter | Multiplier |
|---|---|
| Paper | 0.75x |
| Ticket | 2x |
| Sticker | 2x |
| Festive | 3x |
| Planter of Plenty | 50% bonus |
↖ Best Fields for Every Planter
Use this as your main placement cheat sheet.
| Planter | Best Fields | Main Reason |
|---|---|---|
| Plastic | Flexible | General loot, puffshrooms |
| Candy | Stump, Strawberry, Pineapple, Coconut | Glues, Motivating, fast growth |
| Red Clay | Cactus, Pepper, Clover, Mountain | Stingers, waxes, Invigorating |
| Blue Clay | Blue Flower, Bamboo, Pine Tree | Micro-converters, blue materials |
| Tacky | Dandelion, Sunflower | Items, Satisfying / Comforting |
| Pesticide | Spider, Strawberry, Bamboo | Nectar, bitterberries, materials |
| Heat-Treated | Cactus, Pepper, Rose, Mushroom, Clover, Mountain | Red hive route |
| Hydrophonic | Blue Flower, Bamboo, Pine Tree | Blue hive route |
| Petal | Dandelion, Sunflower, Pumpkin, Pineapple, Coconut | White value, strong loot |
| Planter of Plenty | Stump, Mountain, Coconut, Pepper | Endgame loot, rare drops |
If you are unsure:
- Need Glue ➔ Candy in Stump
- Need Stingers/Wax ➔ Red Clay in Cactus/Clover
- Need Micro-Converters ➔ Blue Clay in Spider
- Need White rewards ➔ Petal in Dandelion/Sunflower
- Need rare endgame drops ➔ Planter of Plenty in favorite fields
↖ Puffshroom Chances from Planters
At about 95% growth, a planter can start smoking. A smoking planter spawns a puffshroom when harvested.
| Planter | Smoke Chance |
|---|---|
| Ticket | Guaranteed |
| Sticker | Guaranteed |
| Paper | 1 in 10 |
| Festive | 1 in 10 |
| Plastic | 1 in 7 |
| Candy | 1 in 7 |
| Red Clay | 1 in 6 |
| Blue Clay | 1 in 6 |
| Tacky | 1 in 5 |
| Pesticide | 1 in 5 |
| Heat-Treated | 2 in 9 |
| Hydrophonic | 2 in 9 |
| Petal | 1 in 4 |
| Planter of Plenty | 1 in 3 |
For puffshrooms, Ticket and Sticker are best because they are guaranteed.
For permanent planters, use Planter of Plenty, Petal, Tacky, or Pesticide.
↖ Best Special Drops to Farm
Special drops have cooldowns. Don't spam the same route expecting infinite rare loot.
| Reward | Planter Setup | Cooldown / Note |
|---|---|---|
| 10 Glues | Candy in Stump 3 times in a row | About 1 week |
| Glue chance | Candy Planter | Uncommon |
| Super Smoothie | Plastic Planter | About 1 month |
| 10 Smoothies | Planter of Plenty in Bamboo | About 1 month |
| 10 Star Jelly | Petal in white field | Unknown cooldown |
| 10 Micro-Converters | Blue Clay in Spider | Guaranteed minimum |
| 10 Stingers | Red Clay in Clover → Spider → Cactus | About 2 weeks |
| 10 Stingers | Heat-Treated in Cactus | Special drop |
| Turpentine | Planter of Plenty | About 10% chance |
| Turpentine | Petal Planter | About 1% chance |
↖ Wax Drops Worth Knowing
| Wax | Good Setups |
|---|---|
| Soft / Hard Wax | Red Clay, Planter of Plenty |
| Swirled Wax | Plastic in Coconut, Red Clay in Sunflower, Blue Clay in Spider, Petal in Strawberry, Tacky in Pumpkin |
| Caustic Wax | Plastic in Rose, Clay in Clover, Tacky in Bamboo, Petal in Dandelion |
| Higher Caustic Chance | Pesticide in Strawberry or Bamboo |
| Rare Caustic Chance | Planter of Plenty |
↖ Field Degradation: The Mistake That Slows Everything
Every time you harvest a planter, that field degrades. Reusing the same field makes future planters grow slower.
Maximum degradation: 48 hours.
You can spot it by color. A planter in a degraded field looks brown, then darker with repeated use.
↖ Simple Rotation Example
| Step | Petal Planter Field |
|---|---|
| 1 | Sunflower |
| 2 | Pineapple |
| 3 | Coconut |
| 4 | Repeat after rotation |
Rule: never mindlessly repeat the same field. Rotate 3–4 fields and your growth stays cleaner.
↖ Best Nectar Setups by Hive Color
↖ Blue Hive Planter Setup
Blue hives usually want Motivating, Comforting, and Satisfying Nectar.
| Nectar | Setup |
|---|---|
| Motivating | Pesticide in Spider, Tacky in Mushroom, Candy in Stump |
| Comforting | Pesticide in Bamboo, Blue Clay in Pine Tree |
| Satisfying | Tacky in Sunflower, Pesticide in Pumpkin |
Early blue players can run Candy + Blue Clay + Tacky/Pesticide and get solid value.
↖ Red Hive Planter Setup
Red hives usually want Invigorating, Refreshing, and Satisfying Nectar.
| Nectar | Setup |
|---|---|
| Invigorating | Heat-Treated in Pepper, Red Clay in Cactus |
| Refreshing | Pesticide in Strawberry, Blue Clay in Blue Flower |
| Satisfying | Petal in Sunflower, Candy in Pineapple |
Red hives get the most from Red Clay, then Heat-Treated once unlocked.
↖ White Hive Planter Setup
White hives usually want Satisfying, Motivating, and Refreshing Nectar.
| Nectar | Setup |
|---|---|
| Satisfying | Petal in Sunflower, Candy in Pineapple |
| Motivating | Pesticide in Spider, Heat-Treated in Rose, Candy in Stump |
| Refreshing | Hydrophonic in Blue Flower, Petal in Coconut |
White is not an early-game path. By the time you commit, Petal Planter should already be part of your setup.
↖ Mixed Hive Planter Setup
Mixed hives should stay flexible.
| Goal | Good Nectar Combo |
|---|---|
| General farming | Satisfying + Motivating + Refreshing |
| Red-leaning | Invigorating + Satisfying + Refreshing |
| Blue-leaning | Motivating + Comforting + Satisfying |
| White-leaning | Satisfying + Motivating + Refreshing |
If your hive is still mixed, focus more on materials than perfect nectar.
↖ Best Places to Put Planters So You Don't Lose Them
Bad placement wastes time. Put planters near landmarks you can see fast.
| Field | Easy Placement |
|---|---|
| Sunflower | Near the large sunflower |
| Dandelion | Clear corner |
| Mushroom | Near mushroom cluster |
| Blue Flower | Middle edge between walls |
| Clover | Corner near ladder |
| Strawberry | Beside the big strawberry |
| Spider | Field corner |
| Bamboo | Near parkour |
| Pineapple | Between visible fences |
| Stump | Edge visible from spawn |
| Cactus | Between fence and cactus |
| Pumpkin | Outer edge |
| Pine Tree | Near ramp |
| Rose | Visible corner |
| Coconut | Near field edge |
| Pepper | Outer edge visible from lower zones |
This is boring advice until you stop losing planters. Then it becomes beautiful.
↖ FAQ
↖ What is the best planter to buy first in Bee Swarm Simulator?
Buy Candy Planter first in most cases. It gives glues, gumdrops, jelly beans, and Motivating Nectar. It also has strong fields: Stump, Strawberry, Pineapple, and Coconut.
↖ Is Plastic Planter worth buying?
Yes, but not early for power. Plastic Planter is cheap and useful for puffshrooms, but its loot and nectar value are weak. Prioritize Candy, Red Clay, and Blue Clay first.
↖ What planter is best for puffshrooms?
Ticket Planter and Sticker Planter are best because they are guaranteed to smoke. For permanent planters, use Planter of Plenty, Petal, Tacky, or Pesticide.
↖ How do I avoid field degradation?
Rotate fields. Do not keep placing the same planter in the same field. Degradation can last up to 48 hours and makes planters grow slower.
↖ Which planter is best for rare drops?
Planter of Plenty is the best endgame rare-drop planter, especially because of its Turpentine chance. Petal Planter is also excellent, while Red Clay, Pesticide, and Candy are better for practical material farming.
↖ Summary
The best planter strategy is simple:
- Buy Candy Planter early.
- Add Red Clay and Blue Clay for materials.
- Use Tacky and Pesticide for stronger farming.
- Get Petal Planter as soon as your progression allows.
- Match Heat-Treated or Hydrophonic to your hive color.
- Treat Planter of Plenty as an endgame target.
- Rotate fields to avoid 48-hour degradation.
- Match fields to the nectar your hive actually needs.
Planters are strongest when they are planned. Random placement gives random value. Smart placement turns them into one of the best passive progression systems in Bee Swarm Simulator.

Most Popular Posts
- Bee Swarm Simulator Progression Guide: Best Gear Order from Early Game to Endgame
- Bee Swarm Simulator Planters Guide: Best Fields, Nectar, Growth Times, and Buying Order
- How to Make 20B+ Pollen in Hive Hub as a Blue Hive in Bee Swarm Simulator
- Bee Swarm Simulator Best Mythic Bee: Ranked for Every Hive
- BSS Beesmas Update This Week: BBM Quest, Honeyday, Timer Extension, and Best Prep Guide
- Bee Swarm Simulator Petal Wand Guide: Requirements, Spirit Bear Quests, and Best First Spirit Petal Choice
Popular Category Lists
- ARC Raiders / (304)
- Grow a Garden / (286)
- CoD: Black Ops 7 / (166)
- MLB 26 / (151)
- Monopoly Go / (148)
- Star Citizen / (131)
- ARK Survival Ascended / (93)
- Steal a Brainrot / (92)
- Sailor Piece / (68)
- Forza Horizon 6 / (68)
- Diablo IV / (62)
- Blox Fruits / (62)
- Grow a Garden 2 / (58)
- Adopt Me / (58)
- CoD: BLACK OPS 6 / (55)
- Path of Exile 2 / (48)
- Monster Hunter Wilds / (46)
- Windrose / (44)
- Path of Exile / (40)
- Donut SMP / (37)