


 0
0Bee Swarm Simulator Get Good Beequips Guide: Farming Methods, Shop Priorities, and Trading
- NELSO
- Share
- Bee Swarm Simulator
- 03/19/26
- 1777
If you want better Beequips in Bee Swarm Simulator, the biggest mistake is relying on random luck alone. From my experience, the players who build strong Beequip setups the fastest usually do three things well: they check Dapper Bear's Shop consistently, they know which Beequips are worth buying, and they do not waste wax on weak bases.
- Best Ways to Get Good Beequips
- Best Beequip Sources by Reliability
- Dapper Bear's Shop: What to Buy and What to Skip
- Shop Reset Timing
- What to Skip in the Shop
- Optional Buys That Can Still Be Good
- Must-Buy Beequips From the Shop
- Challenge Farming: Worth It or Not?
- Stick Bug Challenge
- Robo Bear Challenge
- Ant Challenge
- Waxing Tips: Avoid the Common Mistake
- Hard Wax vs Caustic Wax
- Trading: The Fastest Upgrade Path for Smart Players
- The Main Trading Currency
- Best Beequip Strategy by Hive Color
- Simple Daily Routine That Works
- FAQ
- What is the best way to get good Beequips in Bee Swarm Simulator?
- Which Beequips should I prioritize buying?
- Is Stick Bug worth doing for blue hives?
- Should I wax every Beequip I buy?
- Is trading necessary?
- Summary
That is what this guide focuses on. Instead of listing every possible source without context, we will look at which methods are actually worth your time, what they mean for different hive colors, and how to turn decent Beequip finds into real account progress.
↖ Best Ways to Get Good Beequips
Not every source is equal. Some are easy but low value. Others are powerful, but only if your hive is strong enough. The goal is to prioritize methods that are both realistic and profitable.
↖ Best Beequip Sources by Reliability
| Source | Reliability | Potential Quality | Best For | Practical Verdict |
|---|---|---|---|---|
| Dapper Bear's Shop | High | High | All players | Best overall source |
| Stick Bug Challenge | Medium | High | Red/White hives | Strong if you have a good team |
| Robo Bear Challenge | Medium | Very High | Red hives, advanced players | Great but demanding |
| Ant Challenge | Low-Medium | Medium-High | All hive colors | RNG-heavy, still worth runs |
| Brown Bear Stockings | High access, low value | Low | Casual players | Easy, but usually weak |
| Mob Drops | Low | Low | Everyone | Not reliable |
| Planters | Low-Medium | Medium | Passive grinders | Nice bonus source |
| Catalog / Gift Boxes | One-time | Varies | Seasonal progression | Good, but not farmable |
| Trading | Depends on market | Very High | Market-aware players | Best for upgrading efficiently |
| Pay-to-win options | High if spending | Varies | Spenders | Fast, but not skill-based |
For most players, Dapper Bear's Shop is the most reliable source. Challenges are strong extra methods, while trading becomes more important once you understand item value.
↖ Dapper Bear's Shop: What to Buy and What to Skip
This is the most important part of Beequip progression because it gives you repeated chances at valuable items. If you only build one habit, build this one.

↖ Shop Reset Timing
Dapper Bear's Shop resets every 8 hours:
- 12:00 AM
- 8:00 AM
- 4:00 PM
These times are based on British time. Missing resets means missing potential value, especially over long periods.
↖ What to Skip in the Shop
| Usually Skip | Why We Skip It |
|---|---|
| Thimble | Weak compared with better options |
| Thumbtack | Generally low payoff |
| Bottle Cap | Poor long-term value |
| Demon Talisman | Rare use cases, weak for most players |
| Bang Snap | Low priority investment |
| Bandage | Usually not worth the slot or cost |
These are not always useless, but in most cases they are poor investments.
↖ Optional Buys That Can Still Be Good
| Optional Buy | Best Use Case | Why It Can Be Worth It |
|---|---|---|
| Beret | Blue hive | Can roll useful blue-focused buffs |
| Camo Bandana | Flexible use | Situationally decent |
| Bead Lizard | Niche setups | Can be acceptable with strong rolls |
| Rose Headband | Situational | Depends heavily on stats |
| Autumn Sun Hat | White hive | Stronger fit for white setups |
If you are a blue hive, Beret is more attractive. If you are white, Autumn Sun Hat deserves more attention.
↖ Must-Buy Beequips From the Shop
| Must Buy | Why It Matters |
|---|---|
| Smiley Sticker | Strong potential and trade value |
| Charm Bracelet | Valuable rolls, good resale |
| Paperclip | High upside |
| Whistle | Very desirable, especially for red value |
| Kazoo | Consistently strong market interest |
| Camper's Lip Balm | Rare good stats can sell well |
| Candy Ring | High-value potential |
A practical rule I follow is this: buy high-upside Beequips even if they do not fit your current hive, because a good roll can still be sold later for strong value.
↖ Challenge Farming: Worth It or Not?
Challenges can give some of the best Beequips, but they are not equally efficient for every hive color. This is where many players waste time.
↖ Stick Bug Challenge
Possible drops include:
- Smiley Sticker
- Kazoo
- Thumbtack
- Camo Bandana
- Autumn Sun Hat
- Pink Shades
- Seasonal items during Beesmas
| Hive Type | Stick Bug Performance | Why |
|---|---|---|
| Red | Strong | High damage output |
| White | Strong | Good damage and contribution |
| Blue | Weak | Lower challenge damage in most cases |
From experience, Stick Bug is much better for red and white hives. If you are blue, your results are usually worse unless your account is very advanced.

↖ Robo Bear Challenge
Robo Bear has higher upside, but it is much harder. Possible drops include:
- Whistle
- Pink Shades
- Demon Talisman
- Pink Eraser
- Candy Ring
- Camper's Lip Balm
The best strategy is simple: push the highest round you can.
| Requirement | Why It Helps |
|---|---|
| Red hive | Best damage for clearing robots |
| Fuzzy alt | Improves pollen support significantly |
| High nectar | Strong stat support across rounds |
| Low-tier consumables | Extracts, oils, enzymes, tropical drinks help stabilize later rounds |
For most players, this is an advanced farming route, not a beginner one.
↖ Ant Challenge
Possible drops include:
- Bandage
- Bottle Cap
- Candy Ring
- Camper's Lip Balm
- Poinsettia during Beesmas
Ant Challenge is accessible, but the return is inconsistent. Even strong runs can give you nothing useful, so it works better as a side method than a main plan.
↖ Waxing Tips: Avoid the Common Mistake
A lot of Beequip value is lost here. Getting a good base is only half the job.
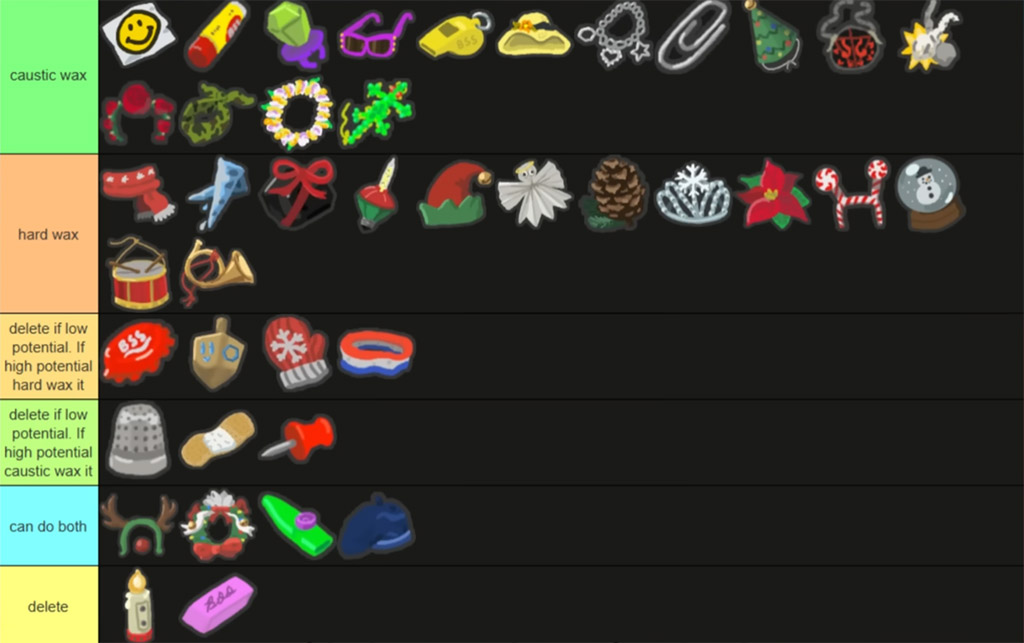
↖ Hard Wax vs Caustic Wax
| Wax Type | Use When | Why |
|---|---|---|
| Hard Wax | The Beequip does not require Caustic-only unlocks | Better efficiency in many cases |
| Caustic Wax | The Beequip has abilities or outcomes tied to Caustic use | Necessary for specific high-end results |
The biggest mistake is using wax without checking whether the Beequip is even worth investing in. In practice, we should ask:
1. Is this Beequip useful for our hive?
2. Does it have trade value?
3. Does it need a specific wax path?
If the answer is no across the board, save your wax.
↖ Trading: The Fastest Upgrade Path for Smart Players
Trading is where a lot of advanced players make up for bad RNG. If you know item value, you do not need every Beequip drop to be perfect.
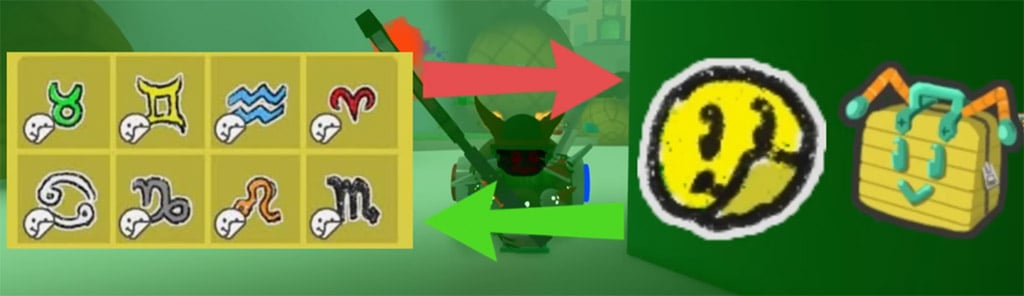
↖ The Main Trading Currency
Most players use Star Signs as the main value reference.
A second important market item is: Bear Bee Voucher
Because the market changes often, live value tracking matters more than static lists.
| Trading Principle | Why It Matters |
|---|---|
| Learn sign values first | Prevents obvious overpay mistakes |
| Track Beequip demand, not just rarity | Rare does not always mean expensive |
| Wax selectively before trading | Smart enhancement raises sale value |
| Use active communities | Better price discovery than random hub trading |
From experience, players who check market demand regularly usually progress faster than players who only farm and never trade.
↖ Best Beequip Strategy by Hive Color
Hive color changes what is efficient. That is why one method can feel amazing for one player and terrible for another.
| Hive Color | Best Farming Focus | Why |
|---|---|---|
| Red | Dapper Shop, Robo Bear, Stick Bug | Strong damage and challenge performance |
| White | Dapper Shop, Stick Bug, selective trading | Good challenge output and strong niche Beequips |
| Blue | Dapper Shop, trading, planters | Weaker challenge damage lowers efficiency |
If you are blue, lean harder into shop checking and trading. If you are red, challenge content becomes much more rewarding.
↖ Simple Daily Routine That Works
To keep Beequip progress consistent, we should follow a repeatable loop instead of farming randomly.
| Step | Action | Reason |
|---|---|---|
| 1 | Check Dapper Bear's Shop every reset | Best repeatable source |
| 2 | Buy all high-upside Beequips | Strong personal or resale value |
| 3 | Skip weak low-value stock | Saves tickets/materials |
| 4 | Run challenge content based on hive color | Maximizes efficiency |
| 5 | Keep planters active | Adds passive chances |
| 6 | Evaluate whether to wax or sell raw | Prevents waste |
| 7 | Check market values before trading | Protects profit margin |
This routine works because it covers both sides of progression: getting Beequips and extracting value from them.
↖ FAQ
↖ What is the best way to get good Beequips in Bee Swarm Simulator?
For most players, Dapper Bear's Shop is the best method because it is consistent, repeatable, and has strong item quality.
↖ Which Beequips should I prioritize buying?
The strongest general buys are:
- Smiley Sticker
- Charm Bracelet
- Paperclip
- Whistle
- Kazoo
- Camper's Lip Balm
- Candy Ring
↖ Is Stick Bug worth doing for blue hives?
Usually less so. Blue hives tend to underperform in damage-heavy challenge content, so shop resets and trading are often better.
↖ Should I wax every Beequip I buy?
No. Only wax Beequips that have strong personal use, clear market value, or a specific unlock path worth chasing.
↖ Is trading necessary?
Not mandatory, but it is one of the fastest ways to turn average drops into meaningful upgrades.
↖ Summary
Good Beequips are not only about luck. The real edge comes from buying the right bases, checking shop resets consistently, using challenge farming where it makes sense, and treating wax and trading as part of one system.

Most Popular Posts
- Bee Swarm Simulator Progression Guide: Best Gear Order from Early Game to Endgame
- Bee Swarm Simulator Bee Bear Quest Guide: Best Fields, Blooms, Stickers & Petal Cub Tips
- Bee Swarm Simulator Planters Guide: Best Fields, Nectar, Growth Times, and Buying Order
- How to Make 20B+ Pollen in Hive Hub as a Blue Hive in Bee Swarm Simulator
- Bee Swarm Simulator Best Mythic Bee: Ranked for Every Hive
- BSS Beesmas Update This Week: BBM Quest, Honeyday, Timer Extension, and Best Prep Guide
Popular Category Lists
- Grow a Garden / (286)
- ARC Raiders / (262)
- CoD: Black Ops 7 / (166)
- Monopoly Go / (146)
- MLB 26 / (144)
- Star Citizen / (112)
- Steal a Brainrot / (89)
- Sailor Piece / (68)
- ARK Survival Ascended / (67)
- Diablo IV / (61)
- Forza Horizon 6 / (60)
- Blox Fruits / (60)
- CoD: BLACK OPS 6 / (55)
- Adopt Me / (53)
- Path of Exile 2 / (48)
- Monster Hunter Wilds / (46)
- Windrose / (44)
- Path of Exile / (40)
- Grow a Garden 2 / (40)
- Bee Swarm Simulator / (36)


