


 0
0Bee Swarm Simulator Glitters Farming Guide: From Early Game to Endgame
- NELSO
- Share
- Bee Swarm Simulator
- 02/01/26
- 1741
If you're going for endgame gear such as Diamond Mask, Gummy Mask, or preparing to get a huge boost, you probably have experienced hitting the Glitter Wall. We understand— you have the honey, the extracts, but you're missing the shiny vials.
Glitter is not just a crafting material, but also a consumable that gives a +100% pollen boost for 15 seconds. Wasting them for small boosts is a rookie mistake. We will show you exactly how to stockpile them. Whether you're an active player or prefer macroing, we are providing a complete guide to obtain Glitters quickly.
- The Sure Things: Guaranteed & Consistent Methods
- 1. The Blender (Your Safety Net)
- 2. Boss Rotations
- 3. Puffshrooms (The Meta Strategy)
- RNG Methods: Luck-Based but Essential
- Memory Matches
- Windy Bee & Meteors
- Mob Farming (Know Your Targets)
- Planters
- Beesmas Exclusives (Seasonal)
- One-Time Rewards & Hidden Tokens
- Optimized Macro Settings
- Frequently Asked Questions
↖ The Sure Things: Guaranteed & Consistent Methods
Let's start with the methods that don't rely entirely on luck. These should be the backbone of your farming routine.
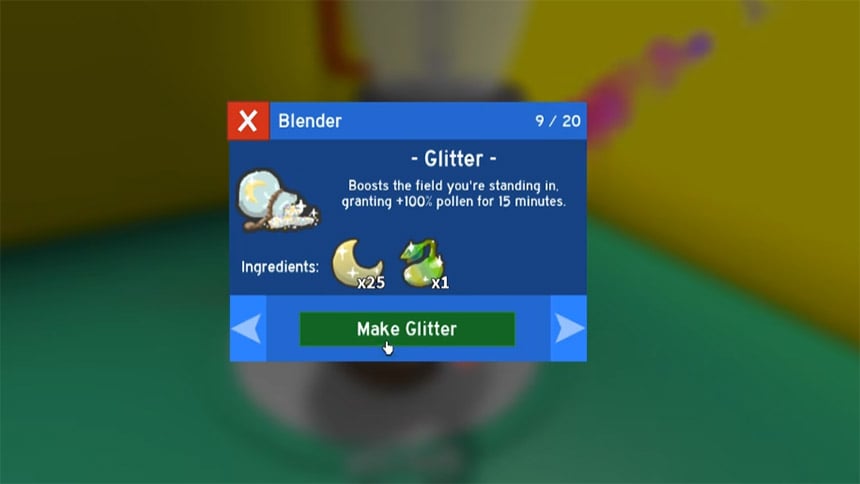
↖ 1. The Blender (Your Safety Net)
When drops run dry, the Blender in the Badge Bearer's Guild is your most reliable source.
Recipe: 25 Moon Charms + 1 Magic Bean.
Strategy:
This method is resource-intensive. We recommend using this only when you are close to a crafting goal. Always farm sprouts to keep your Magic Bean and Moon Charm counts high.
↖ 2. Boss Rotations
Not all bosses are created equal. You need to manage your respawn timers strictly. Using Baby Love (from Baby Bee or Gifted Tadpole Bee) before the kill is non-negotiable—it boosts your Loot Luck by 50%.
| Boss | Frequency | Strategy |
|---|---|---|
| Tunnel Bear | ~48 Hours | High priority. Always check for the drop token. |
| King Beetle | Daily | Quick kill. Don't skip this; it adds up over weeks. |
| Coconut Crab | ~36 Hours | Great loot table. Speed up kills to maximize efficiency. |
| Stump Snail | ~96 Hours | Takes a long time, but the loot pile is massive. |
↖ 3. Puffshrooms (The Meta Strategy)
If we had to pick one method as the king of Glitter farming, it's Puffshrooms.
Why it works:
Higher rarity (Rare/Epic/Legendary) and higher-level Puffshrooms have a significantly increased drop rate.
Pro Tip:
Don't solo this. Coordinate with a server to chase Puffs across fields. You can often get multiple Glitters in a single run if you focus on leveling them up rather than just popping them instantly.
↖ RNG Methods: Luck-Based but Essential
While you can't control these outcomes 100%, you can tilt the odds in your favor by knowing where to look.

↖ Memory Matches
Don't ignore the Memory Match games. They are cooldown-based, so treat them like daily chores.
Nighttime Memory Match (30 Bee Zone): This has the highest drop chance for Glitter. Prioritize this above all others.
Other Locations: 10 Bee Zone, Badge Bearer's Guild, and 35 Bee Zone (Winter Memory Match) are also decent sources.
↖ Windy Bee & Meteors
Windy Bee: The loot drops depend heavily on damage dealt. If you have a high-attack hive, your chances of seeing a Glitter token skyrocket.
Mythic Meteors: When a shower starts, stop what you are doing. Focus on the smallest meteors—they typically yield better rewards, including Glitters and Moon Charms (which you can craft into Glitters).
↖ Mob Farming (Know Your Targets)
Stop wasting time killing Spiders or Werewolves if you are specifically hunting for Glitter. They do not drop them.
Targets: Mantises and Scorpions.
Strategy: Incorporate these mobs into your bug run loops.
↖ Planters
Planters are excellent for passive income.
Petal Planter: The absolute best for Glitters.
Harvest Rule: Always let the planter grow to 100% before harvesting to maximize the loot table potential.
↖ Beesmas Exclusives (Seasonal)
If you are reading this during the Beesmas event, drop everything and focus on these sources. They are often far cheaper and faster than regular farming.
1. Bee Bear's Catalog: You can buy bundles (like the Reindeer Bundle) that contain bulk Glitters (up to 25x).
2. The Samovar: A hidden gem. It guarantees a Glitter on the 4th use and then every 5th use after that. Keep it on cooldown!
3. Spirit Bear's Present (2026): Handing a present to Spirit Bear rewards 3 Glitters instantly.
4. Gift Boxes:
Box 3 (5 Bee Zone): 1 Glitter.
Box 11 (Near Brown Bear): 5 Glitters.
↖ One-Time Rewards & Hidden Tokens
If you are desperate for just one or two more Glitters to finish a mask, go grab these immediately if you haven't already.
Map Tokens:
- Diamond Mask Location: There is a free token right in front of the mask stand.
- Gummy Lair: Look behind the Gummy Boots display.
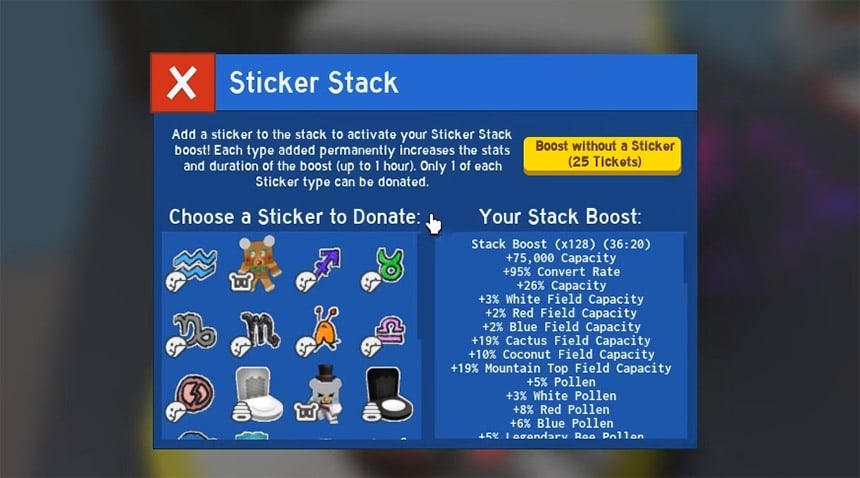
- Sticker Stack: Donating specific stickers to the stack grants 1 Glitter per sticker.
- Stickers to use: Sideways Spirit Bear, Shining Halo, Glowing Smile, and any Star Sign sticker.
↖ Optimized Macro Settings
For those of you using Natro Macro or similar tools, automation is the key to long-term stockpiling.
Field Selection: If you don't have a specific pollen goal, set your macro to the Pineapple Patch or Dandelion Field. Breaking leaves here has a tiny, yet non-zero, chance to drop Glitters.
Mob Killers: Ensure Kill Mobs is enabled, specifically targeting Mantises and Scorpions.
Planter Cycles: Set your macro to rotate the Petal Planter or Tacky Planter for consistent harvests.
↖ Frequently Asked Questions
Q: Can you get Glitters from Fireflies?
A: Yes, but it's rare. Fireflies usually drop Moon charms, but on occasion a Glitter token can spawn, which is why nighttime farming can be more profitable.
Q: Will crafting Glitters be worth it if I'm low on Magic Beans?
A: In most cases. Magic Beans are critical for spawning sprouts, so unless you're 1 or 2 Glitters away from a significant upgrade, like the Gummy Mask, then save your Beans for Sprout Parties where you can get more resources.
Q: Do Aphids drop Glitter?
A: Only the rare ones like the Diamond Aphid, and since these are really rare, don't base your farming method on this.
Final Strategy:
Farming Glitter is a long, drawn out process (a marathon, not a sprint). The most effective players farm in methods: defeating their bosses on cooldown (with Baby Love), completing the Nighttime Memory Match each day, and when possible, refilling their Petal Planter.

Most Popular Posts
- Bee Swarm Simulator Progression Guide: Best Gear Order from Early Game to Endgame
- Bee Swarm Simulator Bee Bear Quest Guide: Best Fields, Blooms, Stickers & Petal Cub Tips
- Bee Swarm Simulator Planters Guide: Best Fields, Nectar, Growth Times, and Buying Order
- How to Make 20B+ Pollen in Hive Hub as a Blue Hive in Bee Swarm Simulator
- Bee Swarm Simulator Best Mythic Bee: Ranked for Every Hive
- BSS Beesmas Update This Week: BBM Quest, Honeyday, Timer Extension, and Best Prep Guide
Popular Category Lists
- Grow a Garden / (286)
- ARC Raiders / (266)
- CoD: Black Ops 7 / (166)
- Monopoly Go / (146)
- MLB 26 / (145)
- Star Citizen / (116)
- Steal a Brainrot / (89)
- ARK Survival Ascended / (74)
- Sailor Piece / (68)
- Forza Horizon 6 / (63)
- Diablo IV / (61)
- Blox Fruits / (60)
- CoD: BLACK OPS 6 / (55)
- Adopt Me / (53)
- Path of Exile 2 / (48)
- Monster Hunter Wilds / (46)
- Windrose / (44)
- Grow a Garden 2 / (42)
- Path of Exile / (40)
- Bee Swarm Simulator / (36)


