


 0
0Bee Swarm Simulator: Gummy Bear Quest 2026 Guide
- WYNN
- Share
- Bee Swarm Simulator
- 01/19/26
- 2085
In Bee Swarm Simulator, The 2026 Gummy Bear Quest feels simple on paper and brutal in real play: a few Robo Parties, a mountain of goo, a pile of kills, and two stickers that may refuse to exist. The good news is we can make it predictable.

Below is a field-tested approach we use to stack tasks together, stop wasting Gumdrops, and avoid the classic traps (rerolling upgrades too early, boosting the wrong fields, and overcommitting to low-value Robo Bear quests). Let's run it like a checklist, not a marathon.
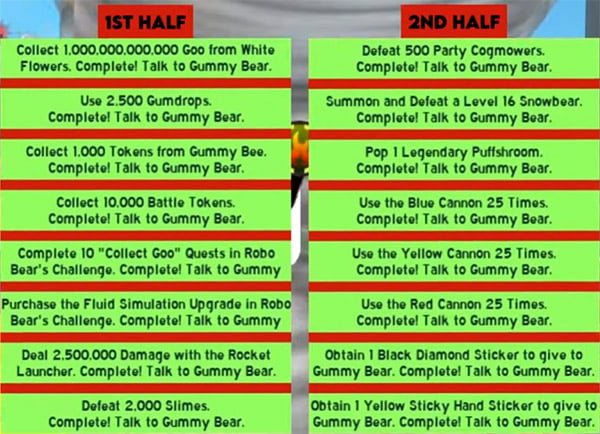
- Main Guide
- The Speedrun Route
- Task Map
- Key Tasks, Done the Fast Way
- White Goo (1 Trillion) Without Bleeding Resources
- Robo Bear Challenge
- Retro Swarm
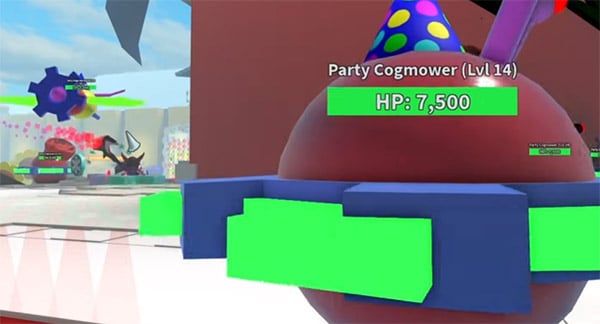
- Party Cogmowers (500)
- Level 16 Snow Bear
- Legendary Puffshroom (Pop 1)
- Cannons (Blue/Yellow/Red x25)
- Stickers (2 Rare)
- FAQ
- 1. Do we really need Gummy Bee for this quest?
- 2. Should we reroll upgrades until we see Fluid Simulation?
- 3. What's the single biggest time-saver for Party Cogmowers?
- 4. We keep failing Level 16 Snow Bear—what's the fix?
- 5) 5. paying full price for half value.
- Summary
↖ Main Guide
↖ The Speedrun Route
We finish faster when we do tasks in a sequence that shares the same activities.
Our recommended order:
- Start working on White Goo + Gumdrops used + Gummy Bee tokens (these overlap heavily).
- Queue Robo Bear's Challenge goals (Battle Tokens + 10 Goo quests + Fluid Simulation appearance window).
- Run Retro Swarm efficiently (Rocket Launcher damage + Slimes).
- Farm Robo Party Cogmowers (needs coordination or server luck, so start early).
- Lock in Snow Bear Level 16 (schedule help, don't hope).
- Puffshroom Legendary + Cannons (quick wins).
- Stickers (treat as parallel/AFK/trade plan, not last-minute panic).
Why this works: if you delay RNG-gated steps (Cog Mowers, Fluid Simulation, stickers), you risk finishing everything else and getting stuck on the worst parts with no momentum.
↖ Task Map
Here's the quest broken into an actionable scan table.
| Task | Fastest Approach | What It Costs | Common Pitfall |
|---|---|---|---|
| 1T White Goo from White Flowers | Boost a high-yield white-leaning field + constant goo uptime | Gumdrops + boosters | Boosting weak fields or running without goo stats |
| Use 2.5k Gumdrops | Let it complete naturally during White Goo + Robo goo quests | Gumdrops | Saving Gumdrops early then grinding later |
| 1k Gummy Bee tokens | Keep Gummy Bee active; increase ability rate; token duplication helps | Beequips/mutations | No Gummy Bee or low ability rate setup |
| 10k Battle Tokens | Do boss/mini-boss loops + challenges that spawn combat tokens | Time, attack bees | Farming passive fields with little combat |
| 10 Robo Bear collect goo quests | Take early/easy goo quests; avoid huge field-locked ones | Some Gumdrops | Picking high-requirement goo quests and stalling |
| Buy Fluid Simulation upgrade | Play until it appears; only reroll when close to finishing | Cogs | Burning cogs rerolling too early |
| 2.5M Rocket Launcher damage | Buy launcher early in match; stand at choke; maximize uptime | Bricks/time | Buying low-impact items first |
| Defeat 2k Slimes | Bundle with Rocket Launcher runs | Time | Waiting until after launcher task |
| Defeat 500 Party Cogmowers | Chain Robo Parties with friends/alts; public server surfing | Coordination | Treating it as solo grind |
| Summon & defeat Level 16 Snow Bear | Bring DPS plan (often red hive helps most) | Buff items | Attempting without preparation stacks |
| Pop 1 Legendary Puffshroom | Raise level by moving fields; aim L10+ cycles | Time/team | Popping low-level in one field repeatedly |
| Use Blue/Yellow/Red Cannon 25x each | Do it in batches while traveling between activities | Minutes | Forgetting and doing it at the end |
| 2 rare stickers (varies) | Targeted bee/field methods, sticker planters, or trade | Time/alt | Random farming without checking sticker source |
↖ Key Tasks, Done the Fast Way
↖ White Goo (1 Trillion) Without Bleeding Resources
This step is where many players lose days, not because the number is impossible, but because their goo uptime is inconsistent.
The setup we use (practical, not perfect gear only)
- Tool: Petal Wand > Porcelain Dipper (if you lack Petal Wand, you can still progress, just slower).
- Core goo gear: Gummy Mask + Gummy Boots (goo synergy matters more than minor pollen stats).
- Hive: Gummy Bee is non-negotiable for steady Gumdrops and token flow. Gifted is ideal, but we don't wait on it if it delays the quest.
- Amulets: prioritize goo-related stats where possible (a goo-leaning roll noticeably stabilizes gains).
Boost loop (repeatable and measurable)
- Get free Gumdrops uptime (e.g., timed unlimited windows) and commit to a single strong session.
- Stack temporary buffs that increase ability rate and pollen flow.
- Choose a strong field (we prefer higher-tier fields where your pollen/sec is meaningfully higher).
- Only spend premium boost materials when you can play the full duration—half sessions waste the most.
If you discover your goo gain feels flat then your issue is usually one of these:
- You're boosting a field your hive can't actually chew through fast enough.
- You lack ability rate / token generation, so goo sources aren't chaining.
- You're running boosts without a plan to maintain goo uptime.
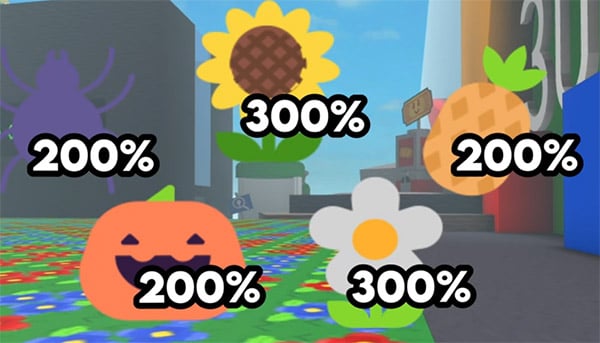
Field selection (what we do in practice)
We pick the field that matches our build and has consistent density:
- If your white collection is decent, high-yield fields outperform easy starter fields even with higher competition.
- If you're forced into mid-tier fields, compensate by improving goo uptime rather than just farming longer.
↖ Robo Bear Challenge
This is the most systems-heavy part. The trick is to stop treating each objective as separate.
Battle Tokens (10k): where they really come from
Battle tokens count quickly when you're actively fighting:
- Bosses and repeatable combat events
- Challenge modes with constant enemies
- Any run where attack bees are actually working
If you discover you're barely getting battle tokens then your session is too peaceful—switch to combat-heavy loops.
10 collect goo quests: pick the right ones
We clear this fast by selecting early, low-threshold goo quests, because:
- They finish while we're already using Gumdrops for other tasks.
- They don't force awkward field commitments.
Rule we follow:
If a goo quest requires a huge amount from a specific field then skip it unless that field is already your best boost field.
Fluid Simulation: don't bankrupt your cogs
Fluid Simulation is rare and luck-driven. That means our strategy is timing-based:
- We don't reroll aggressively early.
- We push runs while we still have multiple objectives to complete.
- When this becomes one of the last blockers, we can justify selective rerolls.
| Situation | What We Do | Why |
|---|---|---|
| Mid-quest, many tasks remaining | Avoid heavy rerolls | Cogs are worth more as progress fuel |
| Endgame, only Fluid Simulation left | Controlled rerolls + lock when seen | Converts luck into certainty |
↖ Retro Swarm
This pair is designed to be bundled. We finish both faster by optimizing launcher uptime.
Rocket Launcher: the buy it early rule
Because damage scales with time holding the launcher, we:
- Prioritize getting the launcher as early as possible in a run.
- Let a teammate (or alt) handle early waves while we focus on collecting bricks.
- Park at the enemy choke so every shot converts into damage efficiently.
If you discover you're short on damage after a run then you likely bought too many side items before the launcher, or spent too much time away from the main lane.
Slimes: don't farm them separately
Slimes die as collateral during launcher runs.
We only switch tactics when launcher no longer one-shots reliably.
↖ Party Cogmowers (500)
This is the part we plan around, not power through.
Fastest realistic methods:
- Coordinate Robo Party spawns with friends.
- Use a secondary account that can access/trigger parties more reliably.
- Public server surf: join active servers where parties are already happening.
If you discover you're doing everything else fast but this number barely moves then your problem isn't DPS—it's spawn rate. Fix the spawn pipeline, not your hive.
↖ Level 16 Snow Bear
Snow Bear at Level 16 punishes sloppy preparation. We treat it like a short boss raid.
Our preparation checklist
- Damage buffs (oil-type buffs, drinks, etc.) used with intention, not randomly.
- Precision/crit reliability: we wait until our marks/stacks are ready.
- Defensive timing: activate shields at the start of the real damage window, not on entry.
If you discover you're getting close but timing out then you usually need:
- Better crit/precision uptime (not more items)
- Cleaner positioning (stay on your damage markers)
- A dedicated helper with a high-DPS hive (often a red hive is the simplest solve)
↖ Legendary Puffshroom (Pop 1)
Legendary requires higher-level Puffshrooms, so the tactic is straightforward:
- Pop early Puffshrooms quickly.
- Follow the chain across multiple fields to raise level.
- Use a zone where fields are close so travel time is minimal.
Mistake we see constantly:
If you keep popping low-level Puffshrooms in the same field then you're slowing the level progression.
↖ Cannons (Blue/Yellow/Red x25)
We do cannons in travel bundles:
- Every time we pass a cannon hub, fire a batch.
- Track counts in a simple note so we don't end up doing 60 trips later.
| Cannon | Batch Strategy |
|---|---|
| Blue | Do 5–10 each time you visit the jelly/shop area |
| Yellow | Do 5–10 whenever you're turning in science-area tasks |
| Red | Do 5–10 whenever you reset/return to hive |
↖ Stickers (2 Rare)
Sticker tasks vary by account. The universal rule is: read the sticker source and build around it.
Fast paths we've used:
- Temporarily adjust hive/bee types on an alt to target a specific sticker drop condition.
- AFK in the correct field when the sticker's trigger is field-dependent.
- Sticker planters: useful, but inconsistent—good as passive background progress.
- Trade: fastest when you know market value; most expensive when you panic-buy.
If you discover you've farmed for hours with no progress then you're probably in the wrong field, using the wrong bees, or ignoring the sticker's trigger condition.
↖ FAQ
↖ 1. Do we really need Gummy Bee for this quest?
For fast completion, yes. Without Gummy Bee, you lose steady Gumdrops and token generation, which directly slows multiple tasks (goo, gumdrops used, tokens).
↖ 2. Should we reroll upgrades until we see Fluid Simulation?
Only when it's one of your final blockers. Earlier, cogs usually produce more progress when spent on continuing runs rather than chasing a rare roll.
↖ 3. What's the single biggest time-saver for Party Cogmowers?
Spawn rate. If you can't reliably start or join Robo Parties, you'll crawl. Friends, coordinated groups, or an alt account changes this task from weeks to sessions.
↖ 4. We keep failing Level 16 Snow Bear—what's the fix?
Treat it as a timing fight: prep your crit/precision window, hold position on damage markers, and align shields/buffs with your burst. If DPS is still short, bring a dedicated high-DPS helper.
↖ 5) 5. paying full price for half value.
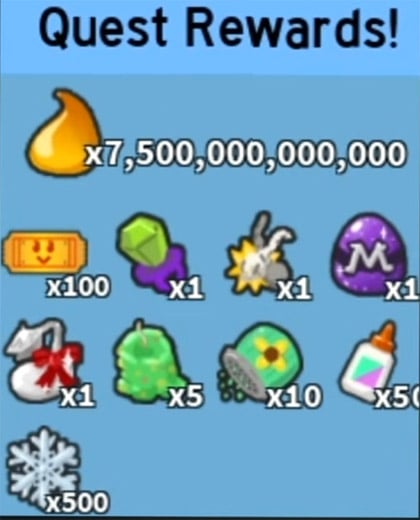
↖ Summary
The 2026 Gummy Bear Quest is fastest when we stop doing tasks one-by-one and start doing them in overlapping clusters: White Goo + Gumdrops + Gummy tokens first, then Robo Bear objectives, then Retro Swarm for Rocket Launcher + Slimes, while we keep Party Cog mowers and stickers running as early as possible.
If you run into a wall, it's usually not skill or gear—it's a pipeline problem: not enough Robo Parties, wrong sticker targeting, or boosts without goo uptime. Fix the pipeline, and the quest becomes a checklist we can actually finish.

Most Popular Posts
- Bee Swarm Simulator Progression Guide: Best Gear Order from Early Game to Endgame
- Bee Swarm Simulator Bee Bear Quest Guide: Best Fields, Blooms, Stickers & Petal Cub Tips
- Bee Swarm Simulator Planters Guide: Best Fields, Nectar, Growth Times, and Buying Order
- How to Make 20B+ Pollen in Hive Hub as a Blue Hive in Bee Swarm Simulator
- Bee Swarm Simulator Best Mythic Bee: Ranked for Every Hive
- BSS Beesmas Update This Week: BBM Quest, Honeyday, Timer Extension, and Best Prep Guide
Popular Category Lists
- Grow a Garden / (286)
- ARC Raiders / (262)
- CoD: Black Ops 7 / (166)
- Monopoly Go / (146)
- MLB 26 / (144)
- Star Citizen / (111)
- Steal a Brainrot / (89)
- Sailor Piece / (68)
- ARK Survival Ascended / (66)
- Diablo IV / (61)
- Forza Horizon 6 / (60)
- Blox Fruits / (60)
- CoD: BLACK OPS 6 / (55)
- Adopt Me / (53)
- Path of Exile 2 / (48)
- Monster Hunter Wilds / (46)
- Windrose / (44)
- Path of Exile / (40)
- Grow a Garden 2 / (38)
- Bee Swarm Simulator / (36)


