


 0
0Grow a Garden Pets Trading Values Tier List after Hungry Birds Update
- Cecila
- Share
- Grow a Garden
- 01/19/26
- 1722
This Grow a Garden Hungry Birds update didn't just add a small event loop—it pushed the game even further into a trade-first economy. Now, the real question isn't just is it cute?, but rather: What can we sell fast, and what will still be worth something tomorrow?
We're treating this guide like a professional trading desk would. For us, value equals tradable price range + liquidity + stability, not vibes and certainly not one suspicious average price displayed on a screen.
Below is a structured value list you can actually use in the market, plus the exact decision rules we follow when buying, selling, or converting messy inventories into cleaner currency pets.
- 1. How we price pets
- 2. 2026 Hungry Birds Value List (SSS–F Tiers)
- 3. Why prices feel weird
- 3.1 Giant Scorpion: Expensive doesn't mean liquid
- 3.2 Code Pets: Premium survives because the story sells
- 3.3 Kitsune & Raccoon: Why they're the market's cash
- 3.4 Birb/BB Hype: The classic cliff-drop curve
- 4. Practical Trading (What we actually do)
- 4.1 Negotiate with ranges, not single numbers
- 4.2 Bundling is the best exit for C/D/E
- 4.3 Anti-trap rules: Fake averages and Wish Prices
- FAQ
- Final Thoughts
↖ 1. How we price pets
Most players get clipped by the same two mistakes:
1. They treat a displayed average as a guaranteed payout.
2. They ignore liquidity (how quickly you can sell without discounting).
What we use instead (Practical Pricing):
- Tradable Range: The band where deals reliably close, not the cheapest listing and not the highest flex post.
- Liquidity Tag: Easy / Okay / Hard to move.
- Volatility Risk: Stable / Swingy / High-risk (common for new event hype).
If you notice a pet has a high average but sits listed for hours with no buyers, then that value is mostly decorative. It looks good in a screenshot, but it won't buy you an upgrade.
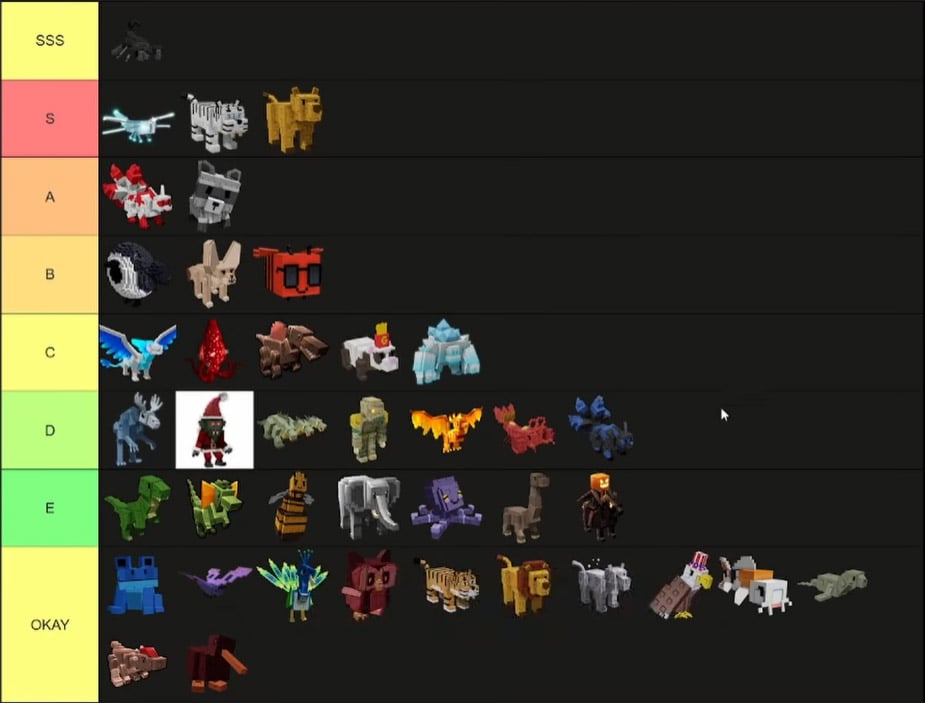
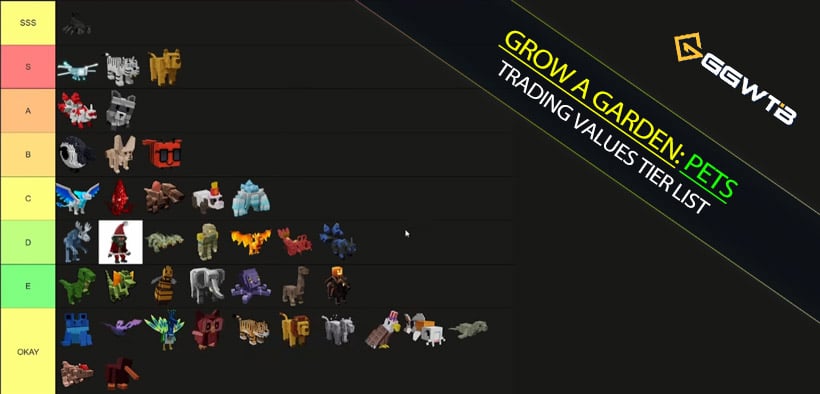
↖ 2. 2026 Hungry Birds Value List (SSS–F Tiers)
Here's our working table: price ranges, liquidity, and what we do with each tier in real trades.
(Note: Token values follow current market data. Markets move, so we stick to ranges.)
| Tier | Example Pets | Tradable Range (Tokens) | Liquidity | How we trade it |
|---|---|---|---|---|
| SSS (Ultra Expensive) | Giant Scorpion | ~53,000 (common anchor) → 250,000 (hard pushes) | Hard (Harder at top end) | Treat as a collector asset. If you need tokens fast, negotiate near the anchor, not the flex price. |
| S (High Premium) | Code Pets (incl. Flame Bee) | 8,000+ (Premium zone) | Okay | Luxury pricing: strong ego value, weaker demand depth. If it doesn't get DMs, you're priced above reality. |
| A (Mainstream Currency) | Kitsune, Raccoon | ~1,000–1,500 (Kitsune often 1.2k–1.5k) | Easy | These function like cash equivalents. Great for bridging gaps and closing deals quickly. |
| B (Mid-High Value) | Fennec Fox, Disco Bee, Birb/BB | Fennec 300–400; Disco 300–350; Birb ~500 (Trending down) | Easy (Birb is swingy) | B-tier is great for trades, but hype pets must be rotated out fast if momentum breaks. |
| C (Usable, not Currency) | Frost Dragon, Ruby Squid, Spinosaurus, French Viper | Mostly 130–200; Corrupted Kitsune ~70–100 | Okay | Best used as bundle filler. Selling single units at top ask often stalls. |
| D (Borderline) | Wendigo, Krampus, Mummy, Ice Golem, Phoenix | ~90–130 (Many cluster near 100) | Okay | Don't anchor on I saw one higher. Price where buyers actually click yes. |
| E (Volume Zone) | Hydra, Hex, Dilophosaurus, Queen Bee, T-Rex | Mostly 25–50; some pushed 50–100 | Easy (at low prices) | Speed matters more than squeezing. If closing costs you only 10 tokens, take it. |
| F (Add-ons) | Echo Frog, Butterfly, Peacock, Blood, Tiger, Kiwi | ~5–30 (Kiwi ~5) | Easy (Low profit) | Use as sweeteners to close deals and improve bundle appeal. |
↖ 3. Why prices feel weird
↖ 3.1 Giant Scorpion: Expensive doesn't mean liquid
We've seen the same pattern repeatedly: someone lists at 250k, gets no serious offers, then slowly walks the price down.
High price automatically means fewer buyers.
Fewer buyers means you don't control the exit.
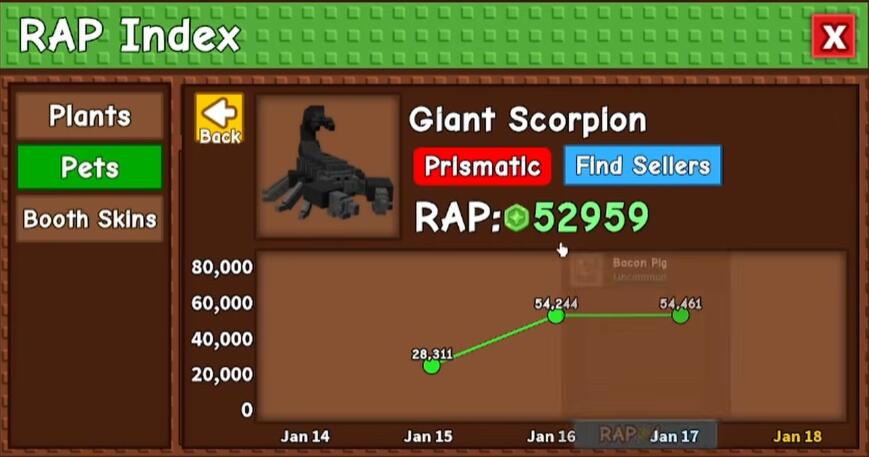
If you notice you're rich on paper but can't convert into A-tier pets or tokens, then you're holding a trophy, not a currency.
↖ 3.2 Code Pets: Premium survives because the story sells
Code pets stay expensive for two reasons:
access barrier (code redemption/paid path) and status signaling (I have the thing you can't casually farm).
But the weakness is obvious:
demand is sentiment-driven. If you notice your code pet isn't getting inquiries at your ask, then the market is telling you the premium is fading—rotate into A-tier immediately.
↖ 3.3 Kitsune & Raccoon: Why they're the market's cash
These work because people broadly agree on the range and they are accepted in almost any negotiation.
Compared with flashy S-tier items, A-tier currency pets give you flexibility: you can buy, sell, or swap without drama.
↖ 3.4 Birb/BB Hype: The classic cliff-drop curve
This is the most common event-pet path:
1. Day 1: Irrational highs (scarcity illusion + FOMO).
2. Days 2–3: Supply ramps, price breaks.
3. Week 1+: Normalizes into a standard tier.
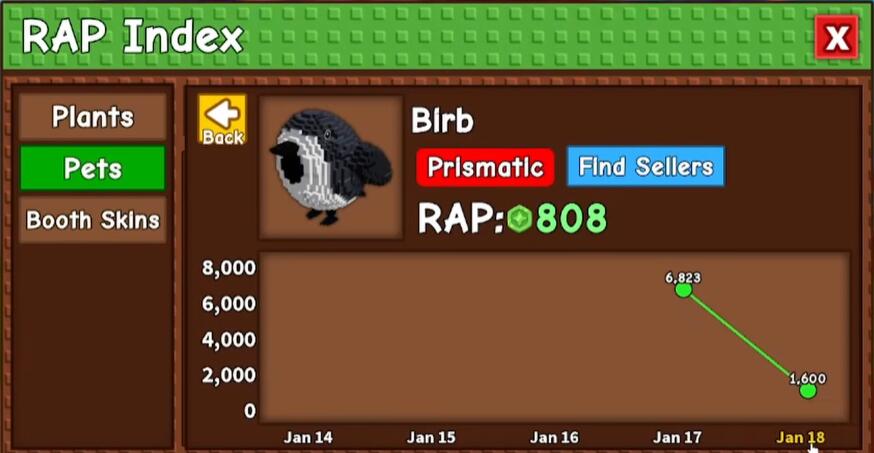
If you notice it sliding from thousands to hundreds quickly, then stop anchoring to yesterday's number. Trade today's tape, not yesterday's brag.
↖ 4. Practical Trading (What we actually do)
↖ 4.1 Negotiate with ranges, not single numbers
Buying A-tier: Start near the lower band (e.g., 1,000–1,200).
Selling B-tier (Fennec/Disco): Price at the too easy to accept point (e.g., ~350) to win on speed.
Why? Because a fast close beats a perfect price you never realize.
↖ 4.2 Bundling is the best exit for C/D/E
C/D/E pets often fail as solo listings because buyers don't want to negotiate for small edges. We use a simple funnel:
1. Pick a target: A-tier or strong B-tier.
2. Bundle: 2–4 C/D/E pets as gap fillers.
3. Sweeten: Add 1–2 F-tier pets to close the deal.
If you notice a buyer keeps stalling over a tiny gap, then your bundle needs a sweetener, not another 20-minute argument.
↖ 4.3 Anti-trap rules: Fake averages and Wish Prices
If you notice a pet's average spikes but nobody is buying at that level, then the average is noise.
If you notice only a few sellers shouting a huge price while the crowd ignores it, then that's not value—it's a wish.
Trade what clears, not what gets posted.
↖ FAQ
1. What should we hold to avoid bleeding tokens?
We prioritize tradability over coolness:
- A-tier (Kitsune/Raccoon) for stability and liquidity.
- B-tier (Fennec/Disco) for flexible swaps, with more exposure to swings.
If you notice your inventory is mostly C/D/E and sales feel slow, then convert upward via bundles into A-tier.
2. Is Giant Scorpion worth buying for regular players?
It can be strong, but as an asset, it behaves like a collector item: high value, low liquidity. If you notice your token balance is tight, then A-tier currency pets usually give better control and safer exits.
3. Is Birb/BB a buy or a sell right now?
We treat it as a short-term momentum asset.
If you notice daily lower lows (e.g., 800 → 600 → 500), then rotate out into A/B tiers. If it stabilizes for several days with steady demand, then a small speculative buy can make sense.
4. Why does Hydra sometimes sell near 100 when many E-tier pets don't?
Because a small number of aggressive buyers can temporarily lift a low-tier item, especially if it has perceived utility or hype. However, if you notice only rare buyers pay 100 while most trades clear at 50, then 100 is an exception price, not the baseline.
5. I only have F-tier pets—can I still trade up?
Yes, but F-tier is a closing tool, not a profit engine.
If you notice a trade is almost done and the buyer hesitates, then adding an F-tier sweetener can push it over the line. Use that to climb into C/D/E bundles, then into B/A.
↖ Final Thoughts
This update's economy rewards players who treat pets like assets: focusing on price range, liquidity, and stability. We keep A-tier (Kitsune/Raccoon) as our cash, use B-tier for swaps, bundle C/D/E to avoid slow solo sales, and treat hype pets like Birb/BB as high-volatility positions that need quick exits.
The market doesn't care what someone claims a pet is worth—it only cares about what reliably closes.

Most Popular Posts
- Grow a Garden 2 Release Date Guide: Why Saturday Is the Likely Launch Window
- Grow a Garden Bizzy Bee Event: Honey Coins, Bee Eggs, Seeds, Upgrades, and Rewards
- Grow a Garden Bee Dungeon Guide: Best Wave 100 Strategy, Bee Shards, and Team Setup
- Grow A Garden Best Pet Mutations 2026: Ranked Guide for Power, Trading, and AFK Farming
- Grow a Garden Bee Stats Guide: Best Bees Ranked by Damage, HP, and DPS
- Grow a Garden Busy Bee Part 2 Guide: Royal Jelly, Best Pets, New Seeds, and Prep Strategy
Popular Category Lists
- Grow a Garden / (286)
- ARC Raiders / (262)
- CoD: Black Ops 7 / (166)
- Monopoly Go / (146)
- MLB 26 / (144)
- Star Citizen / (111)
- Steal a Brainrot / (89)
- Sailor Piece / (68)
- ARK Survival Ascended / (66)
- Diablo IV / (61)
- Forza Horizon 6 / (60)
- Blox Fruits / (60)
- CoD: BLACK OPS 6 / (55)
- Adopt Me / (53)
- Path of Exile 2 / (48)
- Monster Hunter Wilds / (46)
- Windrose / (44)
- Path of Exile / (40)
- Grow a Garden 2 / (38)
- Bee Swarm Simulator / (36)


