


 0
0Bee Swarm Simulator: Red Port-O-Hive Is Smart or Trap?
- WYNN
- Share
- Bee Swarm Simulator
- 02/06/26
- 1029
It looks weird at first: endgame red hives pulling massive numbers while wearing the Red Port-O-Hive instead of the Coconut Canister. We've tested this idea, watched enough boost logs, and the pattern is consistent—it's rarely about better stats. It's about not breaking Coconut Combo timing during coordinated boosts. Here's how the trade works, why it can pay off for a tiny group of players, and what you should do if you're boosting solo.

- 1. What's The Real Reason Endgame Reds Wear The Red Port-O-Hive?
- The Mechanic That Matters: Coconut Combo Timing
- Why The Coconut Canister Can Become A Problem?
- 2. Stats check: Red Port-O-Hive vs Coconut Canister
- Capacity, Conversion Behavior, and Timing Risk Comparison
- 3. The Trade-off In Plain Numbers
- Capacity Is Safety Buffer
- Why Instant Conversion Can sometimes Beat Capacity?
- 4. Decision Rules: Should We Use Red Port-O-Hive?
- Rule 1: Do You Have Coordinated Coconut Combo Support?
- Rule 2: Are You Already over-capacity Stabilized?
- Rule 3: Are You Chasing Timing Purity More Than Average Efficiency?
- 5. How We Test It?
- 6. Common Misconceptions
- 7. FAQs
- 1) Is Red Port-O-Hive Ever Best-in-Slot For Red Hives?
- 2) What's The Biggest Risk If We Copy The Swap Without Support?
- 3) How Do We Know If Timing Is Our Limiting Factor?
- 4) Should We Practice Coconut Combo Before Changing Backpacks?
- 5) What Should Most Players Do This Beesmas?
- Finally
↖ 1. What's The Real Reason Endgame Reds Wear The Red Port-O-Hive?
The short version: timing control beats raw gear stats in certain coordinated boost setups.
↖ The Mechanic That Matters: Coconut Combo Timing
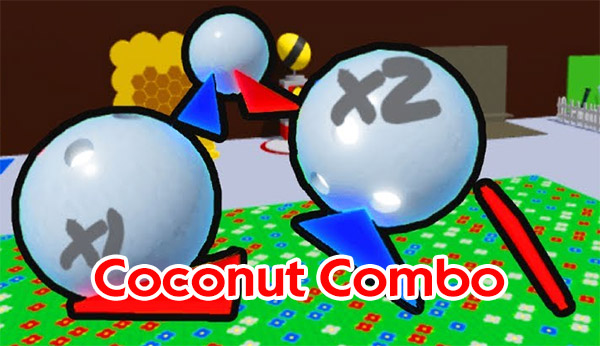
Coconut Combo is one of those multipliers that doesn't just add a little. When you keep it high (players aim at 100x), it amplifies multiple parts of the boost loop—pollen flow, conversion pacing, and the value of big damage windows (like Scorching Star bursts).
- Because Combo stacks are time-sensitive, random extra coconut triggers can desync the rhythm.
- If you're coordinating with helpers (or a team) who are deliberately feeding you coconuts on a schedule, then anything that injects extra coconuts at the wrong moment can ruin the chain.
↖ Why The Coconut Canister Can Become A Problem?
The Coconut Canister is the best general backpack for endgame because it's huge and strong—but it also comes with behavior that can interfere with a strict timing plan.
- If you're relying on a clean Combo timeline, unexpected Inspire Coconut effects can push stacks in uneven jumps.
- If you accidentally create overlapping or mistimed stack growth, you can lose the stable 100x window you were trying to preserve.
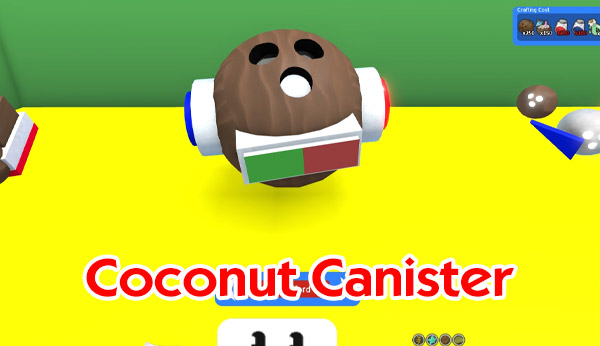
So yes—some top reds swap to Red Port-O-Hive because it's less likely to disrupt the planned combo cadence.
↖ 2. Stats check: Red Port-O-Hive vs Coconut Canister
Let's put the is it secretly stronger? rumor to rest. In general, it's not.
↖ Capacity, Conversion Behavior, and Timing Risk Comparison
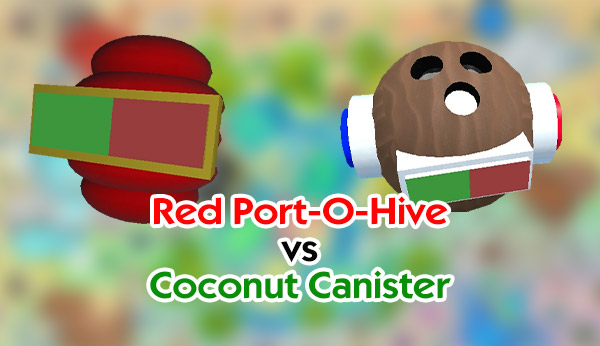
This table focuses on what matters during long boosts: capacity, conversion behavior, and timing risk.
| Item | Capacity (base) | Conversion angle | Timing stability (Coconut Combo) | Who it's for |
|---|---|---|---|---|
| Red Port-O-Hive | ~400k | Stronger red-specific instant conversion feel in practice | Higher (fewer timing disruptions) | Coordinated red boosts with strict combo scheduling |
| Coconut Canister | ~1,000,000 | Broad utility + strong general performance | Lower (can inject unwanted timing variance) | Almost everyone, especially solo / small groups |
What This Means?
- The Red Port-O-Hive usually brings a massive capacity penalty (400k vs 1M is not a rounding error).
- Its value is situational: it can protect a high-precision Coconut Combo plan, and that plan can be worth more than capacity for a very specific setup.
↖3. The Trade-off In Plain Numbers
We'll be blunt: for most of us, swapping off Coconut Canister is a net loss.
↖Capacity Is Safety Buffer
During high-output red boosts, you spike so fast that capacity becomes your don't waste pollen insurance.
- If you fill too often, you're forced into more frequent conversion moments.
- If conversion isn't perfectly aligned with your burst windows, you bleed efficiency.
So if you find that you're filling constantly even with Coconut Canister, then dropping to 400k capacity will make the boost feel choked unless you have extreme support (Balloon Blessing, high-level bees, strong beequips, perfect routing, and/or team coordination).
↖Why Instant Conversion Can sometimes Beat Capacity?
There's a real point hidden inside the debate: not all instant conversion is equal.
- If you're a red hive and your build heavily prioritizes red pollen sources, then red-focused instant conversion can outperform generic instant conversion at the margin.
- If you're operating near a fill threshold, then even a 1–2% conversion difference can change whether you overflow.
But here's the catch: that edge matters most when you're already playing at an extreme ceiling—where everything else (combo uptime, field control, helper timing) is solved.
↖4.Decision Rules: Should We Use Red Port-O-Hive?
Use these rules like a checklist. If you fail one, you probably stay on Coconut Canister.
↖Rule 1: Do You Have Coordinated Coconut Combo Support?
- If you're boosting solo, then you do not want extra constraints—use Coconut Canister.
- If you have 1–2 helpers but no strict schedule, you still want stability and capacity—use Coconut Canister.
- If you have a consistent team that can maintain near-constant 100x Coconut Combo, then the Red Port-O-Hive becomes a tool instead of a downgrade.
↖Rule 2: Are You Already over-capacity Stabilized?
- If you find you're not overflowing often with Coconut Canister, then dropping capacity is unnecessary pain.
- If you discover your pollen spikes are so well-managed (balloons, blessings, conversion stack, precise burst routing) that you're still stable at lower capacity, then the swap is at least testable.
↖Rule 3: Are You Chasing Timing Purity More Than Average Efficiency?
This is the key mindset shift:
- Coconut Canister is the best average performer.
- Red Port-O-Hive is a specialist pick when your main enemy is timing disruption, not raw output.
↖5. How We Test It?
When we evaluate bags for a boost strategy, we track three things across multiple runs:
- Combo Uptime: If you can't keep high Coconut Combo stacks reliably, the whole reason to swap disappears.
- Overflow Loss: If you notice frequent filled moments where tokens/collection are wasted, that's a capacity problem. If you find overflow loss increases after swapping to 400k capacity, then the strategy is failing for your setup.
- Burst Window Yield: We compare how much honey comes from your best burst moments (e.g., big scorch events) relative to total. If timing purity increases burst yield enough to offset overflow loss, then the swap is working for you.
If you discover that your best bursts get stronger but your total honey drops, then the bag swap is a highlight-reel buff, not a real boost buff.
↖6. Common Misconceptions
They Used Red Port-O-Hive, So It Must Be Better
No—most of the time it's a coordination artifact. The strategy assumes:
- dedicated timing,
- disciplined coconut feeding,
- and a build tuned to exploit long, stable multipliers.
Instant Conversion Alone Will Fix Capacity
Instant conversion helps, but it doesn't erase the fact that 1,000,000 > 400,000 when pollen is exploding. If you find yourself filling constantly, then you're not converting better, you're just converting more often—and that can interrupt the flow of collection.
This Is The New Meta For Everyone
This is more like a tournament setup than a ladder build. If you're missing the support system, you only keep the downside.
↖7. FAQs
↖1) Is Red Port-O-Hive Ever Best-in-Slot For Red Hives?
If you're doing highly coordinated boosts where Coconut Combo timing is the main constraint, then yes, it can be the best tool for that specific session. For general play and most boosts, Coconut Canister remains the safer and stronger default.
↖2) What's The Biggest Risk If We Copy The Swap Without Support?
You'll usually lose honey to capacity choke: more overflow, more forced conversions, and less stable burst routing. If you discover you're spending the boost fighting a full bag, switch back.
↖3) How Do We Know If Timing Is Our Limiting Factor?
If you find your honey spikes depend on maintaining a high combo stack and your runs fail mainly when stacks get desynced, then timing is the bottleneck. If you find your runs fail because you fill too fast, capacity is the bottleneck.
↖4) Should We Practice Coconut Combo Before Changing Backpacks?
Yes. If you can't keep high stacks consistently, then changing backpacks won't magically create uptime—it just removes capacity that was protecting you.
↖5) What Should Most Players Do This Beesmas?
Stick to Coconut Canister, improve your boost fundamentals (routing, field control, conversion rhythm, and beequips), and only test Red Port-O-Hive when you can reproduce stable combo timing with help.
↖Finally
Red Port-O-Hive showing up in giant red boosts isn't a secret stat hack—it's a timing-protection choice made for coordinated Coconut Combo play. For most of us, the capacity loss is too expensive, so Coconut Canister remains the correct pick.
If you discover you have consistent 100x Combo support and your runs are limited by timing purity (not overflow), then the Red Port-O-Hive becomes a legitimate specialist option—just treat it like a scalpel, not a new default.

Most Popular Posts
- Bee Swarm Simulator Progression Guide: Best Gear Order from Early Game to Endgame
- Bee Swarm Simulator Bee Bear Quest Guide: Best Fields, Blooms, Stickers & Petal Cub Tips
- Bee Swarm Simulator Planters Guide: Best Fields, Nectar, Growth Times, and Buying Order
- How to Make 20B+ Pollen in Hive Hub as a Blue Hive in Bee Swarm Simulator
- Bee Swarm Simulator Best Mythic Bee: Ranked for Every Hive
- BSS Beesmas Update This Week: BBM Quest, Honeyday, Timer Extension, and Best Prep Guide
Popular Category Lists
- Grow a Garden / (286)
- ARC Raiders / (266)
- CoD: Black Ops 7 / (166)
- Monopoly Go / (146)
- MLB 26 / (145)
- Star Citizen / (116)
- Steal a Brainrot / (89)
- ARK Survival Ascended / (74)
- Sailor Piece / (68)
- Forza Horizon 6 / (63)
- Diablo IV / (61)
- Blox Fruits / (60)
- CoD: BLACK OPS 6 / (55)
- Adopt Me / (53)
- Path of Exile 2 / (48)
- Monster Hunter Wilds / (46)
- Windrose / (44)
- Grow a Garden 2 / (42)
- Path of Exile / (40)
- Bee Swarm Simulator / (36)


