


 0
0Best Assault Rifle in Black Ops 7: Full Stat Comparison, Roles, and Loadouts
- ELSA
- Share
- CoD: Black Ops 7
- 11/20/25
- 2707
If you want a fast start in Black Ops 7, start with the rifle that fits your fights. The breakdown below goes beyond raw numbers to answer the practical questions: who owns mid-range, which AR can replace an SMG up close, which one rewards headshots, and which is most forgiving. Stats are the map; your route is how you use them. Here's a structured overview first, then builds and on‑field execution.
- What Each AR Actually Does
- Range and TTK: Where each rifle wins
- Hybrid hitscan behavior: why velocity isn't everything
- Recoil and controllability: which rifles obey
- Handling and movement: who sees and shoots first
- Attachment Blueprints and Playstyle Templates
- Turning Paper Strength into Real Win Rate
- FAQ
- Summary and Quick Picks
↖ What Each AR Actually Does
Think of these as roles so you can narrow choices before you tinker with builds.
| Weapon | Primary Role | TTK Highlight | Range Profile | Recoil/Handling | Key Trade-off |
|---|---|---|---|---|---|
| M15 | Mid-range all-rounder | ~312 ms sustained into mid-range | Long 5-shot kill region | Very controllable; consistent | Not the fastest up close |
| AK‑27 | Close-to-mid bully | ~264 ms within 4-shot range | Strong up close; flattens beyond first range | Snappy start; needs burst rhythm | Falls off after initial damage tier |
| MXR7 | Headshot precision | ~240 ms with 1 head + 2 body | Shines in first damage tier | Stable climb; favors short bursts | Average TTK without headshots |
| X9 Maverick | Burst punisher | ~160 ms if one-burst | Peeks and picks; unforgiving on misses | Tight burst; cadence-based | Miss a bullet → TTK spikes |
| DS20 Mirage | Tactical utility | No standout raw TTK | Generalist ranges | Manageable but larger magnitude | Relies on grenade launcher value |
| Peacekeeper Mk1 | AR-SMG hybrid | Strong up close | Falls off hard at distance | Best handling/mobility | Limited mid-long presence |
Why does this matter? Because your routes and typical engagement distances decide which gun turns its advantage zone into your default fight.
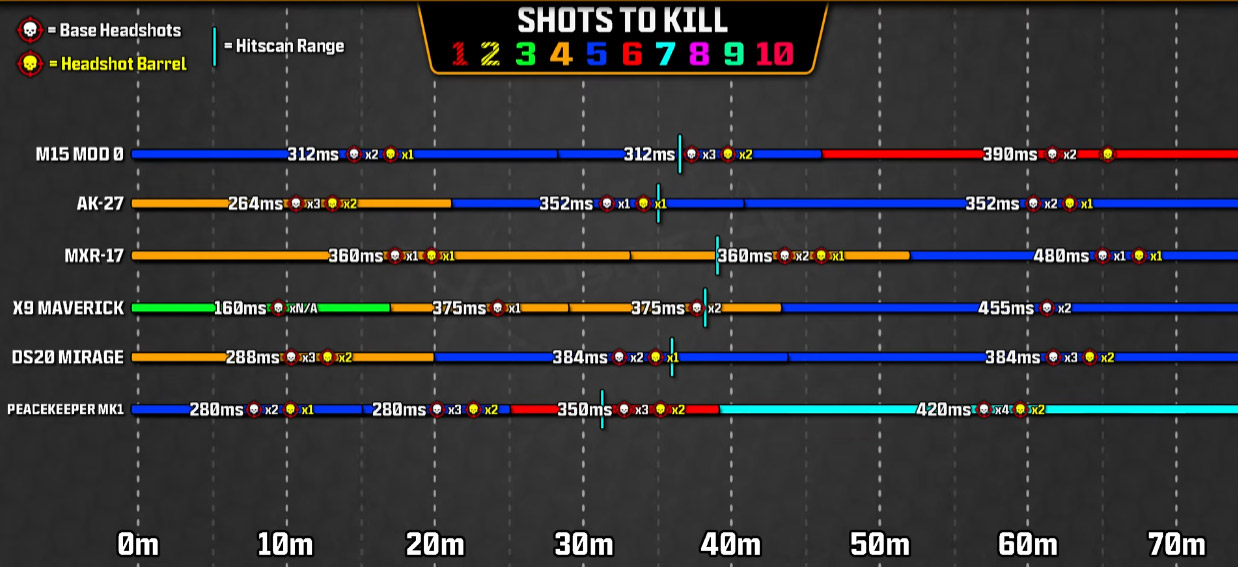
↖ Range and TTK: Where each rifle wins
| Weapon | Highlight | Risk | Practical Meaning |
|---|---|---|---|
| M15 | ~312 ms stays strong into mid-range; wide 5-shot zone | None notable | Wins many 15–30 m duels through consistency |
| AK‑27 | ~264 ms inside 4-shot range | Falls off beyond first range | Great for lane/corner fights; SMG-like trades up close |
| MXR7 | 1 head + 2 body ≈ 240 ms | Average if no headshot | Rewards reliable head-line control; high ceiling |
| X9 Maverick | ~160 ms one-burst potential | Miss a burst bullet → TTK balloons | Pre-aim, take first shot, disengage; bad for reactive spraying |
| DS20 Mirage | Utility over raw dueling | Lower direct DPS | Open sites, displace players, break equipment |
| Peacekeeper Mk1 | Strong close-range with elite handling/mobility | Weak at long lanes | Farm favorable peeks; avoid extended distance fights |
Takeaway: TTK shows potential; repeatability wins matches. M15/AK‑27 are consistency kings; MXR7/X9 require skill timing; Peacekeeper converts movement into safer fights.
↖ Hybrid hitscan behavior: why velocity isn't everything
- Engine note: BO7 uses a hybrid model—inside certain ranges, bullets are effectively hitscan; beyond that, projectile rules apply.
- What this means:
- Inside those hitscan bands, more velocity won't change feel; it only helps extend the band's edge.
- Your shot delay feel at close/mid comes from ADS and recoil control, not bullet speed.
- Practical setup:
- Close/mid ARs (AK‑27, Peacekeeper): prioritize ADS and recoil over velocity.
- Mid/long ARs (M15, MXR7): add some velocity only to push the hitscan boundary outward.
↖ Recoil and controllability: which rifles obey
| Weapon | Recoil Pattern | Key Behavior | Practical Takeaway |
|---|---|---|---|
| M15 | Slow climb; early right then late left; tight pattern | Highly controllable | Great for lane anchoring and continuous control |
| AK‑27 | Snappy first shots; strong right bias; vertical caps then mostly horizontal | Unstable in long sprays | Use 3‑round bursts with brief pauses for best accuracy |
| MXR7 | Steady right‑up drift; slow climb | Predictable in short strings | Favor short bursts and tap firing |
| X9 | Tight burst; perfect recenters between bursts | Cadence-dependent | Focus on burst timing rather than drag control |
| DS20 | Largest magnitude; slow climb; left‑up bias | Predictable with patience | Control improves with deliberate pacing |
| Peacekeeper | High initial visual kick; true recoil lower than it looks | Deceptive visual recoil | Keep bursts short; leverage movement over long beams |
↖ Handling and movement: who sees and shoots first
| Weapon | Handling Strengths | Readiness Speed | Practical Meaning |
|---|---|---|---|
| Peacekeeper | Top ADS, sprint‑to‑fire, slide/dive‑to‑fire, movement | Fastest | Dominates first swings; create more favorable peeks |
| M15 | Strong overall; minimal tradeoffs | Fast | Reliable for quick ADS without sacrificing stability |
| X9 | Strong overall; burst-ready | Fast | Snappy for pre-aimed bursts on corner swings |
| AK‑27 | Average; slower to ready | Slower | Punishing if late on first peek; favor pre-aim and cover |
| DS20 | Average; slower to ready | Slower | Leverage utility to start fights; avoid raw first-peek duels |
| Note | If you often swing first, choose handling over raw TTK. | ||
↖ Attachment Blueprints and Playstyle Templates
Note: Names vary by build lists—follow the logic first, then match to your parts. Start with the direction, then fine‑tune on your map pool.
M15 (mid‑range control / all‑round)
- Direction: tame recoil + extend effective range; keep ADS reasonable.
- Suggested:
- Muzzle: mid compensator (horizontal + mild vertical)
- Barrel: mid‑long (range/velocity)
- Underbarrel/Grip: vertical control or stability
- Optic: 1.5x–2.0x clear glass
- Stock/Rear: slight ADS/stability mix
- Technique: favor sustained short bursts; beyond 25 m, use 5–7‑round bursts over full sprays.
- Who: default main for most players.
AK‑27 (close/mid lane bully)
- Direction: suppress first‑shot jump and right pull; don't overtax ADS.
- Suggested:
- Muzzle: hybrid compensator (vert + horiz)
- Underbarrel: first‑shot stability/initial recoil
- Stock: reduce movement/hip‑fire penalties without killing ADS
- Mag: keep standard to avoid handling tax
- Technique: 3‑round burst—reset—3‑round burst to hold accuracy inside 4‑shot zone.
- Who: SMG‑style AR users who take space.
MXR7 (head‑line specialist)
- Direction: fast ADS + first‑shot accuracy; modest range.
- Suggested:
- Muzzle: precision brake (first‑shot control)
- Optic: clean 1.0x–1.5x dot
- Barrel: lightweight mid (some range without sluggishness)
- Rear: flinch/ADS aid
- Technique: chest‑to‑head drag for 1 head + 2 body; outside first range, switch to deliberate two‑stage bursts.
- Who: confident aimers who track head lines.
X9 Maverick (burst‑cadence pick)
- Direction: tighten burst spread, speed up recentering, keep ADS tidy.
- Suggested:
- Muzzle: burst spread tuner
- Barrel: short‑mid for faster handling
- Underbarrel: burst stability, not spray control
- Optic: low‑mag clarity
- Technique: pre‑aim, take the shot on rhythm; if you drop a bullet, break line of sight immediately and re‑engage.
- Who: players who live on timing and info advantage.
DS20 Mirage (utility opener)
- Direction: ensure baseline stability; play around the grenade launcher.
- Suggested:
- Muzzle: balanced compensator
- Underbarrel: vertical + transition stability
- Priority: plan nade timings—entry, denial, utility breaking
- Technique: use launcher to win space, then advance with rifle; avoid extended even‑strength duels.
- Who: team utility anchors and objective players.
Peacekeeper Mk1 (mobility enforcer)
- Direction: stack mobility/readiness; tame the initial kick.
- Suggested:
- Muzzle: light compensator (first‑shot stability)
- Stock/Rear: ADS + sprint‑to‑fire
- Barrel: short for mobility; accept some range loss
- Laser: hip‑fire tightening (mode‑permitting)
- Technique: slide/strafe to farm close peeks; over ~20 m switch to short bursts.
- Who: fast rotators and re‑engagers.
↖ Turning Paper Strength into Real Win Rate
- Route to rifle, not rifle to route
- If your fights happen at 25 m+, pick M15/MXR7; if you live in chokepoints, AK‑27/Peacekeeper fit better.
- 10‑minute drill at 13 m
- Recreate the test wall distance; record first‑10‑shot dispersion. Layer in strafe + short‑burst rhythm.
- Feel the hitscan boundary
- In a range, back off from close to far and note when you must start leading/compensating—lock that invisible line into your muscle memory.
- Upgrade your KPIs
- Track first‑shot accuracy, opening‑duel win rate, and TTK deviation per engagement, not just K/D. Consistency > highs.
↖ FAQ
- Q: I'm average at aim—should I use MXR7?
- A: Yes, if you train chest‑to‑head drags. Start with 1.0x–1.5x optics and short‑burst cadence until 1 head + 2 body is automatic, then extend range.
- Q: Why does X9 feel feast or famine?
- A: It's cadence‑gated. Failing a one‑burst doubles your exposure time. Solution: pre‑aim corners, commit to one burst, disengage if imperfect.
- Q: Peacekeeper feels wild at mid‑range—am I overreacting?
- A: Its visual recoil overstates true climb. Use 5–7‑round bursts, prioritize first‑shot stability parts, and let movement create windows instead of beaming long lanes.
- Q: My AK‑27 sprays go wide after 5–6 shots—what gives?
- A: It transitions to horizontal‑heavy recoil. Switch to 3‑burst—pause—3‑burst for tighter cones.
- Q: Is M15 too boring for high ceiling play?
- A: Ceiling comes from staying at ~312 ms mid‑range TTK more often than others. It's not flashy, but it converts the most winnable fights in pubs and ranked.
↖ Summary and Quick Picks
- Need a gun that just works anywhere: M15.
- Corner‑brawling and lane pressure: AK‑27 or Peacekeeper (faster, looser feel).
- Confident head tracker: MXR7 to unlock ~240 ms 3‑shot potential.
- Anchor and punish overexposure: X9, accepting the high failure cost.
- Team utility/entry denial: DS20—win space with the launcher.

Most Popular Posts
- Black Ops 7 Endgame Exotic Affinity Weapons Guide: Best Bonuses, Full Weapon List, and Farming Tips
- Black Ops 7 Zombies Totenreich Easter Egg Guide: Fast Solo & Co-Op Main Quest Walkthrough
- Black Ops 7 Cherry Fizz Guide: Fastest Illicit Cargo Event Route for Season 4
- Black Ops 7 Season 04 Endgame META: Best 5 Weapons After the XR3 Ion Nerf
- Black Ops 7 Season 4 Release Date, Maps, Weapons, Zombies, Warzone, and MW4 Reveal Prep
- Black Ops 7 Zombies Fast KOWAKUJO Easter Egg Guide: Cat Wonder Weapon, Evidence Puzzles
Popular Category Lists
- Grow a Garden / (286)
- ARC Raiders / (262)
- CoD: Black Ops 7 / (166)
- Monopoly Go / (146)
- MLB 26 / (145)
- Star Citizen / (112)
- Steal a Brainrot / (89)
- Sailor Piece / (68)
- ARK Survival Ascended / (67)
- Diablo IV / (61)
- Forza Horizon 6 / (60)
- Blox Fruits / (60)
- CoD: BLACK OPS 6 / (55)
- Adopt Me / (53)
- Path of Exile 2 / (48)
- Monster Hunter Wilds / (46)
- Windrose / (44)
- Path of Exile / (40)
- Grow a Garden 2 / (40)
- Bee Swarm Simulator / (36)


