0
0Black Ops 7 Iron Rain Guide: Best Overclock, Counters, and Prestige 3 Endgame Build
- JAMIE
- Share
- CoD: Black Ops 7
- 06/20/26
- 278
The Iron Rain Scorestreak hits hard, but it is not a free-kill button. It rewards prediction, map knowledge, and clean timing. If you drop bombs where enemies are standing, you will miss good players. If you bomb where they are going, you farm.
This guide cuts straight into the useful stuff: Iron Rain stats, best overclock, counters, and a Prestige 3 endgame build built around crit damage, armor sustain, and emergency survival.
- Black Ops 7 Iron Rain Scorestreak Stats
- How to Use Iron Rain Without Wasting It
- Best Iron Rain Targeting Rules
- Best Iron Rain Overclock in Black Ops 7
- Tactical Radar Is the Best Default Pick
- When Active Camo Is Better
- How to Counter Iron Rain
- Is Iron Rain Worth Using?
- Best Prestige 3 Endgame Operator Build
- Prestige 3 Build Overview
- Best Weapons for Endgame
- XR3 Ion
- Hyper Surge
- Best Abilities and Equipment
- Crash Cart
- Grappling Hook
- Decoy Grenades
- Best Skill Tracks for Prestige 3
- Mandatory Skill Tracks
- Flexible Skill Tracks
- Best Exotic Skills
- Conductive Shot
- Shattered Shield
- Best Nightmare Skills
- Frost Vortex
- Phoenix Burst
- How the Build Plays
- FAQ
- What is the best Iron Rain overclock in Black Ops 7?
- How do you aim Iron Rain bombs correctly?
- How do you counter Iron Rain?
- What is the best Prestige 3 endgame build?
- Why is Sharpshooter so strong in endgame?
- Summary
↖ Black Ops 7 Iron Rain Scorestreak Stats
Iron Rain is a player-controlled aerial Scorestreak. You move it across the map and drop bombs from above. You cannot freely change altitude, so positioning matters more than fancy flying.
| Stat | Value | Why It Matters |
|---|---|---|
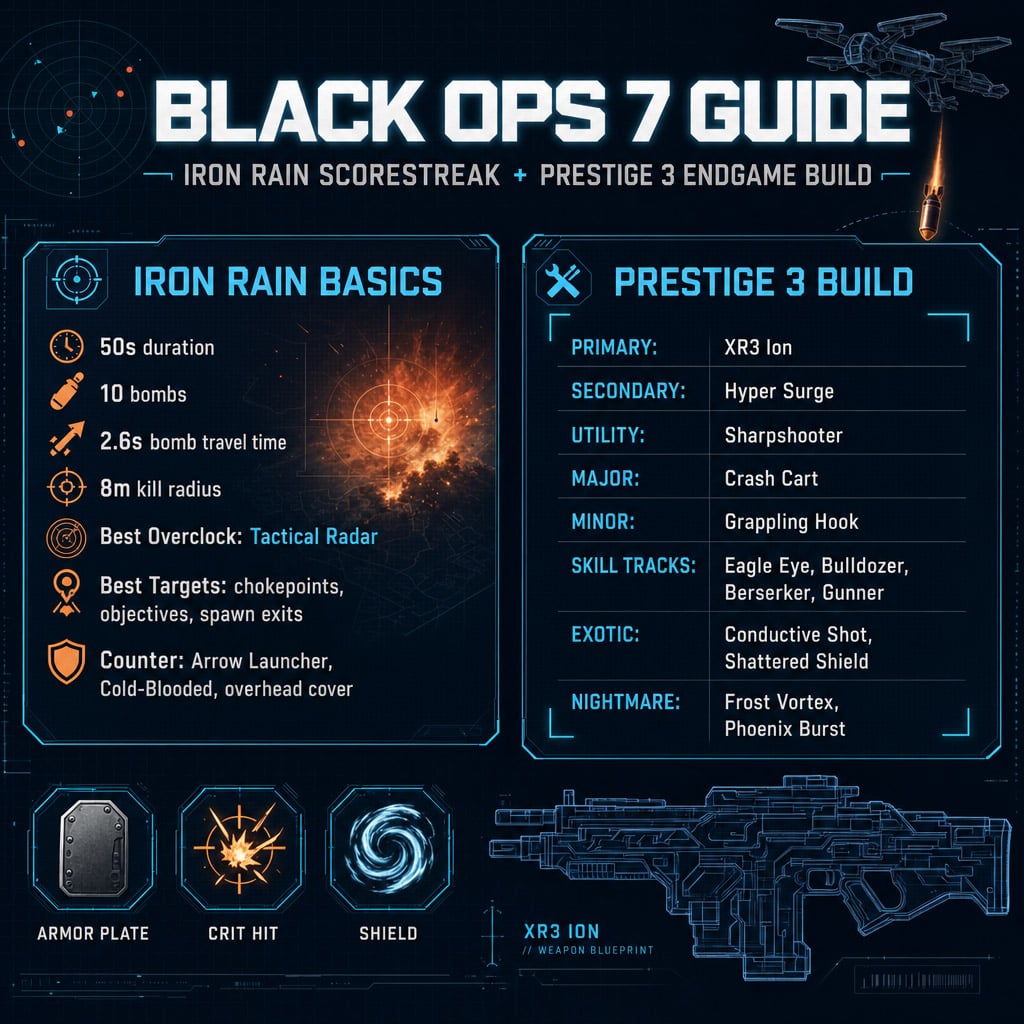
| Duration | 50 seconds | Limited time to create value |
| Bombs | 10 | Huge multi-kill potential |
| Drop delay | 1.5 seconds | Fast, but not spammable |
| Bomb travel time | 2.6 seconds | You must lead targets |
| Kill radius | 8 meters | Strong splash damage |
| Kill diameter | 16 meters | Punishes grouped enemies |
| Score per kill | 35 score | Helps chain streaks |
The key number is 2.6 seconds.
That delay changes everything. Against moving players, aim ahead. Against fast players, aim much farther ahead. Against stationary players, drop directly on them and take the free kill.
↖ How to Use Iron Rain Without Wasting It
The biggest mistake is chasing one cracked-out movement player across the map. Iron Rain moves too slowly for that.
Use it to control routes.
↖ Best Iron Rain Targeting Rules
| Situation | Correct Play |
|---|---|
| Enemy is camping | Drop directly on them |
| Enemy is sprinting | Lead the bomb ahead |
| Enemy team is spawning | Bomb the spawn exits |
| Objective is crowded | Drop on the capture zone |
| Enemies are indoors | Reposition immediately |
| Spawns flip | Move early, do not tunnel vision |
If you find the enemy spawn, do not sit directly above it unless they are exposed. Better play: hover over the lanes leaving spawn. Players move predictably there. That gives you cleaner hits.
Use Iron Rain for:
- Chokepoints
- Objective zones
- Spawn exits
- Open power positions
- Grouped enemies
Avoid wasting bombs on:
- Roofed lanes
- Indoor routes
- Solo speed demons
- Players under hard cover
The best Iron Rain games happen when we stop chasing kills and start cutting off movement.
↖ Best Iron Rain Overclock in Black Ops 7
Iron Rain has two main overclocks: Active Camo and Tactical Radar.
| Overclock | Best Use | Verdict |
|---|---|---|
| Active Camo | Staying hidden, avoiding lock-on | Good vs launcher users |
| Tactical Radar | Revealing enemies, helping teammates | Best overall pick |
↖ Tactical Radar Is the Best Default Pick
Tactical Radar reveals nearby enemies for your team. It has real match value even when your bombs miss.
| Tactical Radar Stat | Value |
|---|---|
| Scan radius | 45–50 meters |
| Reveal duration | 3 seconds |
| Cooldown | 6 seconds |
| Bonus score | 15 score per teammate kill on pinged enemy |
This is the better overclock for most players.
Why? Because it creates value three ways:
1. You find targets faster.
2. Teammates get real-time pings.
3. You earn bonus score when they clean up.
If you play objective modes, Tactical Radar is the clear choice.
↖ When Active Camo Is Better
Active Camo keeps Iron Rain harder to spot. It also blocks launcher lock-on while camo is active.
Camo breaks for 3 seconds when:
- You drop a bomb
- You take damage
Pick Active Camo if the enemy team is instantly shooting down your streaks. Otherwise, Tactical Radar gives more consistent value.
↖ How to Counter Iron Rain
Iron Rain is durable enough to punish lazy teams, but coordinated players can delete it.
| Counter | Requirement | Result |
|---|---|---|
| Arrow Launcher | 2 hits | Best launcher counter |
| ARKM1 Launcher | 4 hits | Slower but reliable |
| Mark 78 without FMJ | About 60 rounds | Works if multiple players shoot |
| Cold-Blooded | Perk equipped | Removes red diamond marker |
| Ghost | Active while moving | Counters Tactical Radar ping |
If you are solo shooting it with a rifle, expect pain. If two or three players focus fire, Iron Rain drops fast.
Best anti-Iron Rain habits:
- Look up immediately after call-in.
- Use Cold-Blooded if streaks are ruining your match.
- Stay under cover.
- Keep moving with Ghost active.
- Team-shoot the streak instead of ignoring it.
↖ Is Iron Rain Worth Using?
Yes, but it is map-dependent.
Iron Rain shines on maps with open skies and predictable lanes. It struggles on maps with roofs, interiors, and constant spawn flips.
| Good For Iron Rain | Bad For Iron Rain |
|---|---|
| Open objectives | Indoor-heavy maps |
| Spawn traps | Roofed lanes |
| Chokepoints | Fast spawn flips |
| Slower enemies | Hyper-mobile players |
| Team modes | Chaotic solo lobbies |
The streak has a high ceiling. One bomb can wipe a team. But it also has a low floor. On the wrong map, you may burn the whole streak for two kills.
Best rule: run it on open maps. Skip it on covered maps.
↖ Best Prestige 3 Endgame Operator Build
A Prestige 3 Operator can equip:
- 4 Skill Tracks
- 2 Exotic Skills
- 2 Nightmare Skills
This build is built for endgame pressure. It works in Glitch Fractures, boss fights, Nightmare zones, and solo runs.
Core idea: stack critical damage, armor regeneration, and panic-button survivability.
↖ Prestige 3 Build Overview
| Slot | Best Pick | Purpose |
|---|---|---|
| Primary | XR3 Ion | Boss and elite damage |
| Secondary | Hyper Surge | Deletes mobs and bosses |
| Utility | Sharpshooter | Upper torso hits become crits |
| Field Equipment | Decoy Grenades | Pulls mobs off you |
| Major Ability | Crash Cart | Self-revive and immunity |
| Minor Ability | Grappling Hook | Escape and reposition |
| Skill Tracks | Gunner, Eagle Eye, Berserker, Bulldozer | Damage and sustain |
| Exotic Skills | Conductive Shot, Shattered Shield | DPS plus defense |
| Nightmare Skills | Frost Vortex, Phoenix Burst | Crowd control and survival |
↖ Best Weapons for Endgame
↖ XR3 Ion
The XR3 Ion still hits hard in endgame. Pair it with Sharpshooter.
Sharpshooter is the damage engine here. It turns upper torso hits into critical hits. That means you do not need perfect headshots while dodging mobs, elites, and boss attacks.
↖ Hyper Surge
The Hyper Surge is the best secondary for this setup. With Shrapnel Rounds and Sharpshooter, it melts everything from standard mobs to Nightmare bosses.
| Weapon | Best Use |
|---|---|
| XR3 Ion | Bosses and elites |
| Hyper Surge | All-purpose endgame melting |
| Reboot 1911 | Mob clear alternative |
| Socal 545 with Sharpshooter | Strong replacement if you lack Hyper Surge |
If you cannot find Hyper Surge, build a Socal 545 with Sharpshooter and use Reboot 1911 as your secondary.
↖ Best Abilities and Equipment
↖ Crash Cart
Crash Cart is non-negotiable for solo endgame.
It can revive you, prevent a down, and grant temporary immunity. In high-level content, one bad corner or elite burst can end a run. Crash Cart fixes that.
↖ Grappling Hook
Use Grappling Hook over Kinetic Jump if you value control. It gets you out of bad angles, body blocks, and boss pressure.
↖ Decoy Grenades
Decoy Grenades are better than they look. Throw one when mobs collapse on you. They create space so you can reload, armor up, or burn a boss.
↖ Best Skill Tracks for Prestige 3
↖ Mandatory Skill Tracks
| Skill Track | Why It Matters |
|---|---|
| Eagle Eye | Massive critical damage boost |
| Bulldozer | Armor regen, point-blank damage, explosive resistance |
Eagle Eye plus Sharpshooter is the core damage combo. Upper torso hits become crits, then Eagle Eye makes those crits hit harder.
Bulldozer gives armor sustain and Point Blank, which boosts close-range damage. It also gives explosive resistance, which matters if you use explosive weapons or effects.
↖ Flexible Skill Tracks
| Skill Track | Why Use It |
|---|---|
| Berserker | Faster fire rate and armor on kills |
| Gunner | Reload speed, weapon swap, ammo sustain |
| Daredevil | Better gliding and map travel |
| Tactician | More utility-focused play |
I prefer Berserker + Gunner because they make fights smoother. Faster fire rate, quicker reloads, armor recovery, and safer reload windows all matter inside Glitch Fractures.
If you are constantly late to world events, swap Gunner for Daredevil.
↖ Best Exotic Skills
↖ Conductive Shot
Conductive Shot adds damage over time. It is strong against elites, bosses, and enemies that force you to reposition.
It is not flashy. It is reliable. That matters more in endgame.
↖ Shattered Shield
Shattered Shield is the real defensive monster.
When an armor plate breaks, it can:
- Stun nearby enemies
- Damage nearby enemies
- Grant immunity when upgraded
- Trigger healing/damage effects when upgraded
The synergy is nasty:
| Combo | Result |
|---|---|
| Shattered Shield + Berserker | Armor returns through kills |
| Shattered Shield + Bulldozer | Faster armor recovery |
| All three together | Repeating stun-damage-survive loop |
This is why the build survives ugly fights.
↖ Best Nightmare Skills
↖ Frost Vortex
Frost Vortex pulls enemies in, slows them, and damages them. Use it when you need space, not just damage.
Best uses:
- Clearing a path
- Locking down mobs
- Controlling boss rooms
- Buying time to reload
- Surviving Glitch Fractures
↖ Phoenix Burst
Phoenix Burst is mandatory for solo players.
When your health gets low, it triggers an explosion, damages enemies, restores health, and can grant immunity when upgraded.
That is not just defense. That is a run saver.
↖ How the Build Plays
The loop is simple.
1. Shoot upper torso/head with Sharpshooter weapons.
2. Let Eagle Eye boost crit damage.
3. Push close when safe for Bulldozer Point Blank damage.
4. Use Berserker and Bulldozer to rebuild armor.
5. Let Shattered Shield punish enemies when plates break.
6. Drop Frost Vortex when mobs flood the screen.
7. Use Grappling Hook before you get trapped.
8. Trust Phoenix Burst and Crash Cart as emergency layers.
This build does not rely on one trick. It stacks several safety nets while keeping damage high.
That is what makes it strong.
↖ FAQ
↖ What is the best Iron Rain overclock in Black Ops 7?
Tactical Radar is the best overall Iron Rain overclock. It reveals enemies in a 45–50 meter radius, tracks them for 3 seconds, and gives 15 bonus score when teammates kill pinged enemies.
↖ How do you aim Iron Rain bombs correctly?
Lead your target. Iron Rain bombs take about 2.6 seconds to hit the ground. Aim where enemies will be, not where they are. For best results, bomb chokepoints, objective zones, and spawn exits.
↖ How do you counter Iron Rain?
Use the Arrow Launcher for a fast counter. It takes 2 hits. The ARKM1 takes 4 hits. You can also use Cold-Blooded, overhead cover, Ghost movement, or coordinated rifle fire.
↖ What is the best Prestige 3 endgame build?
Run XR3 Ion, Hyper Surge, Sharpshooter, Crash Cart, Grappling Hook, Gunner, Eagle Eye, Berserker, Bulldozer, Conductive Shot, Shattered Shield, Frost Vortex, and Phoenix Burst.
↖ Why is Sharpshooter so strong in endgame?
Sharpshooter turns upper torso hits into critical hits. Combined with Eagle Eye, it creates huge damage without requiring perfect headshots during chaotic fights.
↖ Summary
Iron Rain is powerful but inconsistent. Use it on open maps. Bomb chokepoints, objectives, and spawn exits. Pick Tactical Radar for the best all-around value, or Active Camo if enemies keep shooting it down.
For endgame, the best Prestige 3 Operator build stacks Sharpshooter, Eagle Eye, Bulldozer, Berserker, Shattered Shield, Phoenix Burst, and Crash Cart. The result is high crit damage, fast armor recovery, strong crowd control, and enough emergency tools to survive messy fights.

Most Popular Posts
- Black Ops 7 Endgame Exotic Affinity Weapons Guide: Best Bonuses, Full Weapon List, and Farming Tips
- Black Ops 7 Zombies Totenreich Easter Egg Guide: Fast Solo & Co-Op Main Quest Walkthrough
- Black Ops 7 Season 04 Endgame META: Best 5 Weapons After the XR3 Ion Nerf
- Black Ops 7 Cherry Fizz Guide: Fastest Illicit Cargo Event Route for Season 4
- Black Ops 7 Season 4 Release Date, Maps, Weapons, Zombies, Warzone, and MW4 Reveal Prep
- Black Ops 7 Zombies Fast KOWAKUJO Easter Egg Guide: Cat Wonder Weapon, Evidence Puzzles
Popular Category Lists
- ARC Raiders / (298)
- Grow a Garden / (286)
- CoD: Black Ops 7 / (166)
- MLB 26 / (151)
- Monopoly Go / (148)
- Star Citizen / (130)
- ARK Survival Ascended / (92)
- Steal a Brainrot / (90)
- Sailor Piece / (68)
- Forza Horizon 6 / (67)
- Diablo IV / (62)
- Blox Fruits / (62)
- Adopt Me / (58)
- Grow a Garden 2 / (57)
- CoD: BLACK OPS 6 / (55)
- Path of Exile 2 / (48)
- Monster Hunter Wilds / (46)
- Windrose / (44)
- Path of Exile / (40)
- Bee Swarm Simulator / (37)