


 0
0Black Ops 7 Best Sticky-Aim Proven Settings, Positioning, and Drills
- JAMIE
- Share
- CoD: Black Ops 7
- 11/18/25
- 6780
With BO7 AA toned down, you won't get magnetized for free. The win condition now is stacking every controllable edge: steadier sensitivity, cleaner visuals, disciplined deadzones, and a left–right stick rhythm that recreates the old glue. Here's a closed-loop plan—from settings you can copy today to on-map habits that turn lost magnetism into deliberate control. Every item below explains why it works, when to tweak, and how to feel the improvement within a match.
- Core Idea and Quick Map
- Settings You Can Copy Today
- Mechanics and Positioning: Turn Weak AA into Strong Hits
- Validation and Training: One-Week Recalibration
- Quick Checklist
- FAQ
↖ Core Idea and Quick Map
You're doing two things: stabilizing your reticle, then making enemies effectively larger.
- Stabilize the reticle: low–mid sens, slightly higher right-stick min deadzone, vibration off, Standard/Linear curve. This makes micro-corrections predictable.
- Enlarge the target: pick the right ADS FOV (Independent if you want easier micro-aim; Affected if you're seasoned), then use cover to expose less of yourself while seeing more of them.
- Operating rule: left stick drives rotational AA; right stick performs opposite micro-corrections (move left—micro right, move right—micro left). With weaker AA, this counter-pull restores the bite on hitboxes.
↖ Settings You Can Copy Today
These prioritize accuracy. If a role demands faster turns (e.g., hard entry), use the conditional nudges.
Sensitivity and Response Curve
Recommended
- Horizontal/Vertical sens: 1.6–1.8 (example: 1.65)
- ADS per-zoom (0–3×): 0.95; 3×+ not below 0.90
- Aim Response Curve: Standard (primary) or Linear (secondary); avoid Dynamic
Why it works
- With weak AA, high sens won't get corrected by glue. Low–mid sens gives turn and land consistency, crucial for snap-backs when you're shot first.
When to adjust
- If you overshoot micro-corrections → lower base sens by 0.05
- If you're late turning on flanks → raise by 0.05
Deadzones and Input
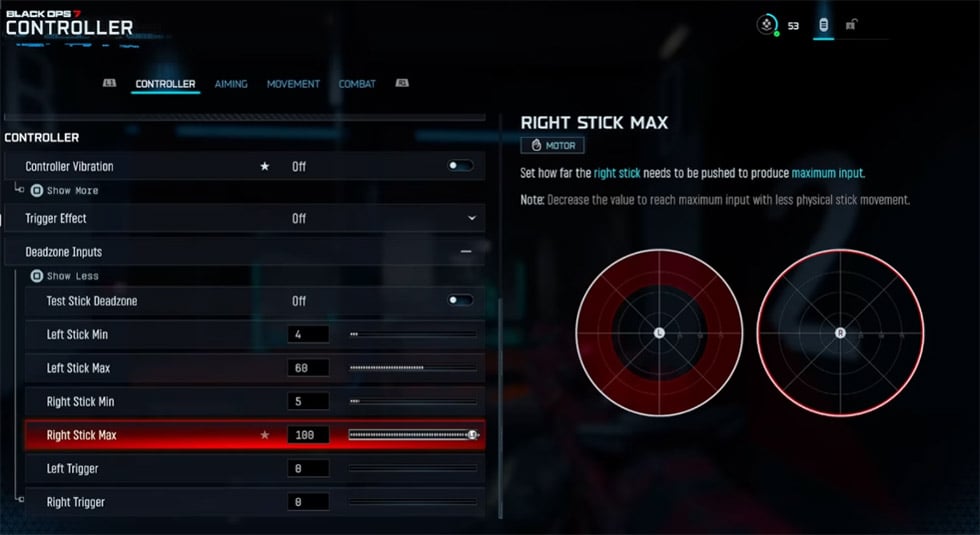
Recommended
- Left stick min deadzone: 0 (add +1% if you see drift)
- Right stick min deadzone: 8% (5% absolute minimum; 8% is steadier)
- Right stick max input: 100%
Why it works
- Too-low right deadzone amplifies noise and tremor—brutal when AA won't hold you. An 8% gate creates a crisp engage point for micro-aim.
When to adjust
- If your crosshair shivers at rest → +1–2% on right min DZ
- If micro-start feels sluggish → -1–2%
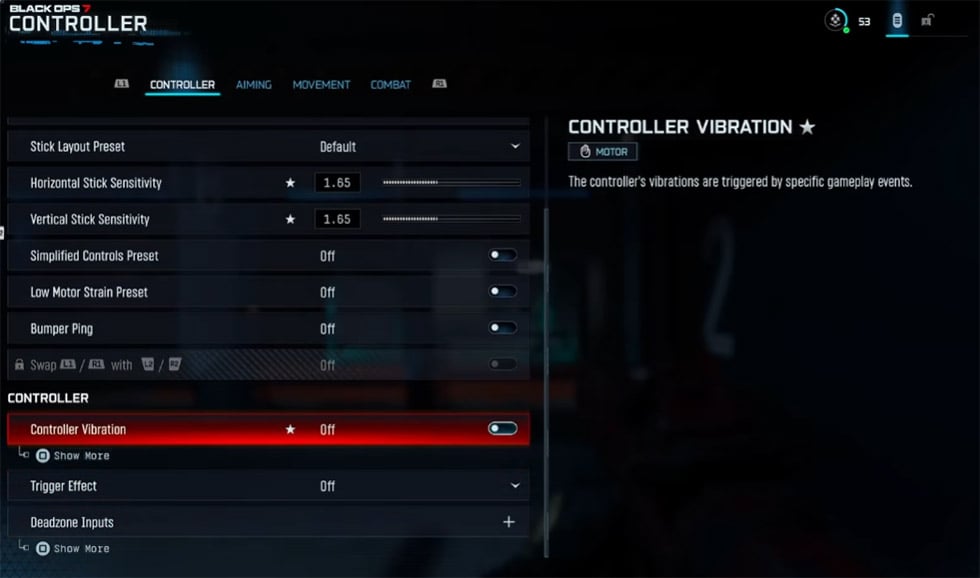
Vibration and Visual Cleanliness
Recommended
- Controller vibration: Off
- Camera shake/movement: Minimum (50)
- Weapon/world motion blur: Off
Why it works
- Vibration kicks your thumb out of millimeter control; motion artifacts hide tracer info and head flicks—information density matters more when AA isn't bailing you out.
FOV and ADS FOV
Recommended
- ADS FOV: Independent for stability and bigger target image; Affected for players already comfortable with recoil and tracking
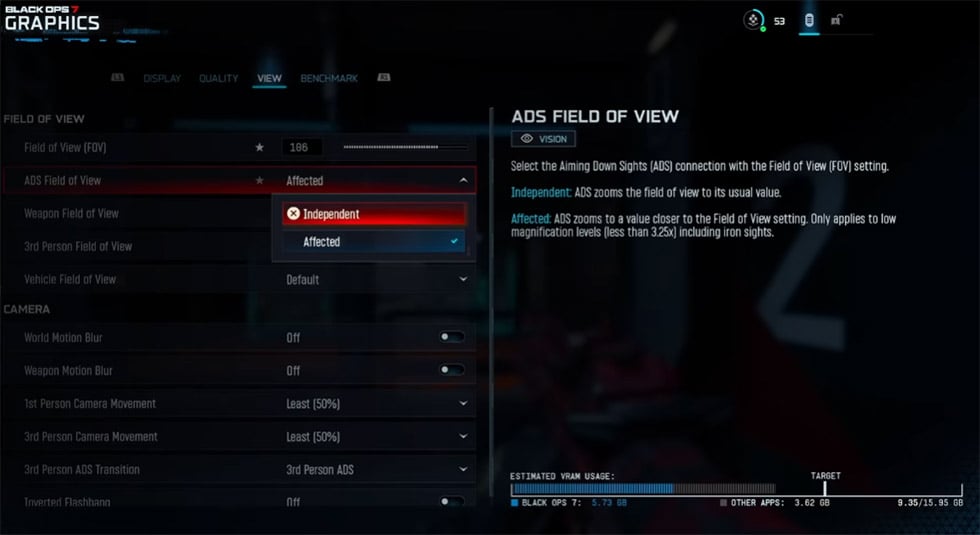
Contrast
- Independent: Bigger target in-scope, higher micro-aim tolerance; visual recoil increase is minor in practice
- Affected: Consistent feel while moving; targets look smaller, less margin for error
Choose based on
- If you regularly miss by a hair at mid-range → go Independent
- If you rely on fluid camera feel and manage recoil well → stay Affected
Advanced Aiming
Recommended
- ADS transition: Gradual
- ADS zoom sensitivity: 0–3× at 0.95; higher magnification 0.95–1.00
Why it works
- Gradual prevents a jarring shift during the assist window; slight ADS downscale calms micro jitter under magnification.
↖ Mechanics and Positioning: Turn Weak AA into Strong Hits
This is repeatable, not flair.
Left–Right Counter-Pull: DIY magnetism
How to do it
- Strafe left with the left stick while nudging the right stick slightly right; reverse for the other side
- Keep right-stick corrections millimeter-level (feel = sub-centimeter)
Why it works
- Left stick still triggers rotational AA; the opposite micro on the right stick locks the center onto the model's chest line
Drill
- In a private range: strafe within a 1–2 m lane, keep crosshair pinned to chest, then graduate to chest→head bump once chest is stable
Window discipline: step back one body-length
Rule
- Don't hug the frame. Step back one body-length so enemies usually see only your forehead while you still cover mid and cross angles
What this means
- Same angle control, dramatically smaller hurtbox exposed. Your TTK wins because you take fewer meaningful bullets
Head-glitch and height line
Principle
The higher the head line and the lower your exposure, the less effective damage you eat over the same peek time
If you find close-range trades volatile, anchor at a head-glitch and pre-ADS the choke
Attachment choice: make them flinch
Example
- Ammo/muzzle that increases target flinch (e.g., 5.56 NATO FMJ analogs)
Why it matters
- Your reticle stays calm while theirs bumps skyward; with weak AA, whoever is calmer wins
Pre-aim timing
Rule
- ADS 0.3 seconds before pieing a corner. If you're often pre-fired, re-order a fixed move → ADS → expose rhythm
Condition
- If early ADS slows you in unsafe zones → half-press or wait to ADS behind hard cover
↖ Validation and Training: One-Week Recalibration
Daily 10–15 minutes. Treat this as maintenance.
Deadzone tune (2 min)
Stand still in the range and watch for drift
- Drift → +1% right min DZ until still
- No drift but slow start → -1%
Micro-stability (5 min)
- Mid-range chest track while strafing. Target 75%+ chest accuracy before attempting head bumps
Zoom discipline (3 min)
For 0–3× at 0.95 ADS sens:
- If you can't pull onto target → +0.02
- If you overshoot → -0.02
Match notes (1–2 games/night)
- Log two items: Did first bullet land near chest line? Were you overexposed when dying?
- If first bullet is wide → -0.05 base sens; if you're late on flank turns → +0.05
↖ Quick Checklist
- Vibration Off; camera movement 50; all motion blur Off
- Sens 1.6–1.8; ADS 0–3× at 0.95; Standard/Linear curve
- Right-stick min DZ 8 (don't go below 5); left-stick 0 (increase only for drift)
- ADS FOV: Independent for aim stability, Affected for fluent feel
- Counter-pull: strafe left/right, micro-correct opposite with right stick
- Positioning: step back from windows, play head-glitches, minimize exposure
- Attachments: pick flinch-inducing ammo/muzzles to destabilize enemies
↖ FAQ
Q1: I've always played high sens for movement—won't 1.6 kill my flow?
- It won't. You're shifting aim management from assist back to hand control. Start at 1.8, stabilize accuracy, then +0.05 steps if your turn speed truly bottlenecks you.
Q2: Does Independent really add more visual recoil?
- The practical difference is small. Because targets look larger, micro-control is easier. If it still feels jumpy, shave ADS zoom sens by 0.02.
Q3: Standard vs Linear—how to pick?
- If you like one-to-one input feel, choose Linear. If you want forgiving starts and mid-range control, choose Standard. Dynamic can feel inconsistent early on with weak AA—skip it.
Q4: Why insist on an 8% right-stick deadzone instead of the lowest possible?
- Low DZ amplifies noise, especially under stress or with worn sticks, showing up as micro shake. Around 8% gives a firm engagement gate for precision.
Q5: I keep losing pure hip-to-hip face-offs. Fix?
- Prioritize head-glitches and the step back one body-length window rule. In true close range, track chest first, then bump to head once the beam is steady.
AA nerfs don't cut your accuracy in half—they force you to manage it actively. Lock the right thumb with sensible sens and deadzones, enlarge targets via ADS FOV and smart exposure, and add the left–right counter-pull to recreate that sticky feel. Run the checklist for a week and you'll notice first bullet on chest, straighter sprays, and faster recoveries when surprised.

Most Popular Posts
- Black Ops 7 Endgame Exotic Affinity Weapons Guide: Best Bonuses, Full Weapon List, and Farming Tips
- Black Ops 7 Zombies Totenreich Easter Egg Guide: Fast Solo & Co-Op Main Quest Walkthrough
- Black Ops 7 Cherry Fizz Guide: Fastest Illicit Cargo Event Route for Season 4
- Black Ops 7 Season 4 Release Date, Maps, Weapons, Zombies, Warzone, and MW4 Reveal Prep
- Black Ops 7 Season 04 Endgame META: Best 5 Weapons After the XR3 Ion Nerf
- Black Ops 7 Zombies Fast KOWAKUJO Easter Egg Guide: Cat Wonder Weapon, Evidence Puzzles
Popular Category Lists
- Grow a Garden / (286)
- ARC Raiders / (262)
- CoD: Black Ops 7 / (166)
- Monopoly Go / (146)
- MLB 26 / (144)
- Star Citizen / (111)
- Steal a Brainrot / (89)
- Sailor Piece / (68)
- ARK Survival Ascended / (66)
- Diablo IV / (61)
- Forza Horizon 6 / (60)
- Blox Fruits / (60)
- CoD: BLACK OPS 6 / (55)
- Adopt Me / (53)
- Path of Exile 2 / (48)
- Monster Hunter Wilds / (46)
- Windrose / (44)
- Path of Exile / (40)
- Grow a Garden 2 / (38)
- Bee Swarm Simulator / (36)


