


 0
0Black Ops 7 Maddox RFB Best Class Loadout Season 1 Guide: Best Setup for All Ranges
- JAMIE
- Share
- CoD: Black Ops 7
- 12/13/25
- 2926
- I. Understanding the Maddox: Damage Profile and Why It Feels So Strong
- 1. Damage Model: 4‑Shot Kill in the Most Important Range
- 2. Fire Rate and TTK: Why It Competes with SMGs
- II. The 7‑Attachment Maddox Build: Core Philosophy
- 1. Core Loadout Overview
- III. Attachment Breakdown: Why Each Piece Matters
- 1. Buffer Spring – The Attachment That Makes or Breaks the Gun
- 2. Optic – LTI Mini: You Don't Need It, But It Feels Amazing
- 3. Muzzle – Vaz 5.56 Suppressor: Staying Off the Radar
- 4. Barrel – 15" Avery Light: Speed Without Killing Your Range
- 5. Underbarrel – Vaz Drift Lock Foregrip: Horizontal Recoil Tamer
- 6. Magazine – 40 Round Fast Mags (Plummage): Comfort Without Overkill
- 7. Rear Grip – Harlequin Grip: Sprint-to-Fire on Steroids
- IV. How to Actually Play This Maddox Class
- 1. Ideal Engagement Ranges
- 2. Playstyle: Aggressive, But Not Brain-Off
- 3. Mode Recommendations: Where Maddox Feels Best
- V. Pros and Cons of This Maddox Class
- FAQ
- Conclusion
Every Call of Duty has that one gun that feels a little too easy. In Black Ops 7, the Maddox RFB absolutely fits that label when you build it right. You can take fights up close, delete people at mid-range, and even challenge long lanes, all with a setup that barely asks you to control recoil.
That's what makes this class so dangerous: it feels like a fast-killing SMG in close quarters, but it still tracks like an AR at distance. And because the attachments are available early (around weapon level 16–18), you don't need to grind the gun to max before it starts frying.
In this guide, I'll walk you through:
- What the Maddox actually does in terms of damage and range
- Why this specific 7‑attachment build works so well
- How the class performs in real fights, not just in the firing range
- When you should use it, and what to avoid so it doesn't fall apart
If you've just unlocked the Maddox and you want something that aims itself and wins most fair fights, this is the build you start with.
↖ I. Understanding the Maddox: Damage Profile and Why It Feels So Strong
Before we touch attachments, you need to know what the base gun is doing. A lot of people throw fastest killing gun around without checking the numbers; here, the numbers actually explain why the gun feels cracked.

↖ 1. Damage Model: 4‑Shot Kill in the Most Important Range
The Maddox deals:
- 28 damage to the body almost everywhere
- 32 damage on headshots
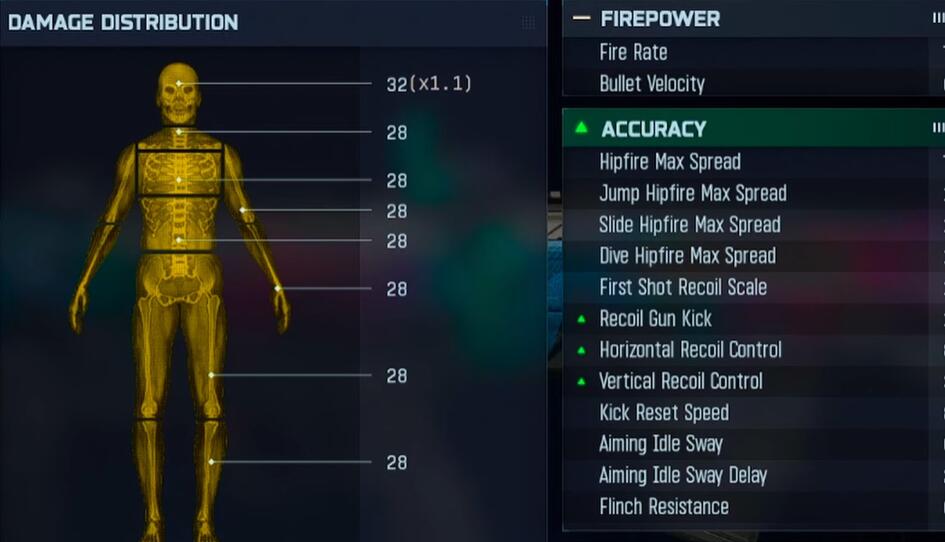
Then it changes with distance roughly like this:
| Range | Damage per shot | Bullets to kill (100 HP) | What this means in practice |
|---|---|---|---|
| 0–19 m | 28 | 4 shots | Core gunfight range on most 3‑lane maps |
| 19–33 m | 22 | 5 shots | Standard AR mid-range fights |
| 33 m+ | 19 | 6 shots | Long lanes, head glitches, defensive angles |
The key part is that 0–19 m is a 4‑shot kill to the chest, which is why it feels like it's bullying some SMGs up close. You don't need headshots to get a good TTK; you can just aim upper chest and let volume of fire do the rest.
Headshots still matter, but they're more like win harder rather than necessary to compete. If the target is already chipped by a teammate or explosives, that 32‑damage headshot just makes the kill even quicker.
↖ 2. Fire Rate and TTK: Why It Competes with SMGs
The class setup we're talking about runs the Maddox at roughly:
- 723 rounds per minute
- 4 bullets to kill at 0–19 m
If you do the math, this gives you a theoretical TTK that's absolutely competitive with, and sometimes better than, the SMGs that aren't built purely for close-range beams.
So when someone says this feels like an SMG with AR range, they're not exaggerating. The combination of:
- 4‑shot kill up close
- High RPM
- Strong mobility and sprint-to-fire is exactly why it feels unfair in short and medium fights.
↖ II. The 7‑Attachment Maddox Build: Core Philosophy
Now let's walk through the actual build and the logic behind each piece.
The idea is simple:
Maximize mobility and recoil control, keep damage profile intact, and avoid unnecessary cons.
You can run 8 attachments via Gunfighter, but in this specific case, the 8th slot adds more drawbacks than it's worth at low weapon levels. The class hits its sweet spot with 7 carefully chosen attachments.
↖ 1. Core Loadout Overview
Here's the full setup in a clean list:
| Slot | Attachment | Role in the build |
|---|---|---|
| Wildcard | Gunfighter | Unlock extra attachment slots |
| Barrel | 15" Avery Light Barrel | Massive mobility and ADS/sprint-to-fire boosts |
| Muzzle | Vaz 5.56 Suppressor | Keeps you off the minimap while firing |
| Optic | LTI Mini | Clean, minimal visual clutter |
| Underbarrel | Vaz Drift Lock Foregrip | Horizontal recoil control |
| Magazine | 40 Round Fast Mags (Plummage) | More bullets, faster reload, no harsh cons |
| Rear Grip | Harlequin Grip | Huge sprint-to-fire and jump responsiveness |
| Internal / Key | Buffer Spring (internal mod slot) | Horizontal + vertical recoil stabilization |
You'll notice one theme immediately:
This isn't a max damage meme build—it's a control + speed build that lets the base damage profile shine.
↖ III. Attachment Breakdown: Why Each Piece Matters
Now, let's break down each component and why it's there. This is where the no skill required feeling comes from.
↖ 1. Buffer Spring – The Attachment That Makes or Breaks the Gun
If you only remember one thing from this guide, let it be this:
The Buffer Spring is the backbone of this entire Maddox class.
It provides:
- Horizontal recoil control
- Vertical recoil control
- Reduced gun kick
This is what takes the Maddox from strong but bouncy to absolute laser beam.
In the firing range, if you:
- Shoot a full mag at mid-range without actively controlling the recoil, you still land most shots in a tight area
- Then, when you do actively pull down and correct, it becomes so straight it feels like cheating
If you notice your Maddox feels wild to control, check if you're missing Buffer Spring or stacking the wrong cons.
↖ 2. Optic – LTI Mini: You Don't Need It, But It Feels Amazing
The LTI Mini is more of a quality-of-life choice:
- Small, low-profile sight
- Clear picture, easy target tracking
- Doesn't clutter your view like some bulkier optics
Can you run irons? Sure.
If you like them, you don't have to use an optic at all. But I've found that:
- The clearer your sight picture,
- The easier it is to consistently snap head level and track mid-range targets
If you'd rather free up this slot for something else, this is the first attachment I'd consider cutting.
↖ 3. Muzzle – Vaz 5.56 Suppressor: Staying Off the Radar
The Vaz 5.56 Suppressor does one critical thing:
- Removes minimap firing ping when you shoot
That single property is huge for anyone who:
- Flanks aggressively
- Holds wider angles
- Prefers to pick off players without announcing their location every time they pull the trigger
There is a Monolithic-style suppressor that also avoids minimap ping but usually adds ADS and movement penalties. At low levels (and with this specific speed + control identity), those extra cons are not worth the trade.
If you're wondering why not more damage or velocity? here's the reality:
- The Maddox already wins most fights it should win
- Not showing on the minimap keeps you alive longer and enables more multi-kills
Survivability is DPS too.
↖ 4. Barrel – 15" Avery Light: Speed Without Killing Your Range
The 15" Avery Light Barrel is where the build really starts to feel snappy. It gives you:
- Improved sprint-to-fire speed
- Faster jumping sprint-to-fire
- Better jumping ADS and standard ADS speed
In other words: you draw your gun faster out of sprint, especially when you're movement-heavy—jumping corners, slide-challenging, or constantly repositioning.
Crucially:
- This barrel doesn't butcher your damage ranges
- Your 4‑shot kill window remains healthy
That means you're not sacrificing lethality for comfort; you're amplifying both.
There is also a prestige barrel that turns the gun into a 2‑round burst, boosts fire rate, range, and headshot multiplier. On paper, that can be insane, but it will probably require a different build (and dropping something like the suppressor) to manage recoil and handling. That's an advanced variant for later.
↖ 5. Underbarrel – Vaz Drift Lock Foregrip: Horizontal Recoil Tamer
This grip exists for one reason: horizontal recoil control.
Without it, you'll notice:
- The Maddox tends to sway left/right at mid to long range
- Your first few bullets are fine, but 10–15 bullets into a spray, your pattern widens and starts missing
In the firing range, when you remove this grip, you can literally see:
- Your traced line wobbling side to side
- Your corrections overshooting, which makes it harder to laser targets at distance
Once you add the Drift Lock back:
- The gun tracks much straighter
- You spend less brainpower fighting your own recoil pattern
- You can focus on target behavior instead of your reticle
Paired with Buffer Spring, this is what transforms the Maddox into that anyone can beam with it rifle.
↖ 6. Magazine – 40 Round Fast Mags (Plummage): Comfort Without Overkill
The magazine choice here is deliberate:
- 40‑round fast mag
- No harsh ADS or movement penalties
- Enough ammo to safely handle 2–3 enemies in one push
Could you go higher capacity? Probably, especially for Warzone.
But in normal multiplayer:
- 40 is the sweet spot where:
- You can take multiple engagements in one life
- Your handling doesn't start feeling sluggish
If you feel like you're always reloading mid-fight, 40 gives you that cushion without turning you into a slow-moving turret.
↖ 7. Rear Grip – Harlequin Grip: Sprint-to-Fire on Steroids
The Harlequin Grip is the final piece that completes the playstyle.
It adds:
- Massive sprint-to-fire speed
- Huge jumping sprint-to-fire boosts
With the full setup:
- Sprint-to-fire speed is boosted by around 61%
- Jumping sprint-to-fire gets a similar massive bump (over 60%)
Without it, you'd be sitting at something like:
- 13% sprint-to-fire boost
- 19% jumping sprint-to-fire boost
So this one attachment alone takes your responsiveness from nice to borderline instant. In-game, that means:
- You win more who shoots first after sprinting duels
- You can ego-challenge more confidently, especially around corners
- You play more like a true SMG while still enjoying AR damage
If you find yourself dying with gun in hand but shots not coming out in time after sprint, your grip choice is usually part of the problem. This one solves that.
↖ IV. How to Actually Play This Maddox Class
A strong build is only half the story. The way you use it determines whether it feels broken or just pretty good.
↖ 1. Ideal Engagement Ranges
Think of the Maddox like this:
| Range | Performance | How you should play it |
|---|---|---|
| 0–10 m | Extremely strong | Take aggressive peeks, trust your sprint-to-fire & TTK |
| 10–19 m | Strong 4‑shot kill zone | Aim chest, no need to force headshots |
| 20–33 m | Still solid, slightly slower TTK | Use cover, burst or short spray, don't stand in the open |
| 33 m+ | Usable but not ideal | Tap fire or short bursts, don't take long exposed duels by choice |
If you notice yourself losing a lot of 40–50 m duels to long-range ARs or DMRs, that isn't the Maddox being weak; that's just the gun being used far outside its main comfort zone.
↖ 2. Playstyle: Aggressive, But Not Brain-Off
This build is clearly made for fast-paced, high-tempo gameplay, but that doesn't mean you should sprint in straight lines and hope for the best.
You should:
- Abuse your insane sprint-to-fire:
- Slide or jump into peeks
- Pre-aim head height around corners
Use cover-to-cover movement:
- Don't ego-chow open mid lanes against full squads
- Move from head glitch to head glitch when possible
Chain kills intelligently:
- With 40 rounds, you can realistically delete 2–3 players
- Reset behind cover after each multi-kill instead of standing in the open reloading
If you find that you're dying immediately after every kill, it might not be the class—it's probably your impatience with repositioning.
↖ 3. Mode Recommendations: Where Maddox Feels Best
This class absolutely shines in:
Fast respawn modes:
- Team Deathmatch
- Domination
- Hardpoint
- Kill Confirmed
It also works in:
- More tactical modes, as long as:
- You're using your speed to take early map control
- You don't ego-peek every long-range LOS on the map
In Warzone or larger-scale modes:
- You might want to:
- Increase mag size further
- Stack more bullet velocity and range
- But the core idea—control + mobility—still applies
↖ V. Pros and Cons of This Maddox Class
No setup is perfect. A clear look at strengths and weaknesses helps you know when to pick this class and when to bench it.
| Aspect | Strengths | Weaknesses / Trade-offs |
|---|---|---|
| TTK | Extremely fast 4‑shot TTK in core ranges | Falls off to 5–6 shots at longer ranges |
| Recoil | Feels like a laser with Buffer + Drift Lock | Still not a pure laser at 40 m+ vs dedicated long-range ARs |
| Mobility | Insane sprint-to-fire and ADS, feels like an SMG | If you over-extend, you'll die faster than you can reposition |
| Versatility | Can handle rush, anchor, flex roles | Not the best extreme-range weapon in the lobby |
| Ease of use | Very forgiving, low recoil skill requirement | Because it's easy, you might over-peek and get punished |
If you're the kind of player who likes fast-paced, low-friction gunfights and doesn't obsess over long-range laser beams, this Maddox build fits you perfectly.
↖ FAQ
Q1: Why only 7 attachments when Gunfighter allows 8?
Because on this specific gun and at this weapon level, the 8th attachment tends to add more negatives than value:
- More recoil
- Slower ADS
- Unnecessary penalties for marginal gains
The 7‑attachment setup already gives you:
- Great control
- Great speed
- Competitive damage across realistic gunfight ranges
If you want to experiment later with an 8th attachment (like the prestige burst barrel), do it once the gun is fully leveled and you're ready to re-balance the build.
Q2: What should I swap first if I don't like one of the attachments?
Priorities to keep:
1. Buffer Spring
2. Vaz Drift Lock Foregrip
3. Harlequin Grip
4. 15" Avery Light Barrel
These define the gun's identity.
If you want to swap something, start with:
- The optic (use irons or a different sight)
- Or the muzzle (if you don't care about being suppressed)
Q3: Is this setup good for newer players?
Yes, absolutely.
Because:
- Recoil is heavily controlled for you
- You don't need to hit perfect headshots
- Sprint-to-fire makes your mistakes less punishing in close fights
If you're still building basic gunskill and map awareness, this class gives you a very forgiving baseline to learn from.
Q4: Can I use this build in ranked or only in casual modes?
You can use it in ranked, especially if:
- You're the fast-entry or flex player
- You like taking space early and holding aggressive angles
However:
- Meta might shift based on patches
- Some ranked environments favor more precise long-range ARs
Still, as a high-pressure entry gun, this Maddox build absolutely has a place.
Q5: When should I not use this Maddox setup?
If you're:
- Playing extremely large maps with nonstop long-range duels
- Anchoring purely from power positions at 40–60 m
- Facing teams stacking high-range beams and DMRs across the board
then a more range-optimized AR or marksman rifle will serve you better.
In those contexts, this Maddox becomes more of a secondary/close-range flex instead of your main gun.
↖ Conclusion
Built correctly, the Maddox RFB in Black Ops 7 turns into a plug and play rifle that:
- Kills in 4 shots at the ranges that matter most
- Fires fast enough to rival SMGs
- Handles so smoothly that recoil control stops being a real concern
The 7‑attachment setup built around Buffer Spring, drift control, and sprint-to-fire speed gives you a gun that feels effortless in the hands and brutal to play against. You don't have to be a recoil god, and you don't need pixel-perfect aim to see results; the numbers and the build do a lot of heavy lifting for you.
If you like playing fast, taking the first shot out of sprint, and winning most fair AR and SMG duels inside 30 meters, this Maddox class is one of the most reliable tools you can add to your loadouts right now.

Most Popular Posts
- Black Ops 7 Endgame Exotic Affinity Weapons Guide: Best Bonuses, Full Weapon List, and Farming Tips
- Black Ops 7 Zombies Totenreich Easter Egg Guide: Fast Solo & Co-Op Main Quest Walkthrough
- Black Ops 7 Cherry Fizz Guide: Fastest Illicit Cargo Event Route for Season 4
- Black Ops 7 Season 4 Release Date, Maps, Weapons, Zombies, Warzone, and MW4 Reveal Prep
- Black Ops 7 Season 04 Endgame META: Best 5 Weapons After the XR3 Ion Nerf
- Best MK35 ISR Class Setup in Black Ops 7: Fast Meta Loadout, Attachments, and Tips
Popular Category Lists
- Grow a Garden / (283)
- ARC Raiders / (256)
- CoD: Black Ops 7 / (166)
- Monopoly Go / (146)
- MLB 26 / (139)
- Star Citizen / (106)
- Steal a Brainrot / (88)
- Sailor Piece / (67)
- Forza Horizon 6 / (58)
- Blox Fruits / (56)
- CoD: BLACK OPS 6 / (55)
- ARK Survival Ascended / (54)
- Diablo IV / (53)
- Path of Exile 2 / (48)
- Adopt Me / (48)
- Monster Hunter Wilds / (46)
- Windrose / (43)
- Path of Exile / (40)
- Battlefield 6 / (34)
- Bee Swarm Simulator / (34)


