


 0
0Black Ops 7 Zombies Totenreich Fast Solo Route, Uranium Setup, and Boss Fight Tips
- ELSA
- Share
- CoD: Black Ops 7
- 05/04/26
- 2141
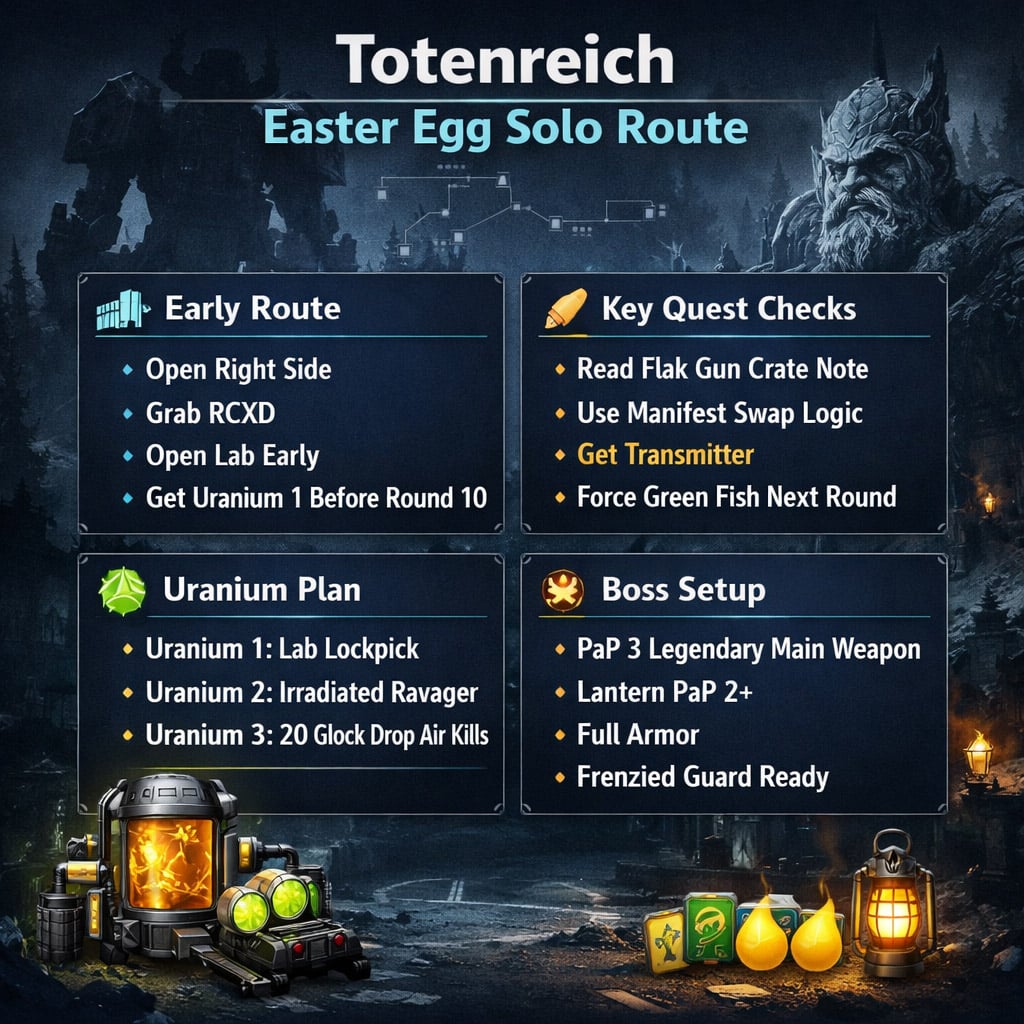
Black Ops 7 Zombies Totenreich gets messy when you play every step in isolation. The clean route is to stack objectives early, avoid wrong crate guesses, secure uranium before the run drags, and enter the boss fight with real damage. This guide cuts the fluff and focuses on what actually saves rounds, points, and downs.
- Best Totenreich Loadout for Solo Easter Egg Runs
- Field Upgrade and GobbleGums
- Fast Early Route: Open Right Side First
- Early Map Order
- RCXD Lab Entry Trick
- Flak Gun Crate Trick: Stop Guessing the Cargo Shipment
- How the Swap Works
- Admin Keycard, Chain Links, and First Uranium
- Grab Chain Links Early
- Use Lab During Synchronization
- Round 9–10 Setup: Pack-a-Punch, Juggernog, Zersa
- Chili Chunks and Zersa
- Constellations, Astrid, and Jotun Star
- Soul Box Safety Trick
- Lighthouse Prep
- Flak Gun Round and Transmitter
- Green Fish Timing and Irradiated Ravager Tracking
- Ping the Irradiated Ravager
- Robot Light Code: Easy Counting Method
- Third Uranium: Use Glock Drop Before Wonder Barrage
- Glock Drop Uranium Method
- Machine Workshop Uranium Puzzle
- Barrel Charge and Bridge Escort
- Bridge Fight
- Bloodheim Hall, Disciple Step, and Sunstone
- Fire Throw Step
- Church Sky Symbols
- Totenreich Boss Fight Prep
- Dravacar Boss Fight Strategy
- Phase 1: Robot Fight
- Glock Drop Loot Window
- Ice Viking Head Trick
- Missile and Freeze Phase
- Final Health Phase
- Hidden Second Chance: Caler's Blessing
- Fast Totenreich Easter Egg Checklist
- FAQ
- What is the best weapon for the Totenreich Easter Egg?
- Can we complete Totenreich without GobbleGums?
- How do we know which Flak Gun crate is correct?
- When does the green fish spawn?
- Where does the irradiated Ravager end up?
- How do we get the third uranium piece?
- What is the easiest robot light code method?
- How do we solve the uranium circuit puzzle?
- What perks should we buy first?
- What level should our weapon be before the boss?
- Summary
↖ Best Totenreich Loadout for Solo Easter Egg Runs
Use a weapon that kills fast while moving. Totenreich punishes slow reloads and weak special-enemy damage.
| Rank | Weapon | Why Use It |
|---|---|---|
| 1 | VST SMG Akimbo | Best solo DPS, melts weak spots |
| 2 | Voyak KT3 AR | Stable backup, easy handling |
| 3 | M34 Nova Line | Strong precision damage |
| 4 | XM325 LMG | Big ammo pool, slower movement |
| 5 | AK-27 AR | Reliable fallback |
↖ Field Upgrade and GobbleGums
Run Frenzied Guard.
It saves bad generator steps, bridge chaos, and the final boss phase. Armor is the difference between clean clear and why did I greed that revive?
| Slot | Pick | Use |
|---|---|---|
| Field Upgrade | Frenzied Guard | Armor recovery, panic button |
| Boss GobbleGum | Raindrops | Supplies |
| Boss GobbleGum | Power Keg | Faster field upgrade |
| Boss GobbleGum | Shields Up | Armor safety |
Save GobbleGums for the boss. The main quest does not need them.
↖ Fast Early Route: Open Right Side First
Your first real goal is early lab access.
Open toward Eid Scallan Square first. Grab the RCXD Scorestreak there. This is the key to opening the lab early and getting uranium before the run slows down.
↖ Early Map Order
| Step | Action | Result |
|---|---|---|
| 1 | Open right side to Eid Scallan Square | Get RCXD early |
| 2 | Zipline to Fishery Island | Continue power route |
| 3 | Take right zipline to Scallan Market | Hit first power switch |
| 4 | Open toward Core Foundry | Start RCXD lab route |
| 5 | Shoot the grate | Begin RCXD mini path |
↖ RCXD Lab Entry Trick
Drive the RCXD to the ramp.
Do this:
1. Stop at the bottom of the ramp.
2. Press boost.
3. Do not jump.
4. Land inside the lab.
5. Detonate.
Result: the lab opens early. This saves several rounds and lets us grab the first uranium before round 10 in a clean run.
↖ Flak Gun Crate Trick: Stop Guessing the Cargo Shipment
The Flak Gun round can be swapped. If you open the wrong crate, you waste time and tempo.
Check the note before committing.
| Note Spawn | When to Check |
|---|---|
| Near Tier's Foot | Before entering robot route |
| Titan Crane Room | Before reading cargo manifest fully |
↖ How the Swap Works
If the note says shells out, chemical bomb in, the Flak Gun round is no longer in its normal shipment.
That means:
- Find the chemical bomb symbol on the manifest.
- Open the crate linked to that symbol.
- That crate now has the Flak Gun round.
| If You See | Do This |
|---|---|
| No note near Tier's Foot | Check Titan Crane Room |
| Shells swapped out | Do not open normal Flak crate |
| Chemical bomb swapped in | Open chemical bomb shipment |
This is one of the easiest ways to prevent a dead run from becoming a slow run.
↖ Admin Keycard, Chain Links, and First Uranium
Enter the robot head. Interact with the panel. Use the chute with the zombie body and recover the Admin Keycard.
Before fully committing to War Factory, go to Titan Crane Room if you still need to check the note.
↖ Grab Chain Links Early
In Titan Crane Room:
1. Press the button to lower the wall.
2. Wall jump toward the boat.
3. Hold interact at the end.
4. Pick up Chain Links.
Then enter War Factory, use the Admin Keycard, and read the cargo manifest.
↖ Use Lab During Synchronization
When Tier synchronization starts, do not stand still.
Run to the lab and complete:
- Identify the two correct alphabetical head jars.
- Turn both on.
- Pick up the purple jar.
- Melt the claw.
- Grab Necro Spike.
- Complete lockpicking.
- Pick up Uranium 1.
Target result: 1/3 uranium before round 10.
↖ Round 9–10 Setup: Pack-a-Punch, Juggernog, Zersa
Before forcing Zersa, get damage.
| Priority | Buy / Upgrade | Why |
|---|---|---|
| 1 | Pack-a-Punch main weapon | Needed for Zersa |
| 2 | Juggernog | Best early survival |
| 3 | Stamin-Up | Platform and escort safety |
| 4 | Melee Macchiato | Needed later |
| 5 | Speed Cola | Faster reloads during pressure |
Buy Juggernog before Quick Revive. Totenreich has too many long interactions where raw health matters more.
↖ Chili Chunks and Zersa
Pick up Chili Chunks from the bridge truck. Place them in Scallan Market.
Best timing:
- Place on round 9.
- End the round near the chain door.
- Insert Chain Links during round transition.
- Repair before the special enemy pressure ramps up.
On round 10, kill the Zersa with your Pack-a-Punched weapon. Pick up the lantern part.
↖ Constellations, Astrid, and Jotun Star
Match constellations using the podium as reference.
Looking from the stairs:
| Order | Direction |
|---|---|
| 1 | Left |
| 2 | Right |
| 3 | Back |
| 4 | Front |
↖ Soul Box Safety Trick
Leave one normal yellow-eyed zombie alive.
Why it works:
- Astrid's step spawns frozen zombies.
- Frozen zombies count for souls.
- Your normal round does not flip early.
Result: fewer zombies, less pressure, cleaner step.
↖ Lighthouse Prep
Before platforms:
- Buy Stamin-Up.
- Pick up the Crowbar on the lighthouse second floor.
- Complete the sequence.
- Grab the Jotun Star wonder weapon.
The Crowbar matters because we need it for the correct Flak Gun crate.
↖ Flak Gun Round and Transmitter
Now open the correct cargo shipment using the note + manifest logic.
Then:
1. Pick up the Flak Gun round.
2. Go to Beacon Island.
3. Load the Flak Gun.
4. Melee it with Jotun Star.
5. Fire at the robot head.
6. Search the robot.
7. Pick up the Transmitter.
↖ Green Fish Timing and Irradiated Ravager Tracking
The green fish is guaranteed after the Transmitter.
| Trigger | Result |
|---|---|
| Pick up Transmitter | Green fish becomes available |
| Push next round | Green fish can spawn |
| Fishing spots | 11 possible locations |
| Fast route timing | Around round 12 |
Before pushing the round, buy Melee Macchiato at Dry Dock.
↖ Ping the Irradiated Ravager
When the green fish pulls out the irradiated Ravager:
1. Ping it immediately.
2. Let it disappear.
3. Push the next round.
4. Open tac map.
5. Track the HVT icon.
6. Kill it after its final teleport.
Its third location is always Eid Scallan Square.
Kill it there for Uranium 2.
↖ Robot Light Code: Easy Counting Method
Install the Transmitter inside the robot.
Then count lights in a simple order.
| Light | What to Count |
|---|---|
| Left light | Sequence 1 and Sequence 2 |
| Right light | Sequence 1 and Sequence 2 |
Do not watch both lights at once.
Example structure:
| Code Part | Your Number |
|---|---|
| Left Sequence 1 | Write it down |
| Right Sequence 1 | Write it down |
| Left Sequence 2 | Write it down |
| Right Sequence 2 | Write it down |
Go to Core Foundry, melt the rope with the wonder weapon or Molotovs, and enter Sequence 1.
If correct, the robot fires rockets.
↖ Third Uranium: Use Glock Drop Before Wonder Barrage
This is the big mistake people make.
Do not pick up Wonder Barrage Controller before farming the third uranium.
Once you take Wonder Barrage, you lose Glock Drop Controller.
↖ Glock Drop Uranium Method
You need 20 airborne zombie kills during Glock Drop.
Best timing:
1. Enter robot Sequence 1.
2. Wait before Sequence 2 becomes available.
3. Gather a full round.
4. Include purple-eyed step zombies.
5. Call Glock Drop.
6. Kill floating zombies fast.
7. Pick up Uranium 3.
| Result | Action |
|---|---|
| Uranium drops | Continue |
| No uranium | Try fresh round |
| Controller lost | Fish for a free Glock Drop |
| Bonus loot drops | Keep useful rewards |
After all 3 uranium pieces are secured, enter Sequence 2.
Then pick up Wonder Barrage Controller.
↖ Machine Workshop Uranium Puzzle
Take Wonder Barrage to Dry Dock. Use it on the stairs to open Machine Workshop.
The puzzle goal is simple: power the machine without overloading it.
| Do | Avoid |
|---|---|
| Build 1–2 small circuits | Forcing one giant circuit |
| Push needle into green | Overcharging |
| Connect isolated nodes carefully | Random placements |
Place all three uranium cores. Watch the needle. If it goes too far, your circuit is too strong.
When complete, grab the barrel.
↖ Barrel Charge and Bridge Escort
Take the barrel behind Quick Revive and activate the generator.
Stay close. If you move too far away, charge drains.
| Problem | Fix |
|---|---|
| Generator stops | Throw Decoy, restart |
| Special spawns | Kill during Decoy window |
| Armor breaks | Pop Frenzied Guard |
| Charge drops | Stand closer |
| Need points | Farm infinite zombies safely |
When charged, carry the Atomcraft Core to the bridge.
Best route: go through Eid Scallan Square.
Reason:
- Armor wall buy nearby.
- Safer pathing.
- Easy church access.
- Grab Disciple Injection on the way.
↖ Bridge Fight
Before placing the barrel, you can shoot the hidden Double Points near the robot claw. Only do it if your setup is stable.
Then:
1. Place the barrel.
2. Use lantern swings for crowd clear.
3. Buy Deadshot Daiquiri on the bridge.
4. Survive the wave.
5. Pick up Dravacar Shard.
↖ Bloodheim Hall, Disciple Step, and Sunstone
Place the Dravacar Shard in Bloodheim Hall.
Use lantern alt-fire to light the fire.
Then pop Disciple Injection.
↖ Fire Throw Step
| Step | Action |
|---|---|
| 1 | Grab 5–6 zombies |
| 2 | Throw them into the fire |
| 3 | Exit injection automatically |
| 4 | Kill HVT Necropin |
| 5 | Pick up Sunstone |
Buy Vulture Raid if available. Grab Max Ammo or Instakill if they spawn.
↖ Church Sky Symbols
Place the Sunstone in the church. Melee it with the lantern.
Look up. Each arrow has a line count.
| Arrow Lines | Order |
|---|---|
| 1 line | First |
| 2 lines | Second |
| 3 lines | Third |
Solo tip: pause while looking at the sky. Write the symbols down.
Throw the lantern at all three symbols in order. If the sky circle blinks all symbols, the boss is unlocked.
↖ Totenreich Boss Fight Prep
Do not enter underbuilt. The boss is not hard if your gear is right.
| Item | Target |
|---|---|
| Main weapon | Pack-a-Punch 3 + Legendary |
| Lantern | Pack-a-Punch 2 minimum |
| Armor | Highest available |
| Field Upgrade | Full Frenzied Guard |
| GobbleGums | Raindrops, Power Keg, Shields Up |
Prioritize your gun over lantern PaP 3. Weak spots die to bullets, not wishful thinking.
↖ Dravacar Boss Fight Strategy
↖ Phase 1: Robot Fight
Use lantern swings to clear zombies.
When the red weak spot appears, shoot it with your main weapon. With a strong VST Akimbo setup, 1–2 magazines usually break it.
After enough damage, Tier fires rockets and moves the fight forward.
↖ Glock Drop Loot Window
If Tier drops a Glock Drop, kill all remaining zombies before it disappears.
| Loot | Best Use |
|---|---|
| Death Machine | Boss weak spots |
| War Machine | Viking heads |
| Mangler Cannon | Burst damage |
Save the War Machine if you get it.
↖ Ice Viking Head Trick
Do not rely only on charged lantern throws. They miss too often.
Better options:
| Method | Result |
|---|---|
| War Machine into mouth | Drops head fast |
| Cooked frag into mouth | Reliable once practiced |
| Lantern throw | Works, less consistent |
| Main weapon after drop | Finishes head quickly |
Once the head drops, unload with your main gun.
↖ Missile and Freeze Phase
Use side pillars.
If your side freezes, pull out the lantern and rotate to the other side.
| Situation | Move |
|---|---|
| Missiles incoming | Play behind pillars |
| Floor freezing | Sprint with lantern out |
| Armor low | Use Frenzied Guard |
| Weak spot exposed | Shoot during safe windows |
↖ Final Health Phase
At around 25% HP, Dravacar pulls you into the center and drops Max Ammo.
Do this:
1. Grab Max Ammo.
2. Dodge rocks.
3. Prone under low rocks.
4. Pop Frenzied Guard.
5. Dump damage into the boss's face.
This is the best time to burn resources. Holding them here gets people killed.
↖ Hidden Second Chance: Caler's Blessing
If you go down with no self-revive or revive effect left, a podium can spawn.
Crawl to it and interact.
Effect:
- Instant revive.
- Temporary Aether Shroud-style safety.
It is not a plan. It is insurance.
↖ Fast Totenreich Easter Egg Checklist
| Stage | Goal |
|---|---|
| 1 | Open right side |
| 2 | Grab RCXD |
| 3 | Open lab early |
| 4 | Check Flak crate note |
| 5 | Get Admin Keycard |
| 6 | Grab Chain Links |
| 7 | Get Uranium 1 |
| 8 | PaP weapon + buy Juggernog |
| 9 | Kill Zersa |
| 10 | Build Jotun Star |
| 11 | Open correct Flak crate |
| 12 | Get Transmitter |
| 13 | Spawn green fish |
| 14 | Kill irradiated Ravager |
| 15 | Get Uranium 2 |
| 16 | Read robot lights |
| 17 | Use Glock Drop for Uranium 3 |
| 18 | Pick up Wonder Barrage |
| 19 | Complete circuit puzzle |
| 20 | Charge barrel |
| 21 | Complete bridge step |
| 22 | Finish Disciple fire step |
| 23 | Solve church symbols |
| 24 | Kill Dravacar |
↖ FAQ
↖ What is the best weapon for the Totenreich Easter Egg?
The best solo weapon is VST SMG Akimbo. It has top-tier close-range DPS and destroys boss weak spots. If you do not have it, use Voyak KT3.
↖ Can we complete Totenreich without GobbleGums?
Yes. The main quest does not need GobbleGums. Save Raindrops, Power Keg, and Shields Up for the boss fight.
↖ How do we know which Flak Gun crate is correct?
Read the note near Tier's Foot or Titan Crane Room. If shells are swapped out, use the manifest to find the replacement symbol. Open that shipment.
↖ When does the green fish spawn?
After picking up the Transmitter, push to the next round. The green fish can then spawn at one of 11 fishing spots.
↖ Where does the irradiated Ravager end up?
Its final teleport location is always Eid Scallan Square. Ping it when it first appears so tracking stays easy.
↖ How do we get the third uranium piece?
Use Glock Drop before picking up Wonder Barrage Controller. Kill 20 floating zombies to force the uranium drop.
↖ What is the easiest robot light code method?
Count one light at a time. First count the left light for both sequences, then the right light for both sequences. Write the numbers down.
↖ How do we solve the uranium circuit puzzle?
Create one or two small circuits. Do not connect everything into one giant circuit. The goal is green power, not maximum power.
↖ What perks should we buy first?
Start with Juggernog, then Stamin-Up, Melee Macchiato, Speed Cola, Quick Revive, Deadshot Daiquiri, and Vulture Raid.
↖ What level should our weapon be before the boss?
Aim for Pack-a-Punch 3 and Legendary rarity on your main weapon. Lantern should be at least Pack-a-Punch 2.
↖ Summary
Totenreich becomes easy when the route is tight.
Open right side first. Use the RCXD to open the lab early. Read the crate note before touching cargo. Grab Uranium 1 before round 10, force the green fish after the Transmitter, and farm Uranium 3 with Glock Drop before taking Wonder Barrage.
Enter Dravacar with PaP 3 Legendary weapon, full armor, Frenzied Guard, and boss GobbleGums ready. Play pillars, use explosives on Viking heads, and burn resources during the final 25%.
That is the clean solo route: fewer wasted rounds, fewer bad downs, and a much faster Totenreich Easter Egg clear.

Most Popular Posts
- Black Ops 7 Endgame Exotic Affinity Weapons Guide: Best Bonuses, Full Weapon List, and Farming Tips
- Black Ops 7 Zombies Totenreich Easter Egg Guide: Fast Solo & Co-Op Main Quest Walkthrough
- Black Ops 7 Cherry Fizz Guide: Fastest Illicit Cargo Event Route for Season 4
- Black Ops 7 Season 04 Endgame META: Best 5 Weapons After the XR3 Ion Nerf
- Black Ops 7 Season 4 Release Date, Maps, Weapons, Zombies, Warzone, and MW4 Reveal Prep
- Black Ops 7 Zombies Fast KOWAKUJO Easter Egg Guide: Cat Wonder Weapon, Evidence Puzzles
Popular Category Lists
- Grow a Garden / (286)
- ARC Raiders / (262)
- CoD: Black Ops 7 / (166)
- Monopoly Go / (146)
- MLB 26 / (144)
- Star Citizen / (111)
- Steal a Brainrot / (89)
- Sailor Piece / (68)
- ARK Survival Ascended / (66)
- Diablo IV / (61)
- Forza Horizon 6 / (60)
- Blox Fruits / (60)
- CoD: BLACK OPS 6 / (55)
- Adopt Me / (53)
- Path of Exile 2 / (48)
- Monster Hunter Wilds / (46)
- Windrose / (44)
- Path of Exile / (40)
- Grow a Garden 2 / (38)
- Bee Swarm Simulator / (36)


