


 0
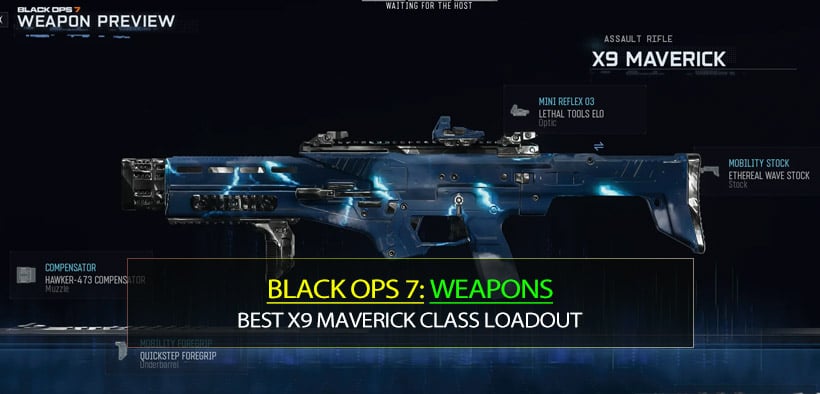
0COD: BLACK OPS 7 Season 1 Best X9 Maverick Class Loadout Broken Burst Setup
- JAMIE
- Share
- CoD: Black Ops 7
- 12/09/25
- 780
- 1. Where the X9 Maverick sits in Season 1
- 2. Full X9 Maverick Class Setup (Attachments, Perks, Gear)
- 3. Attachment Breakdown: Why This Exact X9 Build Works
- 4. Perks, Gear & Enforcer: Why this class is so streak‑friendly
- 5. How to Actually Play This Build: From 20‑bombs to 250+ Kills
- 6. Common Mistakes & How to Fix Them
- FAQ
- Closing Thoughts: When should you pick up the X9 Maverick?
On paper, the X9 Maverick in BO7 Season 1 looks like it should be on the decline. It's a 3‑round burst weapon, it's already taken a pretty heavy nerf, and in most games that's where guns quietly slide out of the meta. But in practice, something very different is happening.
With the right setup, the X9 is still:
- 1–2 bursts to kill, pretty much all the time, and
- strong enough to drop 250+ kills and back‑to‑back tactical nukes in a single session.
So the real question isn't Is it still good?
It's why it's still that good and how you should build and play it to get similar results.
This guide walks you through:
- The exact class setup used in those 250+ kill double nuke games
- Why each attachment, perk, and piece of equipment is chosen
- How to actually play with this gun: slide, pre‑aim, map routing, and nuke pacing
- And what to fix if you copy the class and still feel like you're shooting peas
If you've been feeling like your X9 is shaky, inconsistent, or gets you killed mid‑reload, this is the version designed to fix that.
↖ 1. Where the X9 Maverick sits in Season 1
Let's start with where this gun really stands right now.
Despite a crazy nerf, the X9 Maverick is still realistically:
- Top 2–3 primary weapons in Season 1
- A gun that either kills in one burst or two bursts, and basically never more than that
1.1 What it still does better than most guns
From the gameplay and commentary:
- Time to kill:
- Most fights are either 1 burst (3 bullets) or 2 bursts (6 bullets) to kill.
- There's no weird I shot half a mag and he's still alive feeling.
- Range performance:
- With the right barrel, you still get consistent 1‑burst kills at medium and even long ranges.
- You don't get punished super hard for not being right on top of your target.
- Real match performance:
- Game 1: ~125 kills, almost a 10 K/D, plus a tactical nuke
- Game 2: 100+ kills, another tactical nuke
- Total: 250+ kills + back‑to‑back nukes in a normal session, not some private lobby meme.
That tells you something important:
As long as you build and play the X9 around its burst nature and movement, it's still a straight‑up T1 gun.
1.2 Who the X9 is actually for
You'll get the most value out of this build if:
- You like burst weapons with big damage windows, not spray‑and‑pray autos
- You're willing to pre‑aim, slide, and play angles, not just run in a straight line
- You care about high‑kill games, streaks, and nukes, more than just going slightly positive
If you're newer or aim-challenged, you can still use it, but you'll want to lean harder into pre‑aiming and safer routes (more on that later).
↖ 2. Full X9 Maverick Class Setup (Attachments, Perks, Gear)
Let's start with the overall build so you can see the full picture, then break down the why behind each choice.
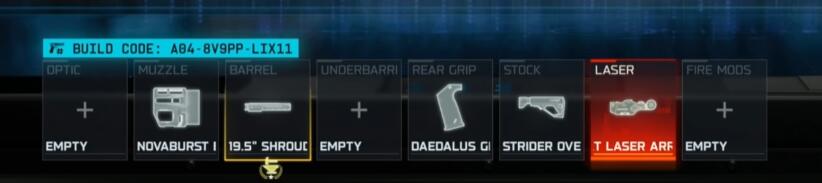
2.1 X9 Maverick Attachment Overview
| Slot | Attachment | What it does in practice |
|---|---|---|
| Muzzle | Nova Burst Brake | Makes bursts calmer, faster recoil reset |
| Barrel | 19.5" Shroud Barrel | More damage range + increased mag size |
| Rear Grip | Daedalus Grip | Faster slide/dive/jump‑to‑fire and ADS |
| Stock | Strider Overstep Stock | Faster ADS + faster ADS movement |
| Laser | 1mW Instinct Laser Array | Additional ADS speed + sprint‑to‑fire |
| Optic | Iron sights (no optic) | Free attachment slot + clean, usable iron sights |
This combo is tuned for one goal:
Make every encounter feel like I saw him first, I shot first, I wiped him instantly.
Not I hope recoil behaves, not I hope my gun reloads in time, but a consistent, repeatable fight pattern.
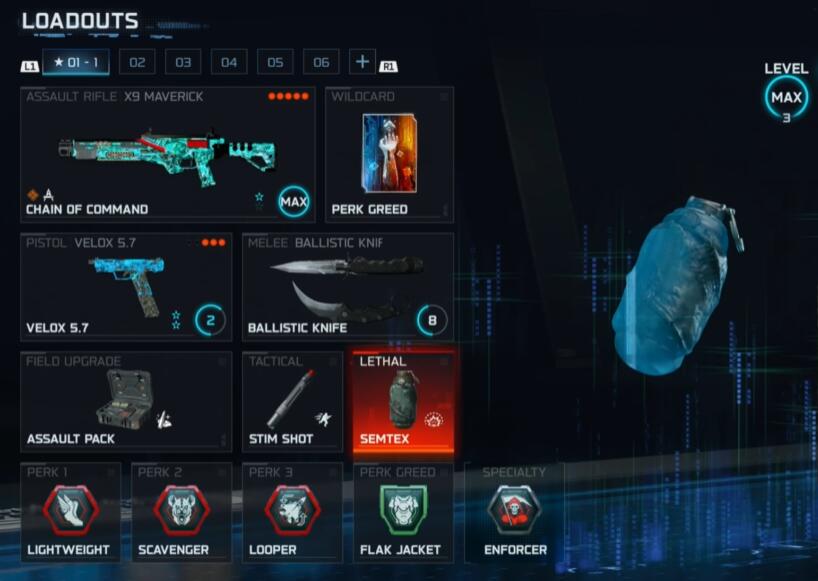
2.2 Full Class Setup (Perks, Wildcard, Equipment, Specialist)
| Category | Choice | What it's doing for you |
|---|---|---|
| Primary | X9 Maverick | Main burst rifle, the star of the show |
| Secondary | Velix 57 (prestiged, no attachments) | Mostly for leveling, not core to the class |
| Melee | Ballistic Knives | Best melee in the game right now, instant close‑range finisher |
| Wildcard | Perk Greed | Lets you stack multiple strong perks at once |
| Tactical | Stim Shot | Quick self‑heal to stay aggressive and keep streaks alive |
| Lethal | Semtex | Clearing points, portal campers, and tight corners |
| Field Upgrade | Assault Pack + Lucky Ammo | Ammo sustain + stronger ammo for high‑kill games |
| Boots | Performance Boots | Faster movement to match the gun's tempo |
| Gear/Explosive | High‑Density Explosive | Stronger explosive lethals |
| Perk | Lightweight | Move faster across the map |
| Perk | Scavenger | Never run out of ammo on big streaks |
| Perk | Looper | Mobility/tempo focused perk (map‑control oriented) |
| Perk | Flak Jacket | Resist explosives; fewer random nade deaths |
| Combat Spec. | Enforcer | On kill: move faster + faster health regen for a short time |
If you notice you often die right when you start popping off, this mix of Flak Jacket, Scavenger, Perk Greed, and Enforcer is exactly what keeps streaks going instead of ending at 5–10 kills.
↖ 3. Attachment Breakdown: Why This Exact X9 Build Works
3.1 Nova Burst Brake – Turning jittery bursts into a laser
The biggest problem with poorly built burst guns is always the same: they feel jumpy and inconsistent.
Nova Burst Brake directly fixes that.
| Aspect | What changes with Nova Burst Brake | Why that matters |
|---|---|---|
| Recoil reset | Bursts reset back to center faster | Long burst chains stay on target, even at range |
| First‑shot kick | Initial upward jump is reduced | Fewer first bullet flies to the sky, second and third finally hit moments |
| Felt stability | Gun feels calmer when holding the trigger down | Lets you focus on movement and minimap instead of wrestling recoil |
You might be wondering:
Why not just stick with a suppressor like usual?
Because in Season 1's crazy fast pace:
- Enemies are already getting info from UAVs, footsteps, portals, and spawns
- The value of being perfectly silent is often lower than the value of locking in accurate, instant bursts
So instead of going all‑in on stealth, you go all‑in on fight quality:
If you hit first and hit hard, you don't need stealth as badly.
3.2 19.5" Shroud Barrel – Fixing range and reload problems in one slot
This barrel does two huge things:
1. Increases damage range
2. Boosts magazine size
| Effect | In‑game feeling | Practical outcome |
|---|---|---|
| Better damage range | 1‑burst kills remain consistent at mid‑long range | You waste fewer bursts finishing low‑HP targets |
| Larger mag size | You feel like you almost never need to reload | You can wipe multiple enemies in one push without reloading |
| Fewer reloads | Fewer died mid‑reload situations | Streaks live longer, especially in chaotic objective game modes |
If you often find yourself dying like this:
I killed 2 guys, went to reload, and the third guy caught me mid‑animation.
3.3 Daedalus Grip – Turning slides into free kills
This grip is all about handling on the move, especially:
- Slide‑to‑fire speed
- Dive‑to‑fire speed
- Jump‑to‑fire and ADS speed
| Situation | With Daedalus Grip | Without it |
|---|---|---|
| Sliding into a lane | Your gun is ready as soon as you exit slide | You often arrive before the gun is up, and lose trades |
| Jumping a corner | ADS feels almost instant | There's a tiny delay where you get shot first |
| Aggressive pushes | Movement and gun handling stay in sync | You constantly feel like my body is here, my gun is not |
If you're someone that likes to slide, start your fights with a slide. This grip makes it free kills.
So if you're the type who naturally wants to slide into fights, Daedalus Grip is how you turn that habit from risky into OP.
3.4 Strider Overstep Stock – Pre‑aiming while constantly moving
This stock gives you:
- Faster ADS speed
- Faster aim walking movement speed (strafe speed while ADS)
That combination changes how you take fights:
- You can pre‑aim corners while moving, instead of walking around hip‑firing
- You're not a stationary target while aiming—your body is always shifting slightly
| If you notice | This stock helps you by… |
|---|---|
| You often see enemies first but still die first | Getting your gun up faster |
| You get beamed while standing still ADS | Letting you strafe while aiming, harder to hit |
The main idea is simple:
X9 wins when you pre‑aim and pre‑position, not when you ego‑sprint and react late.
Strider Overstep Stock makes that pre‑aim playstyle feel natural instead of sluggish.
3.5 1mW Instinct Laser Array – The I saw him, I lived attachment
The laser finishes the handling package:
- Extra ADS speed
- Extra sprint‑to‑fire responsiveness
This matters most in:
- Tight areas around objectives
- Portals where people appear suddenly
- Flagship‑style maps with lots of peek angles
If you keep dying like this:
Guy swings the corner, I try to ADS, and I'm dead before my gun finishes. you're exactly the player this laser is built for. It shaves off that tiny delay that gets you killed in close timing fights.
3.6 Why iron sights (no optic) is the correct choice here
Most people default to slap a red dot on everything, but here's why iron sights are recommended on this X9 build:
1. The irons are actually clean – they don't block much of your vision.
2. You free up an attachment slot for more important handling or stability.
3. At this tempo, ADS speed + visual consistency matter more than zoom.
If you really hate irons:
- You can drop a handling attachment for a lightweight optic
- But you will feel the difference in ADS/mobility, especially in close fights
The creator even admits they ended up liking irons more:
I'm actually starting to like this weapon a lot better just with the iron sights… I'm cooking with it.
If you give yourself 3–5 games to adjust, there's a good chance you'll end up agreeing.
↖ 4. Perks, Gear & Enforcer: Why this class is so streak‑friendly
A gun can be strong and still fail you if the rest of your class doesn't support streaks.
This setup is explicitly designed to keep you alive while you chain kills.
4.1 Perks & Perk Greed: Building a streak identity
Here's how the perk setup works together:
| Slot / System | Choice | Why it matters |
|---|---|---|
| Wildcard | Perk Greed | Lets you bring a full package instead of picking 1–2 perks |
| Perk | Lightweight | Faster base movement; great for flanking and rotation |
| Perk | Scavenger | You don't run dry in 15+ kill streaks |
| Perk | Looper | Extra mobility/tempo utility depending on exact effect |
| Perk | Flak Jacket | Keeps you alive through random nades and explosives |
The idea is:
Stop dying to random nonsense, so your deaths are more about your decisions—not the game throwing explosives at you.
If you've ever gone on a 17‑kill streak just to get deleted by a random grenade, you already know why Flak + Scavenger + Perk Greed is mandatory for any real nuke grind.
4.2 Enforcer: Every kill makes you faster and harder to kill
Enforcer as your combat specialty is huge in this build:
- Every time you get a kill, for a few seconds you:
- Move faster
- Regenerate health faster
As long as you keep chaining kills, these buffs are almost always active.
In practice, it feels like a combo of:
- Lightweight on steroids (extra speed)
- Quick Fix on steroids (faster heal)
This matches the X9 perfectly:
1. X9 gives you reliable 1–2 burst kills
2. Enforcer rewards that with instant tempo boost
3. That boost lets you beat the next enemy to the angle
4. You kill again → buff refreshes → streak snowballs
That's how you get first game: 125 kills with a nuke, second game: another nuke, without camping a single corner all match.
4.3 Equipment & Field Upgrade: Staying alive and online
| Slot | Choice | How it supports your playstyle |
|---|---|---|
| Tactical | Stim Shot | Take damage, heal instantly, push again |
| Lethal | Semtex | Clear campers, portal chokepoints, and hill corners |
| Field Upgrade | Assault Pack + Lucky Ammo | More ammo + stronger bullets in long streaks |
| Boots | Performance Boots | Faster rotations, easier repositioning |
| Explosive Gear | High‑Density Explosive | Buffs your explosive lethals |
If you notice you often:
- Win a fight, but sit weak for too long and die to the next push → Stim fixes that
- Run out of ammo on long streaks and switch to random ground guns → Scavenger + Assault Pack fixes that
All of this is built to ensure: once you start popping off, you stay popping off.
↖ 5. How to Actually Play This Build: From 20‑bombs to 250+ Kills
Copying the class is the easy part.
The more important piece is how you move and take fights with it.
5.1 Opening tempo: info first, ego later
A practical early‑game rhythm looks like this:
1. Off spawn: get info, don't ego‑rush
- Use Lightweight + Performance Boots to hit an early power position
- Your goal is to see their initial push, not to 1v5 mid.
2. Farm your first streaks
- Use the X9 to pick safe fights and quickly get UAV up
- Start reading spawn patterns, portal exits, and mid‑map lanes.
3. Aim for Harp early (or whatever high‑tier radar you're running)
- Once Harp is up:
- Now it's my game. I control the ship. I'm the captain now.
- At this point you're no longer guessing—you're pre‑aiming where they will be, not reacting to where they were.
If you find your streaks keep dying around 5–8 kills, odds are you're pushing too hard before you've earned enough information tools.
5.2 The core gunfight pattern: slide → pre‑aim → 1 burst
You want to avoid treating the X9 like an auto rifle. It shines when you play it like this:
1. Predict where the enemy is coming from
- From UAV, Harp, sound, and teammate positions.
2. Slide into the angle
- Use Daedalus Grip + Strider Stock to slide out while ADS‑ing quickly.
3. Center chest/head and hold the trigger
- Let the Nova Burst Brake do its job; don't spam and jerk your aim around.
4. Use Enforcer's speed buff
- After each kill, immediately reposition or chain into the next target.
Two critical don'ts:
- Don't full‑auto panic hold with wild mouse/controller movement—keep your bursts smooth.
- Don't ego‑stand in the open. This gun is disgusting when you peek → burst → get back into cover.
5.3 Portals & Flagship: Playing high‑tempo maps the smart way
The gameplay commentary gives some useful map‑specific insights.
Portals: tool, not spawn point
- Don't mindlessly sprint into portals; people will camp them with shotguns.
- Instead, use portals to rotate, then hold an angle just off the exit to catch enemies running through.
- Semtex + High‑Density Explosive is perfect for:
- Sticking portal campers
- Clearing tight portal rooms
If you keep dying the second you come out of a portal, start playing around portals instead of directly through them.
Flagship: better than Nuketown (for this gun)
Flagship gets praised as:
- Better than Nuketown
- Better than Babylon
- One of the creator's favorite maps in the game
Why that matters for you:
- It has multiple route options, so you can flank, rotate, and reposition constantly.
- There are good long lines and strong mid‑range fights, where X9's 1‑burst potential shines.
- You can abuse corners and power spots where pre‑aim + burst = free kills.
If you want to feel X9's full strength, Flagship is a great testing ground.
5.4 Nuke pacing: when to slow down and when to keep frying
The creator doesn't just run brain‑off W‑key; there's clear pacing:
- On lower streaks (0–15 kills):
- Play aggressively, test routes, farm info.
- Around 20+ gun streak:
- You'll hear more lines like Let's play it smart here and Patience is a virtue.
- You start watching angles more, taking fewer coin‑flip fights.
Smart nuke habits include:
- Avoid ego‑challenging multiple players when you're one off streaks
- Using Stim before you re‑peek or push into a fresh lane
- Letting your streaks (Harp, HKDs, Sentry) do part of the work so you don't have to risk every angle yourself
That's how you end up with:
- Game 1: 125 kills + nuke, nearly 10 K/D
- Game 2: 112+ kills + nuke, 40‑gun streak
instead of I almost nuked, but died 3 times at 25.
↖ 6. Common Mistakes & How to Fix Them
If you copy the class and still feel off, there's a good chance your issues are more about habits than attachments.
| Problem you're having | What it looks like in game | How to adjust |
|---|---|---|
| Treating X9 like a full‑auto | You hold the trigger and spray; recoil feels wild and random | Focus on controlled bursts and centering, let the brake do its job |
| Dying at portal exits | You spawn or exit portal and get instantly farmed | Use portals to rotate, not as front doors; hold off‑angles instead |
| Standing still in gunfights | You ADS, plant your feet, and get melted | Abuse Strider Stock: always strafe while aiming |
| Never using slide to start fights | You walk into every angle upright and late | Practice slide → ADS → burst as your default opener |
| Not using UAV/Harp enough | You keep getting shot in the back or from off‑screen | Treat streaks as tools, not flex; pop them as soon as you earn them |
| Greeding too hard on high streaks | You hit 20+, then die ego‑pushing 3 guys in a lane | Switch to nuke mode: fewer hard pushes, more info‑based swings |
If you systematically clean up even 2–3 of these, the gun instantly feels stronger without changing a single attachment.
↖ FAQ
Q1: How does X9 Maverick compare to other top guns in BO7 S1?
It's easily in the Top 3 when built and played properly. It doesn't play like a Maddox‑style laser auto; instead, it's about high burst damage + positioning.
If you enjoy see → snap → delete gunfights rather than prolonged spraying, X9 will feel very rewarding.
Q2: Is this build usable for controller players or only M&K?
Both can use it well, just with different emphasis:
- Controller:
- Aim assist + stable bursts makes mid‑range fights feel very comfortable.
- Focus on smooth right‑stick control and controlled bursts.
- Mouse & Keyboard:
- You can take full advantage of fast slide, snap, and pre‑aim angles.
- Just don't over‑flick between bursts; keep your tracking steady.
Q3: I don't like iron sights. Do I have to use them?
No, but they're part of why this build feels so snappy.
- If you really want an optic, use a low‑zoom red dot.
- To make room, you'd probably have to drop the laser or change grip/stock.
- Just be aware you'll feel slower ADS and slightly weaker close‑range snap.
If you can tolerate the irons for a few games, many players end up preferring them on this gun.
Q4: Is this only for pub stomping, or can I use it in ranked too?
The build is tuned for high‑kill, high‑tempo lobbies (Dom, Hardpoint, etc.), but:
- The fundamentals (burst consistency, movement, pre‑aim)
- And the survivability tools (Flak Jacket, Stim, Enforcer)
…translate perfectly into ranked. You might just tighten your positioning and take slightly fewer risky pushes.
Q5: Why can the creator drop 250+ kills and double nukes but I struggle to break even?
It usually comes down to three things:
1. Map knowledge – You don't yet know the best lanes, power spots, and portal routes.
2. Tempo – You either play too fast with no info, or too slow to capitalize on streaks.
3. Fight pattern – You're probably walking into fights instead of sliding + pre‑aiming them.
If you treat this article as a checklist—class, movement, portals, slide pattern, streak usage—and fix them one by one, your stats will climb a lot faster than just playing more games.
↖ Closing Thoughts: When should you pick up the X9 Maverick?
You should seriously consider maining this build if:
- You want a weapon that kills in 1–2 bursts, even post‑nerf
- You enjoy high‑tempo gameplay: sliding, pre‑aiming, chaining kills
- You're aiming for high kill games and tactical nukes, not just breaking even
This X9 Maverick setup does three things incredibly well:
1. Stabilizes your bursts (Nova Burst Brake + Shroud Barrel)
2. Supercharges your handling and movement (Daedalus Grip, Strider Stock, 1mW Laser)
3. Wraps it all in a streak‑friendly class (Perk Greed, Flak Jacket, Scavenger, Enforcer, Stim, Assault Pack)
If lately you've felt like your weapons just don't keep up with Season 1's pace, slot in this X9 build, give yourself a few games to lock in the slide + burst rhythm, and let the gun remind you what a broken burst class is supposed to feel like.

Most Popular Posts
- Black Ops 7 Endgame Exotic Affinity Weapons Guide: Best Bonuses, Full Weapon List, and Farming Tips
- Black Ops 7 Zombies Totenreich Easter Egg Guide: Fast Solo & Co-Op Main Quest Walkthrough
- Black Ops 7 Cherry Fizz Guide: Fastest Illicit Cargo Event Route for Season 4
- Black Ops 7 Season 4 Release Date, Maps, Weapons, Zombies, Warzone, and MW4 Reveal Prep
- Black Ops 7 Season 04 Endgame META: Best 5 Weapons After the XR3 Ion Nerf
- Black Ops 7 Zombies Fast KOWAKUJO Easter Egg Guide: Cat Wonder Weapon, Evidence Puzzles
Popular Category Lists
- Grow a Garden / (285)
- ARC Raiders / (260)
- CoD: Black Ops 7 / (166)
- Monopoly Go / (146)
- MLB 26 / (142)
- Star Citizen / (109)
- Steal a Brainrot / (89)
- Sailor Piece / (68)
- ARK Survival Ascended / (64)
- Forza Horizon 6 / (59)
- Diablo IV / (59)
- Blox Fruits / (59)
- CoD: BLACK OPS 6 / (55)
- Adopt Me / (51)
- Path of Exile 2 / (48)
- Monster Hunter Wilds / (46)
- Windrose / (44)
- Path of Exile / (40)
- Grow a Garden 2 / (37)
- Bee Swarm Simulator / (36)


