0
0EVOMON Equipment Farming Guide: Fast AFK Teragon Method for Level 40+
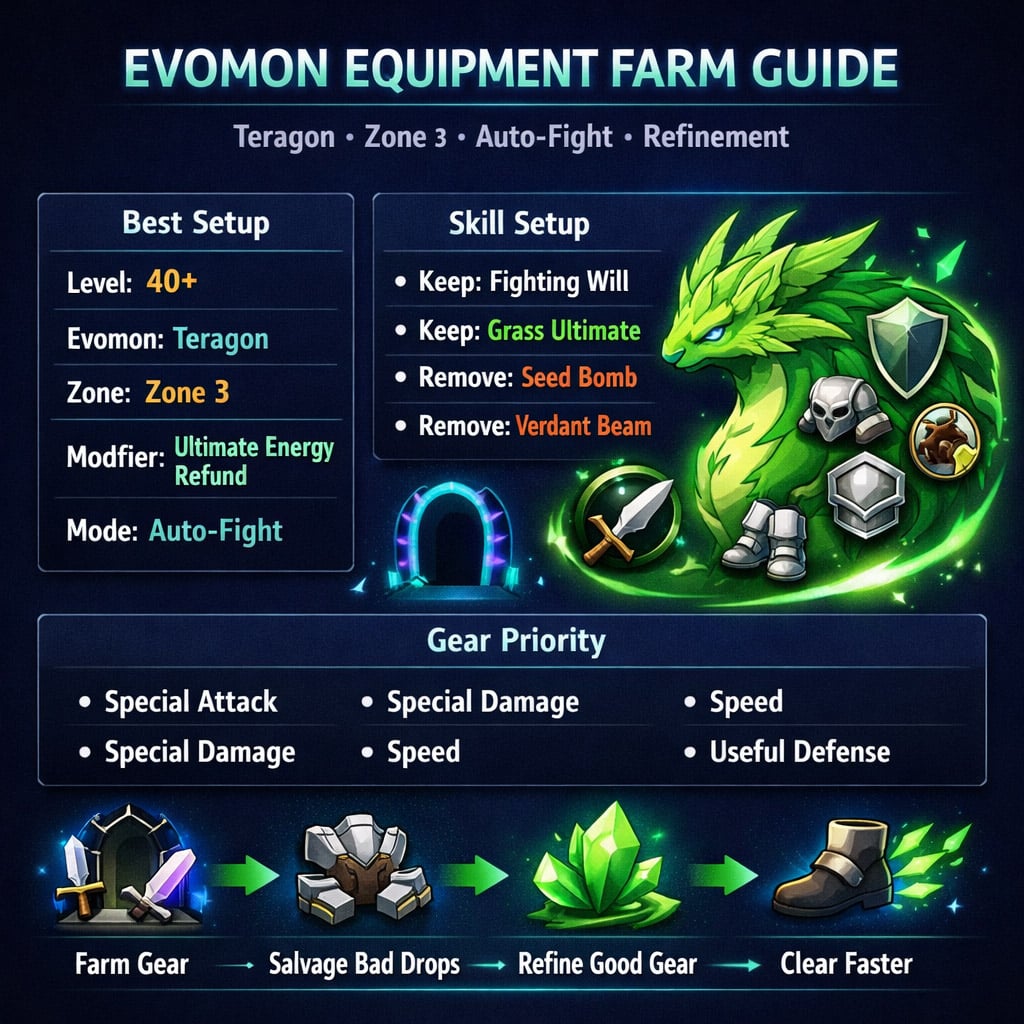
Equipment farming gets painful when auto-fight wastes turns on bad skills. The fix is simple: use Teragon, farm Zone 3, pick the ultimate energy refund modifier, and strip your skill bar down to the only moves that matter.
- EVOMON Equipment Farm Setup
- Best Zone for Teragon Equipment Farming
- Best Teragon Skill Setup for Auto-Fight
- Keep These Skills
- Step-by-Step EVOMON Equipment Farming Method
- Expected Farming Results
- What Equipment to Keep or Salvage
- Best Equipment Stats for Level 40+ Players
- EVOMON Refinement Strategy
- Common Mistakes That Slow the Farm
- Leaving Too Many Skills Equipped
- Picking the Wrong Dungeon Modifier
- Farming Zone 3 Too Early
- Judging Gear by Score Only
- Refining Bad Gear
- FAQ
- What is the best equipment farming zone in EVOMON?
- What skills should Teragon use for this farm?
- Why is the ultimate energy refund modifier important?
- Should I salvage Epic equipment?
- Is equipment score more important than stats?
This method is built for Level 40+ players who need equipment, refinement materials, and better stat rolls without manually grinding every run.
↖ EVOMON Equipment Farm Setup
Use this setup before starting the dungeon.
| Setup | Best Choice | Why It Works |
|---|---|---|
| Player Level | 40+ | Gear farming starts becoming worth it |
| Evomon | Teragon | Strong Grass-type clear speed |
| Zone | Zone 3 | Great matchup, especially final boss |
| Modifier | Ultimate defeat refunds energy | Keeps damage loop running |
| Mode | Auto-fight | Enables repeat farming |
| Goal | Equipment + salvage materials | Fuels refinement upgrades |
If Zone 3 is unstable, farm Zone 2 until Teragon clears cleanly.
↖ Best Zone for Teragon Equipment Farming
Zone 3 is the main target.
Why? The last boss is Water-type, and Teragon's Grass damage deletes it fast. A geared Teragon can one-shot most waves after buffing.
In practical farming, damage can jump from around 297 to 357 after the buff. That difference matters. Across hundreds of runs, faster kills mean more gear, more salvage, more refinement rolls.
| Zone | Use It When | Verdict |
|---|---|---|
| Zone 2 | Teragon is weak or undergeared | Safer |
| Zone 3 | Teragon clears without failing | Best farm |
The rule is simple: never farm a zone you fail often. Failed runs kill efficiency.
↖ Best Teragon Skill Setup for Auto-Fight
Auto-fight is dumb. Use that against it.
If Teragon has four skills equipped, auto-fight may waste turns on weaker moves. Remove them. Force the AI to use the good loop.
↖ Keep These Skills
| Skill | Keep? | Reason |
|---|---|---|
| Fighting Will | Yes | Buffs damage |
| Leaf Storm / Main Grass Ultimate | Yes | Main wave clear |
| Seed Bomb | No | Slows the run |
| Verdant Beam | No | Slows the run |
| Extra filler skills | No | Makes auto-fight worse |
The ideal loop:
1. Fighting Will
2. Main Grass ultimate
3. Enemy dies
4. Energy gets refunded
5. Repeat
This is the whole method. No fancy rotation. No manual play.
↖ Step-by-Step EVOMON Equipment Farming Method
Follow this exact order.
| Step | Action | Result |
|---|---|---|
| 1 | Enter equipment dungeon | Start farm |
| 2 | Select Zone 3 | Best Teragon route |
| 3 | Pick ultimate energy refund | Faster clears |
| 4 | Remove weak Teragon skills | Better auto-fight logic |
| 5 | Keep Fighting Will + Grass ultimate | Clean damage loop |
| 6 | Turn on auto-fight | Hands-free clear |
| 7 | Hit replay after the run | Repeat farm |
| 8 | Salvage bad gear | Get refinement materials |
| 9 | Refine good gear | Build stronger stats |
For long sessions, replay farming is where the loot stacks up. Use only methods allowed by the game rules. Risking an account for lazy automation is never worth it.
↖ Expected Farming Results
The value is not only in good drops. Bad drops are fuel.
Epic and Legendary equipment can be salvaged into refinement materials. In one practical batch, salvaging Epic gear can return around 90+ refinement materials, depending on how much you farmed.
| Farm Time | Expected Value |
|---|---|
| 30 minutes | Small gear batch |
| 2 hours | Multiple salvage/refine attempts |
| 8 hours | Large equipment stockpile |
| Overnight | Heavy material farming, if stable |
If your clear speed is good, this becomes a full upgrade loop:
Farm gear ➔ salvage bad pieces ➔ refine good pieces ➔ clear faster ➔ farm more.
That is why the method works.
↖ What Equipment to Keep or Salvage
Do not keep gear just because the score is high.
Score is useful, but stats matter more. A lower-score item with the correct damage stat can beat a higher-score item with useless rolls.
| Gear Type | Action | Reason |
|---|---|---|
| Bad Epic | Salvage | Good refinement material |
| Good Epic | Keep temporarily | Useful before better Legendary gear |
| Bad Legendary | Salvage or store | Depends on your gear gap |
| Good Legendary | Keep + refine | Long-term upgrade |
If you see a high-score item with the wrong stat, do not force it. Bad stats stay bad.
↖ Best Equipment Stats for Level 40+ Players
First check your Evomon's skill type.
If your main skills are Special Damage, build Special Attack.
If your main skills are Physical Damage, build Attack.
| Build Type | Best Stats | Avoid |
|---|---|---|
| Special Damage | Special Attack, Special Damage, Speed | Physical Attack |
| Physical Damage | Attack, Physical Damage, Speed | Special Attack |
| Tank | HP, Defense, Special Defense | Random damage rolls |
| Speed Carry | Speed + main damage stat | Useless element bonuses |
For Teragon, if your key skills scale with special damage, prioritize:
1. Special Attack
2. Special Damage
3. Speed
4. Defense / Special Defense
Element bonuses only matter if they match your actual damage. A Fire bonus on a non-Fire build is dead weight.
↖ EVOMON Refinement Strategy
Refinement materials are limited. Do not waste them on random pieces.
Refine gear that already has one or two useful stats. Chasing perfect rolls on trash gear burns resources fast.
| Goal | Best Roll | Use When |
|---|---|---|
| More damage | Special Attack / Attack | Main DPS gear |
| Better burst | Special Damage / Physical Damage | Damage build |
| Faster turns | Speed | Farming and PvP value |
| More survival | HP / Defense / Special Defense | If runs are unstable |
| Element boost | Matching element only | Only if it fits your skills |
A good refinement roll is not rare.
A good refinement roll is useful for your Evomon.
↖ Common Mistakes That Slow the Farm
↖ Leaving Too Many Skills Equipped
Auto-fight will use bad skills if you let it.
Fix: Keep only Fighting Will and the main Grass ultimate.
↖ Picking the Wrong Dungeon Modifier
Without energy refund, the method loses speed.
Fix: Always take ultimate defeat refunds energy cost when available.
↖ Farming Zone 3 Too Early
If Teragon dies or fails runs, your efficiency drops hard.
Fix: Farm Zone 2 until Zone 3 becomes stable.
↖ Judging Gear by Score Only
High score does not mean high value.
Fix: Match gear stats to the Evomon's damage type.
↖ Refining Bad Gear
Bad gear with one lucky roll is still bad gear.
Fix: Refine pieces with useful base stats.
↖ FAQ
↖ What is the best equipment farming zone in EVOMON?
Zone 3 is best for Teragon if your clear rate is stable. If you fail runs, use Zone 2 until your gear improves.
↖ What skills should Teragon use for this farm?
Use Fighting Will and the main Grass ultimate / Leaf Storm-style attack. Remove weaker skills so auto-fight does not waste turns.
↖ Why is the ultimate energy refund modifier important?
It refunds energy after ultimate kills. That keeps Teragon's strongest attack available more often, which makes runs faster.
↖ Should I salvage Epic equipment?
Yes, if the stats are bad. Epic gear is valuable as refinement material. Keep only pieces with useful stats.
↖ Is equipment score more important than stats?
No. Stats matter more. A lower-score item with Special Attack can beat a higher-score item with useless rolls.
Summary
The fastest EVOMON equipment farm for Level 40+ players is simple:
Teragon + Zone 3 + ultimate energy refund + stripped skill bar + auto-fight.
Keep only the skills that make the farm faster. Salvage bad gear. Refine pieces with real stat value. Build around your Evomon's damage type, not just equipment score.
The loop is clean:
| Farm | Salvage | Refine | Upgrade |
|---|---|---|---|
| Get equipment | Break bad gear | Improve good gear | Clear faster |
Run it correctly, and equipment farming stops being a slow grind. It becomes a steady upgrade engine.

Most Popular Posts
- Evomon Tier List Guide: Skills, Stats, Status Effects, and Team Builds
- Evomon Strongest in the Current META: Best Evomon Tier List Guide
- Evomon Tier List Guide: Best Meta Evomon for PvP and Progression
- Evomon Leveling Guide: Fast Player XP Farm to Reach Level 60+
- EVOMON Equipment Farming Guide: Fast AFK Teragon Method for Level 40+
- Best AFK Evomon Level Farm Method: Fast Pet XP, Summon Tickets, and Starfruit
Popular Category Lists
- Grow a Garden / (286)
- ARC Raiders / (271)
- CoD: Black Ops 7 / (166)
- Monopoly Go / (148)
- MLB 26 / (148)
- Star Citizen / (125)
- Steal a Brainrot / (89)
- ARK Survival Ascended / (81)
- Sailor Piece / (68)
- Forza Horizon 6 / (65)
- Diablo IV / (61)
- Blox Fruits / (61)
- Adopt Me / (56)
- CoD: BLACK OPS 6 / (55)
- Grow a Garden 2 / (51)
- Path of Exile 2 / (48)
- Monster Hunter Wilds / (46)
- Windrose / (44)
- Path of Exile / (40)
- Bee Swarm Simulator / (36)