


 0
0Grow a Garden Beantock Speed Farming: Rarity Scoring, Corn Dog Recipe Shift, Pet Pouch Power
- Jordan
- Share
- Grow a Garden
- 08/17/25
- 3100
You probably did what I did first: assumed bigger fruit (kg) = more contribution. Testing proved small Dino Shroom and large Dino Shroom give identical points → size weight = 0. Rarity tier actually sets score (e.g., Giant Pine Cone at 7 points vs next-tier woody at 6 over ≥20 deliveries). Simultaneously the Pet Pouch pipeline was upended: Hot Dog was swapped for the Corn Dog recipe, turning pre-farmed Hot Dogs into sunk cost. This means: the old broad category coverage with common plants meta is obsolete; you now pivot to rarity-first + multi-tag compression.
- Scoring Mechanics (Why Rarity Rules)
- Rarity Coverage Strategy (Build A / B / C Tiers)
- Compact Reference Pattern (illustrative only)
- Inventory & Plot Layout
- Solo vs Co-op Mode Switching
- Corn Dog Recipe Shift & Economy Impact
- Hourly Loop Execution Script
- Common Pitfalls & Fixes
- FAQ
- Summary

↖ Scoring Mechanics (Why Rarity Rules)
Question: Why does dumping dozens of common blueberries barely move the bar? Because low-tier berries sit in a weaker rarity bracket (often 5 or less) while a 7-point rare woody outpaces them instantly.
Test recap:
- - Case 1: Giant Pine Cone (Woody) = 7 points; lower woody tier = 6 → 100 deliveries differ by 100 points.
- - Case 2: Dino Shroom size variants = same points → confirms size neutrality.
Inference: Contribution = Σ(rarity base points). The lever you must optimize is average per-unit score, not raw plant count. If you notice you hit only ~200/900 after 40+ plants, your average may be ≤5. Quick formula: Required plants ≈ Target Points / Avg Points per Plant. Example: 900 / 6 ≈ 150; if you can only field 80 six-pointers, you will stall.
lifting average per-plant value beats expanding mediocre volume.
↖ Rarity Coverage Strategy (Build A / B / C Tiers)
Category mindset: goal = cover all possible event request categories with the fewest plots; multi-tag plants (e.g., Sugar Apple covering Fruit + Woody; Beantock itself) are priority anchors.
Tier A: Prismatic / Transcendent / event high-tier or multi-tag elites—seed first, maintain ≥2 maturation waves.
Tier B: High rarity single-tag backups; hold 10–15 potential turn-ins per uncovered category.
Tier C: Mid-rarity accessible stock—used for final 10% push or co-op fillers.
Filling gaps fast:
- - Trade board: lead with your multi-tag list to bargain upward.
- - Community: post Have: Woody 7p x30 / Prehistoric rare x20; Need: Root, Aquatic to be drafted quickly.
- - Planting order: longest cooldown Tier A first → weave short-grow B/C between.
Multi-tag efficiency example:
If 6 multi-tag plants cover 9 of 20 categories → remaining 11 single-tag → plots drop from 20 to 17 (≈15% saved).
list multi-tags before filling with single-purpose plants to avoid wholesale replant waste.
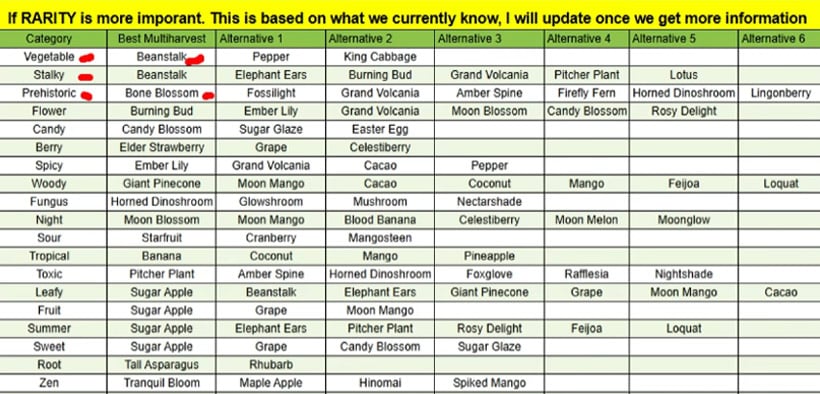
↖ Compact Reference Pattern (illustrative only)
- Category → Recommended (Tier A) → Backup (B) → Fallback (C)
- Berry → High-rarity multi-tag berry/fruit → High-rarity single berry → Mid-tier berry
- Woody → Giant Pine Cone (7) → Next best woody rare → 6-point woody
- Prehistoric → Rare Dino Shroom variant → Lesser variant → Generic prehistoric
- Fruit → Multi-tag Fruit/Woody → High single fruit → Mid fruit
↖ Inventory & Plot Layout
Adopt a dual-zone layout:
- - Rare Core Plots: Tier A + multi-tag only, evaluate each harvest: turn-in now vs reserve for next hour start.
- - Cycle Plots: Rapid B/C regrowth and emergency fillers.
Inventory audit steps:
- 1) List all 20 categories → tick ones with Tier A coverage → mark gaps.
- 2) For each gap, seek the highest multi-tag replacement first.
- 3) Solo partial goal example: Plan to contribute 450 (half). At 6 average points → need ~75 plants.
Decision tree when stuck at ~200/900:
- - Avg <5? → Replace with higher rarity before expanding.
- - Avg ≥6 but stuck? → Quantity or category redundancy issue → shift to co-op.
write the inventory state every hour; visibility accelerates better decisions.
↖ Solo vs Co-op Mode Switching
Solo viable when:
- You cover ≥70% categories with Tier A or A+B blends AND can deploy ≥120 plants of 6–7 points in a cycle.
Co-op trigger conditions:
- Tier A coverage <50% categories.
- Peak single-cycle mature output <100 plants or maturity gaps >30 minutes.
Co-op benefit: flattens diminishing returns—your high rarity seeds anchor while others fill breadth.
Recruitment template: Offering: Woody 7p x30 / Prehistoric rare x20 / Missing: Root, Aquatic / Avg 6.6 p/plant.
speak in resource metrics to get priority invites to fast rooms.
↖ Corn Dog Recipe Shift & Economy Impact
Current verified components: Wood-type plant + Meat-type plant (e.g., Pepper if classified that way in prior cooking set) + Batter (Corn or Violent Corn).
Hot Dogs are presently inert (sunk cost).
Responses:
- Do not delete: future rollback or conversion event is plausible.
- Archive evidence: screenshot current recipe for reference; avoid outdated guide propagation.
- Corn Dog → Pet Pouch → more pet slots → broader passive buff coverage (growth speed, radius, proc chances).
Simplified ROI: if one added buff pet yields a 5–8% improvement in synchronized maturity over 3–5 hour loops, compounding accelerates category readiness.
prioritize Corn Dog crafting now over buying extra mid-rarity seeds.
↖ Hourly Loop Execution Script
| Minute Range | Key Actions | Purpose / Notes | Metric / Decision Trigger |
|---|---|---|---|
| 0–5 | Check requested category; tick matching high-rarity inventory | Establish what the room needs before committing stock | Create/update category checklist; identify gaps |
| 5–10 | Deliver first high-rarity wave | Set early pace; secure a strong baseline of high-point plants | Track points gained; log plants count for average calc |
| 10–15 | Replant exhausted Tier A; insert quick-growth B/C fillers | Maintain future rare supply while filling short cooldown slots | All core rare plots replanted by minute 15 |
| 15–25 | Co-op sync: announce shortages; deliver second wave | Close category gaps; stabilize average points trajectory | If gaps persist >2 categories, request trades/recruits |
| 25–35 | Craft Corn Dogs (if materials ≥ threshold); convert to Pet Pouches | Expand pet buffs to accelerate subsequent cycles | Craft if each ingredient set ≥8; otherwise keep farming |
| 35–45 | Progress check; evaluate server quality | Decide to stay, recruit, or hop before sunk time escalates | If progress <50% & rare stock thinning → recruit or hop |
| 45–55 | Stage second-tier rares; apply growth boosts (if any) | Prepare closing burst; ensure final high-value delivery | Have final wave maturing before minute 55 |
| 55–60 | Final push turn-ins; log plants & points; update avg spreadsheet | Capture data for refinement; preserve momentum next hour | Recalculate Average Points/Plant = Total Points / Plants |
| Heuristic Check | Evaluate early cycle efficiency | Detect low-rarity lobby early to save time | If ≥60 plants delivered by minute 25 & progress <30% → leave |
Threshold heuristic: If ≥60 plants (first 25 minutes) <30% bar → room rarity insufficient—leave early.
schedule beats improvisation; treat it like a timed production line.
↖ Common Pitfalls & Fixes
1) Myth: Bigger fruit weight matters. Fix: 5 paired size tests; identical points → stop weight-focused cultivation.
2) Draining one category completely early. Fix: reserve ≥20% for late push or next cycle seed capital.
3) Ignoring multi-tag compression. Fix: recenter multi-tag in core, push single-tag outward.
4) Front-loading 100% Tier A early. Fix: deliver 60–70% early, hold 30–40% as closing burst insurance.
5) Delaying Corn Dog crafting. Fix: set material threshold (≥8 sets) → batch craft immediately.
6) Not tracking average points. Fix: Average = Points Gained / Plants Delivered; <5.5 triggers rarity pivot.
7) Buying unverified rares at premium. Fix: micro-test (3–5 plant delivery) before scaling.
↖ FAQ
1. Why do large and small versions give identical points?
Same rarity bracket; size is cosmetic for scoring. Dino Shroom sizes confirmed equal.
2. How can I quickly tell if something is a 7-point plant?
Deliver 3–5 specimens solo; (Score After − Before) / Count ≈ per-plant value; ~7 signals top tier.
3. Can I still contribute without top-tier rares?
Yes—stack mid/high multi-tag plus co-op synergy; maintain ≥5 average to stay relevant.
4. Whats the real value of multi-tag plants?
They compress plot count (example ~15% saved) and reduce category gap downtime.
5. Can I pre-craft Corn Dogs safely?
Currently yes, but recipe is volatile—craft in batches and screenshot for provenance.
6. Are Hot Dogs completely useless now?
No active function; treat as speculative inventory for future reuse or conversion.
7. How do I avoid over-delivering early?
Cap first wave at ≤70% of Tier A stock; reserve remainder for finish and next hour's opener.
8. Does delivery order matter?
High-point rares first to set strong baseline; mid mix mid-cycle; final wave closes with remaining rares.
9. How do I test plant score in a busy public lobby?
Ask for a short pause or test during off-peak; or hop to a low-pop instance for sampling.
10. What is a healthy average points per plant?
≥6 = solid rarity distribution; ≥6.5 = you can consider banking surplus.
11. I only reach 200/900—what's priority?
Compute average first: if low, upgrade rarity; if decent, increase volume or shift to co-op.
12. When should I abandon the current room?
Progress <30% with <15 minutes left, your rare stock exhausted, no reinforcements incoming—switch rooms.
↖ Summary
Your edge in the Beantock event is not frantic planting—it's a repeatable rarity-first framework: identify actual 7-point tiers via micro-tests, compress category coverage with multi-tag anchors, channel materials into Corn Dogs → Pet Pouches for compounding growth buffs, run a disciplined hourly loop, and continuously validate point tiers after patches.

Most Popular Posts
- Grow a Garden 2 Release Date Guide: Why Saturday Is the Likely Launch Window
- Grow a Garden Bizzy Bee Event: Honey Coins, Bee Eggs, Seeds, Upgrades, and Rewards
- Grow a Garden Bee Dungeon Guide: Best Wave 100 Strategy, Bee Shards, and Team Setup
- Grow A Garden Best Pet Mutations 2026: Ranked Guide for Power, Trading, and AFK Farming
- Grow a Garden Bee Stats Guide: Best Bees Ranked by Damage, HP, and DPS
- Grow a Garden Busy Bee Part 2 Guide: Royal Jelly, Best Pets, New Seeds, and Prep Strategy
Popular Category Lists
- Grow a Garden / (286)
- ARC Raiders / (262)
- CoD: Black Ops 7 / (166)
- Monopoly Go / (146)
- MLB 26 / (145)
- Star Citizen / (112)
- Steal a Brainrot / (89)
- Sailor Piece / (68)
- ARK Survival Ascended / (67)
- Diablo IV / (61)
- Forza Horizon 6 / (60)
- Blox Fruits / (60)
- CoD: BLACK OPS 6 / (55)
- Adopt Me / (53)
- Path of Exile 2 / (48)
- Monster Hunter Wilds / (46)
- Windrose / (44)
- Path of Exile / (40)
- Grow a Garden 2 / (40)
- Bee Swarm Simulator / (36)


