0
0Grow a Garden Best 61KG Pets Combos for Fast Leveling & Mass-Producing
- Jordan
- Share
- Grow a Garden
- 12/19/25
- 1685
If you've been watching the 61kg Grow a Garden Huge Pets market collapse and thinking there's no way this is intended, you're not alone. I've been running hands-on tests with 61kg Peacock, Mimic Octopus, French Fry Ferret, and Rainbow Dilophosaurus, and the result is simple: 61kg pets are currently the best cost-to-power leverage in the game.
With the right cooldown loops and XP amplification, you can push pets from Level 0 → 40 in minutes, then use Elephants to ramp weight toward semi-huge/huge territory with minimal active play. Below is the clean, practical build guide—no fluff, just what works and when.
- Why 61kg Is the Sweet Spot (Mechanics + What It Means)
- The practical math (what I observed in real runs)
- Current Value & Worth Trading For Targets (Token Efficiency)
- Market snapshot (as used in my tests)
- The Ferret budget truth
- The Three Best 61kg Team Combos
- Combo #1 — Fastest Leveling in Grow a Garden (When It Works)
- Best for
- Team setup
- Why it works (the loop)
- Performance (from repeated runs)
- Hard limitations (don't ignore these)
- If your goal is to mass-produce 61kg Mimic Octopus
- Common mistake I see
- Combo #2 — The Do Everything Loadout (Leveling + Elephant Weight Cap)
- Best for
- Team setup (base version)
- Why it works (in plain language)
- Performance (what you should expect)
- Upgrade path (if you own a Rainbow Dilophosaurus)
- If you only care about leveling speed (not weight)
- Practical tip from experience
- Combo #3 — High Power on a Non-Endgame Budget
- Best for
- Team setup
- Why it works (the key interaction)
- Performance (realistic expectation)
- If you notice downtime
- Pick the Right Combo in 10 Seconds
- FAQ
- 1) Do I need 61kg on every pet in these teams?
- 2) Why are 61kg pets so cheap right now?
- 3) Why doesn't Combo #1 work on everything?
- 4) I want huge pets fast—what should I prioritize: leveling speed or elephant weight synergy?
- 5) Is it worth buying multiple Rainbow Dilophosaurus?
- Conclusion
↖ Why 61kg Is the Sweet Spot (Mechanics + What It Means)
The core exploit is that 61kg sits at a good enough stat breakpoint when you layer common multipliers.
↖ The practical math (what I observed in real runs)
Medium Toy: ~20% passive boost
- This effectively makes a 61kg pet feel closer to an ~80kg equivalent in performance.
Nightmare Mutation: ~22% bonus
- Stacking this with the toy pushes you near 100kg-level performance, which is effectively a soft cap for many skill breakpoints (notably cooldown-related thresholds).
Why this changes everything:
It means cheap 61kg copies can perform like endgame-ish pets. So instead of buying one perfect monster, you buy multiple 61kg units and build loops.
↖ Current Value & Worth Trading For Targets (Token Efficiency)
Prices move, but the pattern has been consistent in my trading/testing: 61kg semi-huge supply is high, and the market punishes anything not true huge.
↖ Market snapshot (as used in my tests)
| Pet (61kg, Nightmare) | Trade Tokens | Why People Buy It |
|---|---|---|
| Peacock | ~1,000 | Cooldown refresh loops + elephant weight farming synergy |
| Mimic Octopus | ~800 | Cooldown reduction + XP loops (fast leveling) |
| French Fry Ferret | ~800 | Leveling speed; doesn't need 61kg to cap utility |
| Dilophosaurus (61kg) | ~1,500 | XP bonus caps early; great pairing pet |
↖ The Ferret budget truth
French Fry Ferret is a special case: you don't need 61kg.
- In my testing, ~45kg already hits its relevant cap (its key utility doesn't scale meaningfully past that).
- What this means: you can save tokens by buying lighter Ferrets and still get nearly the same leveling speed.
↖ The Three Best 61kg Team Combos
Before you copy my loadouts, decide your priority:
- Goal A: Absolute fastest leveling (you want Level 40 as close to blink and it's done as possible)
- Goal B: All-purpose leveling + elephant weight pushing
- Goal C: Strong performance without top-tier pets
I'll give you all three, with swap rules.
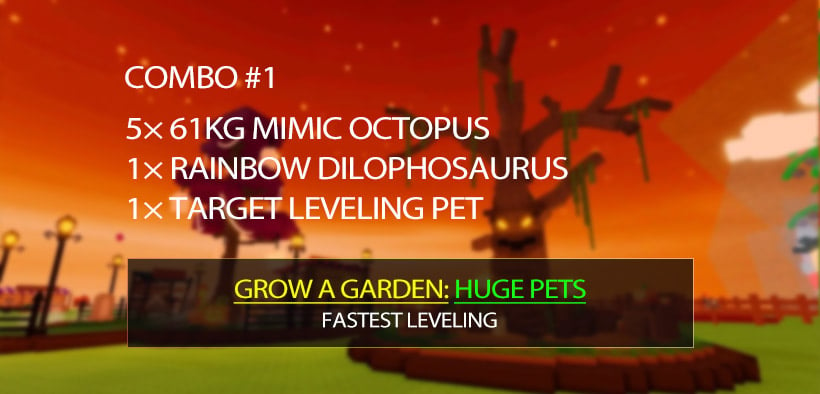
↖ Combo #1 — Fastest Leveling in Grow a Garden (When It Works)
This is the speedrun setup. It's absurd when compatible, and frustrating when not—because it has strict limitations.
↖ Best for
- Players who want the fastest possible Level 0 → 40
- Players who can afford at least one Rainbow Dilophosaurus
- Situations where the target pet is compatible with Mimic behavior
↖ Team setup
- 5× 61kg Mimic Octopus
- 1× Rainbow Dilophosaurus
- 1× Target leveling pet
↖ Why it works (the loop)
- Mimic Octopus reduces cooldowns and boosts XP flow.
- Rainbow Dilophosaurus amplifies XP so hard that the team can chain activations into an infinite-feeling loop.
↖ Performance (from repeated runs)
Level 0 → 40: under ~2 minutes (when the target pet is compatible)
↖ Hard limitations (don't ignore these)
This combo does NOT work well on:
- Pets that can be copied by Mimic Octopus (including Mimic Octopus itself)
- Pets where the loop gets blocked by copy/cooldown rules
It does work on:
- Pets that cannot be copied by Mimic Octopus
- Pets without cooldown skills (examples in my testing: Ruby Squid / Koi-like profiles)
↖ If your goal is to mass-produce 61kg Mimic Octopus
If you want to level multiple Mimics simultaneously, run this variant:
| Purpose | Setup |
|---|---|
| Level 4 Mimics at once | 3× 61kg Mimic Octopus + 1× Rainbow Dilophosaurus + 4× normal-weight Mimic Octopus |
Then:
Use Elephants afterward to push weight, because the leveling phase is the bottleneck you're solving first.
↖ Common mistake I see
People try to jam an Elephant into Combo #1 and get confused when weight gains feel slow.
Why: Dilophosaurus boosts Elephant XP, but it doesn't solve Elephant cooldown constraints the way Peacock-based loops do.
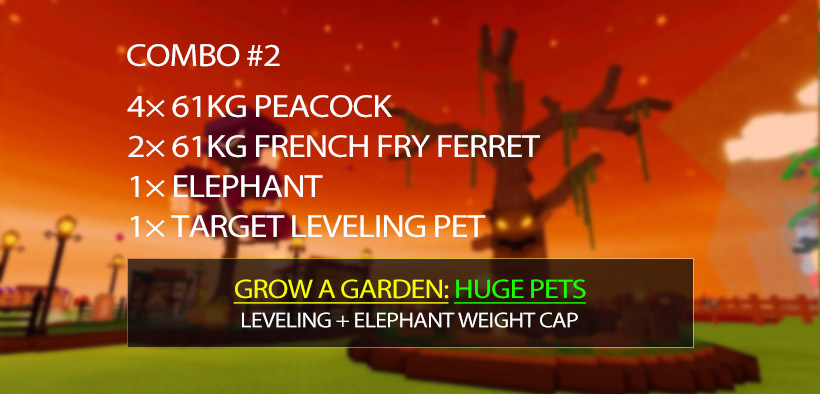
↖ Combo #2 — The Do Everything Loadout (Leveling + Elephant Weight Cap)
If you want one team that levels almost anything and also plays nicely with Elephant weight pushing, this is the safest monster.
↖ Best for
- Players farming weight/huge outcomes using Elephants
- Players leveling many different pets (less compatibility risk)
- People who want speed without being fragile
↖ Team setup (base version)
- 4× 61kg Peacock
- 2× 61kg French Fry Ferret(45kg is usually enough, save tokens if you can)
- 1× Elephant
- 1× Target leveling pet
↖ Why it works (in plain language)
- 4 Peacocks can refresh each other's cooldowns reliably.
- With Medium Toys, they behave like 15-second Peacocks, which accelerates everything.
- Ferrets add consistent leveling speed.
- Elephant pushes weight toward its cap on your target.
↖ Performance (what you should expect)
- Level 0 → 40: ~10 minutes
- Level 0 → 50: ~15 minutes
- Roughly 1 level per ~20 seconds in steady state
↖ Upgrade path (if you own a Rainbow Dilophosaurus)
Replace 1 Peacock with 1 Rainbow Dilophosaurus:
Level 0 → 40 drops to ~6 minutes in my tests
This is one of the best single purchase upgrades if you already run Peacock loops.
↖ If you only care about leveling speed (not weight)
Swap the Elephant out:
- Replace Elephant → another Ferret or another 61kg Peacock
- This pushed my pace closer to ~1 level per 15 seconds
↖ Practical tip from experience
If you only have one true 15-second Peacock (via toy/mutation stacking), you can still make the whole Peacock engine work, because that one can help keep the others cycling. The key is not perfection—it's cooldown overlap.
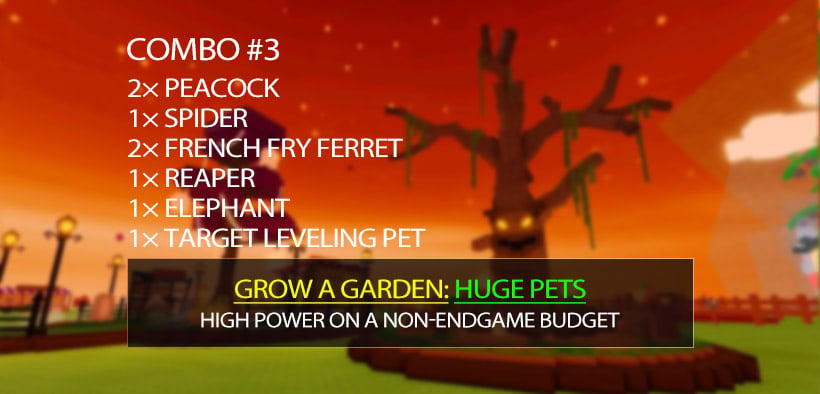
↖ Combo #3 — High Power on a Non-Endgame Budget
This is the setup I recommend when you don't have multiple premium pieces. It's less flashy, but it punches above its cost.
↖ Best for
- Players missing Rainbow Dilophosaurus or multiple 61kg premium pets
- People who want a team that just runs with minimal tuning
- AFK farmers who value stability
↖ Team setup
- 2× Peacock
- 1× Spider
- 2× French Fry Ferret
- 1× Reaper
- 1× Elephant
- 1× Target leveling pet
↖ Why it works (the key interaction)
- Reaper periodically grants a Medium Toy-like effect.
- That creates bursts of 15-second Peacock behavior for several minutes.
- Those bursts accelerate the entire team, including Reaper itself—so uptime can feel nearly continuous if your timing lines up.
↖ Performance (realistic expectation)
Level 40 in ~10 minutes
That's close to Combo #2 performance, sometimes closer than people expect.
↖ If you notice downtime
If your loop feels like it falls asleep, it usually means:
- Peacock cooldown alignment is drifting, or
- Your Reaper toy-effect window isn't being leveraged (you're missing the burst synergy)
↖ Pick the Right Combo in 10 Seconds
Here's the selection cheat sheet I use when friends ask what should I run?
| Your Goal | Best Combo | Why |
|---|---|---|
| Fastest Level 0→40 possible | Combo #1 | XP + cooldown loop is unmatched when compatible |
| Level + Weight pushing (Elephant) | Combo #2 | Peacock engine + Elephant synergy is consistent |
| Strong results without top-tier pets | Combo #3 | Reaper provides pseudo-toy uptime and stability |
| Level multiple Mimics together | Combo #1 (variant) | Parallel leveling then Elephant weight push |
↖ FAQ
↖ 1) Do I need 61kg on every pet in these teams?
Not always. French Fry Ferret is the big exception: around 45kg is typically enough to reach its functional cap. For Peacock and Mimic Octopus, 61kg is valuable because it hits the cheap but near-capped performance band when stacked with toy/mutation bonuses.
↖ 2) Why are 61kg pets so cheap right now?
Supply. Rainbow Elephant-driven weight pushing floods the market with semi-huge outcomes, so anything not perfect huge gets undercut. That's annoying for sellers, but great for builders.
↖ 3) Why doesn't Combo #1 work on everything?
Because Mimic Octopus interactions can be blocked by copy rules or by skill designs that don't create a clean cooldown/activation loop. If the target pet can be copied (or conflicts with Mimic behavior), the engine loses its infinite chain feel.
↖ 4) I want huge pets fast—what should I prioritize: leveling speed or elephant weight synergy?
If you're weight-farming, Elephant synergy matters more than shaving a few minutes off leveling, because weight pushing is the long pole. That's why Combo #2 is the default for huge hunting: it levels fast and supports weight caps cleanly.
↖ 5) Is it worth buying multiple Rainbow Dilophosaurus?
In my experience, no for most players. The performance becomes win more while the cost becomes sell your entire inventory. I've seen pricing around 30,000 tokens each; stacking many can hit insane totals for gains that often resemble Mimic-based loops.
↖ Conclusion
61kg pets are broken in the best possible way for efficiency: they sit at a breakpoint where common multipliers (toy + mutation) push them near top performance without top-tier prices. If you want the fastest leveling and your target pet is compatible, Combo #1 is the speed king. If you want the most reliable path to weight caps and huge outcomes, Combo #2 is the daily driver. And if you're building from a thinner inventory, Combo #3 gives near-premium results with a more forgiving roster.

Most Popular Posts
- Grow a Garden 2 Release Date Guide: Why Saturday Is the Likely Launch Window
- Grow a Garden Bizzy Bee Event: Honey Coins, Bee Eggs, Seeds, Upgrades, and Rewards
- Grow a Garden Bee Dungeon Guide: Best Wave 100 Strategy, Bee Shards, and Team Setup
- Grow a Garden Easter Best Way to Farm Chocolate Coins and Golden Eggs Fast Guides
- Grow a Garden Easter Update Guide: Best Seeds, Pets, and Fastest Event Strategy
- Grow a Garden Busy Bee Part 2 Guide: Royal Jelly, Best Pets, New Seeds, and Prep Strategy
Popular Category Lists
- Grow a Garden / (283)
- ARC Raiders / (251)
- CoD: Black Ops 7 / (164)
- Monopoly Go / (145)
- MLB 26 / (134)
- Star Citizen / (100)
- Steal a Brainrot / (87)
- Sailor Piece / (67)
- CoD: BLACK OPS 6 / (55)
- Forza Horizon 6 / (54)
- Blox Fruits / (54)
- ARK Survival Ascended / (51)
- Path of Exile 2 / (48)
- Adopt Me / (47)
- Monster Hunter Wilds / (46)
- Diablo IV / (45)
- Windrose / (43)
- Path of Exile / (40)
- Battlefield 6 / (34)
- Bee Swarm Simulator / (32)