0
0ARC Raiders Flickering Flames Farming Items Guides: Routes, Spawn Logic, and Zero-Waste Runs
- KIVRI
- Share
- ARC Raiders
- 12/19/25
- 878
You don't need a full weekend (or a spreadsheet addiction) to finish the Flickering Flames project. I've been running this event like a part-time delivery driver: same routes, same containers, minimal detours, maximum completion.
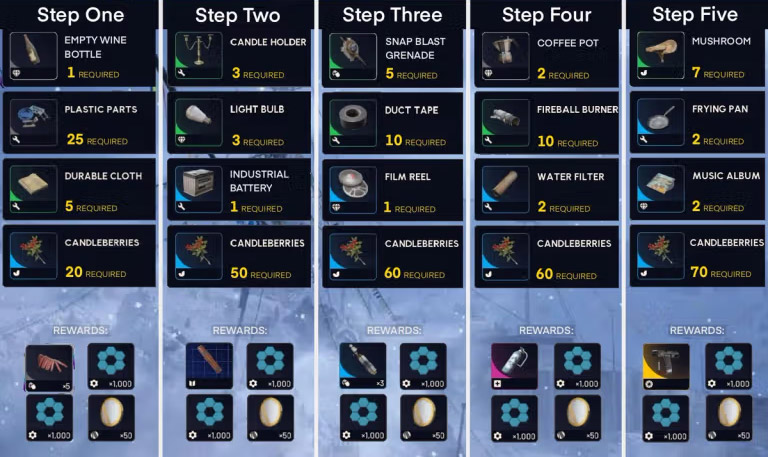
Here's the play: two efficient core runs to clear nearly all residential + utility items, then two targeted micro-farms for Fireball Banners and the slow grind (Candleberries + Mushrooms). I'll also show you exactly what to do if RNG refuses to cooperate, so you don't waste time just looting more stuff with no plan.
- Core Strategy: Finish 80–90% in Two Runs
- Run 1 (Power Gen → Apartments Edge → Hydroponics → Facility → Extract)
- Step-by-step route
- What Run 1 typically completes
- Run 2 (Blue gate Fill the Gaps Sweep)
- What to do in Blue gate
- Why trash cans matter
- Bonus: Duct tape
- Targeted Micro-Farms (Fast, Low-Risk)
- Micro-Farm A: Fireball Banners (Creature drop)
- Micro-Farm B: Candleberries + Mushrooms (Cold Snap efficiency)
- Don't Waste Time Control Panel
- Practical Timing (What I See in Real Runs)
- Common Mistakes I See (And How I Fix Them)
- 1) Looting the wrong theme for the missing item
- 2) Skipping kitchen drawers
- 3) Turning candleberries into a full-map marathon
- 4) Fighting for banners when corpses are available
- FAQ
- 1) If I only have 30 minutes, what's the best plan?
- 2) I'm missing only film reels—where do I go?
- 3) I can't find an industrial battery. What should I change?
- 4) Cold Snap isn't on the map I want. Do I wait?
- 5) I keep dying before extracting with banners. Is it still worth it?
- Wrap-up (What to Run, In Order)
↖ Core Strategy: Finish 80–90% in Two Runs
The reason most people take forever is they loot areas, not item families. This event's items cluster by container type and loot theme:
- Residential containers (kitchen drawers, apartments) = coffee pots, frying pans, candle holders, albums/film reels (depending on your remaining list).
- Breachable/rusty boxes + shelves (raider camps, facilities, hydro structures) = water filters, industrial battery, utility odds and ends.
- Specific creature drops = Fireball Banners.
- Event flora containers (raider baskets/caches during Cold Snap) = candleberries, plus reliable mushroom spots.
That means the fastest approach is route density + container targeting, not sightseeing.
↖ Run 1 (Power Gen → Apartments Edge → Hydroponics → Facility → Extract)
This run is designed to hit every relevant container class once with almost no backtracking.

↖ Step-by-step route
1. Start: Power Generation Elevator
- Check the white car immediately.
- Goal: Light bulbs.
- Why this works: That car has a high spawn tendency for bulbs; I usually see ~2 per visit, which often completes your bulb requirement early.
2. Move: Along the edge to the Apartment Buildings
- Loot bottom floors first.
- Prioritize:
- Green kitchen drawers (best density for kitchen items)
- All normal containers
- Target items: coffee pots, frying pans, candle holders (and other residential pieces you still need).
3. Detour: Raider camp / raider depot-like spot on the edge
- Breach every rusty/breachable box.
- Target items: water filters (big one), occasional extras.
- If you're on the snow variant: watch for raider baskets (candleberries source).
4. Continue: Finish all apartment complexes on that side
- There are typically multiple apartment clusters; don't cherry-pick one building and leave.
- Why: Residential RNG smooths out when you hit enough drawers/containers in one loop.
5. Rotate: Hydroponics complex
- Loot:
- Shelves
- Breachable containers
- Water edges / larger water area (for mushrooms)
- Target items: industrial battery (common here), water filters, mushrooms.
6. Pipeline tower → Control tower → Drop into primary facility
- More breachable boxes for:
- Water filters
- Backup chance at industrial battery
7. Extract: Water treatment elevator
- If you're still short on light bulbs: take the quick left to check another white car nearby (often looted, but worth the 10-second glance).
↖ What Run 1 typically completes
- Light bulbs
- Coffee pots
- Frying pans
- Candle holders
- Water filters
- Industrial battery
- Mushrooms progress (not always finished)
- Durable cloth (if you don't craft) + incidental items like wine bottle (depending on your project list)
↖ Run 2 (Blue gate Fill the Gaps Sweep)
This run exists for one reason: high container density with fast resets on residential loot.
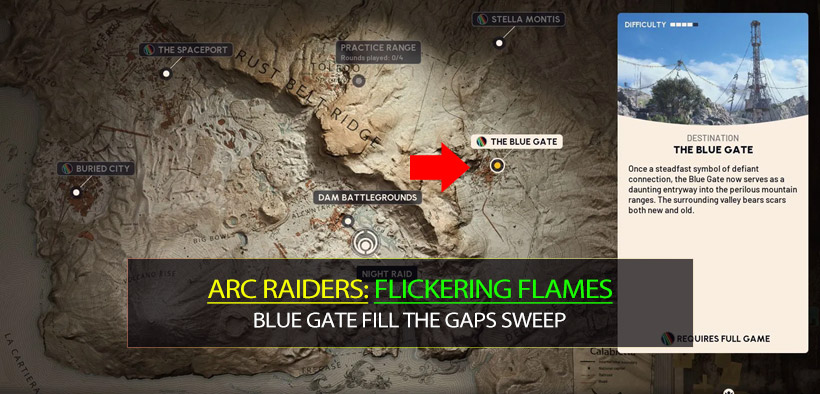
↖ What to do in Blue gate
- Loot all containers in the dense area loop.
- Prioritize trash cans aggressively.
↖ Why trash cans matter
Trash cans have a surprisingly strong tendency to cough up film reels. That means instead of hoping you find reels in random homes, you're farming a container type that behaves like it's biased toward them.
↖ Bonus: Duct tape
You need 10 duct tape (for many players, this becomes the silent time sink).
Blue gate tends to produce duct tape quickly because you can hit many small containers per minute.
If you finish duct tape early, keep running the loop until you close out any remaining residential items (albums/reels/extra kitchen pieces). This avoids doing a third maybe-this-time residential run later.
↖ Targeted Micro-Farms (Fast, Low-Risk)
After Run 1 + Run 2, you should be staring at a short list: Fireball Banners, plus Candleberries and whatever mushrooms remain.
↖ Micro-Farm A: Fireball Banners (Creature drop)
Best practical option: Stella Montis (Business Center loop)
- I often find multiple Fireball bodies late in a raid without fighting.
- Why this matters: you're not paying the ammo + healing + time tax.
Alternative: Sandbox
Plenty of Fireballs as well; choose whichever map you survive more consistently.
Low-risk tactic I use
- Bring a cheap loadout.
- Store up to 3 banners in your safe pocket.
- What this means: even if you get eliminated, you still bank progress. Three quick pickups can represent a huge chunk of the requirement.
↖ Micro-Farm B: Candleberries + Mushrooms (Cold Snap efficiency)
Best option: Spaceport during Cold Snap
- Run the outskirts looking for raider baskets (similar to other event flora containers).
- They don't spawn as commonly as the easier event baskets, but you can still stack a lot per run if you stay disciplined.
Reliable mushroom spot
- There's a tree in the trench (Spaceport) that consistently produces mushrooms.
- Your goal is 7 mushrooms; a couple clean runs usually handles it.
If Spaceport Cold Snap isn't available
Go Blue gate and rotate to the Olive Grove area:
Check buildings for:
- Raider baskets / fruit baskets
- Raider caches (listen for the ticking sound)
Breach caches during Cold Snap for candleberries.
This step is the grind, but it's a controlled grind: you're scanning for specific containers, not looting everything and praying.
↖ Don't Waste Time Control Panel
Below is a practical checklist you can keep beside you. It's organized by item → best farming context → container → route stage → fallback.
| Item | Best Map/Area | Best Container Type | Do It In | If RNG Fails |
|---|---|---|---|---|
| Light Bulbs | Power Gen + near Water Treatment extract | White cars | Run 1 start + end | Check both cars; if still short, repeat Run 1 start only (quick reset) |
| Coffee Pot | Apartment complexes | Green kitchen drawers | Run 1 | Blue gate sweep for residential fillers |
| Frying Pan | Apartments | Kitchen drawers + general containers | Run 1 | Blue gate sweep |
| Candle Holders | Apartments | Kitchen drawers | Run 1 | Blue gate sweep |
| Water Filters | Raider camps + Hydroponics + Facility | Breachable/rusty boxes, shelves | Run 1 | Re-hit breachable box clusters; don't over-loot apartments for this |
| Industrial Battery | Hydroponics + Facility | Shelves + breachable containers | Run 1 | Repeat Hydroponics portion (highest payoff/minute) |
| Film Reels | Blue gate dense loop | Trash cans | Run 2 | Commit to trash cans over pretty houses |
| Duct Tape (x10) | Blue gate | High-density small containers | Run 2 | Stay in container-dense loop; don't travel for it |
| Mushrooms (x7) | Spaceport (Cold Snap) | Water edges + trench tree | Micro-Farm B | Re-run trench tree route; avoid random swamp wandering |
| Candleberries | Spaceport/Blue gate (Cold Snap) | Raider baskets + caches | Micro-Farm B | Blue gate Olive Grove buildings + ticking caches |
↖ Practical Timing (What I See in Real Runs)
I track my runs because it's fast is useless without numbers.
- Run 1: ~20–30 minutes depending on combat interruptions and breach time
- Run 2: ~10–20 minutes (container density carries hard)
- Fireball Banners: often 5–10 minutes if you're not fighting every encounter
- Candleberries + Mushrooms: usually 2–4 Cold Snap raids depending on basket luck and survival
If your raids are clean, you're realistically looking at under an hour for most stages, with candleberries as the only piece that can stretch.
↖ Common Mistakes I See (And How I Fix Them)
↖ 1) Looting the wrong theme for the missing item
If you're missing water filters, apartments are a trap.
Fix: pivot to breachable boxes and shelves (raider camps, hydro, facility).
↖ 2) Skipping kitchen drawers
People loot rooms and ignore drawers because they're annoying.
Fix: treat green kitchen drawers as mandatory stops; they're the fastest kitchen-item density.
↖ 3) Turning candleberries into a full-map marathon
If you run through the center of the map just checking, you burn time and attract fights.
Fix: commit to outskirts basket scanning (Spaceport) or Olive Grove building chain (Blue gate).
↖ 4) Fighting for banners when corpses are available
If you push fights, your banners/hour can drop.
Fix: late-raid sweep for bodies, cheap kit, safe pocket strategy.
↖ FAQ
↖ 1) If I only have 30 minutes, what's the best plan?
Run Run 1 up to apartments + raider camp, then extract. That segment alone can complete bulbs + multiple residential items + water filters if you breach consistently.
↖ 2) I'm missing only film reels—where do I go?
Blue gate, and target trash cans. If you find yourself looting kitchens for reels, you're paying extra time for lower consistency.
↖ 3) I can't find an industrial battery. What should I change?
Stop doing extra residential loops. Go Hydroponics and prioritize shelves + breachables. If you see a choice between another apartment and another hydro building, hydro wins for batteries.
↖ 4) Cold Snap isn't on the map I want. Do I wait?
No. Rotate to Blue gate Olive Grove during its Cold Snap window and hunt raider baskets/caches. If you keep waiting for the perfect Spaceport timing, your total completion time balloons.
↖ 5) I keep dying before extracting with banners. Is it still worth it?
Yes—if you're using the safe pocket. If you secure 3 banners and die, that raid still counts as progress and usually beats playing overly safe for 20 minutes and extracting with one.
↖ Wrap-up (What to Run, In Order)
Here's the exact order I follow when I'm trying to finish without turning it into homework:
1. Run 1: Power Gen → Apartments edge (loot drawers) → Raider camp (breach boxes) → Hydroponics (shelves + mushrooms) → Facility (breach) → Extract
2. Run 2: Blue gate dense loop (trash cans + containers) until residential + duct tape are done
3. Micro-Farm A: Stella Montis Business Center (or Sandbox) for Fireball Banners with safe pocket banking
4. Micro-Farm B: Spaceport Cold Snap outskirts + trench tree for candleberries + mushrooms; fallback to Blue gate Olive Grove during Cold Snap
Follow that sequence and you're spending your time on high-probability containers, not hope.

Most Popular Posts
- Arc Raiders Canto Guide: Best Build, Solo vs Trios Tips, and Blueprint Farm
- ARC Raiders Assessors Guide: Easy Solo Loot Strategy With or Without Smoke Grenades
- ARC Raiders Riven Tides Key Room Guide: Best Hotel Keys, Loot Routes, Secure & Crane Storage
- ARC Raiders Damage Fireflies Trial Guide: Best Farm Method on Buried City Night Raid
- ARC Raiders Scrappy Guide: Best Fruits, and What Apricots & Agave Actually Drop
- ARC Raiders Riven Tides Update: New Map & Items, ARC Turbine, Rewards, and Best Early Strategy
Popular Category Lists
- Grow a Garden / (283)
- ARC Raiders / (251)
- CoD: Black Ops 7 / (164)
- Monopoly Go / (145)
- MLB 26 / (134)
- Star Citizen / (100)
- Steal a Brainrot / (87)
- Sailor Piece / (67)
- CoD: BLACK OPS 6 / (55)
- Forza Horizon 6 / (54)
- Blox Fruits / (54)
- ARK Survival Ascended / (51)
- Path of Exile 2 / (48)
- Adopt Me / (47)
- Monster Hunter Wilds / (46)
- Diablo IV / (45)
- Windrose / (43)
- Path of Exile / (40)
- Battlefield 6 / (34)
- Bee Swarm Simulator / (32)