


 0
0Grow a Garden Huge Capybara Guide: 84kg Nightmare Build, OP Team Comps, Trade Values by Weight
- Cecila
- Share
- Grow a Garden
- 11/01/25
- 1903
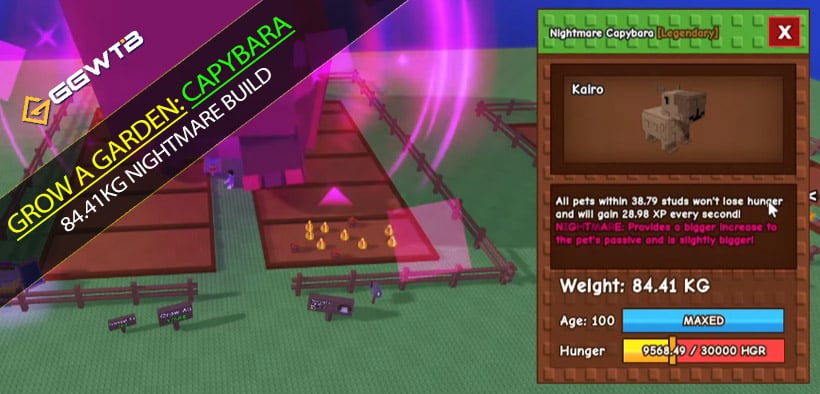
You're looking at the most busted early‑game power leveler in the Grow a garden: the Grow A Garden Capybara. A normal one is good; a huge, 84.41 kg nightmare‑mutated Capybara is a different beast. Why? Because its aura turns hunger off and pumps XP every second—scaled by size and range. This means you can stand still, let your Grow a Garden pets soak XP, and hit key levels in minutes, not hours. In this guide, I'll show you how to build practical teams Combo, exploit the current tiger stack bug (while it lasts), set up a safe AFK loop, and trade Capybaras by weight like a pro.
- Capybara Skill Breakdown: What Changes When It's Huge
- Best Team Combinations: What to Run Right Now
- AFK Leveling Setup: Make It Hands‑Off
- Trade Value by Weight: How to Price Your Capybara
- Risk Notes: Bugs, Patches, and Mutations
- FAQ
- Conclusion
↖ Capybara Skill Breakdown: What Changes When It's Huge
- Core effect: Any pet within the Capybara's aura doesn't lose hunger and gains passive XP per second.
- Normal vs Huge:
- Range: ~15 studs → ~38 studs when huge.
- XP gain: ~3 XP/s → ~28 XP/s when huge (9× burst).
- Hunger immunity removes the biggest AFK friction. Even at zero hunger, pets still receive XP near the Capybara, so you can level through the early game without feeding cycles.
- Dropping a Moth near my huge Capybara took it from level 1→2 instantly, then to level 5 in seconds. For low‑tier pets, the ramp is wild.
↖ Best Team Combinations: What to Run Right Now
Combo A: 7 Capybaras + 1 Tiger + 1 pet you want to level
- There's a live bug where Tiger pulls all Capybaras—including huge—into a tight cluster, effectively stacking auras and locking positions.
- With one huge Capybara plus stacked normals, hovering near a moving Moth spikes readouts up to ~118 XP/s; fluctuation is due to Moth movement. With seven huge Capybaras, clearing 200 XP/s is realistic.
- If you notice the cluster breaks: Re‑issue Tiger's pull and reposition your leveling target inside the overlap zone.
Combo B: Toffee Tether or Pancake Stack clustering
- If you missed the cooking event, grab Toffee Tether (Halloween gear box). It's a mutation that gathers pets around you, making it easy to lock everything inside the Capybara aura.
- Tether replaces any existing mutation—apply it only if your Capybara isn't already running a crucial mutation. Pancake Stack achieves similar auto‑clustering without swapping mutations if you earned it.
Combo C: Moth + Capybara for AFK safety
- While Capybaras stop hunger decay within range, pets wander; outside the aura, hunger can hit zero and slow XP. Moth's global restore (100% hunger every 10 minutes) covers gaps.
- Put the huge Capybara central, set the Moth's idle path short, and use a soft clicker to avoid the platform's 20‑minute AFK timeout.
↖ AFK Leveling Setup: Make It Hands‑Off
- - Positioning: Center your huge Capybara; mark the 38‑stud radius with a simple ring reference (objects or floor markers). Keep target pets inside that circle.
- - Movement control: Use Tiger or Tether to keep a tight stack; if neither is available, fence the garden path so pets don't drift out.
- - Anti‑AFK: A low‑frequency auto click (e.g., every 30–45 seconds) retains session without breaking inputs.
- - Monitoring: If XP per second feels lower than expected, check for aura overlap and hunger status; the combo should read steady gains even at zero hunger inside aura.
↖ Trade Value by Weight: How to Price Your Capybara
Weight scales desirability because bigger Capybaras push range and XP effect near cap, and extreme sizes are rarer (often bred with Brontosaurus boosts). However, practical XP caps around +30 XP/s, so marginal value above ~9 kg slows.
Current market baselines (observations aligned with Trade Kitsune tiers):
- Regular Capybara: Already outvalues most mid‑tier pets. Six normals ≈ one Mimic Octopus, roughly Ostrich/Peacock tier. Recommendation: Hold for compounding demand—players stack Capybaras, Scarlet Macaws, Ostriches, Peacocks, then flip eight Seals for Paradise Eggs (chance at huge pets). Expect price creep; six normals may reach Butterfly equivalence.
- 5 kg: Worth more than a Raccoon. Fair trade: add one Disco + one Dragonfly to match value if you're offering the 5 kg Capybara.
- 6 kg: Two Raccoons aren't enough—require one Kitsune to square the deal.
- 7 kg (Titan tier entry): Value ≈ one Kitsune + one Raccoon.
- 8 kg: Near maxed practical performance. My 84.41 kg nightmare cost two Kitsune equivalents; this class is rare.
- 9 kg+: Extremely rare, commonly results from Brontosaurus‑boosted breeding. Because XP benefit approaches cap (~30 XP/s), price ascends slower. Good offers to accept: two strong Kitsunes or two Kitsunes + one Raccoon, depending on mutation and provenance.
How to negotiate:
- If the buyer fixates on XP cap, anchor on range (38 studs vs 15), clustering synergy, and AFK reliability—it's not just raw XP, it's uptime.
- If you find the market frothy, then set a stop‑trade rule: only accept multi‑asset bundles (e.g., Kitsune + event gear) to hedge volatility.
↖ Risk Notes: Bugs, Patches, and Mutations
- Tiger pull bug: It's a meta‑defining exploit right now. If it gets patched, switch to Moth‑centric AFK or Tether clustering; your huge Capybara still anchors the strategy.
- Mutation conflicts: Applying Toffee Tether replaces existing mutation. If your Capybara already runs Nightmare, decide which utility you want—raw survivability/lore value vs. clustering convenience.
- Over‑stacking: If your XP number looks too high to be real, remember moving units cause fluctuation; validate by timed level checkpoints, not just the meter.
↖ FAQ
Q: Does the Capybara aura give XP when pets are at zero hunger?
A: Yes. Inside the aura, you still gain XP per second even if hunger reads zero. That's why AFK leveling works.
Q: What's the realistic top XP per second I can see?
A: A single huge Capybara posts ~28 XP/s. With bugged clustering and multiple Capybaras, your effective per‑pet gain can spike higher, but expect fluctuation as movers (like Moth) enter/exit the overlap.
Q: If the tiger bug is fixed, is the meta dead?
A: Not at all. Run Moth + Capybara with Tether/Pancake for controlled clustering. You'll lose the extreme stack but retain safe AFK and strong XP uptime.
Q: Should I trade away normal Capybaras now?
A: If you see rising demand tied to Paradise Egg flips, it's smart to hold. If you need liquidity, price at six normals ≈ Mimic Octopus and request add‑ons for event gear.
Q: Do higher weights past 9 kg still matter?
A: Rarity and flex value, yes; practical XP plateaus. If you're a performance player, 8–9 kg hits the sweet spot. If you collect, 84 kg nightmare is primo.
↖ Conclusion
If you want fast, low‑maintenance progress, build around a huge Capybara: lock range, stabilize hunger, and let XP tick while you focus elsewhere. Use Tiger stack while it lasts; have Moth + Tether as your fallback. Price trades by weight, not just the name—5, 6, 7, 8, and 9+ kg tiers behave differently, and the market rewards smart bundling.

Most Popular Posts
- Grow a Garden 2 Release Date Guide: Why Saturday Is the Likely Launch Window
- Grow a Garden Bizzy Bee Event: Honey Coins, Bee Eggs, Seeds, Upgrades, and Rewards
- Grow a Garden Bee Dungeon Guide: Best Wave 100 Strategy, Bee Shards, and Team Setup
- Grow A Garden Best Pet Mutations 2026: Ranked Guide for Power, Trading, and AFK Farming
- Grow a Garden Bee Stats Guide: Best Bees Ranked by Damage, HP, and DPS
- Grow a Garden Busy Bee Part 2 Guide: Royal Jelly, Best Pets, New Seeds, and Prep Strategy
Popular Category Lists
- Grow a Garden / (286)
- ARC Raiders / (267)
- CoD: Black Ops 7 / (166)
- Monopoly Go / (147)
- MLB 26 / (146)
- Star Citizen / (122)
- Steal a Brainrot / (89)
- ARK Survival Ascended / (79)
- Sailor Piece / (68)
- Forza Horizon 6 / (65)
- Diablo IV / (61)
- Blox Fruits / (61)
- Adopt Me / (56)
- CoD: BLACK OPS 6 / (55)
- Path of Exile 2 / (48)
- Grow a Garden 2 / (48)
- Monster Hunter Wilds / (46)
- Windrose / (44)
- Path of Exile / (40)
- Bee Swarm Simulator / (36)


