0
0Path of Exile 2 Mercenary Overview: Witchhunter vs Gemling Legionnaire
- Davis
- Share
- Path of Exile 2
- 12/08/24
- 38354

The Mercenary is one of the most dynamic and visually impressive classes in Path of Exile 2. With an arsenal of grenades, crossbows, and specialized ammunition, it excels in both clearing packs and tackling bosses. This guide explores the Mercenary's core mechanics, dedicated skills, effective combos, and Witchhunter & Gemling Legionnaire Ascendancy!
↖ Overview
The Mercenary class features explosive gameplay with a focus on grenades, crossbows, and tactical ammunition. It is designed for players who enjoy high-damage output and strategic combat. With two ascendancy options, including the Witchhunter, the Mercenary offers versatility and adaptability in various scenarios.
Key Features:
- High Damage Output: Excellent for both single-target and area-of-effect damage.
- Tactical Gameplay: Requires strategic use of ammunition types and grenade placement.
- Versatility: Works well for clearing packs and boss encounters.
↖ Key Skills and Combos
↖ Dedicated Mercenary Skills
Mercenaries work best when equipped with grenades, crossbow bolts and elemental abilities. They can be played together with Ranger and Witch classes to provide more options.
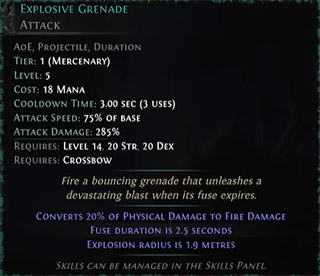
Explosive Grenade:
- Damage Effectiveness: 285%
- Cool Down: 3 seconds
- Radius: Moderate
- Usage: A game-changing skill for early levels, used for pack clearing when combined with basic bolts or rounds.
- Drawback: Damage from explosives is timed via fuse and thus, can only be provided through careful aim.
↖ Ammunition Types
Mercenaries can load their crossbows with specific ammunition types. Only one type can be equipped at a time, making situational awareness crucial.
| Ammunition Type | Effectiveness | Recommended Combos |
|---|---|---|
| Fragmentation Rounds | Enhances freeze and ice effects | Use with Glacial Bolts or Permafrost Bolts |
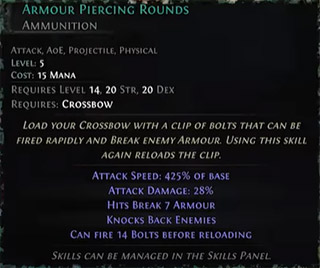
| Armour Piercing Rounds | Breaks enemy armor | Pair with High Velocity Rounds |
| High Velocity Rounds | Consumes broken armor for bonus damage | Combine with Armour Piercing Rounds |


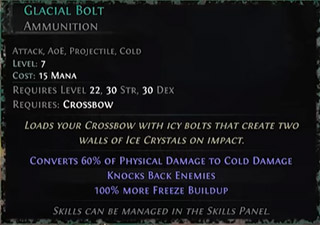
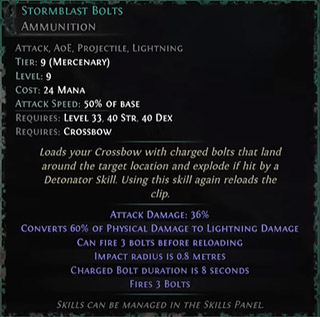
↖ Elemental Bolts
- Permafrost Bolt – An ice spell that deals minimal damage, although that would allow the user to freeze foes quickly in this manner.
- Glacial Bolt – This bolt has relatively low physical damage, however by its spike or frost or cold gems It can be greatly improved for boss fights.
- Stormblast Bolt – A great tool for certain casters to use against large amounts of units, This ammunition is based around lightning.

Note: To optimize ammo expenditure, purchase nodes in the passive tree to increase bolt reload speed and decrease bolt use.
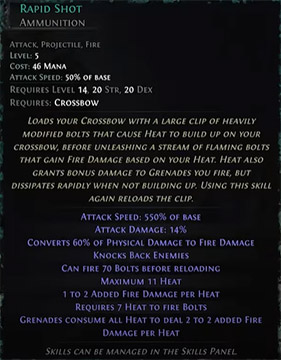
↖ Rapid Shot
- Conversion: Physical to fire damage.
- Mechanic: Requires heat buildup before firing.
- Strengths: Provides substantial flat damage.
↖ Defensive Skills
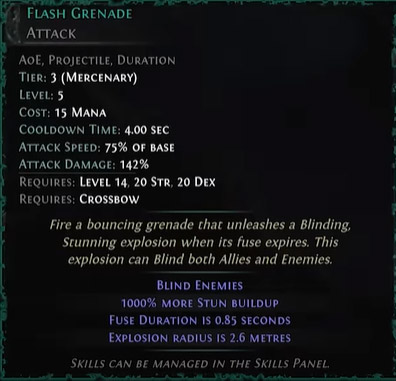
1. Flash Grenade:
Stuns enemies while applying guaranteed blind.
- Cooldown: 4 seconds.
- Usage: A reliable defensive option for crowd control.
2. Cluster Grenade:
Converts some damage to fire.
- Damage Effectiveness: 155%.
- Mechanic: Hits enemies with a large grenade followed by smaller grenades for devastating single-target damage.

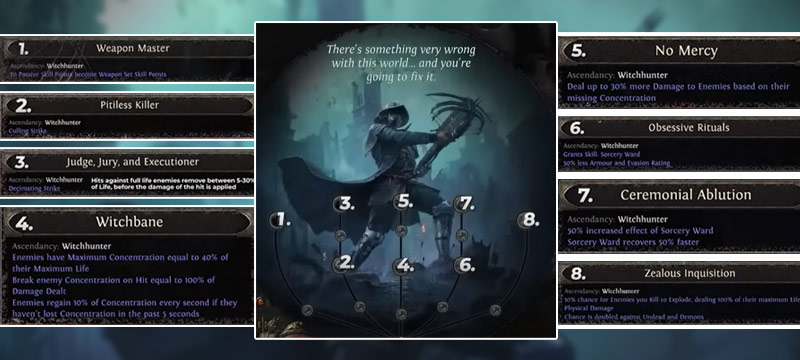
↖ Witchhunter
| Node Name | Key Effect | Best Use Case | Recommendation |
|---|---|---|---|
| 1. Weapon Master | Converts 20 passive skill points into 20 weapon set skill points. | Primarily useful in weapon-swap-oriented builds. | Consider this node only if your build heavily relies on swapping weapon sets for specific scenarios. |
| 2. Pitiless Killer | Grants Culling Strike, instantly killing enemies at specific health thresholds: Normal Monsters (30%), Magic Monsters (20%), Rare Monsters (10%), Unique Monsters (5%). | Builds focused on clearing large packs of enemies quickly. | Highly effective for speed farming and synergizes well with other nodes like Judge, Jury, and Executioner. |
| 3. Judge, Jury, and Executioner | Removes 5% to 30% of an enemy's life on the first hit. | Builds aiming to maximize damage efficiency. | A must-have node for accelerating enemy elimination and reducing encounter times. |
| 4. Witchbane | Introduces a new resource called Concentration, based on 40% of an enemy's maximum life. Breaking Concentration disables enemies temporarily. | Defensive builds or those requiring crowd control. | Pairs well with No Mercy for increased damage output. |
| 5. No Mercy | Increases damage by up to 30% based on the amount of Concentration an enemy has lost. | Builds focusing on Concentration mechanics. | Prioritize this node for builds leveraging Concentration effectively. |
| 6. Obsessive Rituals | Provides a Sorcery Ward defensive layer against elemental damage but reduces armor and evasion by 50%. | Elemental resistance-heavy builds. | Suitable for builds that do not rely heavily on armor or evasion. |
| 7. Ceremonial Ablution | Increases the effect of Sorcery Ward by 50% and speeds up its recovery by 50%. | Builds already utilizing Obsessive Rituals effectively. | Only invest in this node if you are already using Obsessive Rituals. |
| 8. Zealous Inquisition | Grants a 10% chance for enemies to explode upon death, dealing 100% of their life as physical damage. | Builds focused on area-of-effect (AoE) clearing. | Excellent for clearing large packs of enemies, though inconsistent in smaller encounters. |
Summary:
- Very damage oriented
- Excellent clear + Bossing potential
- Defensively should be competitive against other not tanky classes
↖ Gemling Legionnaire
.jpg)
| Node Name | Key Effect | Best Use Case | Consideration | Pros & Cons |
|---|---|---|---|---|
| 1. Crystalline Potential | Provides +12% Quality to all Skill Gems. | Highly beneficial for builds that rely on skill gems with impactful quality bonuses. Comparable to the Ashes of the Stars Amulet from Path of Exile 1, enabling creative interactions. | Requires taking one unrevealed |
|
| 2. Integrated Efficiency | Grants 3 Additional Skill Slots. | Useful for builds requiring extra slots for utility skills or situational abilities. Synergizes well with Thaumaturgical Infusion for additional benefits. | May not be essential for most builds |
|
| 3. Thaumaturgical Infusion | Grants bonuses based on the color of support skill gems socketed anywhere:
| Provides defensive benefits, making it suitable for most builds. Pairs well with Integrated Efficiency to optimize gem usage. | Adaptable to any build, enhancing survivability. |
|
| 4. Adaptive Capability | Allows attribute requirements to be fulfilled by the highest attribute value. | Ideal for Intelligence or Dexterity-stacking builds. Enables players to focus on one primary attribute without worrying about meeting others' requirements. | Particularly useful for builds that rely on heavy stat stacking. |
|
Summary:
- Very flexible
- True potential will be uncovered when we seee Gem quality buffs
- Comfortable for Attribute Stackers
↖ Witchhunter Vs Gemling Legionnaire
| Witchhunter | Gemling Legionnaire |
|---|---|
|
|
Most Popular Posts
- Path of Exile 2 Witch Class Overview: Blood Mage vs Infernalist
- PoE 2 Passive Tree Guide: Classes and Builds Application
- Path of Exile 2 Mercenary Overview: Witchhunter vs Gemling Legionnaire
- PoE 2 Leech Mechanics: Types, Statistics, Example and Keypoints
- PoE 2 Sanctum Farm Guide: Trial of the Sekhemas
- Path of Exile 2 Warrior Class Overview: Titan vs Warbringer
Popular Category Lists
- Grow a Garden / (286)
- ARC Raiders / (262)
- CoD: Black Ops 7 / (166)
- Monopoly Go / (146)
- MLB 26 / (145)
- Star Citizen / (112)
- Steal a Brainrot / (89)
- Sailor Piece / (68)
- ARK Survival Ascended / (67)
- Diablo IV / (61)
- Forza Horizon 6 / (60)
- Blox Fruits / (60)
- CoD: BLACK OPS 6 / (55)
- Adopt Me / (53)
- Path of Exile 2 / (48)
- Monster Hunter Wilds / (46)
- Windrose / (44)
- Path of Exile / (40)
- Grow a Garden 2 / (40)
- Bee Swarm Simulator / (36)