0
0 Created: Oct 4,2026 | RuneScape: Dragonwilds
RuneScape Dragonwilds: Dreaming Stone Shards Route & Puzzle Guide


Tracking down all 13 Dreaming Stone Shards in Dowdun Reach requires navigating multiple vertical zones, solving two locked-door environment puzzles, and managing inventory tools before setting out. Pack your gear and follow this optimized route to complete Doric's quest without backtracking through fortress death runs.
- Required Inventory & Tool Checklist
- All 13 Shard Locations & Route Matrix
- Step-by-Step Route Walkthrough
- Garrison & Pastures (Shards 1–5)
- Crypt, Demon Gate & Lake (Shards 6–8)
- Cathedral & Tower (Shards 9 & 11)
- Complex Puzzle Chambers
- Library Vault Puzzle (Shard 10)
- Menagerie Levers & Shortcut (Shards 12 & 13)
- FAQ (Frequently Asked Questions)
- How many Dreaming Stone Shards are required to advance the quest?
- Can I retrieve Shard 3 without a pickaxe?
- Why won't the Menagerie iron gate open after clearing all three lever sites?
- Does the Crypt shard change graves between server resets?
- What should I do immediately after picking up Shard 13?
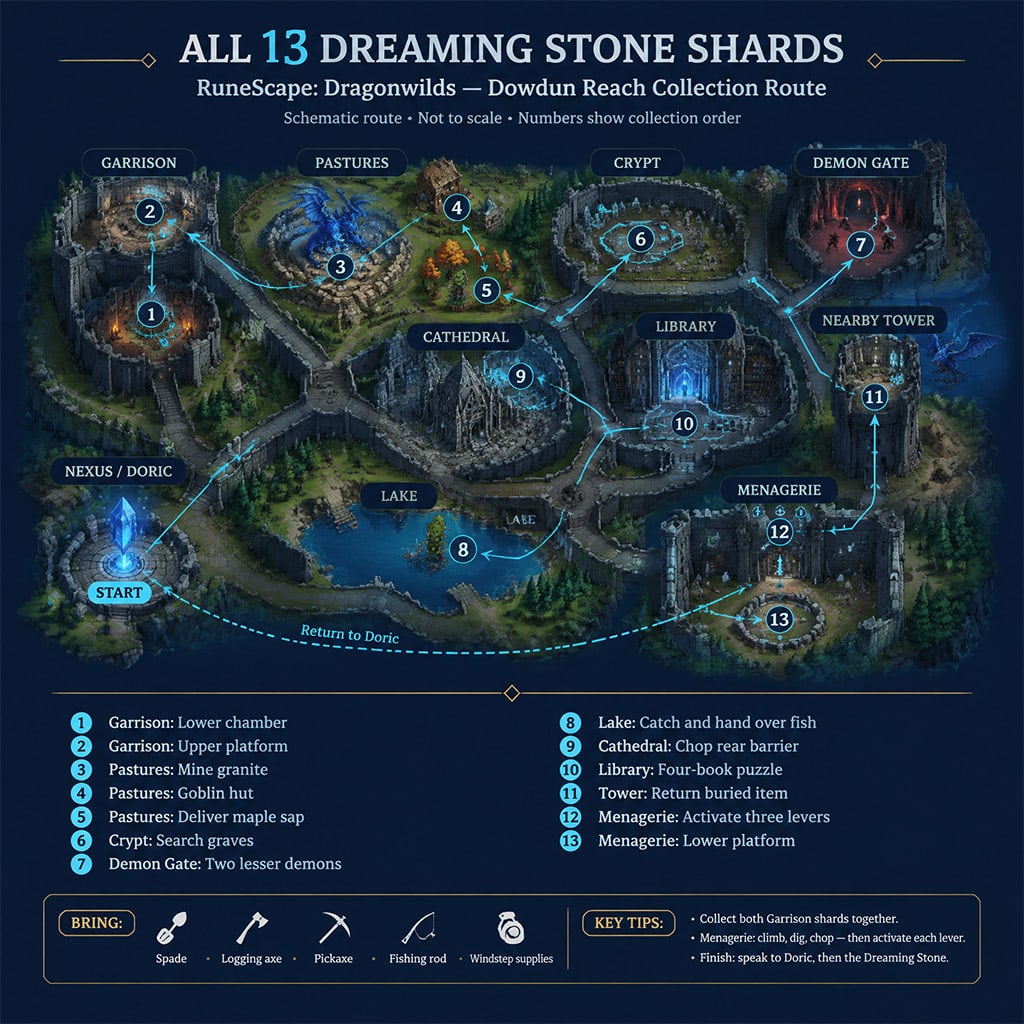
Required Inventory & Tool Checklist
Do not leave the Nexus without these essentials. Running out of stamina or lacking a tool forces an immediate reset of traversal checkpoints:
- Spade: Required for buried shards and puzzle uncovering (Shards 6, 11, 12).
- Pickaxe & Logging Axe: Required for resource clearing (Shards 3, 5, 9, 12).
- Fishing Rod & Bait: Required for the Lake goblin hand-in (Shard 8).
- Windstep Consumables/Stamina Pots: Essential for Garrison vertical ledges and the Menagerie drop shortcut.
- Combat Loadout: Minimum gear to handle two Lesser Demons simultaneously and one Blue Dragon.
All 13 Shard Locations & Route Matrix
| Shard # | Region & Landmark | Required Tools / Combat | Primary Action Trigger |
|---|---|---|---|
| 1 | Garrison Lower Chamber | Combat (Guards) | Descend through spike traps, wipe the room, loot chest |
| 2 | Garrison Upper Castle | Windstep | Climb right-side plank, cast Windstep across gap, kill Knight |
| 3 | Pastures Blue Dragon Arena | Pickaxe + Combat | Kill Blue Dragon, mine the center granite node |
| 4 | Pastures Goblin Encampment | None | Clear perimeter, enter northern hut, pick up from table |
| 5 | Southern Pastures Outpost | Logging Axe | Accept goblin request, chop 3 Maple Sap, submit quest |
| 6 | Crypt Graveyard | Spade | Inspect gravestone clue, dig the fresh soil directly east |
| 7 | Demon Gate Platform | Combat (2x Lesser Demons) | Ride lift up, eliminate demons, loot altar |
| 8 | Lake Shoreline | Fishing Rod + Bait | Talk to angler goblin, catch 1 Raw Trout, return immediately |
| 9 | Cathedral Rear Overlook | Logging Axe | Clear cultists, chop barricade vines, loot behind altar |
| 10 | Library Vault | Combat + Puzzle | Activate 4 tomes in sequence, defeat 2 Lesser Demons |
| 11 | High Watchtower (Pastures) | Spade | Talk to NPC on 2F, dig dirt mound past dragon, hand in relic |
| 12 | Menagerie Locked Gate | Spade + Logging Axe | Clear 3 hidden levers across rooftops, flip gate mechanism |
| 13 | Menagerie Lower Platform | Windstep + Full HP | Drop to lower ledge, cast Windstep across eastern divide |
Step-by-Step Route Walkthrough
Garrison & Pastures (Shards 1–5)
1. Shard 1: Teleport to the fortress gate, run through the Courtyard, and drop down the Garrison service stairs. Disarm or sprint through the floor spikes. Clear the guard patrol to loot the chest against the back wall.
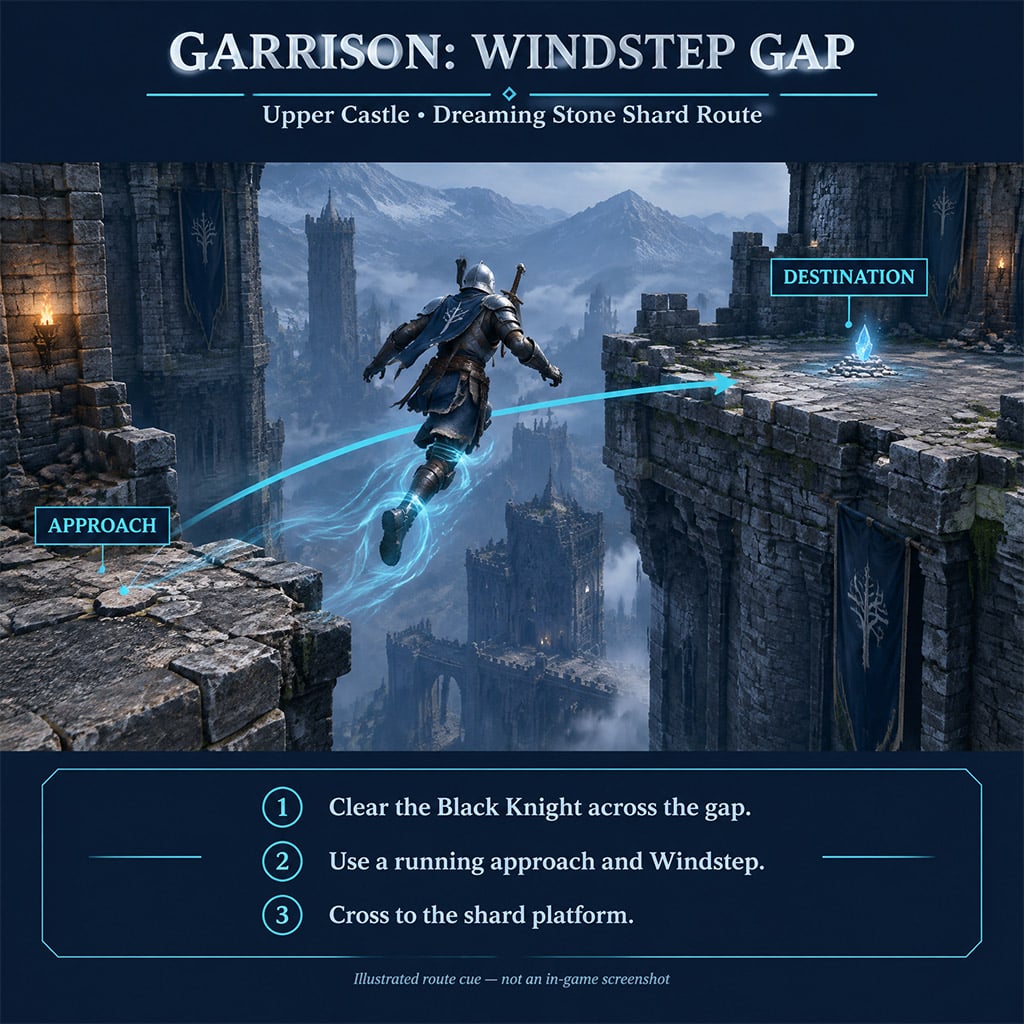
2. Shard 2: Climb back up the main stairwell. Turn right at the wooden scaffold onto the stone ledge. Cast Windstep to cross the shattered gap to the upper battlement. Kill the Black Knight and pick up the shard from the parapet.
3. Shard 3: Drop down into the Pastures arena. Defeat the Blue Dragon. Crucial step: The shard does not drop from the dragon's loot table—equip your pickaxe and mine the cracked granite node in the center of the ring.
4. Shard 4: Head northeast into the goblin camp. Enter the open-door wooden shack; the shard is resting on the workbench.
5. Shard 5: Run south toward the barricades. Speak to the friendly goblin mechanic, chop the marked maple trees outside the palisade, and hand in the sap.
Crypt, Demon Gate & Lake (Shards 6–8)
1. Shard 6: Enter the Crypt via the stone bridge. Defeat the wandering skeletons. Read the journal at the central tombstone. Equip your spade and dig the undisturbed grave plot directly adjacent to the east marker.
2. Shard 7: Follow the lower corridor to the Demon Gate lift. Ascend to the upper platform, eliminate the two Lesser Demons, and claim the shard from the summoning pedestal.
3. Shard 8: Take the southern cave exit down to the Lake. Speak to the fishing goblin, cast your line into the bubbling ripple spot, catch the required fish, and complete the dialogue trade.
Cathedral & Tower (Shards 9 & 11)
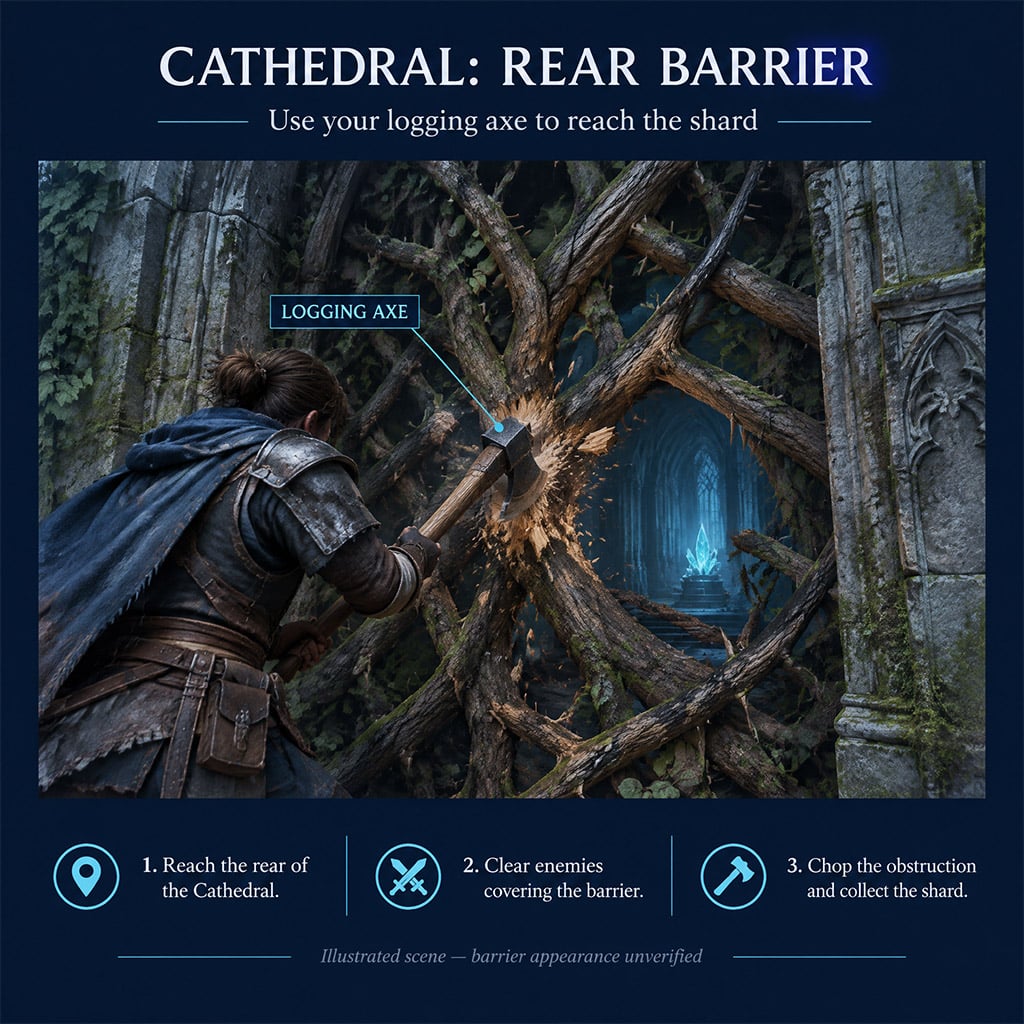
1. Shard 9: Fight through the Cathedral sanctuary to the outdoor rear terrace. Use your logging axe on the thorned debris blocking the alcove. Collect the shard from the stone plinth.
2. Shard 11: Enter the adjacent guard tower and climb to the second floor. Speak to the wounded NPC to start the retrieval request. Run past the dragon overlook, dig the distinct mound on the right ridge with your spade, and return the heirloom to the NPC.
Complex Puzzle Chambers
Library Vault Puzzle (Shard 10)
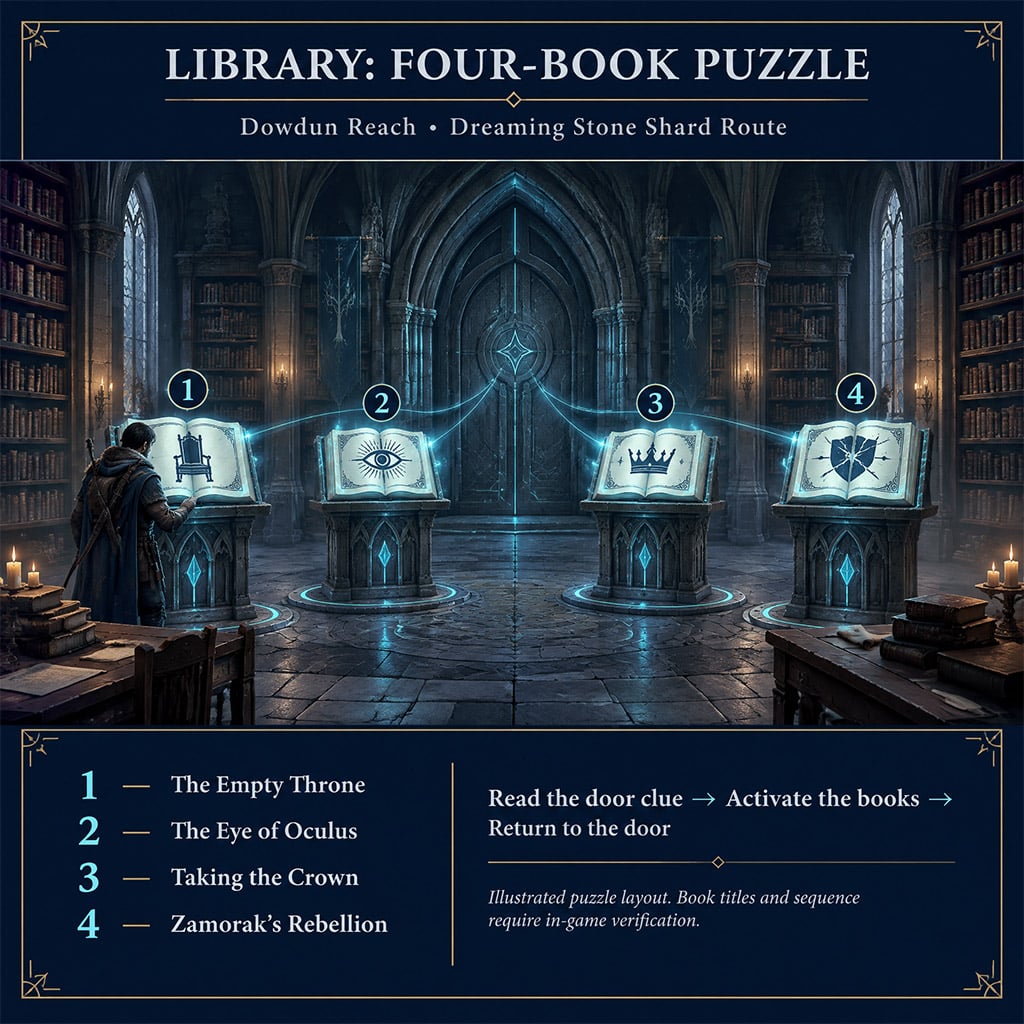
The sealed chamber door requires activating four historical tomes in exact chronological order. Interacting out of order resets the runes and deals minor shock damage.
1. Book 1: The Empty Throne (North alcove, lower shelf)
2. Book 2: The Eye of Oculus (East wall lectern)
3. Book 3: Taking the Crown (South freestanding bookcase)
4. Book 4: Zamorak's Rebellion (West corner table)
Once all four runes glow blue, the chamber door unseals. Defeat the two Lesser Demons inside to unlock the central chest containing Shard 10.
Menagerie Levers & Shortcut (Shards 12 & 13)
The gate guarding Shard 12 is locked behind three mechanical levers scattered across the Menagerie ruins. Removing the obstacle does not pull the lever—you must interact a second time.
- Lever 1 (Far Ruins): Scale the exterior scaffolding of the ruined tower at the southern edge. The lever sits on the open wooden platform.
- Lever 2 (Main Roof): Climb the ladder to the largest rooftop. Use your spade to dig away the dirt mound, then immediately pull the revealed iron lever.
- Lever 3 (Overgrown Annex): Run to the outer brick structure. Chop down the thick briars with your logging axe, then pull the wall lever behind them.
Once the gate opens, claim Shard 12.
To reach Shard 13, look over the eastern cliff edge from the Menagerie platform. Ensure your health is at 100% to survive the minor fall damage, drop onto the lower stone outcrop, and immediately trigger Windstep across the remaining gap to loot the final shard.
FAQ (Frequently Asked Questions)
How many Dreaming Stone Shards are required to advance the quest?
You must collect all 13 shards before Doric can reconstruct the Dreaming Stone at the Nexus. Missing even one prevents the quest progression trigger.
Can I retrieve Shard 3 without a pickaxe?
No. Defeating the Blue Dragon only clears the combat lock; the shard remains encased inside the center granite deposit until mined.
Why won't the Menagerie iron gate open after clearing all three lever sites?
You likely cleared the obstructions without triggering the levers. Levers 2 and 3 require a second manual interaction after using your spade and axe.
Does the Crypt shard change graves between server resets?
No. The correct dig site is fixed directly east of the clue-bearing headstone in the central cemetery clearing.
What should I do immediately after picking up Shard 13?
Teleport back to the Nexus. Interact with Doric, select the shard turn-in prompt, and activate the Dreaming Stone pedestal to begin the next stage of the Black Knight's Fortress storyline.

I’m Amara Okafor, a Nigerian Contributing Writer at GGWTB covering sports, racing, and driving games, alongside casual mobile titles. My guides focus on timing a pass, finding a braking point, and choosing upgrades that suit your playstyle. For shorter sessions, I keep the priorities clear: less menu-hopping, more time playing.
Most Popular Posts
- RuneScape Dragonwilds: Dreaming Stone Shards Route & Puzzle Guide
- RuneScape: Dragonwilds Best Weapons by Power Level and Core Upgrade Priority
- RuneScape Dragonwilds Early Game Guide: What to Build & Upgrade First
- RuneScape Dragonwilds: Best Lodestone Locations and Fast Travel Routes
- RuneScape Dragonwilds Abyssal Whip Guide: Crafting Route & Upgrade
- RuneScape Dragonwilds Best Weapons: Tier Scaling & Upgrade Traps
Popular Category Lists
- ARC Raiders / (355)
- Grow a Garden / (294)
- CoD: Black Ops 7 / (167)
- Star Citizen / (163)
- MLB 26 / (159)
- Monopoly Go / (153)
- ARK Survival Ascended / (128)
- Steal a Brainrot / (99)
- Blox Fruits / (74)
- Adopt Me / (74)
- Forza Horizon 6 / (72)
- Sailor Piece / (68)
- Grow a Garden 2 / (68)
- Diablo IV / (62)
- CoD: BLACK OPS 6 / (55)
- Aion 2 / (53)
- Path of Exile 2 / (48)
- Monster Hunter Wilds / (46)
- Windrose / (44)
- COD: Modern Warfare 4 / (43)