0
0 Created: Oct 6,2026 | RuneScape: Dragonwilds
RuneScape Dragonwilds: Best Lodestone Locations and Fast Travel Routes

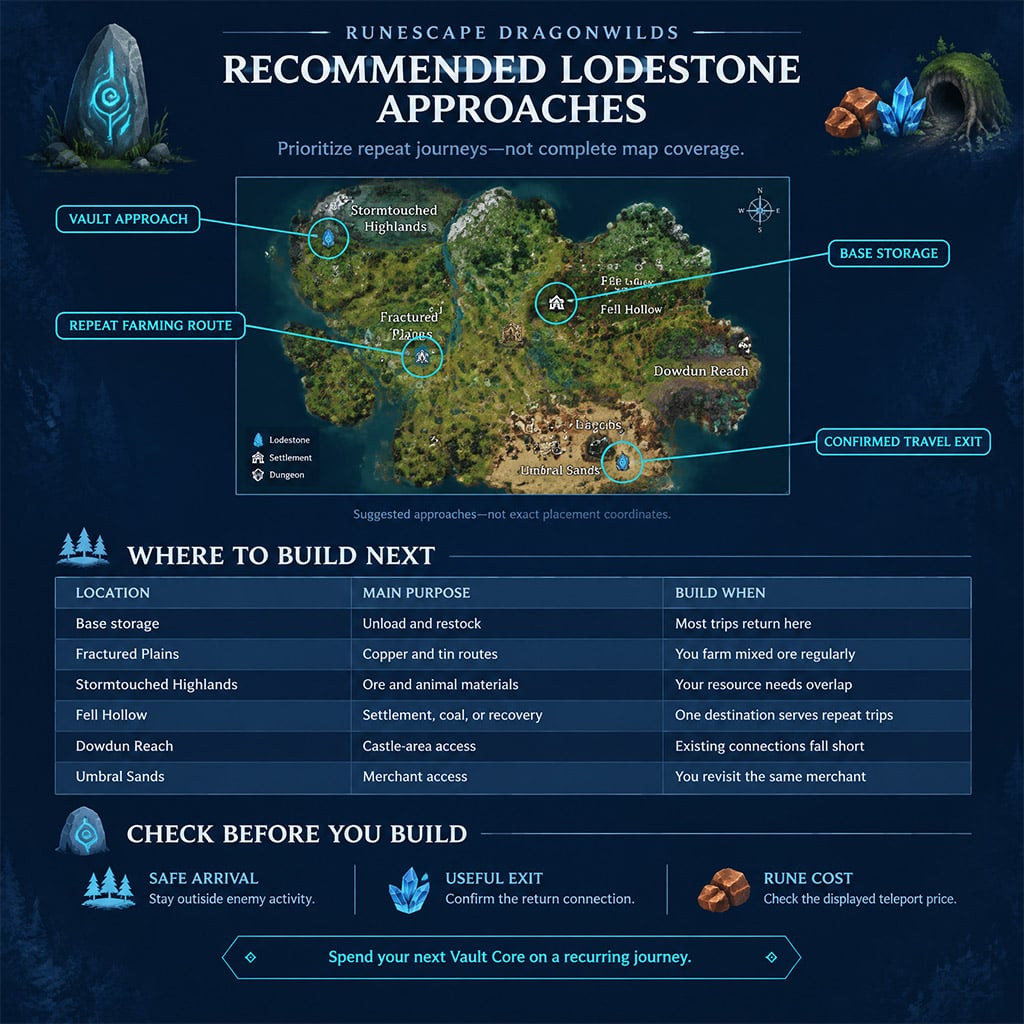
For useful Lodestone locations, prioritize base storage, frequently visited resource clusters, and repeat dungeon or encounter entrances. We recommend building around the trips you already make—not placing a teleport point in every region.

Start with your base, unless an existing destination already serves it conveniently. Your next Lodestone should remove a recurring walk to materials or activities you currently need.
- Best Lodestone Locations: Where to Build First
- Early regions: combine objectives
- Later regions: separate farming from recovery
- Dangerous areas: test the arrival first
- Build Your First Lodestone
- Retrieve a Vault Core
- Place and check the connection
- Plan the Return Before You Teleport
- Choose speed or rune savings deliberately
- Check burrow access before expanding
- Unload before starting the next trip
- FAQ (Frequently Asked Questions)
- What materials do we need to build a Lodestone?
- Where should we place our first Lodestone?
- Can we teleport from anywhere in Dragonwilds?
- How many Law Runes does a teleport cost?
- Do we need a Lodestone beside every burrow?
Best Lodestone Locations: Where to Build First
A distant destination is not automatically a good investment. If you visit it once, a long walk may cost less than diverting a Vault Core from a regular farming route.
These landmark-based placements are recommendations, not verified coordinates or guaranteed safe arrival points.
| Region / landmark | Best use | Build when… | Skip when… |
|---|---|---|---|
| Main base storage | Unloading and restocking | Most gathering trips return here | An existing destination already provides convenient access |
| Temple Woods / Bramblemead Valley vault approach | Repeat vault runs | You revisit the same vault regularly | Existing travel connections cover the approach |
| Whispering Swamp gathering area | Swamp materials and herbs | You need repeated collection trips | Visits are occasional |
| Fractured Plains mixed ore cluster | Copper, tin, and nearby side pickups | Several materials share one route | Another node already reaches that cluster |
| Stormtouched Highlands ridge and cave approach | Ore, stone resources, and animal materials | Your crafting needs overlap along the circuit | You need only one isolated pickup |
| Bloodblight Swamp blightwood approach | Repeated wood gathering | You can establish an arrival outside enemy activity | The proposed landing area exposes you to combat |
| Fell Hollow: Emberwood | Settlement access and nearby gathering | Required access is available and activities overlap | You are still unlocking the area |
| Fell Hollow: Coal Ridge Pass | Coal gathering | Coal becomes a recurring requirement | Your current supply is sufficient |
| Fell Hollow: cleansing well | Recovery-route access | The same well repeatedly interrupts your trips | An existing destination already serves it |
| Dowdun Reach courtyard | General castle-area access | You regularly visit the region | Existing interior connections solve the journey |
| Umbral Sands merchant settlement | Trading | You repeatedly use that merchant | Another settlement meets your needs |
| Burning Spire / Fight Caves approach | Repeated combat attempts | The encounter becomes your active objective | You are making a single exploratory visit |
Spend the next core on your most frequent inconvenient journey, not the largest uncovered area.
Early regions: combine objectives
For Fractured Plains, we favour a route that connects copper and tin rather than separate nodes for each material. Add nearby essence or vent pickups only when they match your current needs.
Walk the circuit before building. Check where your inventory fills, where enemies interrupt gathering, and which exit you can actually use.
A route that looks compact on the map may involve awkward elevation changes. Place for the playable approach, not straight-line distance.
Later regions: separate farming from recovery
Use Emberwood for overlapping settlement and gathering trips, Coal Ridge Pass for recurring coal demand, and encounter entrances for repeated attempts.
A cleansing-well location serves a different purpose: reducing the disruption of recovery trips. It should not compete with a gathering node unless that interruption happens regularly.
For Dowdun Reach, test existing connections before adding a second node. Compact regions rarely justify several destinations unless they remove distinct, repeated walks.
Dangerous areas: test the arrival first
Do not place beside an enemy spawn simply because one arrival avoided combat. We recommend walking the proposed landing area, inspecting nearby enemies, and choosing a clear route out.
Reject an unsafe landing even if it shortens the resource walk. A teleport point that starts combat while you carry valuable materials creates another problem.
Build Your First Lodestone
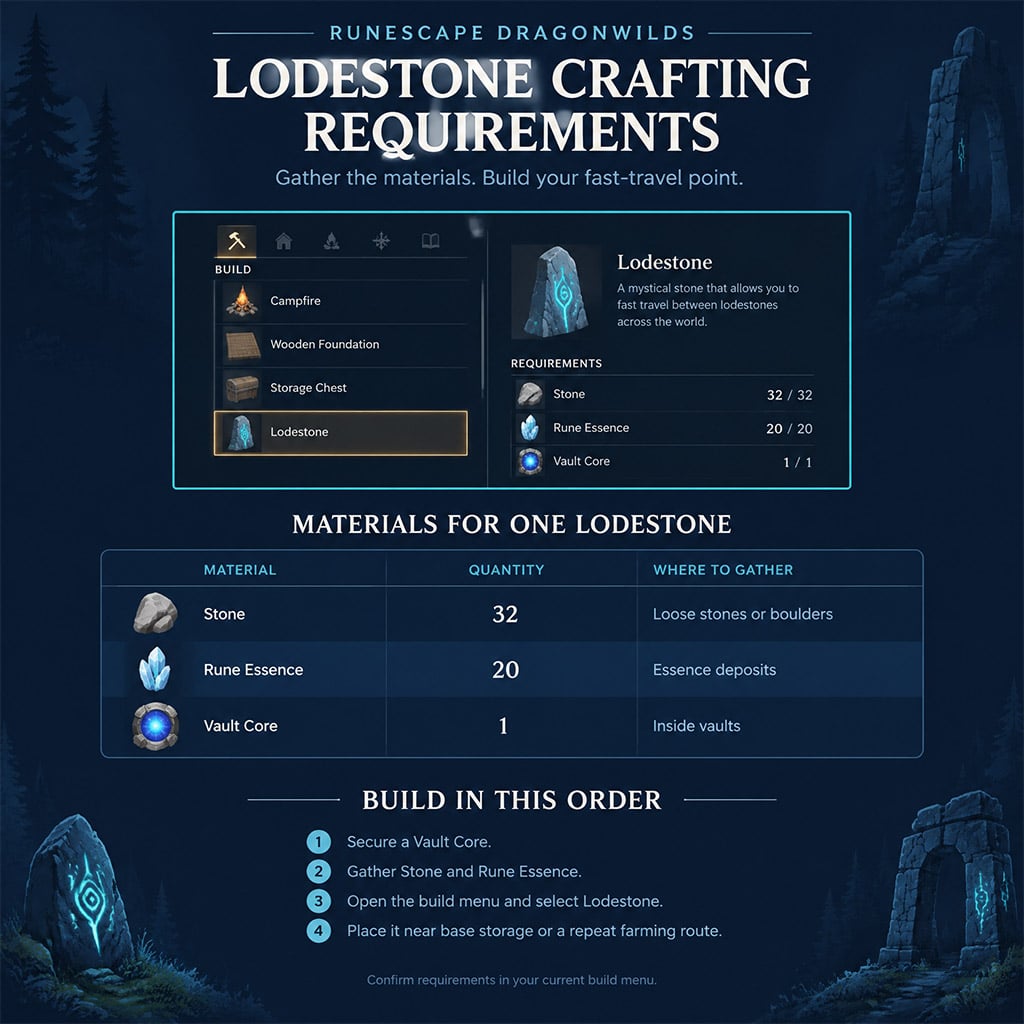
Collecting a Vault Core enables the Lodestone recipe. Metaforge's building database lists the recipe below, matching Destructoid's April 2025 crafting guide.
Check your in-game recipe before gathering for multiple placements.
| Material | One Lodestone | Two Lodestones | Source |
|---|---|---|---|
| Stone | 32 | 64 | Loose stones or mined boulders |
| Rune Essence | 20 | 40 | Essence deposits |
| Vault Core | 1 | 2 | Dragonkin Vaults |
Secure a core before gathering surplus materials for additional nodes.
Retrieve a Vault Core
The crafting guide identifies Dragonkin Vaults around Temple Woods as early sources of cores. Prepare for combat rather than treating the pickup as ordinary gathering.
1. Bring food and equipment you can use reliably.
2. Clear enemies along your approach.
3. Locate and collect a core.
4. Retreat if continuing would risk losing the run.
5. Return to your intended building location.
Do not budget around a guaranteed three-core yield or a precise respawn timer: the available evidence does not establish either.
Place and check the connection
Open the build menu, select Lodestone, and place it where construction is permitted.
At your base, choose a short, unobstructed path to storage and processing stations. At an outpost, check the route between the arrival point and your target.
Then interact with the structure and inspect available destinations. Confirm the network works before relying on it for a remote farming trip.
Plan the Return Before You Teleport
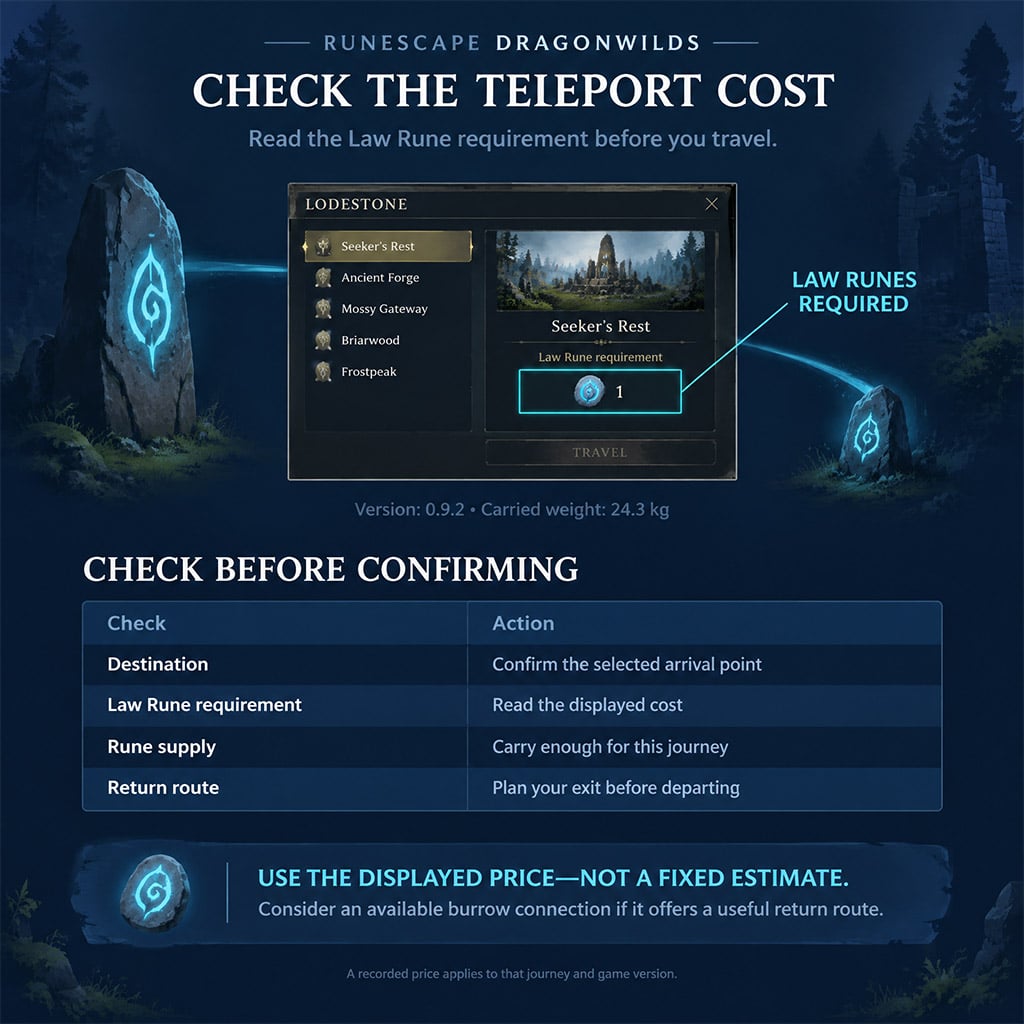
Lodestone travel requires Law Runes and a departure Lodestone. Do not assume every journey has the same price.
The dated Destructoid guide reports a fixed cost, while the supplied placement account describes variable costs. We cannot establish the current pricing formula from those conflicting accounts; use the cost displayed in your game.
Choose speed or rune savings deliberately
Compare the complete return journey—not just its paid segment.
| Return option | Choose it when… | Main drawback |
|---|---|---|
| Direct Lodestone teleport | You need the fastest available return | Requires sufficient Law Runes |
| Burrow connection, then walk | An available connection lands conveniently near home | Adds walking and requires access |
| Burrow connection, then Lodestone | The connection meaningfully shortens the remaining teleport | Detours may outweigh the saving |
| Walk back | The route is short or travel supplies are insufficient | Takes time and exposes you to enemies |
A cheaper teleport is not a better route if reaching it adds an inconvenient detour.
Check burrow access before expanding
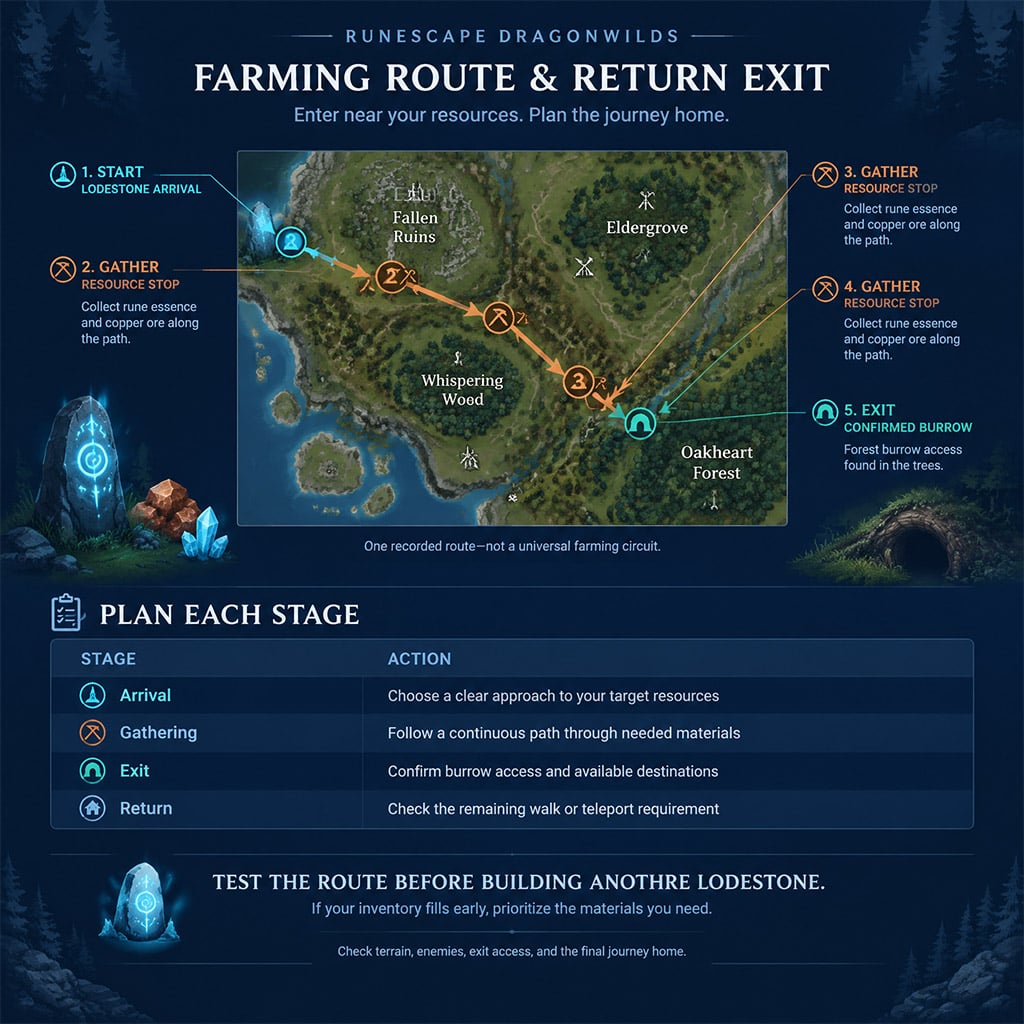
If a burrow lies near the end of your farming route, inspect its requirements and available destinations before building another Lodestone.
We recommend testing the connection with a normal travel load first. Confirm the arrival location and final walking distance; a visible entrance alone does not prove the route is useful.
Heal before travel where damage is possible. Do not rely on an unsupported half health is safe rule.
Unload before starting the next trip
At base, deposit unrelated cargo, queue processing, and restock. Keep enough travel supplies for your intended exit instead of spending everything on arrival.
Do not use Reset Position as routine transport without confirming its current behavior. A recovery feature is not a dependable substitute for a functioning return route.
FAQ (Frequently Asked Questions)
What materials do we need to build a Lodestone?
A Lodestone requires 32 Stone, 20 Rune Essence, and 1 Vault Core, according to the cited database and crafting guide. Confirm the quantities in your current build menu before gathering for several structures.
Where should we place our first Lodestone?
Place it near main-base storage unless an existing destination already serves that location conveniently. We recommend a frequently visited vault or resource cluster as the next priority.
Can we teleport from anywhere in Dragonwilds?
Standard Lodestone travel requires interaction with a departure Lodestone. You also need an available destination and enough Law Runes for the displayed requirement.
How many Law Runes does a teleport cost?
Use the requirement shown in the teleport menu for your selected destination. Available accounts disagree on pricing, so we do not recommend budgeting around a universal fixed cost.
Do we need a Lodestone beside every burrow?
No—add one only when it removes a repeated journey that the existing connection does not solve. Walk the remaining approach first; you may save a Vault Core without making the route less convenient.

I’m Amara Okafor, a Nigerian Contributing Writer at GGWTB covering sports, racing, and driving games, alongside casual mobile titles. My guides focus on timing a pass, finding a braking point, and choosing upgrades that suit your playstyle. For shorter sessions, I keep the priorities clear: less menu-hopping, more time playing.
Most Popular Posts
- RuneScape: Dragonwilds Best Weapons by Power Level and Core Upgrade Priority
- RuneScape Dragonwilds: Dreaming Stone Shards Route & Puzzle Guide
- RuneScape Dragonwilds Early Game Guide: What to Build & Upgrade First
- RuneScape Dragonwilds Skill Training Guide: Routes, Trade-Offs, Priorities
- RuneScape Dragonwilds Best Weapons: Tier Scaling & Upgrade Traps
- RuneScape Dragonwilds Skills Guide: Training Routes Toward Level 99
Popular Category Lists
- ARC Raiders / (339)
- Grow a Garden / (292)
- CoD: Black Ops 7 / (167)
- Star Citizen / (160)
- MLB 26 / (159)
- Monopoly Go / (152)
- ARK Survival Ascended / (125)
- Steal a Brainrot / (98)
- Blox Fruits / (74)
- Adopt Me / (73)
- Forza Horizon 6 / (72)
- Sailor Piece / (68)
- Grow a Garden 2 / (68)
- Diablo IV / (62)
- CoD: BLACK OPS 6 / (55)
- Path of Exile 2 / (48)
- Monster Hunter Wilds / (46)
- Windrose / (44)
- Aion 2 / (43)
- Donut SMP / (40)