0
0Sailor Piece Shard and Reroll Farming Guide: Best Quake Method for Fast Drops
- VAIL
- Share
- Sailor Piece
- 05/01/26
- 503
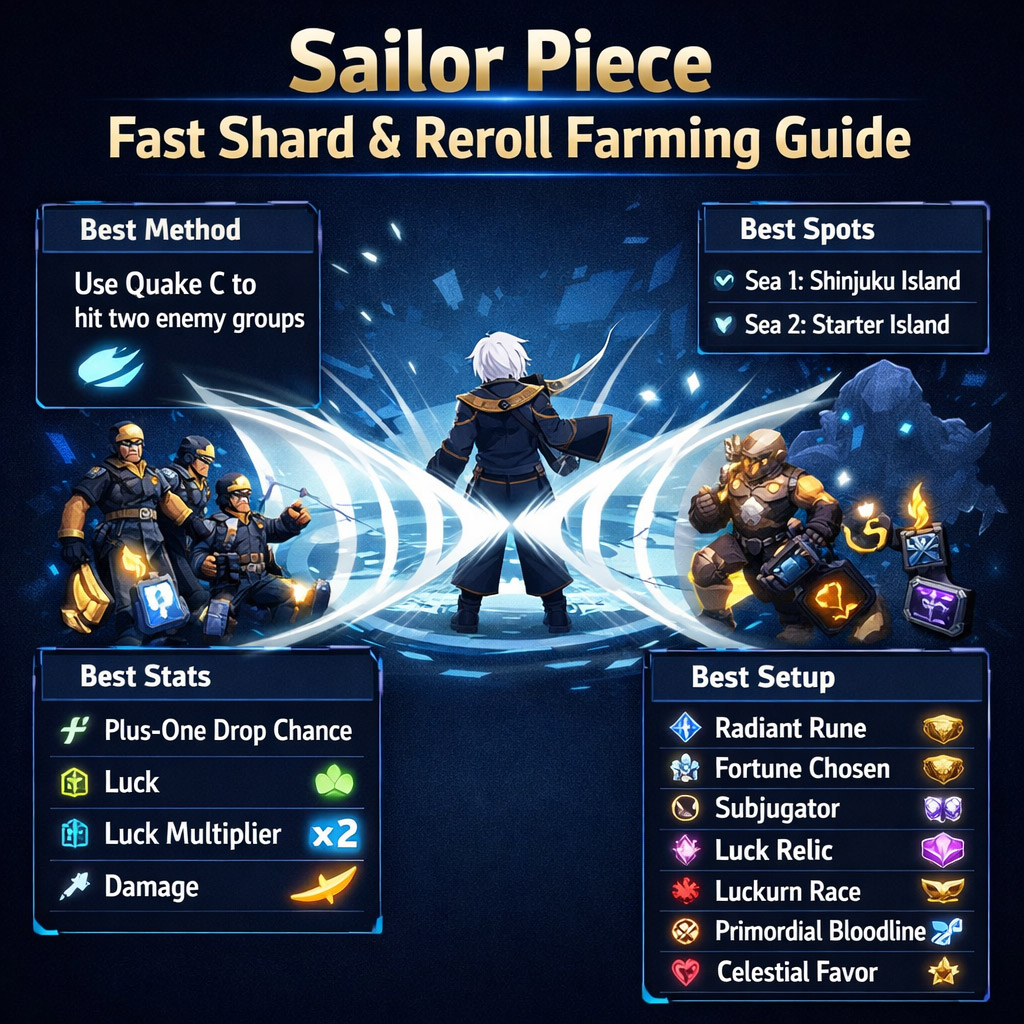
Farming shards and rerolls in Sailor Piece can feel slow if you only clear one enemy group at a time. The better approach is to combine a strong luck-focused build with a farming spot where you can hit two enemy groups at once.

After testing this type of setup, the biggest difference is not just having more luck. It is having plus-one drop chance, enough damage to clear fast, and the right fruit for wide-area farming. For this method, Quake fruit is the main tool because its C move can reach two nearby enemy groups when you stand in the correct position.
- Best Stats for Shard and Reroll Farming
- Best Farming Build
- Key Gear Notes
- Radiant Rune
- Fortune Chosen
- Subjugator
- Luck Relic
- Best Fruit: Quake
- Best Farming Spots
- Sea 1: Shinjuku Island
- Sea 2: Starter Island
- Best Upgrade Order
- Common Mistakes to Avoid
- FAQ
- What is the best way to farm passive shards in Sailor Piece?
- Why is Quake good for shard farming?
- Is luck or plus-one drop chance better?
- What should we upgrade first?
- What is the best title for farming?
- Where should we farm in Sea 1?
- Where should we farm in Sea 2?
- Final Notes
what to use, where to farm, and what to upgrade first.
↖ Best Stats for Shard and Reroll Farming
For materials like passive shards, power shards, race rerolls, and clan rerolls, we want more than raw damage. These drops come from repeated farming, so small stat boosts add up over time.
| Priority | Stat | Why It Matters |
|---|---|---|
| 1 | Plus-one drop chance | Gives extra value when drops happen |
| 2 | Luck | Improves general drop rates |
| 3 | Luck multiplier | Makes your luck scaling stronger |
| 4 | Damage | Faster kills mean more drops per hour |
| 5 | HP / survivability | Helps with stable farming |
If you notice enemies are dying slowly, fix damage first. If enemies die fast but drops feel weak, start improving luck and plus-one drop chance.
That balance is what makes this farm work.
↖ Best Farming Build
You do not need every perfect piece before starting, but these are the best options to aim for.
| Slot | Best Choice | Main Benefit | How to Get It |
|---|---|---|---|
| Rune | Radiant Rune | Up to 28% luck | Infinity Tower |
| Spec Passive | Fortune Chosen | Luck + plus-one drop chance | Judgment Island passive system |
| Power | Subjugator | Luck, damage, HP, crit stats | Lawless Island power system |
| Relic | Luck Relic | 20% luck | Craft on Bizari Island |
| Race | Luckurn | Luck multiplier + damage | Race rerolls |
| Clan | Devil | Luck + plus-one drop chance | Clan rerolls |
| Bloodline | Primordial | Luck multiplier + drop chance | Bloodline rolls |
| Title | Celestial Favor | 50% luck | Kill 5,000 bosses |
The reason this setup is strong is simple: it does not sacrifice farming speed for luck. You still get enough damage to clear enemies quickly, while stacking the stats that improve material drops.
↖ Key Gear Notes
↖ Radiant Rune
Radiant Rune is the best farming rune because it gives a large luck boost when upgraded.
You get it from Infinity Tower on Tower Island. The pity system makes the grind more realistic:
| Progress | Reward |
|---|---|
| 7,500 floors | Guaranteed Radiant Rune |
| 10,000 floors | Guaranteed Primordial Rune |
After getting Radiant, farm Extreme Rune Dungeon to raise your rune stat level. A low-level Radiant Rune is still useful, but a maxed one performs much better.
↖ Fortune Chosen
Fortune Chosen is one of the most important farming passives because it gives both luck and plus-one drop chance.
| Bonus | Value |
|---|---|
| Luck | 5–10% |
| Plus-one drop chance | 17.5–30% |
To unlock spec passives, go to Judgment Island, reach level 10,000, and spend 5,000 Gems.
If your goal is shards and rerolls, Fortune Chosen is usually better than a pure damage passive.
↖ Subjugator
Subjugator is the best power for this farm because it gives luck while also keeping your damage high.
| Stat | Value Range |
|---|---|
| Luck | 8.5–17.5% |
| Damage | 24–49% |
| HP | 24–40% |
| Crit Chance | 1.75–3.5% |
| Crit Damage | 6.5–13% |
Unlock the power system on Lawless Island at level 11,500 for 5,500 Gems.
This is a good example of why farming builds should not be too greedy. If you stack luck but clear slowly, your real drop rate per hour goes down.
↖ Luck Relic
The Luck Relic is easy to understand and worth getting early. It gives 20% luck.
| Material | Amount | Source |
|---|---|---|
| Relic Part 5 | 30 | Strong Bandit, Bizari Island |
| Relic Part 6 | 25 | Strong Bandit, Bizari Island |
Both materials come from the same enemy, so this is one of the cleaner relic farms. If you are missing this relic, it is a good early upgrade before chasing harder rolls.
↖ Best Fruit: Quake
The best fruit for this method is Quake.
The reason is not complicated: Quake C has enough range to hit two enemy groups at once in the right spots. That means you can farm more enemies without constantly moving.
| Normal Farming | Quake Double-Group Farming |
|---|---|
| Clears one group | Hits two groups |
| Requires more movement | Mostly stays in one spot |
| Lower kills per minute | Higher kills per minute |
| Less stable for long farming | Better with auto skill |
You can get Quake from Sailor Island in Sea 1 by buying it with the required currency.
In practice, positioning matters a lot. If your Quake C only hits one side, the method loses most of its value.
↖ Best Farming Spots
The goal is always the same: stand between two enemy groups and use Auto Quake C.
↖ Sea 1: Shinjuku Island
For Sea 1, the best spot is Shinjuku Island.
There are two enemy groups close enough for Quake C to hit both if you stand in the right place.
| Step | What to Do |
|---|---|
| 1 | Equip Quake |
| 2 | Go to Shinjuku Island |
| 3 | Stand between the two enemy groups |
| 4 | Turn on Auto Skill C |
| 5 | Adjust until both groups are getting hit |
If one group stops taking damage, move slightly toward the center and test again.
↖ Sea 2: Starter Island
For Sea 2, use Starter Island.
It works for the same reason: two enemy groups are positioned close enough for Quake C farming.
| Best For | Reason |
|---|---|
| Passive shards | More NPC kills per minute |
| Power shards | Stable repeat farming |
| Race rerolls | Better drop volume |
| Clan rerolls | Works well with plus-one drop chance |
| General materials | Simple setup, low movement |
This is one of the easiest Sea 2 spots to maintain because you do not need a complicated route. Stand correctly, turn on Auto Quake C, and check that both groups are being hit.
↖ Best Upgrade Order
If you do not have the perfect setup yet, upgrade in this order. This avoids wasting time chasing rare bonuses before your farm is actually efficient.
| Stage | Upgrade | Why First |
|---|---|---|
| 1 | Get Quake | Biggest farming speed improvement |
| 2 | Use the right two-group spot | Doubles your farming coverage |
| 3 | Get Luck Relic | Easy 20% luck boost |
| 4 | Farm Radiant Rune | Strong long-term luck gain |
| 5 | Roll Fortune Chosen | Adds plus-one drop chance |
| 6 | Improve Subjugator | Keeps clear speed high |
| 7 | Push for Celestial Favor | Huge 50% luck boost |
If you are still early, do not stress over every perfect roll. A decent farming setup in the right location usually beats a stronger-looking build farming the wrong way.
↖ Common Mistakes to Avoid
A lot of players lose efficiency without realizing it. These are the main issues to watch for.
| Mistake | Why It Hurts | Fix |
|---|---|---|
| Only hitting one enemy group | Lower kills per minute | Reposition until Quake C hits both |
| Building only damage | Worse material drops | Add luck and plus-one drop chance |
| Building only luck | Slow clears | Improve power, race, clan, or bloodline |
| Ignoring title bonuses | Misses a huge luck source | Work toward Celestial Favor |
| Not checking auto skill | Farm may break or miss enemies | Watch the first few cycles |
The best farming setup is not always the flashiest one. It is the one that keeps killing enemies quickly while giving you better drop value.
↖ FAQ
↖ What is the best way to farm passive shards in Sailor Piece?
Use Quake fruit and farm two enemy groups at once with Auto Quake C. For Sea 1, use Shinjuku Island. For Sea 2, use Starter Island.
↖ Why is Quake good for shard farming?
Quake is strong because its C move has wide range. In the right position, it can hit two enemy groups at the same time, which gives more kills per minute.
↖ Is luck or plus-one drop chance better?
Both are important, but plus-one drop chance is extremely valuable for material farming. Luck helps drops happen, while plus-one drop chance can increase the reward when they do.
↖ What should we upgrade first?
Start with Quake and the correct farming spot. Then get Luck Relic, Radiant Rune, and Fortune Chosen. After that, work toward better clan, race, bloodline, and title bonuses.
↖ What is the best title for farming?
Celestial Favor is the best farming title because it gives 50% luck. You unlock it by defeating 5,000 bosses.
↖ Where should we farm in Sea 1?
Farm at Shinjuku Island. Stand between the two close enemy groups and use Auto Quake C.
↖ Where should we farm in Sea 2?
Farm at Starter Island. It has a simple layout that works well with Quake double-group farming.
↖ Final Notes
The best Sailor Piece shard and reroll farm is built around one practical idea: kill more enemies while stacking better drop stats.
Use Quake, stand between two enemy groups, and farm with Auto Skill C. Then improve your setup with Radiant Rune, Fortune Chosen, Subjugator, Luck Relic, Luckurn, Devil, Primordial, and Celestial Favor.
If your enemies die slowly, improve damage. If they die fast but drops feel weak, add luck and plus-one drop chance. Once both sides are balanced, this becomes one of the most reliable ways to farm passive shards, power shards, race rerolls, and clan rerolls in Sailor Piece.
Most Popular Posts
- Sailor Piece Bounty Guide: Fastest Way to Farm Bounty in SEA 2
- Sailor Piece Working Redeem Codes: New Asta Code, Rewards, and How to Redeem
- Sailor Piece Ghoul Update Guide: Black Reaper, Blood Flower Quest, Reaper Keys & F Move
- Sailor Piece Asta Update Guide: Get Anti-Magic Sword, Farm Crystal Defense, and Redeem Codes
- How to Get Kaneki Black Reaper in Sailor Piece: Fast Unlock, F Move, Mastery Farm
- Sailor Piece Best Anti Magic Farming Method: Crystal Defense AFK Guide
Popular Category Lists
- Grow a Garden / (286)
- ARC Raiders / (267)
- CoD: Black Ops 7 / (166)
- Monopoly Go / (147)
- MLB 26 / (146)
- Star Citizen / (122)
- Steal a Brainrot / (89)
- ARK Survival Ascended / (79)
- Sailor Piece / (68)
- Forza Horizon 6 / (65)
- Diablo IV / (61)
- Blox Fruits / (61)
- Adopt Me / (56)
- CoD: BLACK OPS 6 / (55)
- Path of Exile 2 / (48)
- Grow a Garden 2 / (48)
- Monster Hunter Wilds / (46)
- Windrose / (44)
- Path of Exile / (40)
- Bee Swarm Simulator / (36)