


 0
0Black Ops 7 Zombies Totenreich Easter Egg Guide: Fast Solo & Co-Op Main Quest Walkthrough
- ELSA
- Share
- CoD: Black Ops 7
- 05/01/26
- 8556
Totenreich is not the hardest Zombies Easter egg on paper, but it can feel overwhelming because the quest jumps between symbols, item crafting, scorestreak steps, and a long boss fight. The good news is that once we break it into clean sections, the route becomes much easier to follow.
We are focusing on the steps that matter, the mistakes that usually ruin runs, and the setup that gives you the best chance to finish the Easter egg in solo or co-op.
- Best Loadout for Totenreich
- Step 1: Turn on Power and Unlock Pack-a-Punch
- Early checklist
- Step 2: Build the Yoten Star Wonder Weapon
- Get the Chain Links
- Get the Lantern Part
- Solve the Lantern Constellation Puzzle
- Step 3: Build the Wonder Signal
- Get the Crowbar and Cargo Manifest Code
- Fire the Flak Cannon
- Decode the Robot Lights
- Step 4: Open the Machine Workshop and Get Three Uranium Pieces
- Uranium Piece 1: RC-XD Lab Puzzle
- Uranium Piece 2: Glowing Green Fish
- Uranium Piece 3: Glock Drop
- Step 5: Build and Charge the Atomcraft Core
- Step 6: Fire Pit, Disciple Injection, and Sunstone
- Step 7: Solve the Church Symbol Puzzle
- Boss Fight Preparation
- Final Boss Fight Strategy
- Main boss mechanics
- Viking Head Phases
- Final Eye Phase
- Quick Route Checklist
- FAQ
- Can Totenreich be completed solo?
- What is the best weapon for the boss fight?
- What order are the Lantern constellation symbols?
- How do the robot light codes work?
- How do we get the uranium pieces?
- Why does the boss fight feel so long?
- How do we avoid freezing during the boss fight?
- Summary
↖ Best Loadout for Totenreich
Before touching the main quest, we want a setup that can handle regular zombies, HVT enemies, and the boss's weak spots. From actual runs, the biggest difference-maker is not just damage. It is survivability.
| Setup Slot | Best Pick | Why We Use It |
|---|---|---|
| Primary Weapon | Voyak AR / Novaline | Reliable bullet damage for boss phases |
| Secondary | M1911 Akimbo | Great for clearing zombies and Viking heads |
| Field Upgrade Solo | Frenzy Guard | Armor recovery is huge in the boss fight |
| Field Upgrade Co-Op | Aether Shroud | Safer revives and emergency interactions |
| Tactical | Stim Shot | Helps during freezing and escort sections |
| Key Scorestreaks | RC-XD, Glock Drop, Disciple Injection | Needed for quest steps |
The MP40 can be strong if you pull it from the box, but we do not recommend forcing it. In testing, it can slightly out-damage common bullet weapons, but spending 50,000+ points chasing one is usually worse than entering with a fully upgraded Voyak or Novaline.
↖ Step 1: Turn on Power and Unlock Pack-a-Punch
Start by following the in-game objectives until power and Pack-a-Punch are active. The game guides this part clearly, so we do not need to overcomplicate it.
Once Pack-a-Punch is open, the real Easter egg begins.
↖ Early checklist
| Objective | Location | Notes |
|---|---|---|
| Turn on power | Guided objective | Required |
| Unlock Pack-a-Punch | Guided objective | Required |
| Pick up Chili Chunks | Storm Bridge | Behind the truck |
| Place Chili Chunks | Scallan Market | Put them on the table |
| Get Chain Links | Dry Dock | Requires crane wall jump |
| Get Lantern Part | Special round HVT | Usually around Round 10 |
↖ Step 2: Build the Yoten Star Wonder Weapon
The Yoten Star is required for several quest steps and the final boss. Get it as early as possible.
↖ Get the Chain Links
Go to Dry Dock.
1. Enter the Titan Crane Room.
2. Press the crane button.
3. Wait for the wall to lower.
4. Wall-jump from the middle of the wall.
5. Hold interact near the boat tip to grab the Chain Links.
If you miss it, press the button again and retry. There is no major punishment.
↖ Get the Lantern Part
After placing the Chili Chunks in Scallan Market, wait for the second special round. Kill the special HVT enemy and pick up the Lantern Part.
↖ Solve the Lantern Constellation Puzzle
Go to Burial Grounds and open the chained door using the Chain Links. Place the Lantern inside the hidden room.
You now need to match the shrine constellations with the moving symbols on the wall.
| Order | Shrine Position |
|---|---|
| 1 | Left |
| 2 | Right |
| 3 | Back |
| 4 | Front |
If the symbols reset, you picked the wrong one. Start again from the left symbol.
Once solved, follow the ghost and complete the soul box events. After that, finish the Lighthouse platforming section and pick up the Yoten Star.
↖ Step 3: Build the Wonder Signal
Now we need the transmitter and signal controller.
↖ Get the Crowbar and Cargo Manifest Code
Pick up the Crowbar from the second floor of the Lighthouse.
Then go to the War Factory Admin Room and read the Cargo Manifest. Look for the three-bullets icon and note the ID next to it.
That ID tells you which crate to open.
| Possible Crate Location | What to Do |
|---|---|
| War Factory | Check crate ID |
| Core Foundry | Check crate ID |
| Dry Dock | Check crate ID |
| Fueled Road | Check crate ID |
Open only the crate matching your manifest ID. The correct crate gives the Flak Gun Round. Wrong crates can trigger gas, EMP effects, or other punishments.
↖ Fire the Flak Cannon
Take the Flak Gun Round to Beacon Island.
1. Load the flak cannon.
2. Melee the back of it with the Yoten Star.
3. The cannon fires toward the robot.
4. Go to the robot and search the damaged part.
5. Pick up the Transmitter.
↖ Decode the Robot Lights
Enter the robot and install the transmitter in the sparking panel.
You will see two blinking lights. Count the flashes.
| Light | Console Input |
|---|---|
| Left light | Amplitude |
| Right light | Frequency |
There are two patterns. Count both.
A good method is to watch the left light first, write both left numbers down, then wait for the pattern to repeat and watch the right light.
Go to the Core Foundry console, input the first pattern, wait for the rocket strike, then input the second pattern. When done correctly, pick up the Wonder Barrage Controller.
↖ Step 4: Open the Machine Workshop and Get Three Uranium Pieces
Use the Wonder Barrage Controller near the blocked staircase at Dry Dock. This opens the Machine Workshop.
Inside is a machine that needs three uranium pieces.
↖ Uranium Piece 1: RC-XD Lab Puzzle
Grab the guaranteed RC-XD from Eid Scallan Square.
Drive it through the hidden grate path in Core Foundry, jump across the water, land on the small boat, and detonate near the hidden door. This opens the secret Group 935 Genetic Lab.
Inside, look through the window and note which numbered doors have hazard symbols.
| Door Number | Jar Letter |
|---|---|
| 1 | A |
| 2 | B |
| 3 | C |
| 4 | D |
| 5 | E |
For example, if doors 1 and 3 have hazard symbols, place jars A and C on the machine.
If correct, you get purple liquid. Use it with the crab claw to create the Necro Spike, then lockpick the cell and collect the uranium.
↖ Uranium Piece 2: Glowing Green Fish
Find a fishing rod and check fishing spots until you see a green glowing fish.
Catch it, then hunt down the Irradiated Ravager. If it disappears, go to the next round and track it on the Tac Map. Kill it through its stages until it drops uranium.
↖ Uranium Piece 3: Glock Drop
Use a Glock Drop scorestreak with a large zombie horde.
Shoot 20 zombies while they are floating in the air. When the scorestreak ends, it drops the final uranium piece.
↖ Step 5: Build and Charge the Atomcraft Core
Return to the Machine Workshop and place all three uranium pieces into the claw machine.
The puzzle is simple once you understand the goal: place bulbs without overloading the meter.
| Rule | Practical Tip |
|---|---|
| Keep the needle in green | Do not connect too many circuits |
| Separate bulbs | Avoid clustering all three together |
| One attempt per round | If you fail, advance the round |
When complete, pick up the Atomcraft Core.
Take it to spawn and place it near Quick Revive. Activate the generator behind the shack and defend the core. When the charge stops, reactivate the generator.
Once charged, carry the core to Storm Bridge. You will take damage while carrying it, so use Stim Shots and avoid ice hazards.
Place it on the black barrel with the yellow stripe. After the robot event, pick up the Dravacar Shard near the bridge.
↖ Step 6: Fire Pit, Disciple Injection, and Sunstone
Take the Dravacar Shard to the fire pit in Bloodhelm Hall.
Charge the Yoten Star/Lantern with zombie kills, then use the charged ability on the fire pit to create a blue flame.
Next, pick up or craft a Disciple Injection.
Use it in Bloodhelm Hall and throw zombies into the blue fire until the lockdown starts. Kill the HVT enemy and pick up the Sunstone.
↖ Step 7: Solve the Church Symbol Puzzle
Take the Sunstone to the church podium and melee it with the Yoten Star.
A compass appears above the church. It points to three symbols in order.
| Arrow Marking | Symbol Order |
|---|---|
| One line | First |
| Two lines | Second |
| Three lines | Third |
Find the matching symbol mounds around the map and hit them with a charged Yoten Star throw.
Common mound areas include:
| Location |
|---|
| Burial Grounds |
| Eid Scallan Square |
| Lighthouse |
| Spawn |
| Left side of Storm Bridge |
Once the three symbols are done correctly, the boss fight is ready.
↖ Boss Fight Preparation
Do not enter underpowered. This boss is long, and weak damage makes it feel much worse.
| Item | Recommended Before Boss |
|---|---|
| Main Weapon | Pack-a-Punch Tier 3 |
| Yoten Star | Upgraded as much as possible |
| Armor | Level 3 preferred |
| Self-Revive | Required for solo |
| Tactical | Stim Shots |
| GobbleGums | Shields Up, Raindrops, Power Keg, revive-based gums |
If you are in co-op, make sure everyone has a job. One player should focus revives, one should call weak spots, and one should help control zombies during Viking head phases.
↖ Final Boss Fight Strategy
Start the fight from inside the robot.
The boss has several repeating mechanics: red weak spots, frozen arena lanes, meteor attacks, and floating Viking heads.
↖ Main boss mechanics
| Mechanic | What We Do |
|---|---|
| Red weak spots | Focus all bullet damage there |
| Frozen lanes | Rotate early and avoid standing in ice |
| Meteor attack | Hide behind pillars |
| Viking heads | Charge Yoten Star, knock them down, shoot them |
| Frozen ammo box | Use Yoten Star to safely access ammo |
The Yoten Star is not just for damage. It helps keep you warm, which matters when crossing frozen areas or buying ammo.
↖ Viking Head Phases
When the boss becomes immune, floating heads spawn.
| Phase | Number of Heads |
|---|---|
| First immune phase | 1 |
| Second immune phase | 2 |
| Third immune phase | 3 |
Charge the Yoten Star by killing zombies, throw it at a head, then shoot the head while it is vulnerable.
↖ Final Eye Phase
At the end, the boss locks you into the middle area and exposes its eyes. Shoot the eyes while dodging meteors.
If low meteors sweep across the ground, go prone. If you have Frenzy Guard, this is one of the best times to use it.
Keep shooting the eyes until the robot finishes the fight.
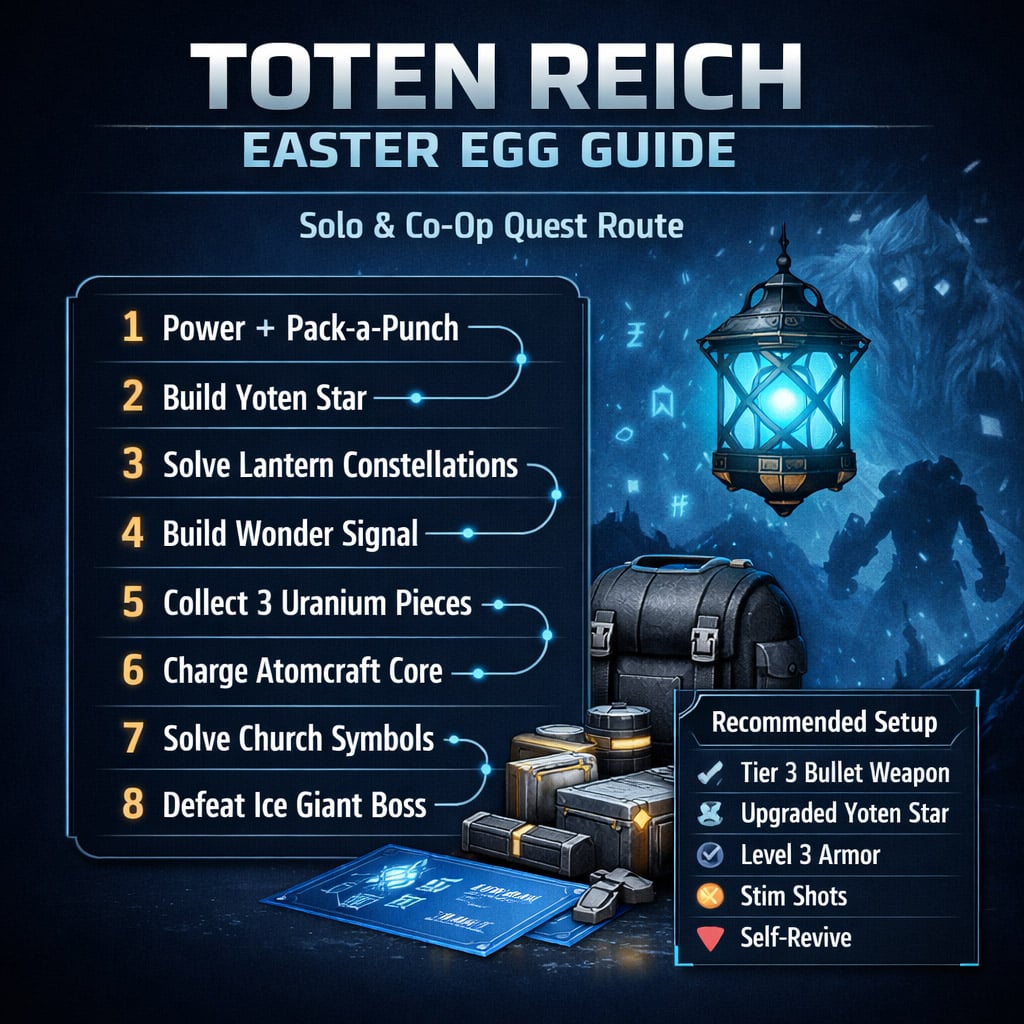
↖ Quick Route Checklist
| Step | Objective |
|---|---|
| 1 | Power and Pack-a-Punch |
| 2 | Get Chain Links and Chili Chunks |
| 3 | Kill special HVT for Lantern Part |
| 4 | Solve constellation puzzle |
| 5 | Follow ghost and get Yoten Star |
| 6 | Get Crowbar and Cargo Manifest ID |
| 7 | Open correct crate for Flak Round |
| 8 | Fire flak cannon and get Transmitter |
| 9 | Decode robot lights |
| 10 | Get Wonder Barrage Controller |
| 11 | Open Machine Workshop |
| 12 | Collect three uranium pieces |
| 13 | Build Atomcraft Core |
| 14 | Charge core at spawn |
| 15 | Place core on Storm Bridge |
| 16 | Get Dravacar Shard |
| 17 | Complete fire pit and Disciple Injection step |
| 18 | Get Sunstone |
| 19 | Solve church compass symbols |
| 20 | Enter boss fight |
↖ FAQ
↖ Can Totenreich be completed solo?
Yes. The Easter egg is fully solo-friendly, but you need to prepare properly. Frenzy Guard, Stim Shots, level 3 armor, and a self-revive make a big difference.
↖ What is the best weapon for the boss fight?
A fully upgraded bullet weapon is the safest choice. The Voyak, Novaline, or another high-damage rifle works well. The MP40 is strong if you get it naturally, but it is not worth wasting the run chasing it.
↖ What order are the Lantern constellation symbols?
The order is left, right, back, front when facing the shrine from the stairs.
↖ How do the robot light codes work?
The left light is Amplitude and the right light is Frequency. Count both lights for two sequences, then enter them at the Core Foundry console.
↖ How do we get the uranium pieces?
You need three sources: the RC-XD lab puzzle, the glowing green fish Ravager, and the Glock Drop airborne zombie challenge.
↖ Why does the boss fight feel so long?
Usually because weak spots are being missed. Normal body damage helps, but the real progress comes from shooting red weak spots, Viking heads, and the final eye weak points.
↖ How do we avoid freezing during the boss fight?
Keep the Yoten Star charged and use it while rotating. Move early when lanes freeze, and do not greed damage from unsafe positions.
↖ Summary
Totenreich is much easier when we treat it as a clean route instead of one giant checklist. Build the Yoten Star first, finish the Wonder Signal, collect the three uranium pieces, charge the Atomcraft Core, solve the Sunstone symbols, and enter the boss fight fully upgraded.
For the smoothest clear, go in with a Pack-a-Punch Tier 3 bullet weapon, upgraded Yoten Star, level 3 armor, Stim Shots, and a self-revive. Play the boss fight patiently, prioritize red weak spots, and use the Yoten Star to manage freezing. That is the difference between a chaotic wipe and a clean first completion.

Most Popular Posts
- Black Ops 7 Endgame Exotic Affinity Weapons Guide: Best Bonuses, Full Weapon List, and Farming Tips
- Black Ops 7 Zombies Totenreich Easter Egg Guide: Fast Solo & Co-Op Main Quest Walkthrough
- Black Ops 7 Season 04 Endgame META: Best 5 Weapons After the XR3 Ion Nerf
- Black Ops 7 Cherry Fizz Guide: Fastest Illicit Cargo Event Route for Season 4
- Black Ops 7 Season 4 Release Date, Maps, Weapons, Zombies, Warzone, and MW4 Reveal Prep
- Black Ops 7 Zombies Fast KOWAKUJO Easter Egg Guide: Cat Wonder Weapon, Evidence Puzzles
Popular Category Lists
- Grow a Garden / (286)
- ARC Raiders / (267)
- CoD: Black Ops 7 / (166)
- Monopoly Go / (147)
- MLB 26 / (146)
- Star Citizen / (122)
- Steal a Brainrot / (89)
- ARK Survival Ascended / (77)
- Sailor Piece / (68)
- Forza Horizon 6 / (65)
- Diablo IV / (61)
- Blox Fruits / (61)
- Adopt Me / (56)
- CoD: BLACK OPS 6 / (55)
- Path of Exile 2 / (48)
- Grow a Garden 2 / (48)
- Monster Hunter Wilds / (46)
- Windrose / (44)
- Path of Exile / (40)
- Bee Swarm Simulator / (36)


