0
0 Created: Jul 23,2026 | Star Citizen
Star Citizen 4.9 Hull C Cargo Hauling Guide: Make Millions aUEC Without Autoload

The Hull C is not dead in Star Citizen 4.9. Autoload is broken, yes. But the ship still prints money if you use it the right way: Loading Dock to Loading Dock, high-paying hauling contracts, clean spindle organization, and no wasted hangar logistics.
This is not a fill the entire ship every run strategy. That is how people burn out.
The real Hull C money comes from stacking profitable contracts, moving manageable cargo volumes, and avoiding broken routes.
- Star Citizen 4.9 Hull C: What Still Works and What Does Not
- Best Hull C Rule: Only Run Loading Dock to Loading Dock Routes
- How to Check a Valid Hull C Route
- Best Hull C Contracts in Star Citizen 4.9
- Manual Hull C Loading: Fast Field Workflow
- Park the Hull C Correctly
- Use Ship Tractor Beams
- Load Big Boxes First
- Realistic Hull C Loading Times
- Organize Cargo by Spindle
- Hull C Unloading: Get Paid Without Losing Cargo
- Safe Delivery Order
- Fast Unloading Tips
- Hull C Profit in Star Citizen 4.9
- Current Hull C Problems in 4.9
- Redwind Cargo May Not Spawn
- Do Not Store a Loaded Hull C
- Hull C Safety Tips for Pyro
- Hull C vs Other Cargo Ships
- Best Hull C Money Loop in 4.9
- FAQ
- Is the Hull C broken in Star Citizen 4.9?
- Does Hull C autoload work in 4.9?
- How do I know if a station works for Hull C hauling?
- How much money can the Hull C make without autoload?
- What is the biggest Hull C mistake?
- Summary
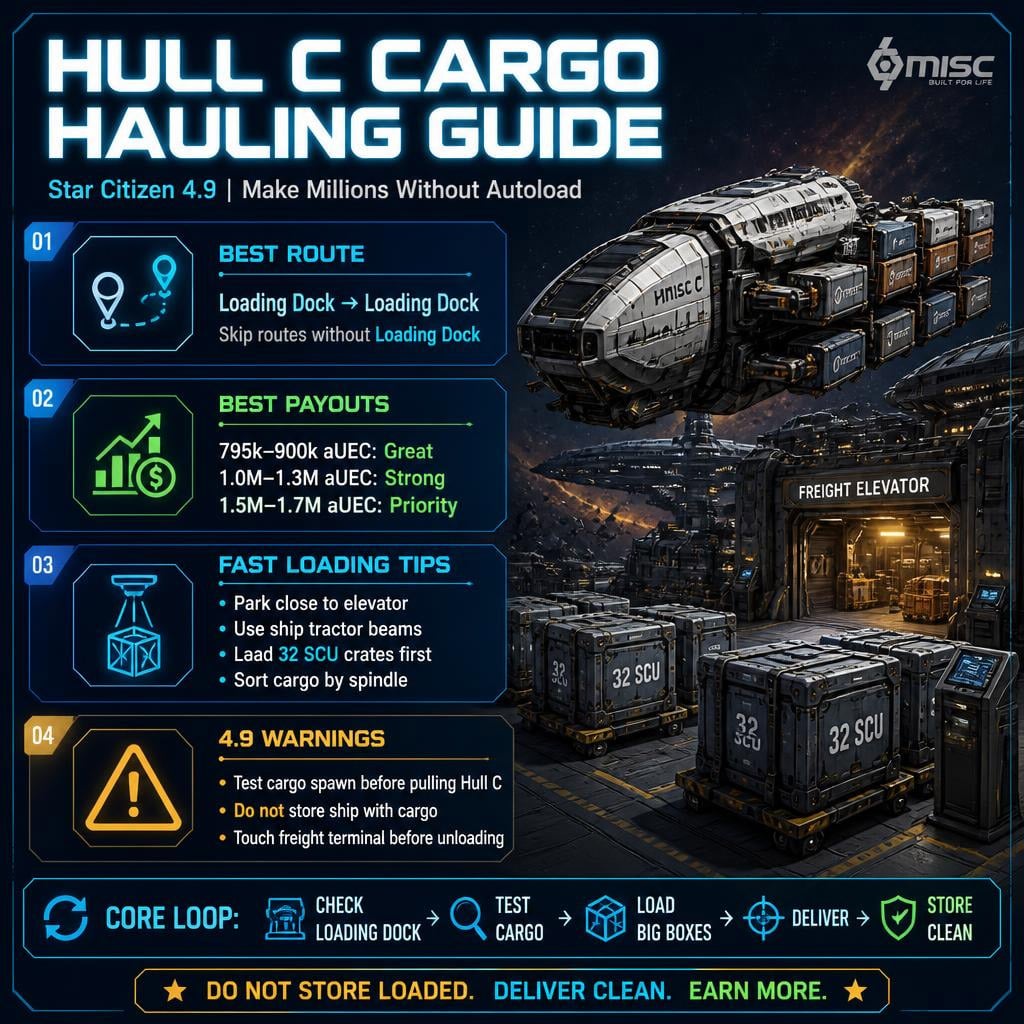
Star Citizen 4.9 Hull C: What Still Works and What Does Not
The biggest mistake players make is confusing broken autoload with a broken Hull C.
They are not the same thing.
| Feature / Issue | Status in 4.9 | What It Means |
|---|---|---|
| Hull C external cargo grid | Works | Manual hauling is viable |
| Autoload | Not working | You must load by hand |
| Ship tractor beams | Works well | Good for 32 SCU crates |
| Loading docks | Required | Best Hull C routes use them |
| Stored with cargo | Buggy | Can spawn glitched in hangar |
| Redwind cargo spawning | Inconsistent | Test before committing |
The Hull C is still the strongest dedicated hauler when the route supports it.
If you hate moving cargo manually, fly something else. If you can handle a few minutes of box work, the profit is worth it.
Best Hull C Rule: Only Run Loading Dock to Loading Dock Routes
For the Hull C, route selection matters more than raw cargo capacity.
Before accepting a hauling contract, check both ends of the route. The location must list:
Loading Dock
No Loading Dock, no Hull C run.
How to Check a Valid Hull C Route
1. Click the pickup or delivery location.
2. Open the location details.
3. Look for Loading Dock.
4. Check both pickup and drop-off.
5. Skip the contract if either side lacks it.
This avoids the worst Hull C mistake: taking a good-paying contract that forces bad hangar logistics.
| Route Type | Use Hull C? | Why |
|---|---|---|
| Loading Dock → Loading Dock | Yes | Fastest and cleanest |
| Loading Dock → Hangar | Avoid | Extra transfer steps |
| Hangar → Hangar | No | Bad Hull C workflow |
| Commodity terminal route | Risky | Autoload issues |
| External freight elevator route | Best | Built for Hull C hauling |
The Hull C lives outside. Treat it that way.
Best Hull C Contracts in Star Citizen 4.9
High-reputation hauling contracts are where the Hull C shines.
Do not obsess over full loads. A small contract can still pay absurdly well.
| Payout Range | Take It? | Notes |
|---|---|---|
| 300k–600k aUEC | Sometimes | Good filler on route |
| 795k–900k aUEC | Yes | Great time-to-profit |
| 1.0M–1.3M aUEC | Yes | Strong Hull C money |
| 1.5M–1.7M aUEC | Priority | Best if route is clean |
| Low pay + many small boxes | Skip | Bad handling value |
A contract paying around 800k aUEC can take only 3–5 minutes to load if the cargo volume is reasonable.
That is why the Hull C still works.
You are not earning because every spindle is full. You are earning because the payout per minute is strong.
Manual Hull C Loading: Fast Field Workflow
Manual loading is not scary. Bad parking is scary.
A clean park cuts several minutes off every job.
Park the Hull C Correctly
Use this setup at external freight elevators:
1. Stop near the freight elevator.
2. Put the cargo grid roughly halfway over the loading area.
3. Kill drift before leaving the pilot seat.
4. Keep shields up, especially in Pyro.
5. Close the ship if you leave it unattended.
The closer the spindle is to the elevator, the faster the tractor work.
Use Ship Tractor Beams
The Hull C tractor beams are good enough now.
They move 32 SCU crates cleanly. They rotate well. They are safer than standing outside with a handheld tractor in a hot zone.
Key tip:
Tap Q to cycle tractor beam control modes until movement feels natural.
Use the mode that stops cleanly with mouse movement. It makes box placement much less annoying.
Load Big Boxes First
Big boxes are your money movers.
| Box Size | Priority | Reason |
|---|---|---|
| 32 SCU | First | Best movement value |
| 16 SCU | Second | Still efficient |
| 8 SCU | Third | More handling |
| 4 SCU or smaller | Last | Time sink |
If a mission is full of tiny boxes, the payout needs to justify the pain.
Realistic Hull C Loading Times
These are practical manual-loading expectations.
| Cargo Situation | Load Time |
|---|---|
| Small contract around 150 SCU | 3–5 min |
| Two moderate contracts | 5–8 min |
| Mixed cargo with smaller boxes | 8–12 min |
| Large partial Hull C load | 15–20 min |
| Near-full 32 SCU load | 25–30 min |
Most profitable contract runs do not require a full Hull C.
That is the whole point.
Organize Cargo by Spindle
If you take multiple contracts, split them by spindle.
Do not mix drop-offs unless they all go to the same destination.
| Spindle | Use Case |
|---|---|
| Forward dorsal | Mission A |
| Forward lower | Mission B |
| Rear dorsal | Mission C |
| Rear lower | Mission D / overflow |
This saves time at delivery.
If you stack three missions and forget which box goes where, that is not a Hull C problem. That is a filing problem with engines.
Hull C Unloading: Get Paid Without Losing Cargo
Unloading is where careless haulers lose money.
Before moving any cargo onto the delivery elevator:
Touch the freight elevator terminal first.
This reduces the chance of cargo disappearing or failing to register.
Safe Delivery Order
1. Park close to the external freight elevator.
2. Interact with the freight terminal.
3. Confirm the elevator is ready.
4. Move cargo onto the platform.
5. Send it down.
6. Wait for mission completion.
Do not make the elevator guess what you are doing. It guesses badly.
Fast Unloading Tips
- Drop small boxes in one corner.
- Move large crates first where possible.
- Rotate only when needed.
- Use lower or rear tractor beams for blind spots.
- Turn off radar only if the area is safe and labels are blocking vision.
A medium delivery can unload in around 10 minutes if cargo is mixed and you are not rushing.
Cleaner loads go faster.
Hull C Profit in Star Citizen 4.9
Here is what a practical session can look like.
| Session Detail | Result |
|---|---|
| Active hauling time | 60–75 min |
| Completed mission payout | 4.7M aUEC |
| Remaining contract value | 1.7M aUEC |
| Potential total | 6.4M aUEC |
| Autoload used | No |
That is why the Hull C is still worth flying.
With cleaner contract stacking and a stable shard, a solo player can make several million per session. With a second player watching security or helping cargo, the loop gets even better.
Current Hull C Problems in 4.9
The ship is strong, but the patch has landmines.
Redwind Cargo May Not Spawn
Redwind Linehaul pays well, but cargo spawning can be inconsistent.
Before pulling the Hull C:
1. Accept one small test contract at your current station.
2. Check the elevator.
3. Confirm the cargo appears.
4. If it does not, shard hop.
Do not prep the Hull C before confirming cargo exists.
| Contract Type | Reliability | Advice |
|---|---|---|
| Redwind Linehaul | Inconsistent | Test first |
| Covalex | Better | Good fallback |
| Interstellar hauling | Mixed | Check route |
| Commodity trading | Risky | Uses your money |
| Contract hauling | Best | Safer profit |
If you find a shard where Redwind works, stay there and run it.
Do Not Store a Loaded Hull C
This is the real Hull C-specific bug to respect.
If you store the ship with cargo attached, it may spawn expanded and glitched into the hangar floor.
Before storing:
- Remove all cargo.
- Contract the ship.
- Close it fully.
- Store only when clean.
Never end a session with cargo still attached unless you enjoy gambling with physics.
Hull C Safety Tips for Pyro
The Hull C is big, slow, and obvious.
It has strong shields, but it is not invisible. Treat every loading stop like someone may be watching.
| Situation | Action |
|---|---|
| Unknown ship passes by | Keep working, stay alert |
| Ship circles you | Pause and watch |
| Player approaches on foot | Close ship |
| You take fire | Leave or defend |
| Escort is present | Keep loading, stay aware |
Basic habits:
- Keep shields up.
- Do not leave doors open.
- Close the ship when stepping away.
- Watch radar before turning it off.
- Do not linger after delivery.
Cargo hauling is only profitable if the cargo arrives.
Hull C vs Other Cargo Ships
The Hull C is not the easiest hauler.
It is the best high-capacity contract hauler when the route supports it.
| Ship | Best Use | Weakness |
|---|---|---|
| Hull C | Massive external hauling | Needs loading docks |
| C2 Hercules | Flexible hangar cargo | Lower cargo ceiling |
| Caterpillar | Mid-scale hauling | Slower layout |
| Ironclad | Heavy utility / future cargo | Not a pure Hull C replacement |
| Smaller haulers | Simple contracts | Lower profit ceiling |
If you want comfort, take a C2.
If you want serious external hauling money, take the Hull C.
Best Hull C Money Loop in 4.9
Use this loop every time.
| Step | Action |
|---|---|
| 1 | Check both locations for Loading Dock |
| 2 | Accept one test contract |
| 3 | Confirm cargo appears |
| 4 | Pull the Hull C |
| 5 | Park close to the elevator |
| 6 | Load big boxes first |
| 7 | Organize by spindle |
| 8 | Fly direct to delivery |
| 9 | Touch terminal before unloading |
| 10 | Empty, contract, and store clean |
This is the current best Hull C workflow.
Simple. Repeatable. Profitable.
FAQ
Is the Hull C broken in Star Citizen 4.9?
No. The Hull C still works for manual hauling. Autoload is broken, but the external cargo grid and ship tractor beams are usable. The main ship-specific issue is storing it with cargo attached.
Does Hull C autoload work in 4.9?
No. Do not plan around autoload. Use manual loading at external freight elevators.
How do I know if a station works for Hull C hauling?
Check the location details for Loading Dock. If pickup or delivery does not list Loading Dock, skip the route.
How much money can the Hull C make without autoload?
A practical session can make several million aUEC. One tested-style run can complete around 4.7M aUEC in roughly 60–75 minutes of active hauling, with more still onboard.
What is the biggest Hull C mistake?
Taking contracts without checking the route. The second biggest mistake is storing the Hull C with cargo attached. Both waste time fast.
Summary
The Hull C is still the king of cargo hauling in Star Citizen 4.9 if you stop treating autoload as mandatory.
Run Loading Dock to Loading Dock contracts. Test cargo spawning first. Use the ship tractor beams. Load big crates first. Sort missions by spindle. Touch the delivery terminal before unloading. Never store the ship loaded.
That is the working loop.
No autoload. No drama. Just millions.

Most Popular Posts
- Star Citizen 4.9 Mining Guide: Best Laser Buffs, Crafted Heads, Scanning, Materials and Nyx Missions
- Star Citizen 4.9 Ship Buying Guide: What to Buy, Skip, and Prioritize
- Star Citizen 4.9 Salvage Guide: Easy AUEC from Battaglia Ship in Distress + Golem Module Fix
- Star Citizen 4.9 Battaglia Contracts, Persistence Fixes, Best Loot, Scanning Changes, and Ship Rewards
- Star Citizen 4.9 Hull C Cargo Hauling Guide: Make Millions aUEC Without Autoload
- Star Citizen 4.9 Alleso Money Guide: Best Pyro Trade Route for Fast aUEC
Popular Category Lists
- ARC Raiders / (348)
- Grow a Garden / (293)
- CoD: Black Ops 7 / (167)
- Star Citizen / (161)
- MLB 26 / (159)
- Monopoly Go / (152)
- ARK Survival Ascended / (127)
- Steal a Brainrot / (99)
- Blox Fruits / (74)
- Adopt Me / (73)
- Forza Horizon 6 / (72)
- Sailor Piece / (68)
- Grow a Garden 2 / (68)
- Diablo IV / (62)
- CoD: BLACK OPS 6 / (55)
- Path of Exile 2 / (48)
- Aion 2 / (47)
- Monster Hunter Wilds / (46)
- Windrose / (44)
- Donut SMP / (41)