0
Created: Nov 11,2026 | Star Citizen
Star Citizen Mining Loadouts & Trade Route: Fast Profit Checklist

Scan Mass, Resistance, and Instability before activating your mining laser, and verify live terminal stock before buying cargo. Match your ARGO Mole lasers to the rock's limiting stat and audit UEXCorp data in-game to prevent wasted runs.
- Mining: Scan the Rock Before Choosing a Loadout
- High-Mass Outliers & Group Targets
- 4-Step Rock Fracture Fallback
- Optimal ARGO Mole 3-Laser Build
- Single-Seat Miners & Crafted Gear Risks
- Trade Routes: Verify Stock and Demand Before Buying
- Multi-Leg Chain Routes
- Pyro 3-Leg Chain Route Template
- Pre-Flight Execution Checklist
- FAQ (Frequently Asked Questions)
- Why won't my mining laser charge the rock at all?
- What is the best solo setup for the ARGO Mole?
- Do crafted mining lasers stay on your ship after an insurance claim?
- Why do UEXCorp trade routes show higher profits than I get in-game?
- When should I abandon the third leg of a chain trade route?
Mining: Scan the Rock Before Choosing a Loadout
Your mining laser selection depends on the rock's exact scan metrics, not mineral rarity. Treat Mass as an independent power gate that stops solo miners even when Instability and Resistance read near zero.
Match your active turret or gadget to the exact scan bottleneck below.
| Scan Stat | Failure Symptom | Immediate Countermeasure |
|---|---|---|
| Mass | Charge meter stays at zero despite max throttle. | Swap to a Helix laser or combine beams with a second miner. |
| Resistance | Fracture energy stalls below the green zone. | Trigger a Surge module or attach a Sabir gadget to drop resistance. |
| Instability | Charge bar spikes wildly and causes overcharge damage. | Switch to a Focus 3 module setup to widen the optimal window. |
| Mineral Concentration | Rock fractures into high-percentage inert material. | Skip any sub-rock reading under 25% pure mineral to save cargo space. |
Ignore percentage-based resistance modifiers on low-resistance rocks, as reducing a 5% base stat yields zero practical time savings.
High-Mass Outliers & Group Targets
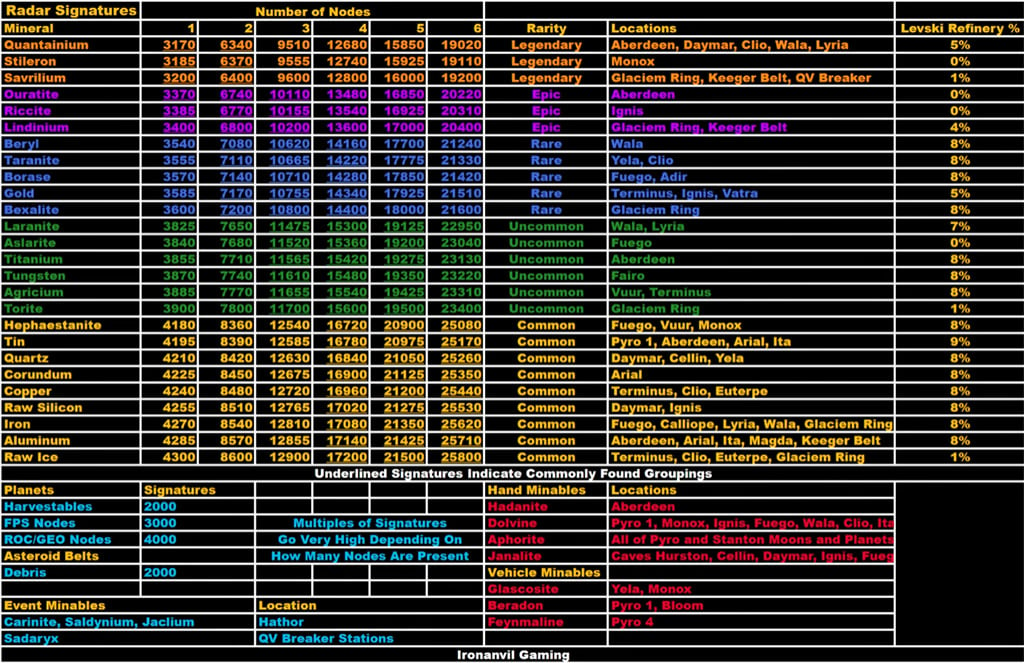
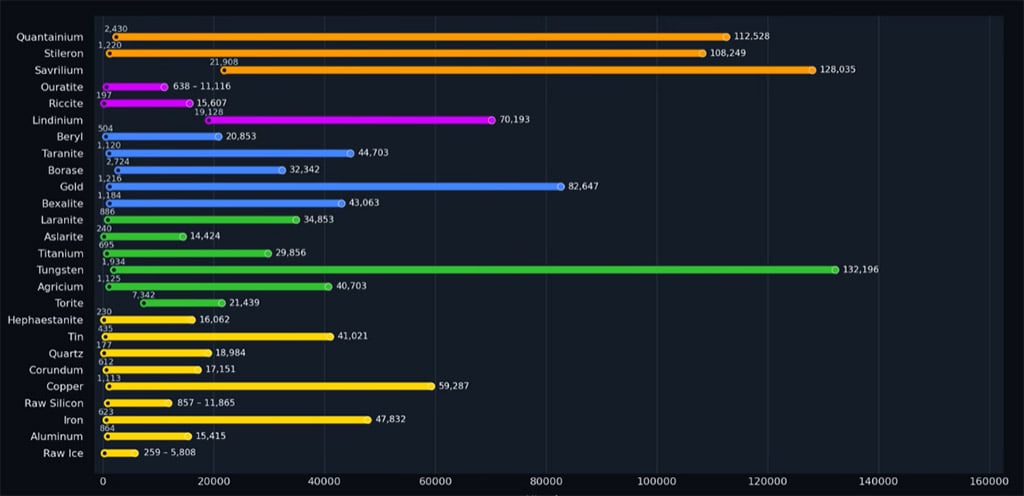
Specific minerals bypass standard resistance checks and block solo lasers through raw Mass alone. In our solo versus duo testing, cracking a single high-mass node with two lasers yielded 40% more pure ore per hour than hunting smaller solo rocks.
- Mass Outliers: Treat Tungsten, Ortite, and Recite as heavy power checks that require high-output beams regardless of stability readings.
- Multi-Crew Nodes: Bring a second miner for large deposits of Quantanium, Stelleron, Hafnium, Lindinium, Gold, and Tungsten.
- Solo Fallback: Target smaller boulder fragments of high-tier ores when flying solo, accepting lower total SCU yields for guaranteed fracture speed.
4-Step Rock Fracture Fallback
1. Scan Core Metrics: Lock the asteroid to read Mass, Resistance, and Instability before powering weapons.
2. Swap Active Turrets: Move to the mining seat built to counter the highest limiting stat on your HUD.
3. Downsize Targets: Abandon oversized primary boulders and fracture smaller adjacent rocks if energy still stalls.
4. Call Backup: Sync beams with a second player ship to overcome hard Mass walls.
Optimal ARGO Mole 3-Laser Build
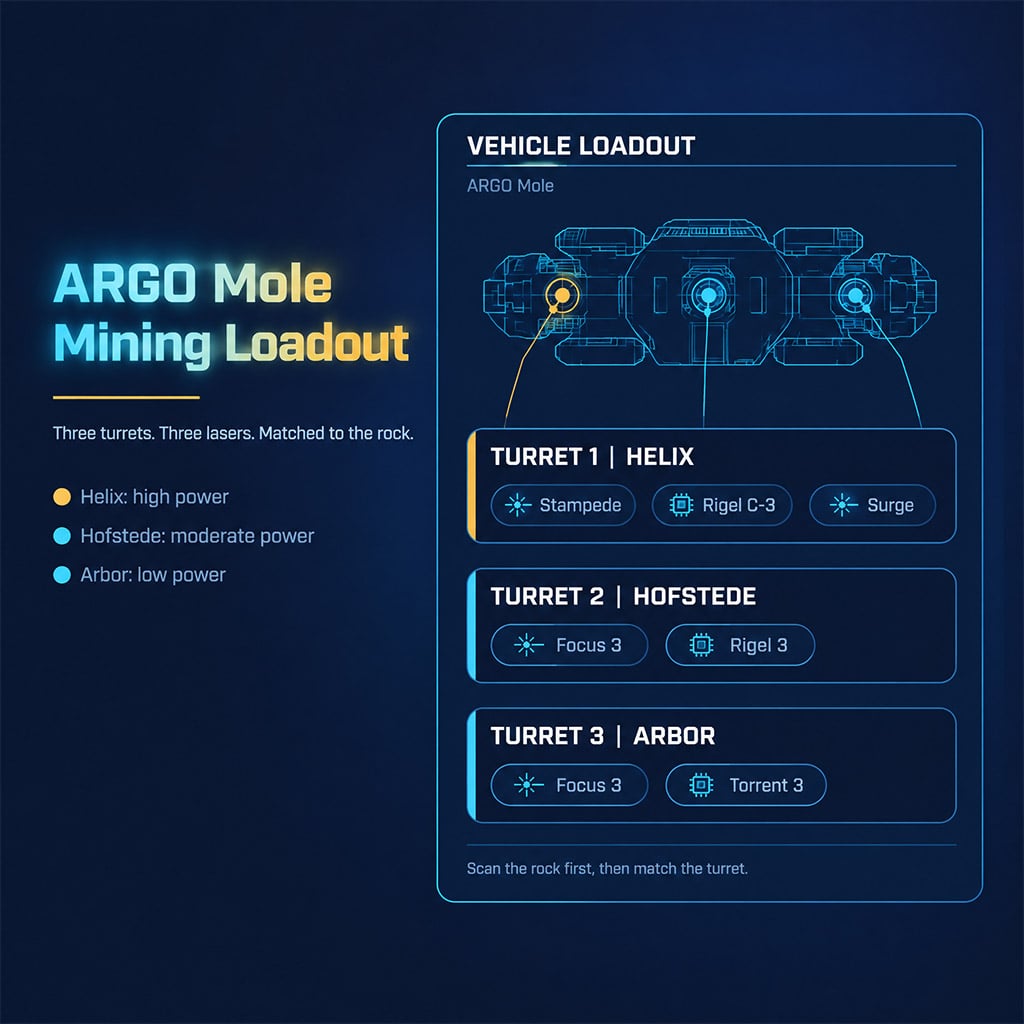
Equipping three identical high-power lasers wastes the ARGO Mole's three-turret versatility. We run three specialized Size 2 setups across the bow and side turrets to clear any asteroid profile without returning to a station.
Equip this exact three-turret spread to cover every asteroid class in a single sortie.
| Laser Head | Equipped Modules | Tactical Role |
|---|---|---|
| Helix II | Stampede, Rieger-C3, Surge | High-power breaker for massive, high-resistance S-tier nodes. |
| Hofstede-S2 | Focus III, Rieger-C3 | Balanced mid-power setup for unstable mid-tier minerals. |
| Arbor MH2 | Focus III, Torrent III | Precision low-power beam for volatile, low-mass fragments. |
Keep your default laser active on easy rocks rather than swapping seats, because changing turrets costs more time than brute-forcing a weak node.
Single-Seat Miners & Crafted Gear Risks
Solo Prospector pilots lack multi-turret flexibility and must rely on trunk inventory swaps. Keep one all-rounder laser equipped and carry extra modules and mining gadgets in your ship storage to handle spike stats.
- Insurance Bug Prevention: Unequip expensive crafted lasers during high-risk runs, as we verified post-patch that ship insurance claims occasionally fail to restore custom-crafted sub-components.
- Backup Hardware: Stash a stock, uncrafted Hofstede or Helix laser in your local station inventory so a single ship destruction never halts your mining loop.
Trade Routes: Verify Stock and Demand Before Buying
High paper margins on UEXCorp or SC Trade Tools mean nothing if the outpost is out of stock or the destination demand is capped. Always cross-check external planner routes against live in-game Commodity Terminals before spending credits.
Follow this six-step audit before locking your cargo grid.
- Select Base Route: Identify a high-margin commodity and starting outpost using UEXCorp or SC Trade Tools.
- Cap Purchase Volume: Limit your buy order to the lowest of four ceilings: Ship SCU Capacity, Available aUEC, Seller Stock, or Buyer Demand.
- Factor Overhead: Deduct automated loading fees and quantum fuel costs from your projected net margin.
- Verify Live Terminals: Check the physical Commodity Kiosk at the buy location to confirm real-time price and inventory availability.
- Clock Turnaround Time: Time the entire loop—including atmospheric exit, freight elevator loading, and unloading—to track true aUEC per hour.
- Pivot Away from Crowds: Skip the #1 listed public route on third-party tools, as player congestion drains stock and tanks profit by up to 60% in our live server runs.
Always prioritize a short, mid-margin planetary hop over a high-margin deep-space haul if the shorter loop yields higher aUEC per hour.
Multi-Leg Chain Routes
Flying an empty hull back to your starting station cuts your hourly profit in half. Build a three-leg Chain Route that loads profitable cargo at every drop-off point.
1. Leg 1 (A to B): Buy your primary commodity at Location A and sell the full hold at Location B.
2. Leg 2 (B to C): Purchase a local export from Location B's terminal and haul it to a verified buyer at Location C.
3. Leg 3 (C to A): Load a return commodity at Location C that sells directly back to Location A to close the loop.
Fly back with an empty cargo hold if the final leg has low buyer demand, because waiting on terminal refresh timers wastes more money than deadheading.
Pyro 3-Leg Chain Route Template
Use this Pyro System three-leg loop to test station-to-station chain mechanics. In our three-run haul test, timing freight elevator queues at Ruin Station determined whether this loop beat standard one-way hauling.
Verify live terminal prices at each stop before committing your haul budget to this Pyro loop.
| Route Leg | Commodity | Origin & Destination |
|---|---|---|
| Leg 1 | Aluminum | Megumi Refueling → Ruin Station |
| Leg 2 | Pressurized Ice | Ruin Station → Endgame (ArcCorp) |
| Leg 3 | Nitrogen | Endgame (ArcCorp) → Megumi Refueling |
Buy a 1-SCU test crate first to confirm the destination terminal accepts the cargo before filling a C2 Hercules or Caterpillar.
Pre-Flight Execution Checklist
Run this four-point check before pulling your ship from the hangar to prevent bankroll wipes.
- Mining Prep: Scan Mass, Resistance, and Instability first, match your turret to the bottleneck, and leave crafted lasers stored until insurance bugs are patched.
- Trading Prep: Confirm live Seller Stock, Buyer Demand, and Loading Fees on every leg before purchasing cargo.
- Bankroll Management: Never invest more than 50% of your total aUEC into a single cargo hold to survive server disconnects or piracy.
- Profit Logging: Track your real in-game payout against external tool estimates and drop any route that underperforms by more than 20%.
FAQ (Frequently Asked Questions)
Why won't my mining laser charge the rock at all?
Your laser lacks the power to overcome the rock's Mass. Switch to a Helix laser head, pop a Surge module, or link beams with a second miner.
What is the best solo setup for the ARGO Mole?
Run a Helix II on the center turret for heavy rocks, a Hofstede-S2 on the left for unstable nodes, and an Arbor MH2 on the right for small fragments.
Do crafted mining lasers stay on your ship after an insurance claim?
No, ship insurance claims inconsistently restore custom crafted lasers after destruction. Always carry an uncrafted backup laser in your local station inventory.
Why do UEXCorp trade routes show higher profits than I get in-game?
Third-party tools rely on delayed player updates and ignore loading fees and terminal competition. High player traffic drains seller stock and crashes buyer demand before you arrive.
When should I abandon the third leg of a chain trade route?
Skip the final leg whenever the return commodity has low profit margins or capped buyer demand. Flying back empty is faster and more profitable than camping a locked terminal.

I’m Benjamin Walsh, an Australian Senior Copy Editor at GGWTB focused on survival crafting, open-world exploration, and extraction games. My guides weigh base locations, supply routes, and what deserves the last slot in your backpack. When editing, I look for skipped prerequisites and unclear directions—a useful guide shouldn’t send you across the map without the right tools.

Most Popular Posts
- Star Citizen 4.10 Quantum Drive Guide: Best Drives for Speed, Range, and Crafting
- Star Citizen Ship Update: Galaxy, Kraken and 2026 Release Forecast
- Star Citizen 4.10 Weapons and Components Guide: Best Quantum Drives, Ballistics, Distortions, and Ship Loadouts
- Star Citizen 4.10 Industry Guide: Cargo, Hull C, Salvage, Mining Modules and Battaglia Blueprints
- Star Citizen 4.10 Cargo Hauling Guide: What Works, What's Still Broken
- Star Citizen Ship Showdown: Top Bracket, Free Fly Rules, Idris-P Sale & Alpha 4.10 Timing
Popular Category Lists
- ARC Raiders / (370)
- Grow a Garden / (299)
- Star Citizen / (170)
- CoD: Black Ops 7 / (167)
- MLB 26 / (159)
- Monopoly Go / (153)
- ARK Survival Ascended / (132)
- Steal a Brainrot / (101)
- Adopt Me / (78)
- Blox Fruits / (74)
- Forza Horizon 6 / (72)
- Sailor Piece / (68)
- Grow a Garden 2 / (68)
- Aion 2 / (63)
- Diablo IV / (62)
- COD: Modern Warfare 4 / (56)
- CoD: BLACK OPS 6 / (55)
- Maplestory Classic / (50)
- Path of Exile 2 / (48)
- Monster Hunter Wilds / (46)