0
0 Created: Sep 18,2026 | Star Citizen
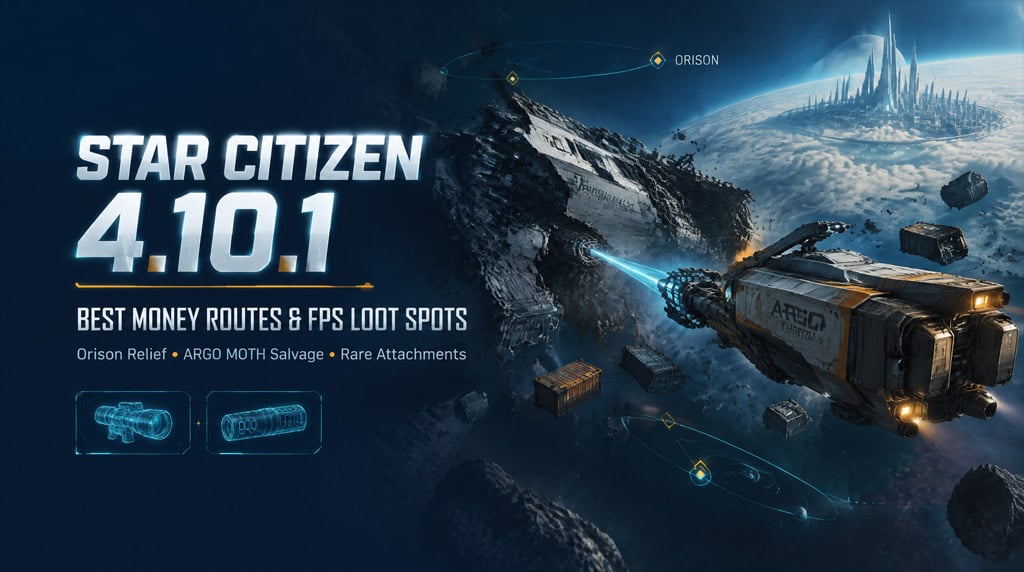
Star Citizen 4.10 Farming Guides: aUEC Farming Route and FPS Attachment Loot Spots

For reliable Orison Relief progress, run the 96 SCU Medium Supply Haul; use MOTH salvage only when the live material contract still pays enough to justify its bugs and handling time. For FPS attachments, start at ASD Onyx for optics or Hathor for general muzzle devices rather than defaulting to Jumptown.
- Choose the Right Orison Relief Route
- Fastest Reliable Event Route: Medium Supply Haul
- Ship and Cargo Requirements
- When Not to Use the RAFT
- MOTH Salvage Money Route
- Run a Profitability Check First
- Select a Processable Wreck
- Inspect Cargo Before Destroying the Hull
- Prevent Freight-Elevator and Delivery Failures
- Submit Exact Quantities
- Recover Missing Cargo
- Reduce Piracy Exposure
- Best FPS Attachment Loot Locations
- ASD Onyx for Optics
- Hathor for General Muzzle Devices
- Distribution Centers for Size 3 Parts and Armor
- Pyro Data Centers for Stoic and Torrent
- Contested Zones for Organized Groups
- Build a Short, Targeted Farming Route
- Optics Route
- General Muzzle Route
- High-Risk Suppressor Route
- FAQ (Frequently Asked Questions)
- Is the Star Citizen 4.10.1 five-million-aUEC method still reliable?
- What is the fastest reliable Orison Relief route?
- Can the ARGO MOTH fracture a Hercules wreck?
- Where should we farm FPS optics in Star Citizen 4.10.1?
- What should we do when the freight platform takes cargo but the contract does not complete?
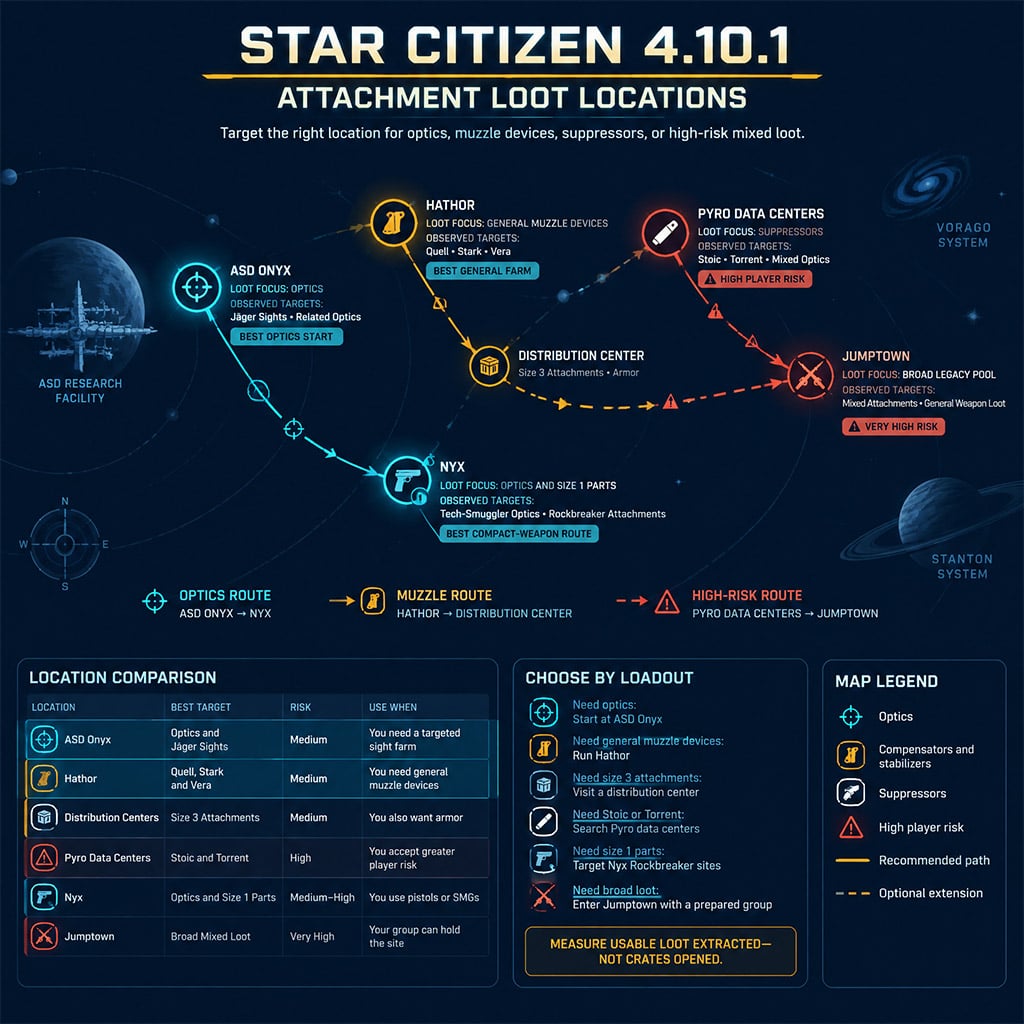
Choose the Right Orison Relief Route
The early 5 million aUEC per hour salvage claim depends on a repeatable material order, favorable wreck yield, rapid box production, and a stable freight terminal. Treat it as a peak result, not a dependable hourly rate.
A current RSI Community Hub route reports that the Medium Supply Haul awards 6,000 event points, requires 96 SCU of medical supplies, and can be repeated without a cooldown. It lists 12 runs—roughly four hours—as the full reward-track route.
Use this table before renting a ship.
| Route | Core Requirement | Best Use | Avoid It When |
|---|---|---|---|
| Medium Supply Haul | 96 SCU of medical supplies | Predictable event progression | You lack a ship that handles 8 SCU containers cleanly |
| MOTH salvage | Salvage rental and eligible wreck contracts | High aUEC potential plus event materials | The delivery payout or required quantity has changed |
| Rubble turn-ins | Fracture and disintegrate eligible wrecks | Salvage-focused event progress | You want the shortest current event route |
| Combat contracts | Combat-capable ship | Players who dislike cargo handling | You need reliable freight profit |
Judgment call: choose the supply route for event rewards; choose salvage only after checking the live contract economics.
Sources: Official Star Citizen Alpha 4.10.1 Patch Notes and RSI Community Hub Orison Relief Route.
Fastest Reliable Event Route: Medium Supply Haul
The supply route removes wreck compatibility and salvage-processing variables. Its main costs are long-distance travel and manual cargo handling.
Ship and Cargo Requirements
The documented community route recommends renting an ARGO RAFT at Teasa Spaceport in Lorville. Its 192 SCU capacity accommodates the mission's twelve 8 SCU medical-supply containers without wasting cargo space.
Raw capacity is not the only factor. A larger freighter may load more cargo but lose time through narrow interiors, lifts, or awkward container placement.
Use this sequence:
1. Rent or retrieve a ship that can carry at least 96 SCU.
2. Accept the Medium Supply Haul under the Orison Relief contracts.
3. Collect twelve 8 SCU medical-supply containers.
4. Deliver the full load to Orison.
5. Confirm the 6,000-point award before accepting the next contract.
6. Repeat until the required reward tier appears in your account.
If several players run together, every participant should accept the contract before delivery. The community-tested route reports full progress for each eligible party member rather than divided progress, but confirm that everyone sees the active objective before moving the cargo.
When Not to Use the RAFT
Skip the RAFT when you already own a ship that carries the containers with less loading friction. Capacity above 96 SCU offers no advantage if you cannot pre-purchase or stage cargo for a second active contract.
Do not assume its 192 SCU hold automatically completes two runs. Mission cargo generation, contract ownership, and pickup availability control whether a second load can be staged.
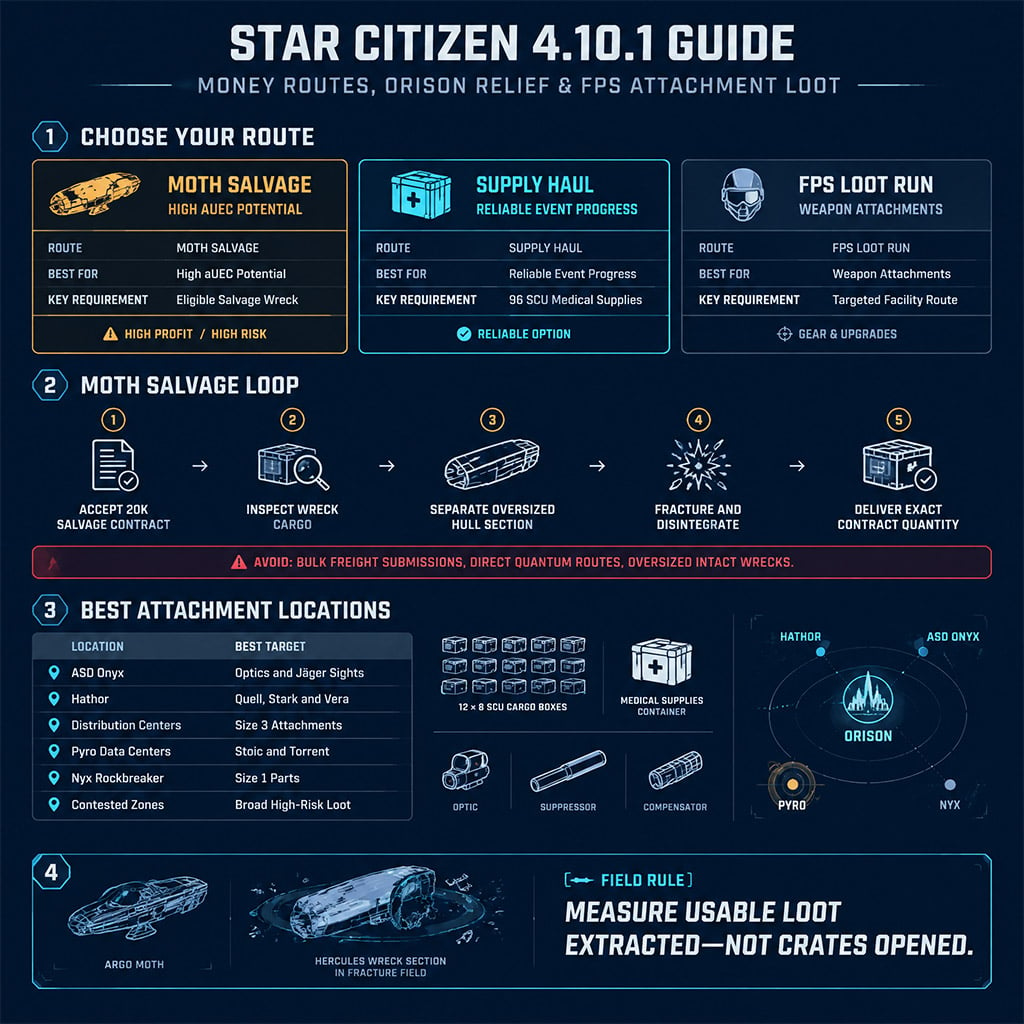
MOTH Salvage Money Route
MOTH salvage makes sense only when the live delivery contract produces a strong net return. Check the payout, required SCU, accepted material type, rental cost, and salvage fee before leaving the terminal.
Run a Profitability Check First
The early field run showed a 200,000-aUEC order requiring 12 SCU of construction material. That run converted 64 SCU into five complete orders for a theoretical 1 million aUEC gross payment.
Those figures are patch-sensitive. Later community testing describes a different rubble route using 4 SCU turn-ins and approximately 43 submissions for full event progress, which means the early payout loop should not be treated as permanent.
Use the live values to calculate whether the run is still worthwhile:
| Cost or Delay | Include in Your Decision |
|---|---|
| MOTH rental | Use the shortest rental unless planning multiple sessions |
| Salvage contract fee | Paid even when a wreck proves inefficient |
| Travel time | Includes rental pickup, wreck travel, and Orison delivery |
| Box production | Continues after material processing |
| Freight handling | Often slower than the fracture itself |
| Failure risk | Covers piracy, death, server loss, and terminal desynchronization |
Judgment call: abandon the method when one complete wreck cycle pays less than your safer cargo or combat alternative.
Select a Processable Wreck
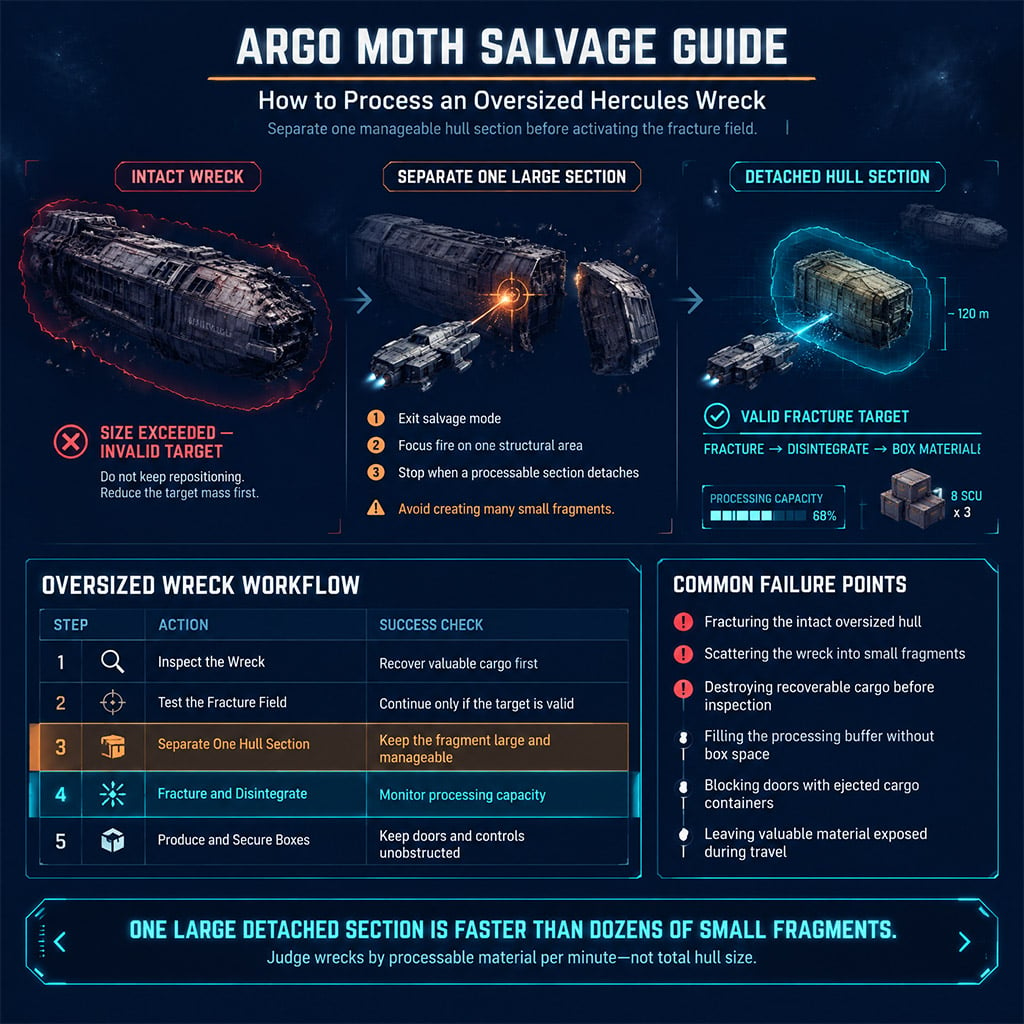
Do not choose contracts by hull size alone. The current community rubble route recommends eligible 400i, Vanguard, and RAFT wrecks, while the early money run used a Hercules section after the intact hull exceeded the MOTH's fracture limit.
If an intact wreck displays size exceeded, use this procedure:
1. Leave salvage mode.
2. Concentrate ship fire on one structural section.
3. Stop when a large piece separates.
4. Place the detached section inside the fracture field.
5. Fracture and disintegrate it.
6. Begin box production before collecting more material.
The target is one large processable section—not dozens of scattered fragments.
Inspect Cargo Before Destroying the Hull
Some salvage targets carry recoverable freight. Scan or inspect the wreck before firing because structural damage can destroy cargo or scatter it beyond practical recovery.
Take high-value cargo first when its sale value exceeds the extra handling time. Skip low-value freight if it delays a short, high-paying material contract.
Prevent Freight-Elevator and Delivery Failures
Freight synchronization is the route's biggest failure point. The physical cargo, local warehouse, mission tracker, and terminal can update at different times.
Submit Exact Quantities
Never send the entire load merely because the contract accepts a smaller amount.
Follow this order:
1. Accept one delivery contract.
2. Wait for the acceptance notification and objective marker.
3. Place the exact required quantity on the freight platform.
4. Lower the platform.
5. Assign the cargo to the active contract.
6. Confirm the transfer.
7. Wait for payment and objective completion.
8. Accept the next order.
For a 12 SCU requirement, the early run used one 8 SCU container and one 4 SCU container. If you cannot create the exact combination, do not test excess-cargo behavior with your full load.
Recover Missing Cargo
If the terminal removes the cargo without completing the contract, stop all further submissions.
Check the local warehouse, wait for the mission tracker, cycle the freight platform once, and reopen the transfer interface. Change servers only after confirming the material is absent from both the warehouse and platform inventory; a server change can turn a delayed transaction into a permanent loss.
Reduce Piracy Exposure
Popular station-to-Orison quantum lines are predictable. With a valuable load aboard, make a short jump toward another marker, cancel quantum travel, and plot Orison from the new position.
This does not prevent interdiction. It moves you away from the most obvious traffic line and costs little compared with losing several completed orders.
At August Dunlow Spaceport, park with the cargo-access side facing the freight platform. Close the hangar before unloading whenever the instance allows it.
Best FPS Attachment Loot Locations
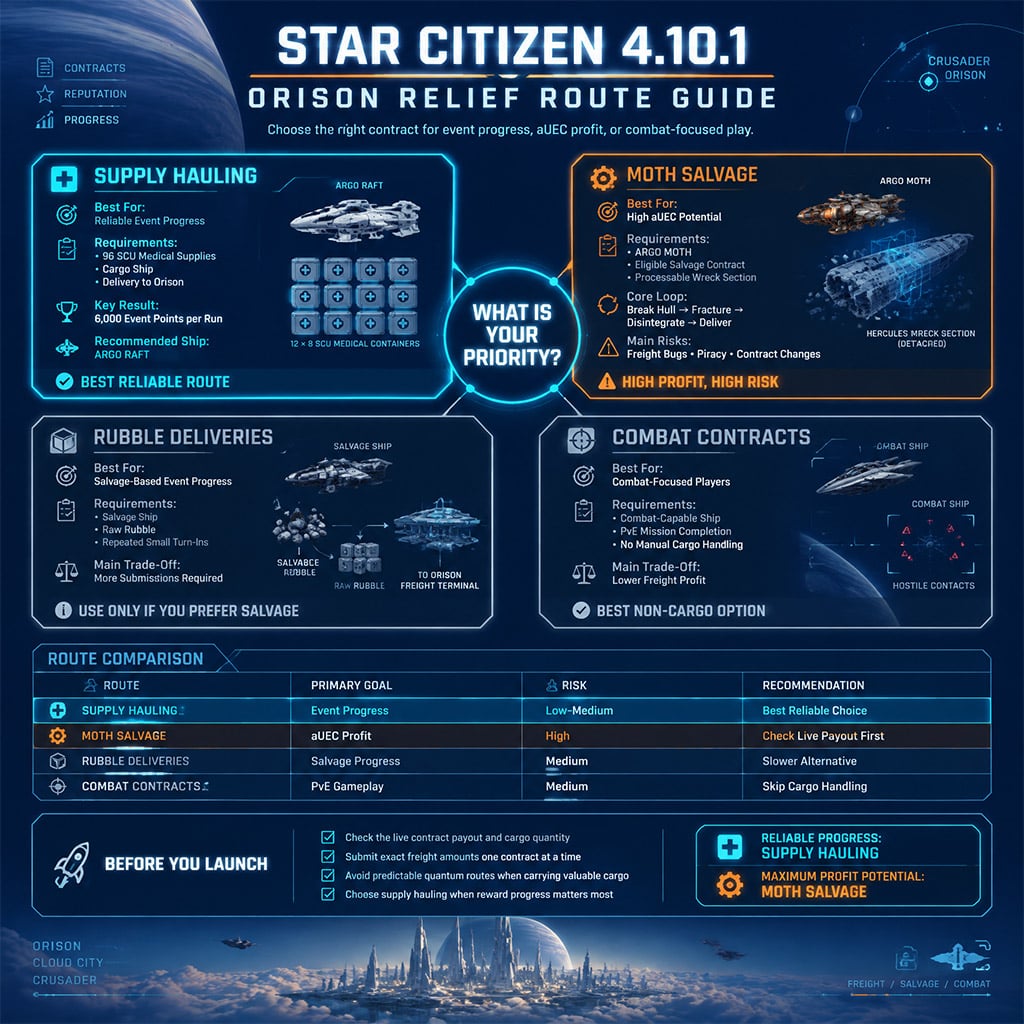
The Alpha 4.10.1 patch notes moved barrel compensators and stabilizers across all three sizes into the general loot pool. That confirms broader availability, not guaranteed drops or identical location weighting.
The locations below reflect observed loot tendencies from repeated 4.10.1 runs. Random generation, server state, and container availability will change individual results.
| Location | Observed Bias | Risk | Best Use |
|---|---|---|---|
| ASD Onyx Research Site B | Jäger and related optics | Medium | Targeted sight farming |
| Hathor facilities | Quell, Stark, and Vera attachments | Medium | General muzzle-device runs |
| Stanton distribution centers | Size 3 compensators and armor | Medium | Heavy attachments plus armor |
| Pyro data centers | Stoic, Torrent, and mixed optics | High | Suppressor hunting |
| ASD Lazarus | Equalizer and Escalate attachments | High | Energy-weapon attachments |
| Contested Zones | Broad weapons and attachments | Very high | Organized teams |
| Nyx tech-smuggler sites | Optics and mixed attachments | Medium–High | Alternative sight route |
| Rockbreaker stations | Higher observed share of size 1 parts | Medium–High | Pistols and SMGs |
| Jumptown sites | Broad legacy pool | Very high | PvP-ready groups |
Judgment call: farm Onyx or Hathor first; use Contested Zones only when your group can protect the looter.
ASD Onyx for Optics
Use ASD Onyx Research Site B when you need sights rather than a random mixture of attachments. The documented runs found several Jäger variants and roughly seven optics across multiple clears.
Search side rooms and smaller eligible containers. A lower crate count can still outperform a larger facility when more drops match the category you need.
Hathor for General Muzzle Devices
Hathor produced the broadest practical mixture of Quell, Stark, and Vera attachments across several sizes. One recorded clear produced about four size 2 Quell attachments, with additional items found by the group.
This route suits squads using different weapon classes. Skip it when you need one specific suppressor associated with another observed pool.
Distribution Centers for Size 3 Parts and Armor
Distribution centers showed an observed bias toward size 3 compensators, plus desirable armor as secondary loot. That sounds attractive, but few everyday FPS weapons accept size 3 muzzle devices.
Run these sites when both loot categories interest you. For pistol, SMG, or standard-rifle kits, Onyx, Hathor, or Rockbreaker offers more usable drops.
Pyro Data Centers for Stoic and Torrent
Pyro data centers remain a strong observed source for Stoic and Torrent variants. The cost is higher player risk and weaker recovery options after death.
Enter with replaceable equipment, park away from direct approaches, and leave once you secure the target attachment. Opening one more container is a poor trade when your backpack already holds the item you came for.
Contested Zones for Organized Groups
Contested Zones provide broad loot but punish players who open inventory before securing the room. Assign one teammate to cover entrances while another searches containers.
Solo players should prioritize compact attachments and leave bulky weapons behind. Measure the route by usable items extracted, not loot found before death.
Build a Short, Targeted Farming Route
Cross-system shopping wastes more time than poor drop luck. Pick one attachment category and stop when you obtain a compatible item.
Optics Route
1. Clear ASD Onyx Research Site B.
2. Store valuable sights locally.
3. Use Nyx tech-smuggler sites only as a secondary route.
4. Extract immediately after finding the required optic.
General Muzzle Route
1. Clear a Hathor facility.
2. Keep only sizes compatible with your active weapons.
3. Visit a distribution center only for size 3 parts or armor.
4. Bank the attachments before starting another clear.
High-Risk Suppressor Route
1. Equip gear you can replace.
2. Enter a Pyro data center with medical supplies and spare ammunition.
3. Search for Stoic or Torrent variants.
4. Leave as soon as the target drops.
One successful 20-minute extraction beats an hour-long run that ends at the regeneration terminal.
FAQ (Frequently Asked Questions)
Is the Star Citizen 4.10.1 five-million-aUEC method still reliable?
No, the 5 million-aUEC hourly figure is a best-case early result, not a stable guarantee. Check the live material order's payout, quantity, accepted commodity, and cooldown before renting a MOTH.
What is the fastest reliable Orison Relief route?
The documented reliable route is the Medium Supply Haul requiring 96 SCU of medical supplies. Community testing reports 6,000 points per run and 12 runs for the full reward track.
Can the ARGO MOTH fracture a Hercules wreck?
The MOTH may reject an intact Hercules because it exceeds the fracture limit. Separate a large hull section with concentrated weapon fire, then fracture the detached piece.
Where should we farm FPS optics in Star Citizen 4.10.1?
Start at ASD Onyx Research Site B for the strongest observed optics bias. Nyx tech-smuggler locations provide a secondary route when Onyx containers are empty or recently looted.
What should we do when the freight platform takes cargo but the contract does not complete?
Stop submitting cargo and check the local warehouse before touching another contract. Wait for synchronization, cycle the platform once, and change servers only after confirming the material is missing from every local inventory view.

I’m Benjamin Walsh, an Australian Senior Copy Editor at GGWTB focused on survival crafting, open-world exploration, and extraction games. My guides weigh base locations, supply routes, and what deserves the last slot in your backpack. When editing, I look for skipped prerequisites and unclear directions—a useful guide shouldn’t send you across the map without the right tools.

Most Popular Posts
- Star Citizen 4.9 Mining Guide: Best Laser Buffs, Crafted Heads, Scanning, Materials and Nyx Missions
- Star Citizen 4.9 Ship Buying Guide: What to Buy, Skip, and Prioritize
- Star Citizen 4.9 Salvage Guide: Easy AUEC from Battaglia Ship in Distress + Golem Module Fix
- Star Citizen 4.9 Battaglia Contracts, Persistence Fixes, Best Loot, Scanning Changes, and Ship Rewards
- Star Citizen Alpha 4.9 Guide: Best Features, Mining Scan Upgrade, Weapon Nerfs
- Star Citizen 4.9 Hull C Cargo Hauling Guide: Make Millions aUEC Without Autoload
Popular Category Lists
- ARC Raiders / (341)
- Grow a Garden / (292)
- CoD: Black Ops 7 / (167)
- Star Citizen / (160)
- MLB 26 / (159)
- Monopoly Go / (152)
- ARK Survival Ascended / (125)
- Steal a Brainrot / (98)
- Blox Fruits / (74)
- Adopt Me / (73)
- Forza Horizon 6 / (72)
- Sailor Piece / (68)
- Grow a Garden 2 / (68)
- Diablo IV / (62)
- CoD: BLACK OPS 6 / (55)
- Path of Exile 2 / (48)
- Monster Hunter Wilds / (46)
- Aion 2 / (45)
- Windrose / (44)
- Donut SMP / (41)