


 0
0The Most Broken Zombies Loadout in Black Ops 7: XR3 Ion Sniper Max DPS Guides
- ELSA
- Share
- CoD: Black Ops 7
- 10/23/25
- 2494
You're about to build the most absurdly strong Zombies loadout in Black Ops 7: the XR3 Ion Sniper. It charges three rounds per shot, crits like a truck, and—when fully upgraded with the right elemental—can spike to nearly 300,000 damage per second. Why should you care? Because it outpaces Ray Gun by ~6× and beats Ray Gun M2 by ~2× in raw DPS, which changes how you approach boss control, high-round clears, and salvage economy.
- Why XR3 Ion Is Broken Right Now
- The Catch: Practicality vs. Power
- Step-by-Step Build: Attachments, Perks, and Ammo Mod
- Upgrade Path: Rarity, PaP Levels, and Elemental
- Salvage Economy: Monkey Bomb Loop to Accelerate
- Real-World Tests: Zersa and HVT Melts
- How to Play It: Micro-Flow and Collateral Lines
- FAQ
- Summary
What does that mean in-game? If you're willing to tolerate a quirky charge shot and a slightly impractical base feel, you get a sniper that collaterals lines of zombies, erases Zersa in seconds, and scales into late rounds when other primaries start to fall off.
↖ Why XR3 Ion Is Broken Right Now
- Conclusion first: XR3 Ion has the highest DPS in BO7 Zombies so far.
- Data to back it:
- At top rarity with crits: ~38,000 crit per projectile.
- The weapon fires 3 projectiles per charge → ~114,000 damage per trigger pull.
- Accounting for fire rate, you land ~196,000 DPS on crit chains.
- With Napalm (elemental) applied, per-shot elemental damage rises to ~57,000, pushing total throughput toward ~294,000 DPS.
- if your aim sits on crit zones and you maintain charge cadence, bosses and armored zombies evaporate faster than with Ray Gun or M2.
↖ The Catch: Practicality vs. Power
- Compared to the other sniper: XR3 deals more, but feels less practical at base due to charge delay, ADS drag, and ammo throughput.
- If you notice charge stutter or damage drop-off at range, it's not your imagination—bullet velocity and damage range matter here.
- If you struggle pre-PaP, then lean on box hits or early salvage tricks to accelerate upgrades; the weapon wakes up after Pack-a-Punch and perk synergy.
↖ Step-by-Step Build: Attachments, Perks, and Ammo Mod
- Optics:
- Kepler T-Range Holo: keeps your FOV manageable without bulky scopes. If you prefer a clear sightline, this is solid; you don't strictly need it, but it smooths target acquisition.
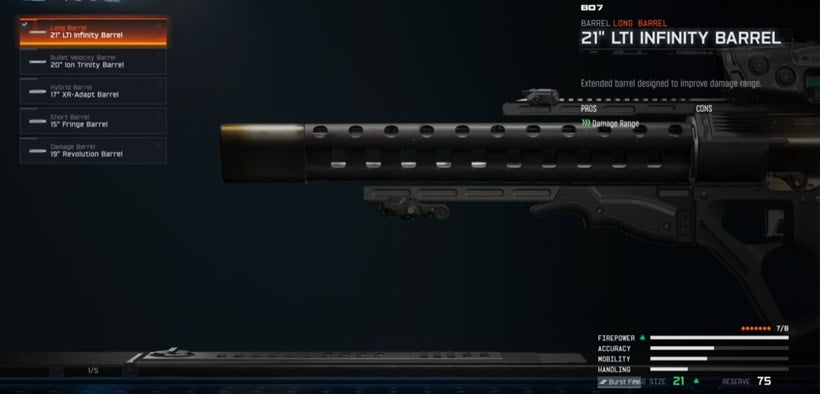
- Barrel:
- 21" LTI Infinity (long barrel): prioritize damage range to reduce drop-off.
- Alternative: Hybrid barrel for combined damage range + bullet velocity if you're seeing mid-range falloff.
- Underbarrel/Handguard:
- Advanced Step Handguards: boosts aim-walking, strafe, and hipfire handling—key for keeping your reticle on crits during micro-movement.
- Magazine:
- 21-round extended mag: pick it despite the current Pack-a-Punch bug (mag reduces from 21 to ~14 after PaP). Expect a fix at launch; for now, plan ammo carefully.
- Rear Grip:
- L9 Vertigo Grip: horizontal recoil + stabilization for steadier multi-crit chains.
- Stock:
- Mobility Stock: improves hipfire, movement, and strafing to help retain crit tracking during the charge behavior.
- Laser:
- IMW Instinct: faster ADS; XR3 benefits greatly because charge + ADS together can feel sluggish without it.
- Ammo Mod:
- Rapid Fire Quick Charge: reduces charge time and hikes effective ROF; this is the “it clicks” moment where XR3's burst becomes ridiculous.
- Perk Synergy:
- Double Tap: increases fire rate; with charge quickening, your burst cadence becomes vicious.
- Deadshot Daiquiri: crit focus; since XR3 lives on crit multipliers, this pays immediate dividends.
- Speed Cola: offsets the big-mag reload pain; with the PaP mag bug, this becomes essential QoL.
- Armor: pick up early to avoid being punished during charge windows; you'll stand longer in sightlines.
↖ Upgrade Path: Rarity, PaP Levels, and Elemental
- Early game (Loadout Rarity):
- You'll feel the weapon's impractical side—charge delay and limited ammo sustainability. If you find yourself starved, don't linger; push PaP quickly.
- Pack-a-Punch:
- PaP 1 → notable jump; expect close-range crit ~2,160 rising to ~2,376 with perks before rarity.
- PaP 2 → damage per projectile around ~4,752 at base; multiplied by 3 shots per charge equals serious throughput, especially with crits.
- Elemental Choice:
- Napalm Burst: currently the best XR3 elemental for boss damage and overall DPS scaling. If Zersa is your problem, napalm turns the gun into a melt tool.
- Max Rarity:
- Expect ~38,000 crit per projectile at the top tier; add napalm elemental (~57,000 per shot) and your practical DPS spikes.
- If you find ADS delay persists after maxing, revisit grips/laser to bias faster snaps.
↖ Salvage Economy: Monkey Bomb Loop to Accelerate
- If you craft a Monkey Bomb (1,000 salvage) then feed it to Chompy:
- Max ammo refills grant you 2 monkeys back.
- Sacrifice those two monkeys → ~2,000 salvage per cycle.
- If you repeat per round: you can snowball to ~10,000 salvage quickly.
- If you notice the station shortchanging you (e.g., 500 instead of 1,000 in beta), assume a beta quirk; cycle again or trigger a fresh max ammo to reset.
↖ Real-World Tests: Zersa and HVT Melts
- Field note: At base rarity, XR3's triple-shot and Double Tap already shred Zersa's faceplate; cadence matters—count your charges (1-2-3-4-5) and re-align on crit spot.
- With PaP and Napalm:
- Crit ticks in the ~21k range early; at max, elemental pops ~57k per pulse, bosses disintegrate in a few volleys.
- What this implies: In boss-heavy rounds (30+), precision and ammo discipline are your limiting factors, not raw damage. If you keep crit discipline and element uptime, XR3 can anchor boss fights.
↖ How to Play It: Micro-Flow and Collateral Lines
- If you're lining up trains, then leverage the triple-projectile to collateral 4–7 zombies on Instakill; it's both ammo-efficient and round-speedy.
- If you notice damage drop at mid-range, then aim for tighter trains and push into crit distance; don't free-fire at long ranges without the hybrid barrel.
- If reloads are catching you mid-wave, then kite to a trap or funnel, pop Speed Cola, and reset; XR3 punishes greedy reloads because charge behavior invites standing still.
↖ FAQ
Q: Why not use the other sniper? It feels more practical.
A: You're right: the other sniper handles cleaner at base due to hipfire and snap feel. However, XR3 out-damages it decisively at full build. If your priority is boss time-to-kill and late-round DPS, XR3 wins; if you value snappier day-to-day handling, the other sniper is friendlier.
Q: Is Napalm mandatory?
A: For peak DPS and boss melts, yes. If you find you're overkilling adds and running dry, you can experiment—but current testing shows napalm yields the best elemental amplitude for XR3.
Q: How do I fix the PaP magazine bug?
A: You can't in beta; plan around it. Carry Speed Cola, manage reload windows, and abuse salvage loops for ammo sustain. Expect Treyarch to normalize mags at launch.
Q: Does Double Tap stack meaningfully with the rapid charge ammo mod?
A: Yes. Double Tap raises effective fire rate; rapid charge reduces charge delay. Together, your volley cadence tightens, which is exactly how XR3 reaches its high DPS ceiling.
Q: What attachments should I swap if mid-range damage feels off?
A: Try the hybrid barrel for velocity + range, and ensure your laser/grip combo still preserves ADS speed. If ADS feels slow, prioritize IMW Instinct and consider a lighter stock.
↖ Summary
If you want the single most overpowered Zombies loadout right now, build the XR3 Ion Sniper around crits, fast charge, and Napalm. The math is unapologetically silly—three-projectile charges, ~38k crits per shot, and elemental pulses that push toward ~294k DPS. If you find the base feel clunky, then treat it like a boss tool: perk into Double Tap, Deadshot, Speed Cola; PaP early; fix your range/velocity; and run the monkey-salvage loop. Do that, and you'll watch Zersa and HVTs fall over in seconds while your collateral lines turn into highlight reels.

Most Popular Posts
- Black Ops 7 Endgame Exotic Affinity Weapons Guide: Best Bonuses, Full Weapon List, and Farming Tips
- Black Ops 7 Zombies Totenreich Easter Egg Guide: Fast Solo & Co-Op Main Quest Walkthrough
- Black Ops 7 Cherry Fizz Guide: Fastest Illicit Cargo Event Route for Season 4
- Black Ops 7 Season 04 Endgame META: Best 5 Weapons After the XR3 Ion Nerf
- Black Ops 7 Season 4 Release Date, Maps, Weapons, Zombies, Warzone, and MW4 Reveal Prep
- Black Ops 7 Zombies Fast KOWAKUJO Easter Egg Guide: Cat Wonder Weapon, Evidence Puzzles
Popular Category Lists
- Grow a Garden / (286)
- ARC Raiders / (264)
- CoD: Black Ops 7 / (166)
- Monopoly Go / (146)
- MLB 26 / (145)
- Star Citizen / (114)
- Steal a Brainrot / (89)
- ARK Survival Ascended / (72)
- Sailor Piece / (68)
- Forza Horizon 6 / (62)
- Diablo IV / (61)
- Blox Fruits / (60)
- CoD: BLACK OPS 6 / (55)
- Adopt Me / (53)
- Path of Exile 2 / (48)
- Monster Hunter Wilds / (46)
- Windrose / (44)
- Grow a Garden 2 / (41)
- Path of Exile / (40)
- Bee Swarm Simulator / (36)


