



 0
0 Created: Jul 30,2026 | ARC Raiders
ARC Raiders Solo Damage ARC Blaze Grenade Route and Push Guides

A strong Solo Damage ARC Blaze Grenade run is not about throwing fire everywhere. It is about killing the right ARC targets, saving grenades, and using ziplines to stay ahead of bad spawns.
The target is simple: 38K+ consistently, with real 40K+ potential if Bombardier, Bastion, and Leaper spawns cooperate.
- Best Map for Solo Damage ARC Blaze Grenade
- Best Targets for Damage ARC Score
- Buried City Bombardier Spawn Plan
- Blaze Grenade Damage Rules
- Recommended Solo Blaze Grenade Loadout
- Why Suppressed Anvil Matters
- Hullcracker Ammo Strategy
- Zipline Route Rules
- Ideal Run Flow
- Bastion and Leaper Decisions
- Turbine Damage on Night Raid
- Handling Other Players
- Biggest Threats to a 40K Run
- The 38K to 40K Difference
- Common Mistakes That Kill Blaze Grenade Runs
- FAQ
- What is the best map for Solo Damage ARC Blaze Grenade runs?
- How many Blaze Grenades should we bring?
- Do Blaze Grenades stack damage in ARC Raiders?
- How do we break 40K in Damage ARC?
- Why use Survivor instead of a damage augment?
- Summary
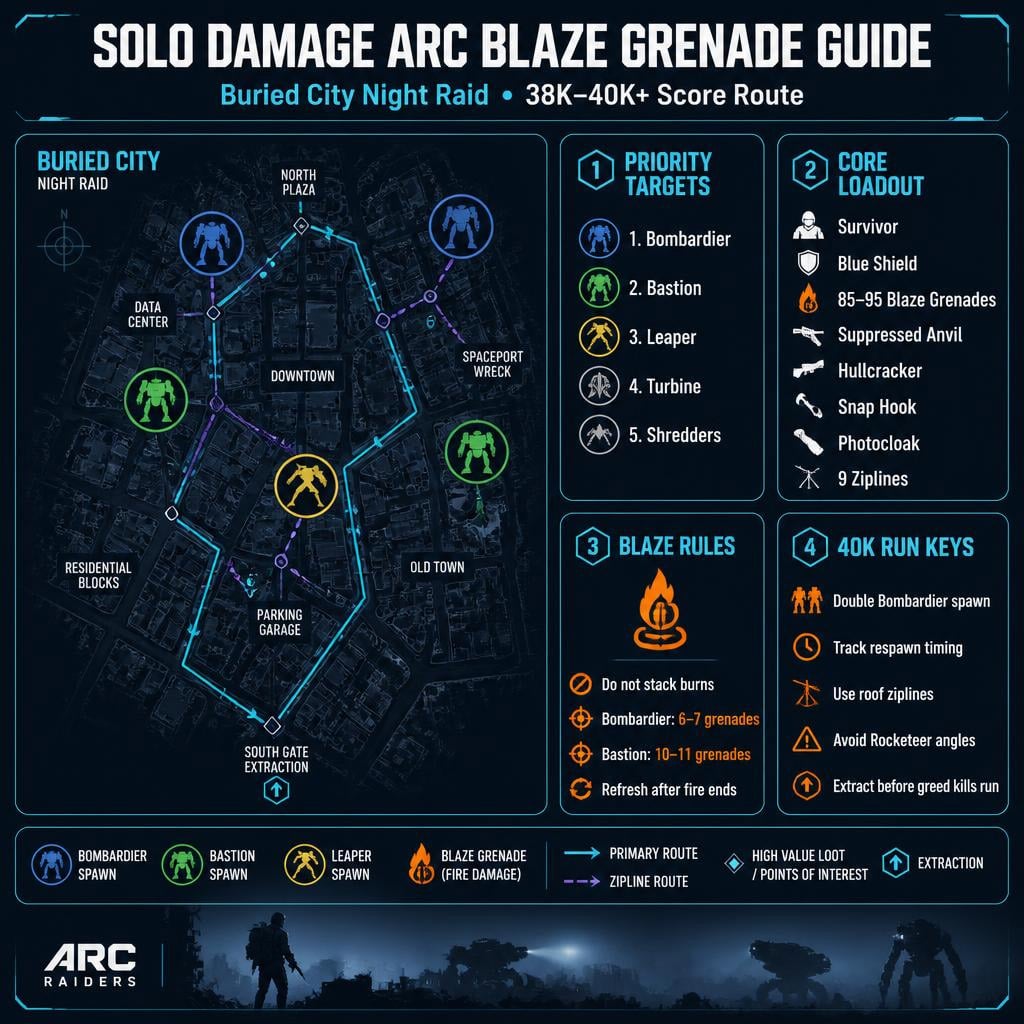
Best Map for Solo Damage ARC Blaze Grenade
Buried City Night Raid is the best starting point.
It has shorter rotations than Spaceport, strong Bombardier access, and enough high-value ARC spawns to push a serious score. The downside is RNG. Bastions and Leapers can spawn in annoying spots.
| Map | Pros | Cons |
|---|---|---|
| Buried City Night Raid | Short route, good Bombardier loop, efficient ziplines | More spawn RNG |
| Spaceport Night Raid | More ARC density, high ceiling | Long travel time |
| Other Night Raids | Usable for practice | Lower efficiency |
For score pushing, we want double Bombardier spawns. Without them, 40K becomes much harder.
Best Targets for Damage ARC Score
Do not waste time clearing random ARC. Focus on high-value targets.
| Priority | Target | Why It Matters |
|---|---|---|
| 1 | Bombardier | Main score source |
| 2 | Bastion | Great points, slower kill |
| 3 | Leaper | Strong bonus if nearby |
| 4 | Turbine | Good filler on Night Raid |
| 5 | Shredders / small ARC | Only kill during downtime |
The run lives or dies on Bombardiers. If we get two clean Bombardier kills and one decent Bastion, 38K+ is very realistic.
Buried City Bombardier Spawn Plan
The best setup is:
- Old Town Bombardier
- New District / Parking Garage Bombardier
The Old Town Bombardier is the key spawn. If it appears, there is a strong chance we can build a good route around it.
| Bombardier Spawn | Value | Decision |
|---|---|---|
| Old Town | S-tier | Core target |
| New District / Parking Garage | S-tier | Best second target |
| Central Park | A-tier | Good, but pulls extra ARC |
| Far outer spawn | B-tier | Only if route allows |
Kill the first Bombardier early, then track the respawn window. If we kill it around 27–28 minutes, expect it to matter again later.
Blaze Grenade Damage Rules
The most important rule:
Blaze Grenade damage does not stack.
Throwing three Blaze Grenades on one target at the same time is wasted damage. Throw one. Let it burn. Refresh when the fire is about to end.
| Target | Approx. Blaze Grenades | Notes |
|---|---|---|
| Bombardier | 6–7 | Keep it standing in fire |
| Bastion | 10–11 | Slow but worth it |
| Leaper | Variable | Good if it stays near burn |
| Turbine | Situational | Throw into the core |
We usually bring 85–95 Blaze Grenades.
85 is enough for clean play.
95 gives room for bad movement, missed throws, and bonus Turbine damage.
Recommended Solo Blaze Grenade Loadout
This setup is built to survive. Blaze Grenade runs are expensive. Dying with this kit hurts.
| Slot | Pick | Why |
|---|---|---|
| Augment | Survivor | Safer for long solo runs |
| Shield | Blue Shield | Better vs dangerous ARC |
| Main Damage | 85–95 Blaze Grenades | Core damage source |
| Weapon | Suppressed Anvil | Kills small ARC quietly |
| Heavy Weapon | Hullcracker | Backup damage / ammo from Bombardiers |
| Mobility | Snap Hook | Mandatory movement tool |
| Route Tool | 9 Ziplines | 7 core, 2 flexible |
| Stealth | Photocloak | Breaks bad ARC aggro |
| Healing | Vital Shots + basic heals | Fast recovery |
If you are not confident, do not greed damage augments. Use Survivor. This run is about finishing alive with score, not looking flashy and dying at extract.
Why Suppressed Anvil Matters
Small ARC ruin runs.
Pops, Fireballs, Wasps, and Spotters can pull aggro at the worst time. A Suppressed Anvil lets us remove them without waking up half the map.
It also works as a backup PvP weapon. If another Raider gets too curious, we are not helpless.
Hullcracker Ammo Strategy
Do not overpack Hullcracker ammo.
Bombardiers often drop enough. We can loot after kills and keep inventory space for grenades, heals, or shields.
| Option | Use Case |
|---|---|
| No starting ammo | Best if confident |
| Small ammo stack | Safer opener |
| Heavy ammo stack | Usually wasteful |
If another player loots your Bombardier, ask for Hullcracker ammo before they vacuum everything. Simple, practical, no drama.
Zipline Route Rules
Bring 9 ziplines.
The main route usually needs around 7. Keep 2 spare for bad spawns or extraction.
| Zipline Use | Purpose |
|---|---|
| Core route | Connect Bombardier and Bastion zones |
| Spare zipline 1 | Adjust to final extract |
| Spare zipline 2 | Emergency roof angle or bad spawn |
| Roof zipline | Avoid Rocketeer pressure |
The big lesson:
Place ziplines for the fight you will have later.
If a Rocketeer controls your final Bombardier angle, a ground-level route is a trap. Put the zipline to a roof. Fight from above. Extract clean.
Ideal Run Flow
Keep the route tight. Do not wander.
| Phase | Goal |
|---|---|
| Early | Confirm double Bombardier |
| First fight | Kill Old Town Bombardier |
| Midgame | Rotate to Bastion / second Bombardier |
| Downtime | Kill visible Leaper or Turbine |
| Respawn | Return for Bombardier timing |
| Late | Push final high-value ARC only if safe |
| Extract | Leave before greed kills the run |
If you are running with no confirmed target, you are losing score.
Bastion and Leaper Decisions
Bastions are great. Bad Bastion spawns are not.
| Spawn | Decision |
|---|---|
| Central Bastion | Kill it |
| Near Bombardier route | Kill it |
| Hospital Bastion | Only if timing allows |
| Unknown Bastion | Do not over-search |
Leapers are bonus points. Take them only when they are visible and close.
If you spend one minute hunting an unknown Leaper, the run is already bleeding.
Turbine Damage on Night Raid
Turbines are useful filler. They are not the main plan.
Use them when:
- Bombardier is on respawn.
- Bastion is too far.
- Turbine is near your route.
- You can throw Blaze into the core safely.
Skip them when extra ARC pressure is too high. A dead run gets zero value from one more target.
Handling Other Players
Other players can steal your damage by shooting Bombardiers.
Use voice if available:
Please don't shoot the Bombardier. I'm doing Damage ARC. You can take the loot after.
This works more often than expected. Most players want loot. We want score. Give them the loot, keep the damage.
| Situation | Move |
|---|---|
| Player aims at Bombardier | Ask them to stop |
| They want loot | Offer it |
| They shoot anyway | Move on |
| They clear small ARC | Use the opening |
Do not tilt. Lost damage is annoying, but wasting another minute arguing is worse.
Biggest Threats to a 40K Run
Most failed runs do not die to Bombardiers. They die to bad secondary pressure.
| Threat | Problem | Answer |
|---|---|---|
| Rocketeer | Deletes you from bad angles | Roof zipline + Photocloak |
| Vaporizer | Forces panic movement | Break aggro, reposition |
| Bombardier shell | Huge burst damage | Keep lateral movement |
| Wreckage | Blocks dodges | Avoid fighting inside debris |
| Flying ARC | Interrupts rotations | Suppressed Anvil or cloak |
The worst combo is low HP + Rocketeer + wreckage. If you see that setup, stop greeding. Heal, cloak, or rotate high.
The 38K to 40K Difference
A 38K+ run can happen with mistakes.
A 40K+ run needs cleaner late-game decisions.
| Score | What Usually Happened |
|---|---|
| 30K–34K | Weak spawns or missed targets |
| 35K–38K | Good Bombardiers, average support targets |
| 38K–40K | Double Bombardier + at least one good Bastion |
| 40K+ | Clean route, extra Leaper/Turbine, safe finish |
If you are sitting around 38.5K, one final Bombardier, Leaper, or clean Turbine window can push 40K.
But only if you live.
Common Mistakes That Kill Blaze Grenade Runs
| Mistake | Why It Hurts |
|---|---|
| Stacking Blaze Grenades | Damage does not stack |
| Chasing unknown Leapers | Wastes time |
| Ignoring respawn timing | Misses Bombardier windows |
| Saving ziplines too long | Bad final path |
| Fighting Rocketeer from low ground | Easy death |
| Greeding final target | Run ends before extract |
The cleanest fix is simple: plan the exit before the last kill.
FAQ
What is the best map for Solo Damage ARC Blaze Grenade runs?
Buried City Night Raid is the best practical map. It has short rotations and strong Bombardier access. Spaceport Night Raid also works, but the travel time is much longer.
How many Blaze Grenades should we bring?
Bring 85–95 Blaze Grenades. Use 85 if you are clean with timing. Use 95 if you want more safety for missed throws, bad movement, or Turbine damage.
Do Blaze Grenades stack damage in ARC Raiders?
No. Blaze Grenade damage does not stack. Throw one, let it burn, then refresh. Throwing multiple at once wastes grenades.
How do we break 40K in Damage ARC?
You usually need double Bombardiers, at least one good Bastion or Leaper, smart Turbine damage, and a clean extraction. The last part matters most. Dying at 39K pace is still dying.
Why use Survivor instead of a damage augment?
Survivor keeps the run alive. Blaze Grenade attempts cost a lot of oil and materials. A safer augment is better for repeated solo score pushes.
Summary
The Solo Damage ARC Blaze Grenade strategy is built on efficient target selection.
Prioritize Bombardiers. Add Bastions when the route allows. Take Leapers only when visible. Use Turbines as filler. Never stack Blaze Grenades.
The best practical setup is Survivor, Blue Shield, Suppressed Anvil, Hullcracker, Snap Hook, Photocloak, 9 ziplines, fast heals, and 85–95 Blaze Grenades.
For 40K, the damage is usually there. The real test is discipline: save ziplines, fight Rocketeers from roofs, track Bombardier respawns, and extract before greed deletes the run.

Most Popular Posts
- ARC Raiders Update 1.42: Phantom Targets Farming Guide (Glitched Wasps, Rewards, Regional Conditions)
- ARC Raiders Hullcracker Blueprints: Fastest Way to Complete The Major's Footlocker
- ARC Raiders Best Pop Trigger Strategy: Fast Phantom Targets Damage Guide
- ARC Raiders Subway Skin Guide: Unlock the Subterranean Outfit
- ARC Raiders Looting Mk. 3 Survivor Blueprint Guide: Best Blue Gate Route and Drop Locations
- ARC Raiders Medium & Heavy Gun Parts Blueprint Guide: Best Farm Route, Locations, and Refiner Crafting
Popular Category Lists
- ARC Raiders / (354)
- Grow a Garden / (294)
- CoD: Black Ops 7 / (167)
- Star Citizen / (163)
- MLB 26 / (159)
- Monopoly Go / (153)
- ARK Survival Ascended / (128)
- Steal a Brainrot / (99)
- Blox Fruits / (74)
- Adopt Me / (74)
- Forza Horizon 6 / (72)
- Sailor Piece / (68)
- Grow a Garden 2 / (68)
- Diablo IV / (62)
- CoD: BLACK OPS 6 / (55)
- Aion 2 / (52)
- Path of Exile 2 / (48)
- Monster Hunter Wilds / (46)
- Windrose / (44)
- Maplestory Classic / (42)






