


 0
0Black Ops 7 Best Settings: Pro Controller, Mouse/Keyboard, Graphics, Audio & HUD Setup
- ELSA
- Share
- CoD: Black Ops 7
- 11/14/25
- 5970
Before you dive into your first BO7 match, lock in the fundamentals that actually move your K/D: input response, aim behavior, visibility, and sound. Here's a field-tested setup that favors consistency under pressure, not just pretty menus. We'll start with the works-for-most baselines, then show you why they matter and how to verify them in minutes. Let's get you crisp tracking, fewer missed inputs, and clearer targets—here's the path.
- Controller Settings (Fast, Stable, Aim-Assist Friendly)
- Mouse & Keyboard (Precision Comes From DPI + eDPI)
- Graphics & Visibility (PC & Console)
- View & Camera
- Audio (Footstep Priority)
- Interface & HUD
- Console Notes
- Practical Loadout for Testing
- FAQ
- Summary
↖ Controller Settings (Fast, Stable, Aim-Assist Friendly)
This section prioritizes snappy input and predictable tracking.
Quick Wins
- Input device: Controller.
- Layout: Tactical (drop/crouch on right stick). If you have rear paddles, bind melee/jump there for uninterrupted aim.
- Vibration/Trigger Effects: Off. You want zero aim wobble and no variable trigger weight.
- Bumper/Trigger swap: Only if your triggers are analog and feel slow—L1/R1 are faster to spam tactically.

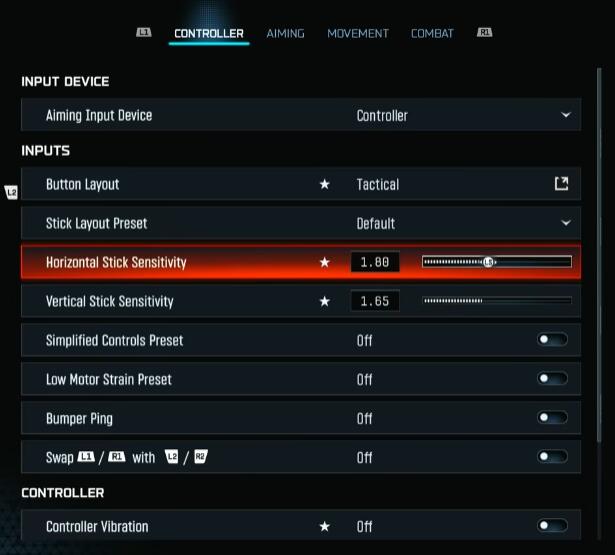
Sensitivity & Curves
- Horizontal/Vertical: 1.8 H / 1.65–1.7 V (staggered).
- Why: Most gunfights are left-right; a touch more horizontal keeps micro-corrections tight without overflicking.
- If you overshoot at range, drop both by ~0.05–0.1. If you can't keep up in hip fights, raise H first.
- Response Curve: Dynamic.
- Because the reverse S-curve feels snappy at micro-aim while preserving smoothness.
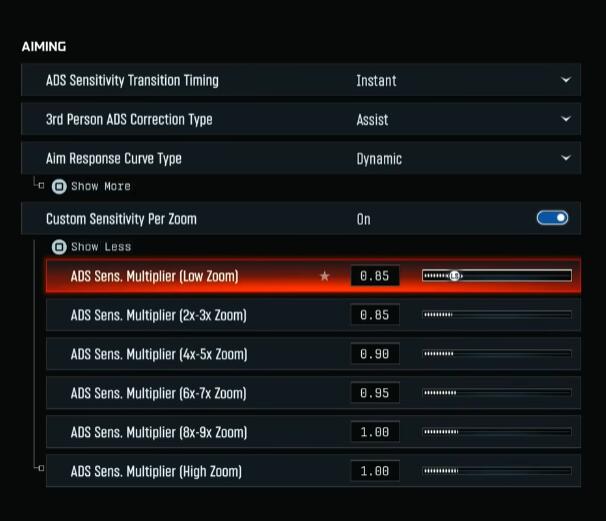
- ADS Transition: Instant.
- Custom Zoom Multipliers:
- Low zoom (irons/RDS): 0.85
- 3–5×: ramp to ~0.9
- 6×+: 1.0
- This keeps iron/red-dot precise but avoids sluggishness on high zoom.
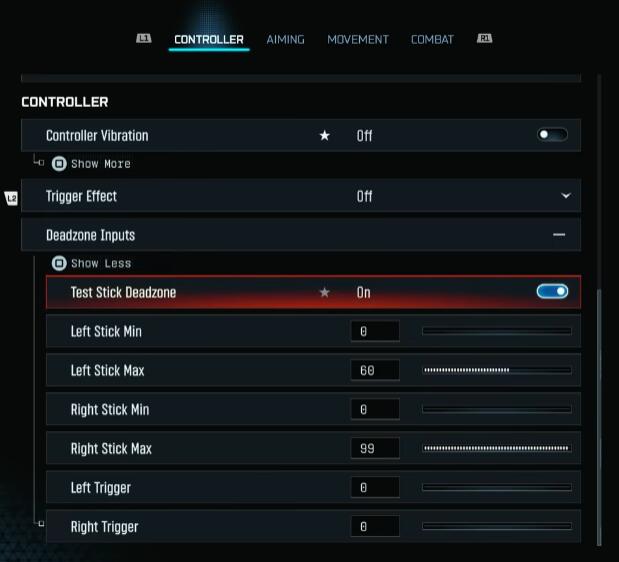
Dead Zones (Do This Right)
- Trigger Deadzones: 0% / 0% for fastest ADS/fire.
- Stick Min:
- Test: Set Min to 0, open stick test, note drift value after releasing the stick.
- Right Stick (aim): Set Min just above drift (e.g., drift 2% → set 3%). Avoid auto-aim fighting your input.
- Left Stick (movement): You can keep Min 0 to allow slight movement input which helps rotational AA feel consistent.
- Stick Max:
- Left Max ~60 (hit full movement sooner).
- Right Max ~90 (retain fine aim range at the top end).
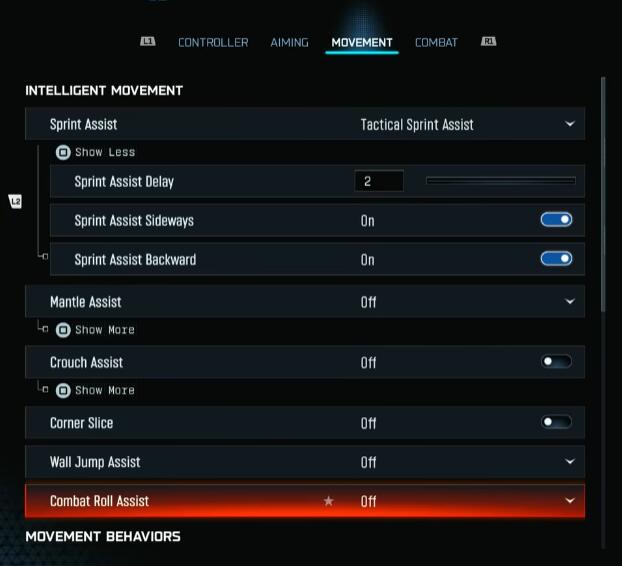
Movement Assist Tweaks
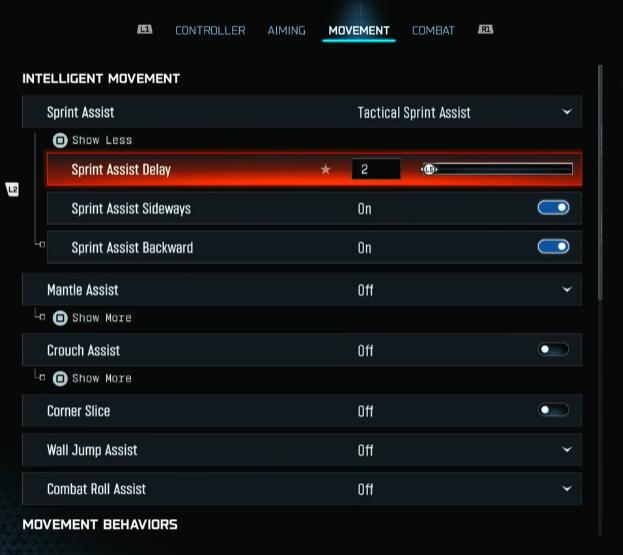
- TAC Sprint Assist: On; delay 1–2 (type exact value with a keyboard if needed).
- Sprint Assist Sideways/Backwards: On (unified feel).
- Mantle/Crouch/Wall Jump/Combat Roll Assist: Off. You want manual control to avoid unwanted moves mid-fight.
- Slide/Dive: Tap to slide with Short delay to access both moves quickly.
- Sprint Restore: On. Slide Maintain Sprint: On. Smooth slide cancels.
- Parachute/Wingsuit: Manual. Pull late, more control in drops.
- Sprint Behavior: Toggle. TAC Sprint Activation: Single Tap. Door Bash: On.
Combat
- ADS Behavior: Hold.
- Mount: ADS + Melee (prevents accidental mount).
- Reload Prioritization: Prioritize Reload in MP; switch to Prioritize Interact in Warzone-like modes.
- Mantle Cancels Reload: Off. Sprint Cancels Reload: On if you like manual reload-cancel control.
- Ammo Depleted Auto-Switch: Off (avoid unintended swaps).
Verification
- Aim wall test: Track a diagonal line across a wall with a 1–2× optic. If micro-corrections jitter, lower H slightly or raise right-stick Min by 1%.
- Movement flow: Sprint-slide-jump chain in a private match. If dives trigger accidentally, extend the dive delay to Medium.
↖ Mouse & Keyboard (Precision Comes From DPI + eDPI)
Sensitivity is primarily a function of DPI and your centimeters-per-360.
Baselines
- DPI: 800–1600; start 800 for control.
- eDPI (DPI × in-game sens): 2400–4800 is a common BO range. Example: 800 DPI × 3.0 sens = 2400 eDPI.
- ADS Multipliers: Mirror the controller logic—lower on 1× (0.85), ramp to 1.0 on high zoom.
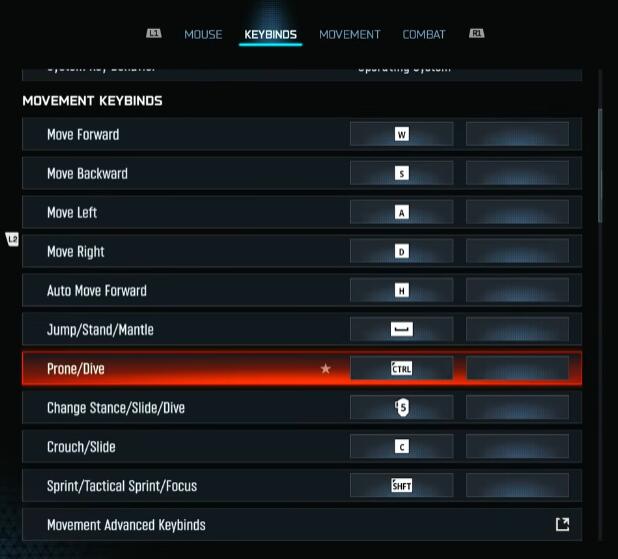
- Keybinds: Favor thumb buttons for lethal/tactical; keep prone/dive reachable (C vs. Mouse4/5).
Movement Aids
- Turn off corner slice/wall-jump/roll assists: manual control keeps aim stable during peeks.
- Sprint Restore: On for quality of life.
Micro-Test
- Microtrack the edge of a sign at 15–25m. If you overshoot, lower eDPI ~5–10%. If you can't keep up with AD strafers, raise ~5–10%.
↖ Graphics & Visibility (PC & Console)
We optimize for clarity first, frames second, eye candy third.
Display (PC)
- Fullscreen Exclusive.
- Refresh Rate: Match monitor. Cap FPS just below max to reduce frame spikes (e.g., 240 cap on 240 Hz).
- NVIDIA Reflex:
- If CPU time > GPU time (telemetry), set On + Boost.
- If GPU time > CPU time, use Eco.
- V-Sync: Off.
- HDR: Off for competitive play (subjective).
- Gamma: 2.2. Brightness ~55 for visibility (adjust to map glare).
Quality Strategy
- Competitive: Low/Very Low where possible; disable post-process blur.
- Balanced: Mix of Low/Medium; textures Normal.
- Cinematic: High—but expect reduced consistency.
Recommended Toggles (PC and Console-where-available)
- Dynamic Resolution: Off (no visual swings mid-fight).
- Upscaling: FidelityFX CAS ~90. Frame gen: Off (latency risk).
- Ray Tracing: Off.
- Depth of Field: Off. Motion Blur (world/weapon): Off. Film Grain: 0.
- Screen-Space Reflections/Lighting/Shadows: Off (clearer glass/water reads).
- Shadows: Base Shadow Quality Normal (spot player silhouettes), but disable screen-space variants.
- Texture Resolution: Normal on mid/high GPUs; drop if VRAM constrained.
- Particle Resolution: Very Low.
- Bullet Impacts: On (intel).
- Terrain/Volumetrics: Medium for balance; drop if GPU-bound.
- Water Quality: Off/Low unless you value aquatic visuals.
Verification
- Telemetry: Enable FPS, Latency, Packet Loss, CPU/GPU time. Aim for stable frametime over peak FPS.
- Glass/water check: With SSR off, confirm enemy clarity through panes/puddles—it should be noticeably better.
↖ View & Camera
These settings are universal for clarity and control.
- FOV: 90–110 recommended; 120 if you're accustomed. Wider FOV reduces visual recoil but can shrink target size.
- ADS FOV: Affected (lower perceived recoil).
- Weapon FOV: Wide. Vehicle FOV: Wide.
- Camera Movement/Shake: Least. Turn off all supplementary camera effects.
- Inverted Flashbang: Optional; black flashes avoid white-out but can feel like a freeze—choose what keeps you calm.
↖ Audio (Footstep Priority)
Sound is information; tune for footsteps and gunfire, not music.
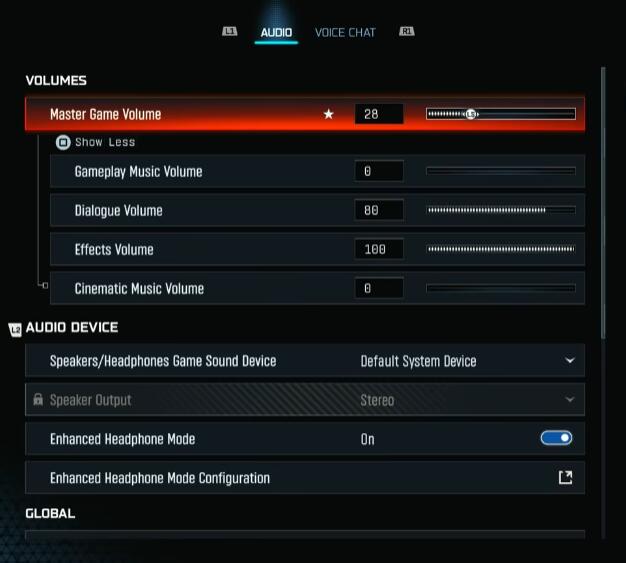
- Master: As needed for your setup.
- Music: 0.
- Dialogue: Moderate (intel callouts).
- Effects: 100 (footsteps, reloads, rips).
- Cinematic: 0.
- Mix Preset: Treyarch Mix or Home Theater as reliable defaults.
- Enhanced Headphone Mode: Test On vs Off—keep whatever gives clearer directional steps on your headset.
- Licensed Music Mute: On (stream-safe).
- Tinnitus Reduction: On. Mono Audio: Off.
Verification
- Private match: Have a friend sprint, slide, climb behind walls/floors. Adjust preset until vertical audio cues feel consistent.
↖ Interface & HUD
See more, think less.
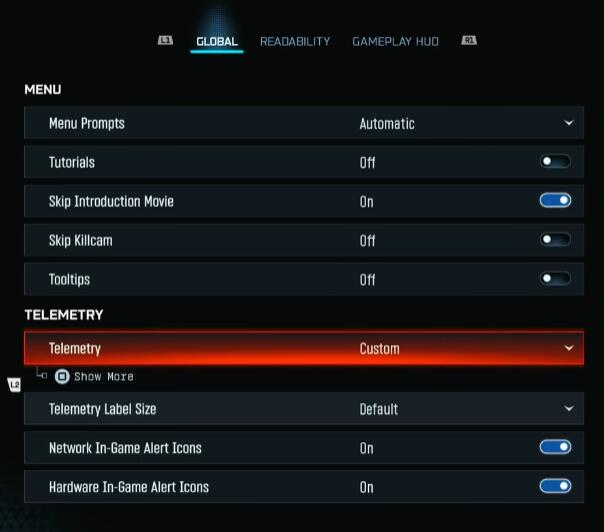
- Telemetry: FPS, Latency, Packet Loss, CPU Time, GPU Time, In‑Game Clock (optional).
- Network/Hardware Icons: On (packet burst, throttling alerts).
- Color Customization:
- Use Custom palette. Enemies: saturated red. Friendlies: deep blue. Neutral: purple.
- Color Filter: Filter 2 → Target Both → increase intensity for consoles/washed-out monitors. Start at 60–80.
- Minimap: Rotation On (cleaner comms). Radar weird modes: Off.
- Crosshair: Lines On; Center Dot Large/Largest. Consider a bright, non-red color to avoid blending with enemy tags.
- HUD Layout: Choose visibility-first layouts; keep clutter off center.
↖ Console Notes
- You won't see every PC quality toggle.
Focus on:
- FOV, ADS FOV Affected, motion blur/DoF/film grain Off, color filter boost, brightness ~55.
- Controller settings above (sens, dead zones, assists Off, TAC sprint assist).
- Frame caps/VRR: Use system-level VRR if supported; prefer Performance modes.
↖ Practical Loadout for Testing
- Weapon: Fast handling AR/SMG with a clean 1.0–1.5× optic.
- Map: A bright map with glass/water elements.
- Drill:
1) Microtrack a wall line for 10 seconds without overshoot.
2) Snap between two head-high stickers at 15m; measure misses.
3) Fight a bot strafing left/right; adjust H sens first, then right-stick Min.
Expected Gains
- 5–15% increase in first-bullet connection rate (from clearer sight picture and staggered sens).
- Reduced reload/mantle misfires (manual assists off, better binds).
- Lower input latency when CPU/GPU-bound modes are set correctly.
↖ FAQ
Q1: My aim feels floaty after these changes—what first?
- Lower Horizontal sens by 0.05–0.1 and raise right-stick Min by 1%. On PC, confirm V-Sync is Off and Reflex mode matches your bottleneck.
Q2: Should I copy dead zones exactly?
- No. Test your own drift. Right-stick Min should sit just above your drift; left-stick Min can be 0 to keep movement engagement.
Q3: Is 120 FOV always better?
- Only if you're used to it. Targets shrink at higher FOVs. If you lose mid-range duels, try 100–105.
Q4: CAS at 90 looks too sharp—what then?
- Drop to 70–80 or slightly increase in-game brightness for softer mids without blurring motion.
Q5: Do screen-space reflections off really help?
- Yes—glass/water clarity improves, reducing false reflections and making silhouettes pop.
↖ Summary
Lock in staggered controller sensitivity (1.8H/1.65–1.7V), Dynamic curve, precise dead zones with 0% triggers, and manual movement control. Pair that with clarity-first graphics—no motion blur/DoF/SSR, CAS ~90, and telemetry-driven Reflex mode—and a footstep-priority audio mix. Finish with a saturated enemy color profile and a bright center dot. If you find jitter, reduce H sens; if tracking lags, raise H or adjust right-stick Min by 1%. Test, tweak, verify—your aim and visibility should feel calmer, faster, and more consistent under fire.

Most Popular Posts
- Black Ops 7 Endgame Exotic Affinity Weapons Guide: Best Bonuses, Full Weapon List, and Farming Tips
- Black Ops 7 Zombies Totenreich Easter Egg Guide: Fast Solo & Co-Op Main Quest Walkthrough
- Black Ops 7 Season 04 Endgame META: Best 5 Weapons After the XR3 Ion Nerf
- Black Ops 7 Cherry Fizz Guide: Fastest Illicit Cargo Event Route for Season 4
- Black Ops 7 Season 4 Release Date, Maps, Weapons, Zombies, Warzone, and MW4 Reveal Prep
- Black Ops 7 Zombies Fast KOWAKUJO Easter Egg Guide: Cat Wonder Weapon, Evidence Puzzles
Popular Category Lists
- Grow a Garden / (286)
- ARC Raiders / (285)
- CoD: Black Ops 7 / (166)
- MLB 26 / (149)
- Monopoly Go / (148)
- Star Citizen / (128)
- Steal a Brainrot / (90)
- ARK Survival Ascended / (85)
- Sailor Piece / (68)
- Forza Horizon 6 / (66)
- Diablo IV / (62)
- Blox Fruits / (62)
- Adopt Me / (57)
- Grow a Garden 2 / (56)
- CoD: BLACK OPS 6 / (55)
- Path of Exile 2 / (48)
- Monster Hunter Wilds / (46)
- Windrose / (44)
- Path of Exile / (40)
- Bee Swarm Simulator / (37)


