0
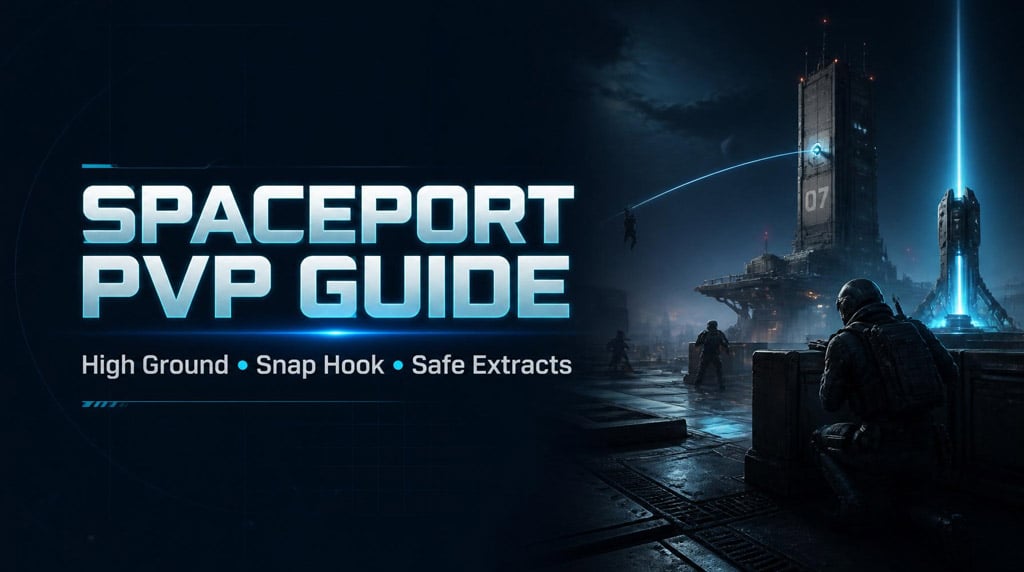
0ARC Raiders Spaceport PvP Guide: Best Map Strategy for High-Value Extracts
- JEANE
- Share
- ARC Raiders
- 06/20/26
- 120
Spaceport is not a bad map. It is a map that punishes sloppy players.
If you sprint through open lanes, drop from height too early, or loot bodies without cover, Spaceport will delete your raid. If you control rooftops, abuse snap hook angles, and manage third parties properly, it becomes one of the best money maps in ARC Raiders.
We play Spaceport for one reason: consistent high-value extracts. A clean raid can easily snowball from a few kills into 300k+ value, and exceptional raids can push far higher when multiple teams collapse into the same rooftop fight.
- Why Spaceport Is One of the Best ARC Raiders Maps
- Spaceport Core Rule: Take Height, Keep Height
- When to Hold Height
- When to Drop
- Best Spaceport PvP Strategy: Damage First, Commit Later
- How to Thin Teams Safely
- Snap Hook Guide for Spaceport
- Best Uses for Snap Hook
- Bad Snap Hook Habits
- Barricades Win Spaceport Fights
- Best Barricade Uses
- Smoke and Grenade Timing on Spaceport
- Use Smoke For
- Use Grenades For
- Best Weapons for Spaceport
- How to Survive Third Parties on Spaceport
- Third-Party Checklist
- Best Third-Party Strategy
- Safe Revives on Spaceport
- Revive Rules
- Looting Guide: How Not to Throw a Rich Raid
- Safe Loot Order
- Loot Priority
- Spaceport Extraction Strategy
- Extract Earlier When Rich
- Final Extract Checklist
- Best Spaceport Team Communication
- Common Spaceport Mistakes
- FAQ
- Is Spaceport the best map in ARC Raiders?
- What is the most important Spaceport strategy?
- What should I bring to Spaceport?
- How do I deal with third parties on Spaceport?
- When should I extract on Spaceport?
- Summary
↖ Why Spaceport Is One of the Best ARC Raiders Maps
Spaceport rewards players who control space before they chase kills.
The map gives you:
- Long sightlines for early damage.
- Strong rooftop positions for safe pressure.
- Predictable rotations from enemy teams.
- Snap hook routes for fast repositioning.
- High-value PvP loot from stacked fights.
The key is patience. You do not win Spaceport by full-sending every sound. You win by making other teams cross bad angles while you hold the best one.
| Spaceport Strength | Why It Matters |
|---|---|
| Rooftop control | Lets you see teams before they reach you. |
| Long lanes | Rewards good aim and opening damage. |
| Vertical layers | Lets skilled players isolate enemies. |
| Frequent third parties | More danger, but also more loot. |
| Strong extract value | PvP-heavy raids can snowball fast. |
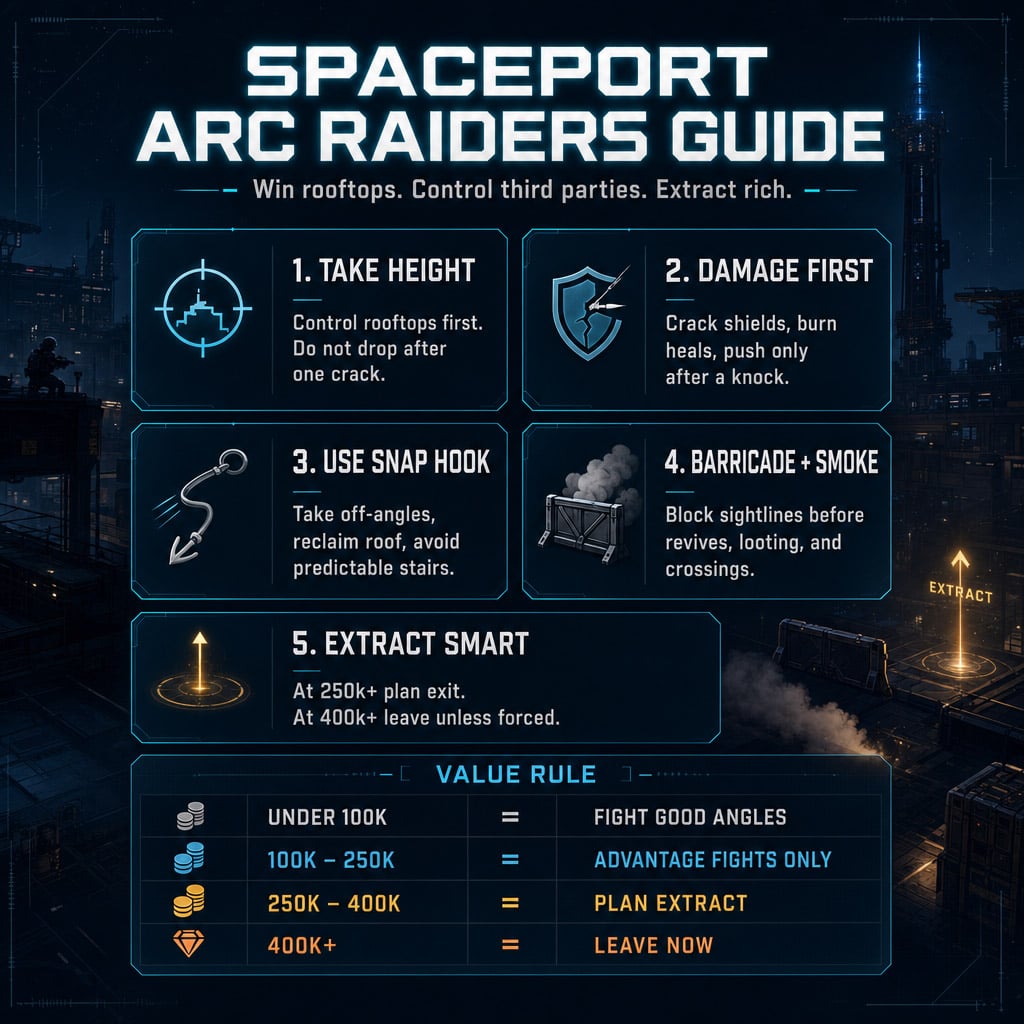
↖ Spaceport Core Rule: Take Height, Keep Height
High ground wins Spaceport.
If your team controls a strong rooftop, you control the fight. You can shoot first, rotate first, and decide when to commit.
Do not drop just because you cracked someone. That is how players throw huge raids.
↖ When to Hold Height
Hold the roof if:
- You hear players below.
- Another team is rotating in.
- You only cracked one enemy.
- You do not know where the third player is.
- You still have safe angles to farm damage.
↖ When to Drop
Drop only when:
- You get a knock.
- The enemy team is split.
- A third party is too far to punish.
- You have smoke or snap hook to reset.
- You can finish the fight in seconds.
| Situation | Best Play |
|---|---|
| Enemy team below you | Hold height and listen. |
| One enemy cracked | Keep shooting, do not drop. |
| One enemy knocked | Look for thirst or safe push. |
| Multiple teams nearby | Stay high and let them fight. |
| Rooftop team drops | Take their roof immediately. |
Spaceport is simple at the top level: the team that owns height usually owns the raid.
↖ Best Spaceport PvP Strategy: Damage First, Commit Later
Most deaths on Spaceport come from overcommitting.
The better play is to bleed teams before the real fight starts.
↖ How to Thin Teams Safely
Do this before pushing:
1. Crack shields from roof or off-angle.
2. Force enemies to use heals.
3. Watch for the third player.
4. Secure a knock if they misposition.
5. Thirst only when safe.
6. Push only after their team loses structure.
This works because Spaceport fights attract attention. If you spend too long in a low-ground brawl, another team will arrive and clean you up.
| Bad Habit | Better Habit |
|---|---|
| Dropping after one crack | Hold height and farm more damage. |
| Chasing one runner | Check third-party angles first. |
| Looting instantly | Reload, heal, barricade, then loot. |
| Fighting in open lanes | Use roof edges and hard cover. |
| Reviving in panic | Smoke or barricade first. |
The goal is not to look aggressive. The goal is to leave alive with the loot.
↖ Snap Hook Guide for Spaceport
Snap hook is one of the best tools on Spaceport.
The map has rooftops, ledges, walls, towers, and vertical escape routes everywhere. Good snap hook usage turns bad fights into winnable ones.
↖ Best Uses for Snap Hook
Use snap hook to:
- Take roof before enemies.
- Create side angles.
- Escape a bad trade.
- Reclaim height after enemies drop.
- Chase isolated players.
- Avoid predictable stairs and doors.
↖ Bad Snap Hook Habits
Do not snap blindly into:
- A full team holding roof.
- A stairwell with no info.
- A body pile during an active fight.
- Low ground with no reset path.
| If You See This | Snap Hook Play |
|---|---|
| Enemy holding staircase | Snap to an off-angle. |
| Rooftop is empty | Take it instantly. |
| Teammate down below | Check third parties before snapping. |
| Enemy drops from roof | Snap up and steal height. |
| No snap charges left | Start extracting earlier. |
Good players use snap hook for position, not speed.
↖ Barricades Win Spaceport Fights
Bring barricades. Use them early.
Spaceport has too many long angles to rely on natural cover. Barricades let you revive, heal, loot, and reset without getting beamed from across the map.
↖ Best Barricade Uses
Place barricades:
- On exposed rooftop edges.
- At stairwell entrances.
- Around body piles.
- Before reviving teammates.
- During late extract rotations.
| Barricade Spot | Purpose |
|---|---|
| Rooftop edge | Blocks long-range pressure. |
| Stairwell | Stops sudden pushes. |
| Body pile | Makes looting safer. |
| Revive angle | Protects teammate pickup. |
| Open crossing | Buys time during extract. |
Do not save barricades forever. If an angle feels dangerous, block it.
↖ Smoke and Grenade Timing on Spaceport
Utility decides Spaceport fights.
A strong aim player with no utility gets trapped. A smart player with smoke, grenades, and barricades gets second chances.
↖ Use Smoke For
- Retaking height.
- Crossing open lanes.
- Reviving teammates.
- Dropping into a fight.
- Breaking line of sight during extract.
↖ Use Grenades For
- Clearing small rooms.
- Punishing revives.
- Forcing players out of corners.
- Breaking stairwell holds.
- Stopping enemies from healing.
Do not smoke randomly. Smoke should solve a problem: line of sight, revive pressure, rotation, or extraction.
↖ Best Weapons for Spaceport
Spaceport favors mid-range control.
You need a weapon that can crack enemies across roof gaps and still survive close pushes.
| Weapon Role | Best Use |
|---|---|
| Mid-range automatic | Main Spaceport fighting weapon. |
| Long-range precision | Opening damage on rotations. |
| Burst weapon | Punishes exposed players fast. |
| Close-range backup | Saves you when enemies snap in. |
| Utility-heavy loadout | Best for long fights and resets. |
A long-range weapon like a Renegade-style rifle becomes deadly once you learn bullet travel and drop. You do not need every shot to kill. You need enough tags to burn enemy heals before they reach you.
↖ How to Survive Third Parties on Spaceport
Spaceport fights snowball fast.
One gunfight becomes two. Two becomes four. If you tunnel vision, you die with a full bag.
↖ Third-Party Checklist
Before pushing, ask:
- Where is the closest team?
- Can we finish this fight fast?
- Can we loot after?
- Do we still own height?
- Do we have smoke or snap hook to leave?
If the answer is no, delay the push.
↖ Best Third-Party Strategy
Let other teams spend resources first.
Then:
1. Shoot from height.
2. Knock isolated players.
3. Thirst safely.
4. Avoid dropping into the middle.
5. Reposition after each kill.
| Fight State | Correct Response |
|---|---|
| Two teams fighting below | Shoot from roof, do not dive. |
| One team healing | Grenade or pressure them. |
| Enemy knocked far away | Thirst only if safe. |
| Your teammate down | Stabilize before revive. |
| Bodies everywhere | Clear angles before looting. |
Spaceport rewards clean timing. Not blind courage.
↖ Safe Revives on Spaceport
A bad revive gets both players killed.
A good revive wins the raid.
↖ Revive Rules
Before reviving:
1. Kill or pressure the closest enemy.
2. Block line of sight with smoke or barricade.
3. Wait out grenades.
4. Revive only when the angle is safe.
5. Move immediately after the pickup.
| Revive Situation | Best Decision |
|---|---|
| Enemy pushing close | Fight first. |
| Grenade landed | Wait for explosion. |
| Teammate behind cover | Revive after blocking angle. |
| Multiple teams shooting | Survive first, revive later. |
| You have smoke and barricade | Use both if value is high. |
Do not panic-res. Spaceport punishes panic harder than most maps.
↖ Looting Guide: How Not to Throw a Rich Raid
Looting is where greedy players lose Spaceport.
The fight is not over because bodies are on the ground. On this map, bodies are bait.
↖ Safe Loot Order
Before opening a body:
1. Reload.
2. Heal.
3. Check rooflines.
4. Check stairwells.
5. Place barricades.
6. Loot fast.
7. Move.
↖ Loot Priority
| Priority | Loot Type |
|---|---|
| 1 | Strong weapons |
| 2 | Rare augments |
| 3 | Shield swaps |
| 4 | Ammo for your guns |
| 5 | Quest materials |
| 6 | Extra utility |
If you are already carrying 300k+ value, stop playing like you have nothing to lose.
You have everything to lose.
↖ Spaceport Extraction Strategy
The raid is not won until you extract.
Late Spaceport extracts are dangerous because you may be heavy, low on utility, low on snap charges, or stuck fighting AI near the route.
↖ Extract Earlier When Rich
Use this simple rule:
| Current Value | Mindset |
|---|---|
| Under 100k | Take good fights. |
| 100k–250k | Fight with advantage only. |
| 250k–400k | Start planning extract. |
| 400k+ | Leave unless forced to fight. |
↖ Final Extract Checklist
Before moving:
- Check timer.
- Check snap charges.
- Save one smoke if possible.
- Avoid open lanes.
- Watch for extract campers.
- Do not fight unless blocked.
- Hit the button early.
The worst Spaceport death is dying rich because you wanted one more body.
↖ Best Spaceport Team Communication
Spaceport is vertical. Bad callouts kill teams.
On me is not enough.
Use precise calls:
- Two roof, north edge.
- One second floor, close stairs.
- Solo below us healing.
- Full team snapping tower side.
- Third party crossing south.
- Knocked one, not thirsted.
| Callout Priority | Example |
|---|---|
| Enemy count | Two pushing. |
| Layer | Roof / second floor / ground. |
| Health | Cracked / one HP / full. |
| Action | Reviving / looting / dropping. |
| Direction | North roof / south stairs. |
Clean comms make Spaceport feel slower. That is a good thing.
↖ Common Spaceport Mistakes
Avoid these and your extract rate goes up fast.
| Mistake | Fix |
|---|---|
| Dropping after one crack | Wait for knock or split. |
| Ignoring rooftops | Clear height first. |
| Looting in the open | Barricade before looting. |
| Chasing solos too far | Protect position first. |
| Reviving during grenades | Wait, then revive. |
| Fighting too long low ground | Reset to height. |
| Extracting too late | Leave once value is high. |
Spaceport does not forgive ego plays. It rewards discipline.
↖ FAQ
↖ Is Spaceport the best map in ARC Raiders?
Spaceport is one of the best maps for PvP value and consistent extracts. It rewards height control, utility, and smart third-party timing. If you play for loot and survival instead of ego fights, it is a top-tier map.
↖ What is the most important Spaceport strategy?
Take height and keep it. Rooftops give vision, pressure, and escape routes. Dropping too early is the fastest way to lose control of the raid.
↖ What should I bring to Spaceport?
Bring a strong mid-range weapon, a close-range backup, smoke, barricades, grenades, enough healing, and snap hook charges. Spaceport fights often chain into multiple teams, so light kits get punished.
↖ How do I deal with third parties on Spaceport?
Do not dive into the middle. Hold edges, shoot from height, thirst safely, and reposition after every kill. If too many teams are nearby, let them fight first.
↖ When should I extract on Spaceport?
Start planning extract around 250k–400k value. At 400k+, leave unless a fight is unavoidable. The extra loot is rarely worth losing the whole raid.
↖ Summary
Spaceport is a high-skill, high-profit ARC Raiders map.
Play it correctly:
- Control high ground.
- Use snap hook for angles.
- Bring barricades and smoke.
- Damage teams before pushing.
- Respect third parties.
- Loot fast.
- Extract once the bag is worth protecting.
Spaceport pays players who think before they swing. That is why it is one of the best maps in ARC Raiders.

Most Popular Posts
- ARC Raiders Riven Tides Key Room Guide: Best Hotel Keys, Loot Routes, Secure & Crane Storage
- ARC Raiders Bettina Guide: Best Build, Buffs, and How to Use It Against ARC
- Best ARC Raiders Attachments for Every Weapon: Complete Weapon Mod Guide
- ARC Raiders Turbine Boss Guide: Spawn Time, Weak Points, Best Weapons, and Loot
- Arc Raiders Patch 1.27: Regional Pricing, Augment Rework, and Expedition Catch-Up
- ARC Raiders Update Guide: Best Nomadic Envoy Trades, Rascal Grenade Launcher, Durability Buffs
Popular Category Lists
- ARC Raiders / (298)
- Grow a Garden / (286)
- CoD: Black Ops 7 / (166)
- MLB 26 / (151)
- Monopoly Go / (148)
- Star Citizen / (130)
- ARK Survival Ascended / (92)
- Steal a Brainrot / (90)
- Sailor Piece / (68)
- Forza Horizon 6 / (67)
- Diablo IV / (62)
- Blox Fruits / (62)
- Adopt Me / (58)
- Grow a Garden 2 / (57)
- CoD: BLACK OPS 6 / (55)
- Path of Exile 2 / (48)
- Monster Hunter Wilds / (46)
- Windrose / (44)
- Path of Exile / (40)
- Bee Swarm Simulator / (37)