


 0
0Black Ops 7 Zombies: Easy Astra Malorum Farming with PhD Launcher Strat Guide
- JAMIE
- Share
- CoD: Black Ops 7
- 12/08/25
- 1410

- The Loadout: Winning Before You Spawn
- Early Game: The Door Strategy
- The Strategy: The Observatory Table
- Dealing with Oscar (The Boss)
- FAQ
- Summary
Running trains for five hours straight is exhausting. If you are looking to hit Round 100 on Astra Malorum without sweating through your controller, you need a strategy that works smarter, not harder.
We are going to bypass the complex Wonder Weapon quests and ignore the tedious Easter Eggs. Instead, we are focusing on a specific interaction between the Arrow 109 Rocket Launcher and the PhD Flopper perk. This guide breaks down exactly how to turn a small table in the Observatory into an impenetrable fortress of explosions.
Here is the structured breakdown of how to set this up and survive the long haul
↖ The Loadout: Winning Before You Spawn
You cannot just jump into the match and hope for the best. This strategy relies entirely on specific Augment synergies that you need to equip in the menu first.
1. The Weapon
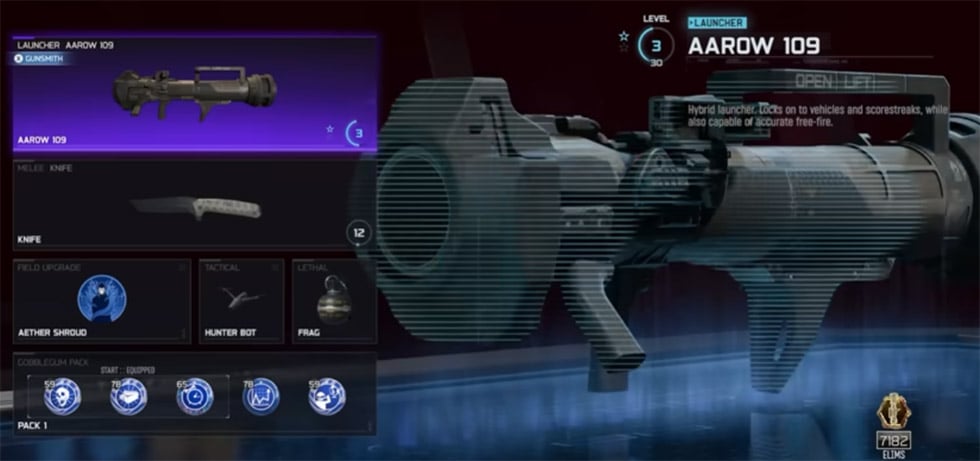
Essential: Start with the Arrow 109 Rocket Launcher.
Do not rely on the Mystery Box to give you this. The drop rates are unreliable, and you need to be leveling up its rarity from round one.
2. Critical Augments (The Secret Sauce)
This is where the magic happens. If you don't have these specific augments equipped, the strategy falls apart.
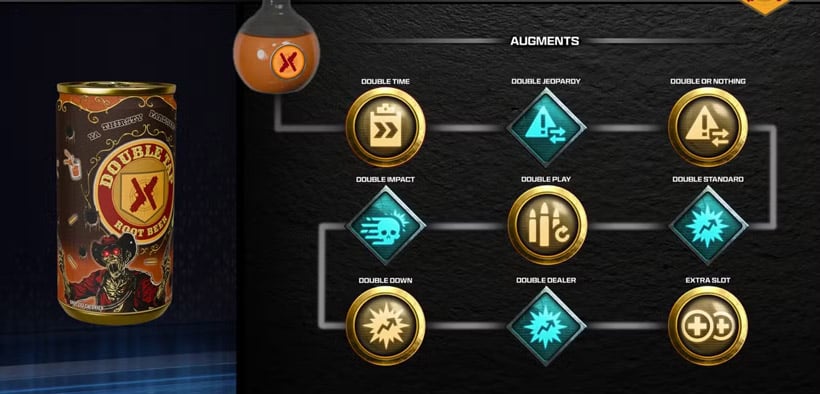
PhD Flopper (The Damage Dealer):
- Major - Double Whammy: This causes a second explosion after a flop.
- Minor - Stuntman: This is the game-changer. It creates an explosion when you wall jump. Since we will be jumping on a table, this triggers constant free damage.
Vulture Aid (The Sustain):
- Major - Aromatic: Following the Season 1 buff, this applies armor plates much more economically. It is vital for tanking hits.
- Minor - Condor's Reach: This allows you to pick up ammo and power-ups from a distance, meaning you rarely have to leave your camping spot.
Defensive Perks:
- Death Perception: Use Sixth Sense to reduce damage taken from behind (crucial as zombies will climb up behind you).
- Jugger-Nog: Equip Turtle Shell for back protection.


3. Field Upgrade & Ammo Mods
Aether Shroud: Run Extra Charge and Extension. This is your get out of jail free card for ammo runs.
Ammo Mod:Fireworks is excellent for camping. Cryofreeze is safer but slows down the rounds.
↖ Early Game: The Door Strategy
Once you load in, your instinct might be to open every door you see. Stop.
You must keep the two doors leading to the Abyssal Rim area closed.
Why does this matter?
1. Spawn Manipulation: It forces zombies to spawn much faster in the Observatory area where we will be camping.
2. The Oscar Trap: There is a high chance the boss, Oscar, will spawn inside that locked area and get stuck, effectively removing him from the game.
Proceed to open the rest of the map via the Astralis Machiner side (right side) to access Pack-a-Punch. During these early rounds, use a wall weapon like the Novaline or Akita to farm points. Trying to use the un-upgraded rocket launcher early on is just painful.
↖ The Strategy: The Observatory Table
Once you have your perks (prioritize PhD, Vulture Aid, and Speed Cola) and a Pack-a-Punched Arrow 109, head to the Observatory Dome.
The Mechanics
Locate the table next to the Pack-a-Punch machine. There is a metal electric box on top of it.
1. Jump onto the table.
2. Jump again onto the metal electric box. This counts as a wall jump/mantle, triggering the Stuntman explosion.
3. Fire your rocket launcher at the floor to the right of the table as you land.
The Flow
You are creating a loop: PhD Explosion + Rocket Impact + Electric Cherry Burst.
Nothing can survive this AoE damage.
Crucial Movement Tip:
You must constantly move forward and towards the metal box. If you just stand still or face the wrong way, the zombies climbing up will push you off the table. Once you find the rhythm, you can do this with your eyes closed, but you need to maintain that forward pressure to stay locked in position.
↖ Dealing with Oscar (The Boss)
Post-Round 51, Oscar becomes a Ravager and will aggressively target you.
The Trap (Best Case)
If you kept the Abyssal Rim doors closed, he might spawn in there and stay stuck. Enjoy your free rounds.
The Glitch
If he is chasing you, lead him toward the spawn area, then use the Fast Travel portal back to the Observatory. He often bugs out trying to follow you through the portal and gets stuck for 20+ minutes.
The Fight
If you must kill him, use Hunter Killer Drones to strip his UFO shields, then melt him with the Wonder Weapon or a Pack-a-Punched Ray Gun.
↖ FAQ
Q: Will I run out of ammo?
A: Rarely. Condor's Reach on Vulture Aid will suck up ammo packs from the dead zombies. If you do run dry, pop your Aether Shroud, run to the ammo crate at the back of the room, buy ammo, and run back. You have plenty of time.
Q: Should I use the Rampage Inducer to speed this up?
A:Absolutely not. The Heavy Zombies in Rampage mode are too bulky. They will swarm the table and push you off before you can kill them. The rounds are fast enough already; don't risk the run for a few saved minutes.
Q: What should my secondary weapon be?
A: A Ray Gun (Mark 1 or 2). If you go down, the Ray Gun allows you to easily get a kill to trigger Quick Revive's Equivalent Exchange, reviving you with all your perks intact. A standard pistol won't do enough damage at Round 80+.
↖ Summary
This strategy transforms Astra Malorum from a chaotic survival challenge into a calculated rhythm game. By leveraging the specific interaction between the Arrow 109 and PhD's Stuntman augment, you become a walking nuke.
Remember: keep those Abyssal Rim doors shut, hug that metal box on the table, and watch your six.

Most Popular Posts
- Black Ops 7 Endgame Exotic Affinity Weapons Guide: Best Bonuses, Full Weapon List, and Farming Tips
- Black Ops 7 Zombies Totenreich Easter Egg Guide: Fast Solo & Co-Op Main Quest Walkthrough
- Black Ops 7 Cherry Fizz Guide: Fastest Illicit Cargo Event Route for Season 4
- Black Ops 7 Season 04 Endgame META: Best 5 Weapons After the XR3 Ion Nerf
- Black Ops 7 Season 4 Release Date, Maps, Weapons, Zombies, Warzone, and MW4 Reveal Prep
- Black Ops 7 Zombies Fast KOWAKUJO Easter Egg Guide: Cat Wonder Weapon, Evidence Puzzles
Popular Category Lists
- Grow a Garden / (286)
- ARC Raiders / (262)
- CoD: Black Ops 7 / (166)
- Monopoly Go / (146)
- MLB 26 / (145)
- Star Citizen / (112)
- Steal a Brainrot / (89)
- Sailor Piece / (68)
- ARK Survival Ascended / (67)
- Diablo IV / (61)
- Forza Horizon 6 / (60)
- Blox Fruits / (60)
- CoD: BLACK OPS 6 / (55)
- Adopt Me / (53)
- Path of Exile 2 / (48)
- Monster Hunter Wilds / (46)
- Windrose / (44)
- Path of Exile / (40)
- Grow a Garden 2 / (40)
- Bee Swarm Simulator / (36)


