0
0Choosing Battlefield 6 RedSec Battle Royale Best Weapons: Meta Loadouts, Attachments
- Zane
- Share
- Battlefield 6
- 11/01/25
- 3120
You don't win RedSec Battle Royale because one gun is OP—you win because your two-gun setup covers every fight. After extensive live matches and firing range tests, we've distilled a short list of high-win-rate weapons, stable attachments, and why they're strong right now. By the end, you'll be able to build a two-weapon kit around distance, ammo economy, circle shape, and class so you consistently convert fights into knocks.
- Core principle: one close-range gun, one mid-long gun
- Mid-long anchors: Cord 6P67 vs. NVO
- NVO: the needle poke (lower RPM, higher damage)
- Close-range finishers: KV9 and SCW10 (TTK first)
- The do-it-all carbine: Sawar 300 SC (compact SCAR)
- Long-range answers: Recon class snipers (pick by sweet zone)
- Honorable mentions and special plays
- Practical setup tips
- FAQ
- Conclusion
↖ Core principle: one close-range gun, one mid-long gun
- Why split roles? Recent changes to TTK and bullet deviation (bloom/precision) punish double-stacking the same role. You need a face-melting fast gun for rooms and pushes, plus a calm, controllable mid-long anchor for open lanes and headies.
- What this means: your optics, recoil control, and magazine choices must serve each weapon's role. When both guns are jack of all trades, you lose the edge exactly where it matters.
↖ Mid-long anchors: Cord 6P67 vs. NVO
Cord 6P67: the laser pointer (high RPM, low damage)
- Feel and numbers: 900 RPM, 20 damage, exceptionally high control/precision. Under ~100m, deviation is minimal; in BR this creates forgiving spray-tracking and consistent breaks.
- Attachments and why:
| Attachment | Pick | Primary Benefit | When to Swap | Notes |
|---|---|---|---|---|
| Muzzle | Compensated Brake (20 pts) | Best recoil and deviation control | Flash Hider or Suppressor if mini-map concealment is critical | Raw performance favors Brake |
| Barrel | Heavy/Extended Barrel | Higher bullet velocity, better sustained accuracy in long sprays | Rarely swap; only drop if point budget is extremely tight | Helps mid-long engagements feel “hitscan-like” |
| Grip | Classic Vertical Grip | Direct precision and control increase | Use cheaper vertical-style alternative if not unlocked | Most impactful stat line for consistency |
| Magazine | 36-round | Enough for multi-target downs without overspending points | Go larger only after recoil/precision are solved | Prioritize stability first, capacity second |
| Optic | CCO 2x | Most natural default sensitivity, easy transitions | Swap by preference if you fine-tune per-zoom sensitivity | Great balance for mid-range tracking |
- Pro tip: treat Cord as mid-range primary with close-range emergency use. Use short bursts at 50–120m; you'll keep bullets in the cone and win damage races without overblooming.
- When to pick: if you prefer holding mouse-1 and tracking, want high RPM forgiveness, and often fight across 50–120m.
↖ NVO: the needle poke (lower RPM, higher damage)
- Feel and numbers: 650 RPM, 33 damage. Hits feel heavier; best with controlled 3–5-round bursts.
- Attachments and why:
| Attachment | Pick | Primary Benefit | When to Swap | Notes |
|---|---|---|---|---|
| Muzzle | Converter → Compensated Brake (Lv38) | Early control (Converter), top-tier stability (Brake) | Upgrade to Brake at Lv38 for Cord-like stability | Converter is a stopgap until Brake unlocks |
| Barrel | Extended Barrel | Higher velocity, tighter mid-long trajectories | Only drop if points are extremely tight | Improves consistency through lanes |
| Grip | Classic Vertical Grip | Best precision/control per point | Use a cheaper vertical-style alternative if locked | Top priority for accuracy |
| Magazine | 40-round fast mag (after stability) | Sustains fights without mid-reload | In tight budgets, keep smaller mag; consider dropping Brake for capacity if you burst | Consistency first, capacity second |
| Optic | CCO 2x | Most reliable at default sensitivity | Swap based on personal per-zoom tuning | Balanced for mid-range control |
- Pro tip: shoot in rhythm. Time bursts with enemy peeks; pause between 3–5 rounds to reset bloom and out-accuracy faster guns.
- When to pick: if you're disciplined with burst pacing, value higher per-bullet damage, and frequently duel at ~120m edges or through tight sightlines.
Selection advice
- - If your recoil control and spray tracking are medium or you prefer full-auto pressure, go Cord.
- - If you love burst control and landing high-value shots, go NVO.
- - Bring only one of the two. The second slot should be a close-range killer.
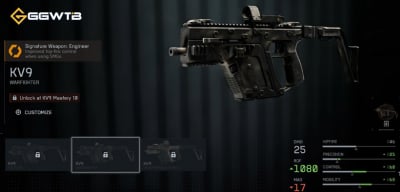
↖ Close-range finishers: KV9 and SCW10 (TTK first)
KV9 (Vector)
- Core: absurd close-range TTK; first to shoot, first to win.
- Pain point: small base mag. You want the 23 or 27-round extensions (Lv26/Lv40). Looted/leveled ground versions often come with bigger mags—use them.
- Attachment direction: prioritize mag capacity and hipfire/mobility. If points are limited, capacity > muzzle/laser.
- Tempo tip: push on two angles when possible; the one real weakness is reload mid-fight. Create crossfires so a single mag secures downs.
SCW10
- Core: 800 RPM, 33 damage. TTK rivals KV9; the feel is snappier and more controlled.
- Pain point: same mag issue; it truly shines at 25 rounds (Lv27).
- When to use: you favor short controlled bursts at arm's length or slightly longer room distances.
Bonus: the mid-capable SMG UMG40 (UMP)
- Strength: high precision/control extends SMG usefulness into medium ranges.
- Trade-off: lower RPM means pure hip-to-hip brawls are weaker than KV9/SCW10.
- Fit: great if your main gun is a sniper and you need your secondary to cover more mid-range gaps.
↖ The do-it-all carbine: Sawar 300 SC (compact SCAR)
- Performance: 600 RPM, 33 damage. In practice it behaves like a compact laser; one mag can clear multiple close-mid targets with clean burst control.
- Attachment priorities:
| Attachment | Pick | Primary Benefit | Upgrade/Swap Condition | Notes |
|---|---|---|---|---|
| Muzzle | Single Port → Compensated Brake (20 pts) | Early recoil control → top-tier stability | Upgrade to Brake as soon as unlocked | Brake offers the strongest recoil/deviation reduction |
| Barrel | Extended / Heavy Barrel | Higher bullet velocity and sustained precision | Pick based on point budget and desired spray length | Heavy favors long sprays; Extended balances velocity and control |
| Grip | Classic Vertical Grip | Cements mid-range stability and precision | Use vertical-style alternative if locked | Highest impact per point for consistency |
- Use case: slot it as a close-mid generalist when your squad lacks a stable AR anchor; it backfills both roles well enough.
↖ Long-range answers: Recon class snipers (pick by sweet zone)
- Concept: each sniper has a one-shot sweet zone range. Smaller circles favor shorter sweet zones.
- Choices:
- M2010 ESR: 80–100m sweet zone. Best middle-distance all-rounder; fits most fights.
- SV-98: 70–90m sweet zone. Strong late-game in tighter circles and urban sightlines.
- PSR: 120–150m sweet zone. Dominates early/mid in open terrain and ridge wars.
- Mini Scout: fast follow-up shots; lacks a clear sweet zone advantage—use for pressure and chaining hits.
- Class tip: Recon's improved breath control makes sniping truly viable. If you're not Recon but want distance control, a stable AR (Cord/NVO) is usually more consistent.
↖ Honorable mentions and special plays
- AK-205: ground-loot purple builds feel no recoil + low bloom. Even naked, precision sits high. If you find one, upgrade along precision-first lines.
- LMR-27 (DMR): weak in multiplayer, but in BR its higher fire rate plus DMR accuracy lets you pin down unstable AR users. The secret is burst rhythm and recoil discipline.
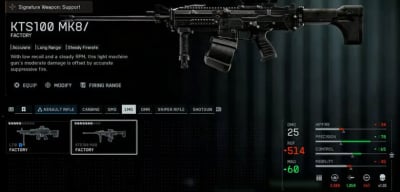
- LMG pick: KTS 100 MK8. Across testing, it's the most consistent BR performer. If your role is lane suppression and window sweeps while the team advances, this is your tool.
↖ Practical setup tips
- Favorites: mark the exact variant as Favorite in the armory; otherwise you can't pull it from BR custom crates.
- Sens tuning: each optic magnification has its own sensitivity. If 2x feels universally right, bias toward CCO 2x and reduce aim mismatch.
- Point budgeting: control first (Brake/Vertical/Heavy), then mag size, then suppression/lasers. If you're constantly getting mini-map pinged, only then trade some stability for stealth.
- Circle and weapon decisions:
- If your fights cluster inside 100m, favor ESR/SV-98 over PSR.
- If your team only has one true close-range gun, pick Cord over NVO to raise forgiveness.
↖ FAQ
Q1: Low-level attachments—how do I build a usable mid-long gun?
- If you lack the high-tier Brake, use Converter or a cheaper compensator. Keep a vertical-style grip as your first pick. Accept a smaller mag rather than sacrificing stability—consistency wins more fights.
Q2: I keep dying mid-reload in close quarters. What now?
- If you find reloads get you killed:
1) prioritize extended mags even if you downgrade the muzzle
2) push with teammates on two angles to reduce solo reload risk
3) practice weapon swapping instead of reloading in the open.
Q3: Why does my KV9 lose to MP5 players sometimes?
- Likely mag not extended or you're fighting outside true face-range. If your average engagement is short-mid, consider SCW10 or UMG40; or switch your mid-long anchor to Cord for faster follow-up sprays.
Q4: My sniper leaves enemies one shot from a knock. Why?
- You're probably outside the sweet zone. ESR's 80–100m, SV-98's 70–90m, PSR's 120–150m are the reference. If you're out of band, plan the follow-up or sync with teammate damage.
Q5: NVO vs. Cord—how do I decide?
- Pick by habit: love tracking full-auto and forgiveness → Cord. Prefer burst timing and harder hits → NVO. Don't carry both; reserve the second slot for a true close-range finisher.
↖ Conclusion
If you want an immediately strong loadout: Cord 6P67 (Compensated Brake + Heavy/Extended Barrel + Classic Vertical Grip + 36-round + CCO 2x) paired with KV9 (prioritize extended mag, then mobility-focused attachments). If you're playing Recon, try ESR with UMG40 to cover mid and quick follow-ups. Two final steps matter most: set your exact variants as Favorites for BR pickups, and tune per-zoom sensitivity to what feels natural. Keep the rule of three in mind—lock recoil first, expand mags second, add suppression last—and you'll see your hit consistency, knock count, and late-circle composure rise fast.
Most Popular Posts
- Battlefield 6 Season 1 Ultimate Weapon Tier List: Best Guns, TTK Data, Loadouts, and Pro Tips
- Top 10 Low-Recoil BF6 Guns: Most Accurate Battlefield 6 Weapons
- Battlefield 6 AFK XP After Patch: Easy Passive Leveling Using 4-Minute Portal Lobbies
- How To Unlock the PSR (M98B) in Battlefield 6 Fast?
- Battlefield 6 Top 10 Meta Weapons: Builds, TTK Insights, and Practical Tips
- Battlefield 6 Fast Weapon Leveling Guide: Unlock Attachments
Popular Category Lists
- Grow a Garden / (286)
- ARC Raiders / (277)
- CoD: Black Ops 7 / (166)
- MLB 26 / (149)
- Monopoly Go / (148)
- Star Citizen / (127)
- Steal a Brainrot / (90)
- ARK Survival Ascended / (84)
- Sailor Piece / (68)
- Forza Horizon 6 / (66)
- Diablo IV / (62)
- Blox Fruits / (61)
- Adopt Me / (56)
- CoD: BLACK OPS 6 / (55)
- Grow a Garden 2 / (53)
- Path of Exile 2 / (48)
- Monster Hunter Wilds / (46)
- Windrose / (44)
- Path of Exile / (40)
- Bee Swarm Simulator / (37)