0
0Battlefield 6 Season 1 Ultimate Weapon Tier List: Best Guns, TTK Data, Loadouts, and Pro Tips
- Ben
- Share
- Battlefield 6
- 11/04/25
- 14871
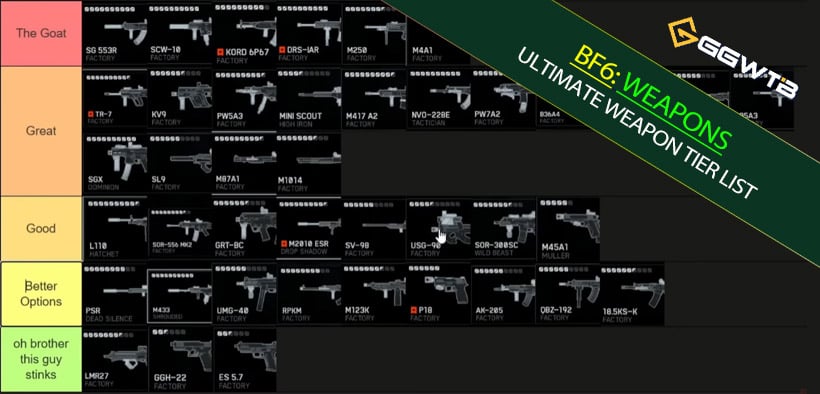
You want a tier list that doesn't just say this gun slaps, but tells you why it wins fights and what that means for your playstyle. Here's a structured breakdown of Battlefield 6 Season 1 weapons based on hands-on unlocks, stat testing (RPM/TTK/sweet-spot ranges), and real match outcomes. Below, you'll see who belongs in GOAT, who's merely great, and which options you should ditch. Let's unpack the meta, then lock in the exact builds that convert stats into wins.
- Meta Overview
- GOAT Tier — Win Now Picks
- Great Tier — Consistent Carry Picks
- Shotguns: M1014 (Benelli) and M87A1
- Good Tier — Playable, Needs Context
- Better Options Tier — Usable, But Outclassed
- THIS GUY STINKS Tier — Avoid Unless Meme
- Practical Loadouts and Play Patterns
- High-Impact Micro Tips
- FAQ
↖ Meta Overview
Season 1 favors high-RPM autos with controllable spread and flexible ranges. DMRs that two-shot body are niche but deadly with discipline. Shotguns are map/mode dependent but brutal in tight sectors. Pistols? Mostly backup—unless you're landing magnum-level shots.
- What matters most
- TTK windows under 200 ms dominate close quarters.
- Muzzle velocity and spread determine mid-range consistency more than raw damage.
- Magazine economy matters on high-RPM SMGs: running dry mid-fight kills streaks.
- Practical read
- If you can handle recoil, heavy-hitting rifles at 700+ RPM (TR7, SG553R) feel unfair.
- For team impact, autos > snipers in most modes; use snipers when you can convert picks into pushes.
↖ GOAT Tier — Win Now Picks
These either cover every phase well or are so efficient at one job that they warp fights.
M4A1 (Carbine, 200 ms TTK feel)
- Why it's GOAT: 200 ms-class TTK, superb handling, wide build flexibility. Outpaces many ARs due to spread behavior + 70 RPM edge over similar options.
- Use when: You want one gun for pubs, flanks, and objective holds.
- Loadout tips
- Barrel: Light/short for handling
- Underbarrel: Angled/Stubby to tame initial kick
- Mag: Extended if you chain fights
- If you find your duels going long at 40–60 m, then add a long barrel and a 1.5–2x optic; accept slightly slower ADS.
SCW10 (SMG, fastest full-auto TTK)
- Why it's GOAT: 150 ms TTK; with hollow points, theoretical 75 ms bursts—reaction-time breaking. Recoil is gentle; only weakness is base mag.
- Use when: You hard-clear buildings and play hyper-aggressive entries.
- Loadout tips
- Mag: Extended mandatory
- Barrel: Suppressor for route safety or short barrel for snap
- Grip: Laser/hipfire package for tight rooms
- If you find yourself reloading mid-engagements, then pace bursts and pre-position cover between picks.
M250 (LMG, long-range lane bully)
- Why it's GOAT: Unlimited four-shot feel at long range with bipod; deletes lanes, punishes peeks. Only gun nerfed in BR variant—tells you everything.
- Use when: You anchor and farm crossers on Conquest/Breakthrough.
- Loadout tips
- Bipod: Always
- Optic: 2–3x for ridge control
- Barrel: Heavy/compensated to lock beams
- If enemies start smoke-pushing, then rotate to a side angle instead of brute-forcing through smokes.
AEK/Cord 6P67 (High RPM laser)
- Why it's GOAT (borderline): Insane controllability + velocity. TTK isn't top on paper, but practical accuracy means more real-world beams at 50–60 m.
- Use when: You need a point and melt rifle at mid.
- Loadout: Stabilizing grip + extended + mid optic (1.5–2x).
↖ Great Tier — Consistent Carry Picks
Strong across pubs; lose to GOAT only at the extremes.
| Weapon | Role / Why It Works | Key Stats/Traits | Recommended Build | Play Tips |
|---|---|---|---|---|
| SG553R | AR reach with SMG-tier TTK; forgiving 30-round mag | 720 RPM; 3-shot body up close; strong close-mid consistency | Short barrel; Angled grip; 1.5x; Hollow Points (situational) | Aggressive rifling on small/medium maps; take early fights |
| TR7 | M60 damage at G36 RPM; high skill ceiling | 720 RPM; heavy recoil down-right; 20-round mag | Vertical-control grip; 1.5x optic | If tracking suffers, switch to calmer AR; burst to manage bloom |
| MP7 | Movement-first SMG; wins by handling and hipfire | Low raw DPS but elite mobility and accuracy | Laser; Short barrel; Extended mag | Pre-aim entries; abuse strafe and hipfire in tight spaces |
| L85A3 | SCAR but better feel; cleaner spread and close TTK | Stable mid-range performance; flexible | Balanced barrel; Underbarrel for first-shot control | Hold mid lanes; punish peeks at 30–60 m |
| M240L | M60 ranges with higher RPM and better handling | Faster reloads; more recoil/spread than M60 | Compensator barrel; 2x optic; Extended mag | Anchor short lanes; avoid long ego sprays without bracing |
| M277 | Carbine variant of lane anchor; versatile | 4-shot to ~75 m; good handling | Comp barrel; 2x optic; Extended mag | Flex between anchor and flank; control mid crossings |
| M2010 ESR | Reliable mid-range sniper; team-play picks | Sweet spot 80–120 m; high velocity | Mid-power optic; Velocity/long barrel | Secure picks then push objectives off numbers |
| SV98 | Closer sweet spot enables aggression | Slower ROF; worse velocity than M2010 | Mid optic; Velocity barrel | Play up a sector; reposition after each pick |
| Mini Scout | Extreme velocity; rapid follow-ups; universal headshot | Highest muzzle velocity; two-tap potential | Light suppressor; Hybrid scope | Pair with forward beacons; hold cross-angles for instant picks |
| AK-4D (G3) | M60 damage in AR form; rewards precision | 20-round mag; with HP, two-head to ~20 m | Recoil control grip; 1.5–2x optic | Prioritize head multipliers; take measured bursts |
| DRS A | Exceptional spread when recoil-managed | Mediocre pattern but tight landed spread | Stability-first underbarrel; balanced barrel | Learn pattern, then commit to 8–10 round bursts at mid |
↖ Shotguns: M1014 (Benelli) and M87A1
| Weapon | Role / Why It Works | Key Stats/Traits | Recommended Build | Play Tips |
|---|---|---|---|---|
| M1014 | Best pure CQB converter on small modes | 200 RPM; one-shot body ~10 m; slugs two-tap ~40 m | Buckshot/Slug (map-dependent); Short barrel; Quick ADS sight | Hug corners; pre-aim entries; swap to slugs for longer lanes |
| M87A1 | Longer one-shot reach with slower cycle | Better one-shot range than M1014; slower follow-ups | High-damage buck; Long barrel; Simple 1x optic | Play tighter bursts; don’t re-peek until rechamber completes |
| SL9 | Lane suppression with surprising accuracy | UMG40 concept; higher RPM; 60-round option; low recoil builds | Extended 60; Balanced/Comp barrel; Stability underbarrel; 1.5–2x | Hold mid lanes; fire in controlled strings to keep spread tight |
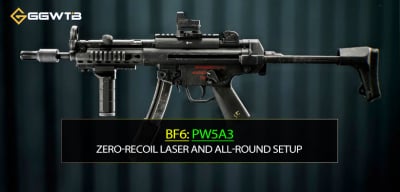
| PW5 A3 (MP5) | Ultra-stable SMG that overperforms at range | Exceptional stability; extends effective range beyond norms | Laser; Short/light barrel; Extended mag; Clean 1x optic | Pre-aim head-height; abuse low recoil for 20–40 m taps |
↖ Good Tier — Playable, Needs Context
Capable with the right setup or on the right maps.
| Weapon | Role / Why It Works | Key Stats/Traits | Recommended Build | Play Tips |
|---|---|---|---|---|
| NVO228E | Solid close-mid AR with workable range | 654 RPM; 3-shot body to ~10 m; sub-200 ms TTK up close | Short/Comp barrel; Angled/Vertical grip; 1.5x optic | Exploit close 3-shot window; transition to bursts past 25 m |
| M2010 ESR | Context-dependent mid-range sniper | Great/Good depending on lobby pace; high velocity; 80–120 m sweet spot | Long/Velocity barrel; Mid-power optic; Stability bipod | Pick on slower lobbies; swap off if tempo gets too fast |
| SO 300 SC | UMP-like SMG with stronger 3–4 shot windows | 3-shot window; doubled 4-shot range vs UMP; poor long-range velocity | Short barrel; Laser; Extended mag; Clean 1x | Farm 5–25 m; avoid long lanes where velocity drops shots |
| SCAR (Sor 55i6 Mk II) | High-velocity full-auto for AR-range dominance | Clean spread; excels at range; clunky up close | Balanced/Long barrel; Underbarrel for first-shot; 1.5–2x | Hold sightlines 30–70 m; pre-fire and avoid tight corners |
| GRTBC | Balanced AR with accuracy focus | M4 damage model; better accuracy; slow reload; modest RPM | Comp barrel; Angled grip; Fast mag if available; 1.5x | Play cover-to-cover; reload discipline; take mid-range duels |
| M39 EBR / SVDM | Semi-auto DMRs that reward pacing | Decent velocity; SVDM higher ROF and better feel | Long/Velocity barrel; 2–3x optic; Stability underbarrel | Pace shots for 2–3 hit confirms; punish peeks at 50–120 m |
| L110 | Serviceable LMG when top-tier are taken | Outclassed by M60/M250/M240L; still reliable | Comp barrel; 2x optic; Extended; Stability grip | Anchor lanes; avoid prolonged hipfire; manage spread with bursts |
↖ Better Options Tier — Usable, But Outclassed
You can win with these; other picks do the same job better.
| Weapon | Role/Overview | Main Issue | Suggested Use | Better Alternatives |
|---|---|---|---|---|
| PSR (50 BMG) | Slow-velocity sniper with 100–150 m sweet spot | Lowest velocity; low-impact picks; tempo drag | Slow lobbies, static lanes, patient picks | M2010, Mini Scout |
| M433 | AR with decent paper TTK | Weird spread post-S1; loses mirrors | 25–45 m controlled bursts | More stable rifles (meta ARs) |
| UMG40 | Accurate SMG | 4-shot only to ~10 m; weak damage model past that | 5–20 m entries, avoid long lanes | SMGs/ARs with better damage curves |
| RPKM | Maneuverable LMG | Out-controlled by M60/DRS on same lanes | Short lane holds, rotate often | M60, DRS |
| M123K | Big mag, fast ROF hybrid | Bloom nerfs; weak long-range, shaky close | Mid-close suppression, short bursts | Top SMGs/ARs for consistency |
| P8 | Serviceable sidearm | Noticeable TTK gap in duels | Cleanup/last-bullet finishes | Stronger pistols |
| QBZ 192 | 771 RPM bipod carbine | Damage falloff undercuts niche | Static lane holding only | DRS |
| 18.5 KSK (Saiga 12) | Semi-auto shotgun | No body one-shot; weaker CQB reliability | Close quarters with follow-up shots | M1014 |
| AK-205 | Low-pressure AR | Too many bullets to kill; slow time-to-kill | Only when accuracy is perfect | Higher-DMG ARs |
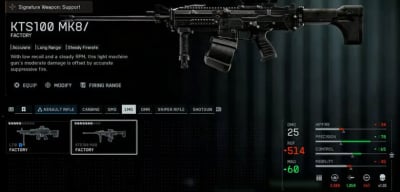
| KTS 100 Mk 8 | LMG with L110 dmg and M60 RPM | Worse TTK tradeoffs; few winning lanes | Niche lane anchoring | L110, M60 |
↖ THIS GUY STINKS Tier — Avoid Unless Meme
- LMR27: DMR that needs four shots at any range, 10-round mag, three headshots for a three-shot kill—fails the DMR brief.
- GGH22: Default pistol but worse—slower ROF, more recoil, smaller mag. Its advantage only appears past 35 m, where pistols aren't used.
- 57: Semi pistol doing 20 max damage; despite fast ROF, it has the slowest practical pistol TTK due to bullet count needed.
↖ Practical Loadouts and Play Patterns
Close-Quarters Frenzy (TDM/Domination interiors)
- - SCW10: Extended mag, laser, short barrel, micro optic
- - MP7: Extended, laser, lightweight barrel
- - Tip: If you're reloading mid-clear, then stagger push with a teammate and trade reloads.
Mid-Range Objective Control (Conquest/Breakthrough)
- - SG553R: Angled grip, 1.5–2x, balanced barrel
- - L85A3: Stability-first underbarrel, mid optic, comp barrel
- - TR7: Vertical control grip, 1.5x, accept 20-round discipline
- - Tip: If your first 7–9 bullets don't down, then reset the duel; don't mag-dump into spread bloom.
Lane Anchoring and Area Denial
- - M250: Bipod, heavy barrel, 2–3x
- - M240L: Comp barrel, 2x, extended
- - Tip: If enemies smoke your sightline, then slide 15–20 m laterally to re-establish a new crossing angle rather than sprinting through smoke.
Aggressive Recon/Hybrid Sniping
- - Mini Scout: Light suppressor, 6x hybrid, sprint-to-fire stock
- - SV98: Mid-power glass, velocity barrel
- - Tip: If picks don't translate into objective gains, then collapse toward squad and spearhead a push post-pick.
↖ High-Impact Micro Tips
- If you consistently lose 50–50s, then drop to a gun with faster handling and higher initial accuracy (M4A1, MP7) before chasing paper TTK.
- If your bullets disappear at 40–70 m, then your muzzle velocity or spread is the problem—switch to L85A3/SG553R or add a velocity barrel.
- If you're top-fragging but losing objectives, then swap sniping for an auto that clears and holds (M4A1/SG553R) and anchor the point.
- If recoil feels random, then over-control in the first 10 bullets and feather the rest—most BF6 spread models reward burst discipline.
↖ FAQ
Q: Why isn't the PSR top-tier if it's 50 BMG?
A: Velocity and sweet-spot window. You get a 100–150 m body kill zone and sluggish bullet speed. In practice, you get fewer impactful picks than with M2010 or the Mini Scout.
Q: TR7 seems cracked but inconsistent—what am I missing?
A: It's a skill amplifier. If you don't pull down-and-right smoothly for 8–10 rounds, its theoretical TTK disappears. Lower your FOV or add a steadier grip to feel the magic.
Q: Shotguns feel feast-or-famine—worth it?
A: On the right sectors (Breakthrough interiors, TDM chokepoints), M1014 is phenomenal. On open Conquest maps, you'll starve between fights.
Q: Are pistols worth grinding?
A: Outside the M44 (two-body potential; with hollow point, one-head to ~20 m), most secondaries are panic tools. Don't expect them to win clean duels vs primaries.
Q: M60 vs M240L vs M250—how to pick?
- - M250: Lane control king with bipod.
- - M240L: Faster handling and reload, still beams.
- - M60: Big mag comfort; slower but forgiving. Choose based on whether you anchor (M250), flex (M240L), or brute-force with volume (M60).
Most Popular Posts
- Battlefield 6 Season 1 Ultimate Weapon Tier List: Best Guns, TTK Data, Loadouts, and Pro Tips
- Top 10 Low-Recoil BF6 Guns: Most Accurate Battlefield 6 Weapons
- How To Unlock the PSR (M98B) in Battlefield 6 Fast?
- Battlefield 6 AFK XP After Patch: Easy Passive Leveling Using 4-Minute Portal Lobbies
- Battlefield 6 Top 10 Meta Weapons: Builds, TTK Insights, and Practical Tips
- Battlefield 6 Fast Weapon Leveling Guide: Unlock Attachments
Popular Category Lists
- Grow a Garden / (286)
- ARC Raiders / (267)
- CoD: Black Ops 7 / (166)
- Monopoly Go / (147)
- MLB 26 / (146)
- Star Citizen / (122)
- Steal a Brainrot / (89)
- ARK Survival Ascended / (79)
- Sailor Piece / (68)
- Forza Horizon 6 / (65)
- Diablo IV / (61)
- Blox Fruits / (61)
- Adopt Me / (56)
- CoD: BLACK OPS 6 / (55)
- Path of Exile 2 / (48)
- Grow a Garden 2 / (48)
- Monster Hunter Wilds / (46)
- Windrose / (44)
- Path of Exile / (40)
- Bee Swarm Simulator / (36)