0
0Diablo 4 Season 12 Best Necromancer Build Guide: Blood Golem Endgame Build
If you want a Necromancer build that feels powerful without taking forever to assemble, this is the one we'd recommend first in Season 12. We've tested a lot of Necro setups this season, and Blood Golem stands out for one simple reason: it does everything well. It clears fast, scales hard, and doesn't require a perfect inventory before it starts feeling good.

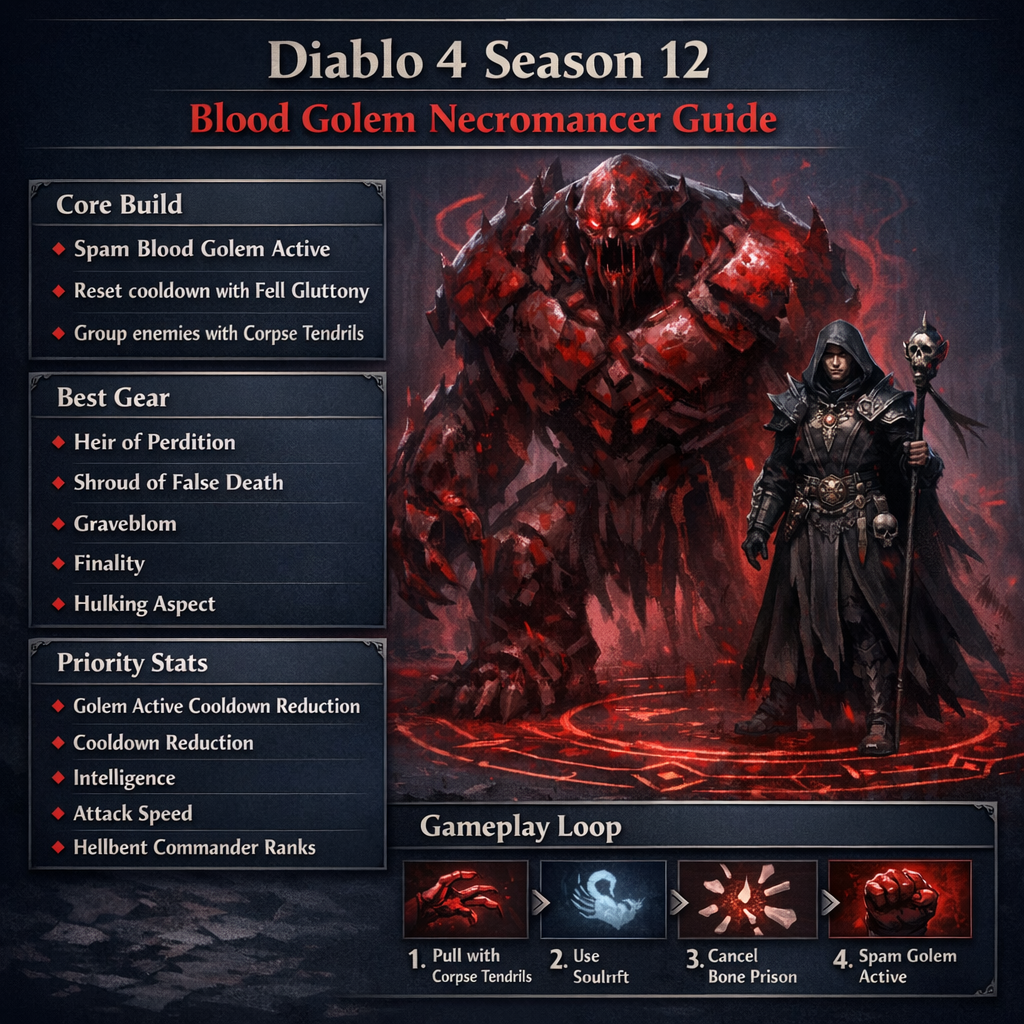
The build is built around spamming the Blood Golem active skill. We drop the rest of our minions, stack cooldown support, and turn the Golem into our main source of burst damage. Once the cooldown loop is working, the build becomes smooth, reliable, and surprisingly easy to play.
- Why This Build Is So Strong
- Core Build Idea
- Best Gear and Aspects
- Gear Priorities
- Skill Setup
- Paragon Priority
- How to Play the Build
- Real Gameplay Tip
- Common Problems and Quick Fixes
- FAQ
- Is this the best Necromancer build in Diablo 4 Season 12?
- Is Blood Golem Necro hard to play?
- What is the most important stat?
- Do I need all the unique items?
- What should I upgrade first?
- Final Thoughts
↖ Why This Build Is So Strong
What makes this build special is not just raw damage. It's the combination of:
- Fast setup compared to many endgame builds
- Strong all-content performance
- Simple core rotation
- High ceiling for pushing
In practice, the build works because Fell Gluttony, Hulking Aspect, and Decrepify cooldown support let us cast the Golem active again and again. That turns one strong summon into a repeatable screen-clearing tool.
| Strength | Why It Matters |
|---|---|
| High burst damage | Great for elites, bosses, and dense pulls |
| Short cooldown loop | Keeps the build feeling smooth |
| Easy gameplay | Low APM compared to many top builds |
| Good scaling | Improves a lot with better gear |
If you've played Necro before, this build feels much cleaner than many shadow-heavy or corpse-heavy setups. If you're newer, it's also easier to learn because the damage pattern is obvious: group, buff, slam.
↖ Core Build Idea
The goal is simple:
1. Lower the Blood Golem active cooldown
2. Group enemies with Corpse Tendrils
3. Use Soulrift and Bone Prison tech for extra damage
4. Spam Golem active into packed mobs
That's the loop. And yes, it's as fun as it sounds.
One thing we noticed while playing this setup is that the build starts feeling strong earlier than expected. You do not need every best-in-slot item before it becomes effective. If you already have the cooldown engine online, your damage will usually be good enough for most endgame content.

↖ Best Gear and Aspects
Here's the simplified gear setup with the pieces that matter most.
| Slot | Best Choice | Why We Use It |
|---|---|---|
| Helm | Heir of Perdition | Big offensive value |
| Chest | Shroud of False Death | Strong damage and stats |
| Gloves | Aspect of Reanimation | Boosts Golem damage |
| Pants | Blood Moon Breeches | Skill ranks and better Decrepify value |
| Boots | Hulking Aspect | Helps reset Golem cooldown |
| Weapon | Graveblom | Great Golem scaling and attack speed |
| Off-hand | Finality | Strong multiplier, helps with resource sustain |
| Amulet | Fell Gluttony Aspect | Core piece for cooldown reset |
| Rings | Grasping Veins + Great Feast | Reliable damage increase |
↖ Gear Priorities
If you are still farming upgrades, focus on these affixes first:
- Golem Active Cooldown Reduction
- Cooldown Reduction
- Intelligence
- Attack Speed
- Passive Ranks, especially Hellbent Commander
- Resource sustain on off-hand if essence feels bad
If you find that the build hits hard but feels awkward, that usually means your cooldown rolls are not there yet. Damage is important, but the build only really comes alive when the active resets feel consistent.
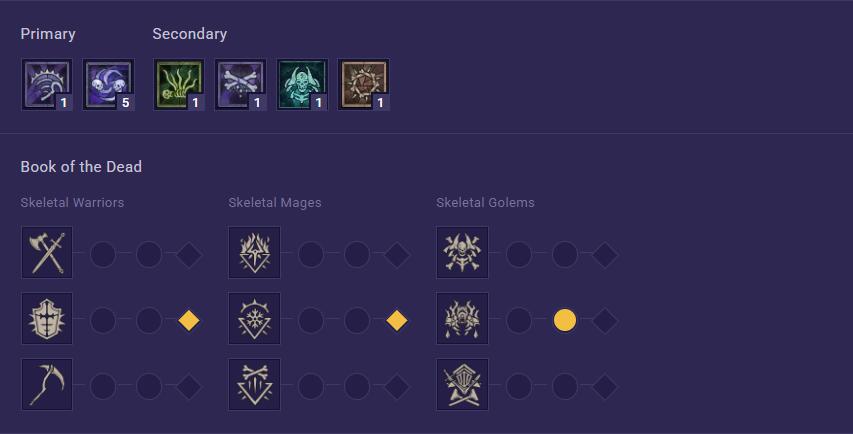
↖ Skill Setup
The skill tree is pretty straightforward. We're mostly taking tools that support the Golem, not trying to split damage across multiple mechanics.
| Skill / Passive | Why It Matters |
|---|---|
| Reap | Attack speed support |
| Hewed Flesh | More corpse generation |
| Decrepify | Cooldown recovery engine |
| Corpse Tendrils | Best grouping tool in the build |
| Bone Prison | Used for damage optimization |
| Soulrift | Vulnerable uptime, damage, and essence support |
| Golem Mastery | Priority passive |
| Hellbent Commander | Best damage passive |
| Kalan's Edict | Attack speed and damage boost |
| Inspiring Leader | Crit support |
A small but important detail: Bone Prison canceling gives extra value with Kalan's Edict. If you are pushing harder content, that trick is worth learning. If you're just farming, you can play much more loosely and still destroy content.
↖ Paragon Priority
You do not need to overcomplicate the Paragon route. Grab the biggest multipliers first.
| Board / Glyph | Priority |
|---|---|
| Starting Board + Eliminator | Early |
| Hulking Monstrosity + Deadraiser | Very high |
| Frailty + Golem | Very high |
| Flesh-Eater + Corporeal | High |
| Cult Leader | Very high |
| Essence | Good late pickup |
If you have fewer Paragon points, go in this order:
1. Legendary nodes
2. Glyph sockets
3. Important surrounding nodes
4. Spare points after that
This is one of the easiest ways to avoid wasting power during progression.
↖ How to Play the Build
The basic rotation is simple and works in almost all content.
1. Pull enemies with Corpse Tendrils
2. Use Soulrift
3. Cast and cancel Bone Prison
4. Spam Blood Golem active
5. Use Reap when helpful for attack speed
For casual farming, you can simplify it even more:
- Corpse Tendrils
- Soulrift when available
- Golem active spam
That's enough for most content outside serious ladder pushing.
↖ Real Gameplay Tip
From our own runs, the biggest damage difference usually comes from how well we group enemies. If you cast into scattered targets, the build feels okay. If you pull everything into one tight pack first, the build feels broken. That's the habit that separates average clears from fast clears.
↖ Common Problems and Quick Fixes
| Problem | Likely Cause | Fix |
|---|---|---|
| Golem active feels slow | Not enough cooldown support | Add Golem active CDR and Fell Gluttony |
| Damage feels inconsistent | Poor enemy grouping | Use Corpse Tendrils more deliberately |
| Essence feels bad | Weak sustain on off-hand | Add resource restore chance |
| Build feels squishy | Missing defensive rolls or bad timing | Add life/defense and use reinforcement correctly |
If you notice the build feels weaker in boss fights than in dungeons, check whether your cooldown engine is still functioning well in lower-density situations. That's usually the first thing to clean up.
Build Link: Mobalytics Build Link
↖ FAQ
↖ Is this the best Necromancer build in Diablo 4 Season 12?
It is one of the strongest Necromancer builds in the season, especially if you want something that works in nearly all content without a painful gearing curve.
↖ Is Blood Golem Necro hard to play?
Not really. The basic version is very easy. The advanced version has more optimization, but the core loop is simple and comfortable.
↖ What is the most important stat?
Golem Active Cooldown Reduction is one of the most important stats because it controls how often you can use your main damage skill.
↖ Do I need all the unique items?
No. The build gets stronger with premium uniques, but it works before full best-in-slot gear as long as the cooldown setup is in place.
↖ What should I upgrade first?
Start with:
1. Fell Gluttony
2. Cooldown reduction
3. Weapon scaling
4. Hellbent Commander ranks
5. Attack speed breakpoint
↖ Final Thoughts
This is one of the rare Diablo 4 builds that feels strong early, scales well late, and stays fun the whole time. We get a clean gameplay loop, strong endgame results, and a gearing path that makes sense instead of feeling punishing.
If you want a Necromancer build for Season 12 that is powerful, practical, and easy to enjoy for long sessions, Blood Golem is one of the safest picks on the board.
Most Popular Posts
- Diablo 4 S13 Gear Guide: Fast Progression, Farms, Aspects, Ancestral Gear, and Mythic Uniques
- Diablo 4 Charms and Seals Guide: How to Get Better Rolls, Six Slots, and Unique Charms
- Diablo 4 S13 Leveling Guide: Best XP Farm, Charms, War Plans, and Torment 1 Prep
- Diablo 4 S13 Mythic Unique Farm Guide: Best Undercity, Mephisto, Sparks, and Boss Routes
- Diablo 4 S13 Endgame Fast Uniques, Ancestrals, Mythics, War Plans, and Torment Guides
- Diablo 4 Greater Affix Guide: Fast Ancestrals, Mythic Uniques, Aspects and OP Endgame Loot
Popular Category Lists
- ARC Raiders / (291)
- Grow a Garden / (286)
- CoD: Black Ops 7 / (166)
- MLB 26 / (150)
- Monopoly Go / (148)
- Star Citizen / (128)
- ARK Survival Ascended / (90)
- Steal a Brainrot / (90)
- Sailor Piece / (68)
- Forza Horizon 6 / (67)
- Diablo IV / (62)
- Blox Fruits / (62)
- Adopt Me / (58)
- Grow a Garden 2 / (57)
- CoD: BLACK OPS 6 / (55)
- Path of Exile 2 / (48)
- Monster Hunter Wilds / (46)
- Windrose / (44)
- Path of Exile / (40)
- Bee Swarm Simulator / (37)