0
0Helldivers 2 Emplacement Stratagem Tier List: Best Picks for Bugs, Bots, and Illuminate
- Hell
- Share
- Helldivers 2
- 04/12/26
- 553
Emplacement Stratagems are some of the most matchup-dependent tools in Helldivers 2. On paper, a lot of them look strong. In real missions, though, their value changes fast depending on faction, map flow, and whether your team is holding ground or constantly moving.
After a lot of live-match use, one thing becomes clear: the best Emplacements are the ones that stay useful even when a fight gets messy. That is why some options feel excellent on one front and almost pointless on another.
Below is a practical tier list focused on real gameplay value, not just theory.
- Emplacement Tier List by Faction
- Terminids
- Automatons
- Illuminate
- Best and Worst Emplacements
- Practical Loadout Advice
- If you are fighting Terminids
- If you are fighting Automatons
- If you are fighting Illuminate
- Why These Rankings Hold Up
- FAQ
- Which Emplacement Stratagem is best overall in Helldivers 2?
- Are mine Emplacements worth using?
- Is Shield Generator Relay worth bringing?
- Why are Anti-Tank Mines rated so low?
- What is the best Emplacement for Automatons?
- Final Take
↖ Emplacement Tier List by Faction
A single universal ranking does not really work here, so the better approach is to break it down by enemy front.
↖ Terminids
Against bugs, we usually care most about horde control, lane pressure, and how well a Stratagem holds up once enemies get close.
| Stratagem | Tier | Quick Take |
|---|---|---|
| HMG Emplacement | A | Best overall bug pick; strong sustained damage |
| Gas Mines | A | Great area denial and wave disruption |
| Anti-Tank Emplacement | B | Good into big targets, weaker into swarm pressure |
| Incendiary Mines | B | Useful fire spread, but still inconsistent |
| Anti-Personnel Mines | C | Can work, but too random on normal missions |
| Anti-Tank Mines | C | Niche at best |
| Grenadier Battlement | C | Decent launcher, weak overall value here |
| Shield Generator Relay | Worst | Bugs do not pressure it in the right way |
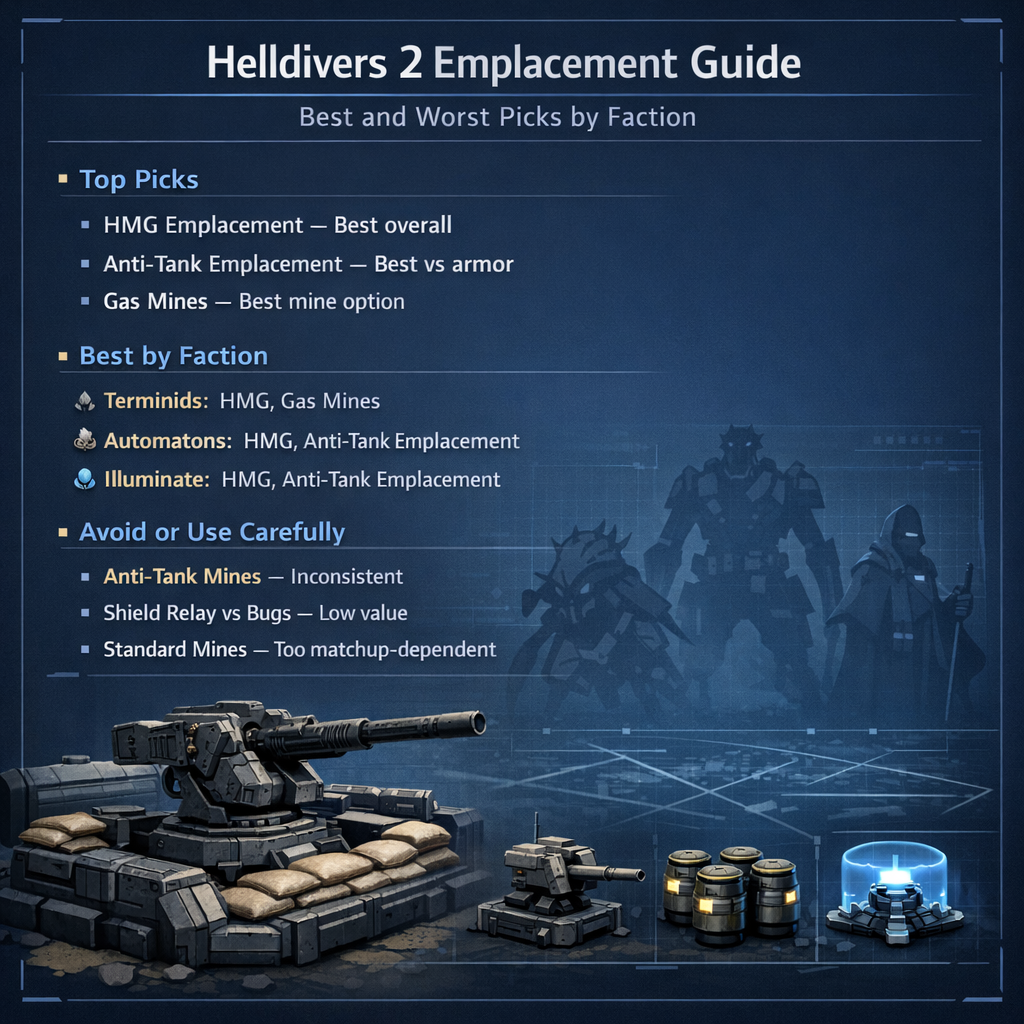
What this means in practice: if your squad is getting flooded, HMG Emplacement and Gas Mines are the safest picks.
↖ Automatons
Bots are where Emplacements feel the strongest. They reward range, anti-armor, and defensive positioning more than any other faction.
| Stratagem | Tier | Quick Take |
|---|---|---|
| HMG Emplacement | S | One of the strongest bot tools in the game |
| Anti-Tank Emplacement | S | Excellent into armor, structures, and holds |
| Gas Mines | A | Reliable disruption and control |
| Shield Generator Relay | A | Very useful on objectives and extraction |
| Grenadier Battlement | B | Playable, but outclassed |
| Anti-Tank Mines | C | Underperforms in real missions |
| Anti-Personnel Mines | Low | Too inconsistent |
| Incendiary Mines | Low | Fire is weak on this front |
From experience, HMG Emplacement is the easiest high-value pick here. If you need to break armor or clear bot strongholds, Anti-Tank Emplacement is just as strong.
↖ Illuminate
Illuminate matchups are trickier because some of their units float, which makes ground traps less reliable. That said, a few Emplacements still perform extremely well.
| Stratagem | Tier | Quick Take |
|---|---|---|
| HMG Emplacement | S | Best all-around pick on this front |
| Anti-Tank Emplacement | S | Great for Harvesters and heavier targets |
| Gas Mines | A | Strong versus Voteless and lane pushes |
| Incendiary Mines | A- | Good into ground hordes, weaker into float-heavy fights |
| Shield Generator Relay | C | Some value, but uptime feels too short |
| Anti-Personnel Mines | C | Only decent in the right missions |
| Grenadier Battlement | C | Angle-dependent and awkward |
| Anti-Tank Mines | Low | Too few good targets |
If you want one safe recommendation for Illuminate missions, go with HMG Emplacement. It handles the widest range of threats without asking too much from map geometry.
↖ Best and Worst Emplacements
Here is the shorter version if you just want the headline picks.
| Category | Best Pick | Why |
|---|---|---|
| Best overall Emplacement | HMG Emplacement | Reliable on every front, excellent sustained damage |
| Best anti-armor pick | Anti-Tank Emplacement | Top-tier against bots and Illuminate heavies |
| Best minefield | Gas Mines | Most consistent area denial |
| Best defensive support | Shield Generator Relay vs Bots | Strong on fixed-position missions |
| Most overrated | Anti-Tank Mines | Good idea, weak real-world consistency |
| Weakest faction matchup | Shield Relay vs Bugs | Too little value against melee-heavy pressure |
The pattern is pretty simple: reliable damage and reliable space control win out over clever but inconsistent traps.
↖ Practical Loadout Advice
This is the part most players care about: what should we actually bring?
↖ If you are fighting Terminids
- Bring HMG Emplacement if you want the safest all-purpose choice.
- Bring Gas Mines if your team needs breathing room against swarms.
- Bring Incendiary Mines mainly on tighter defense-style missions.
↖ If you are fighting Automatons
- Start with HMG Emplacement or Anti-Tank Emplacement.
- Add Shield Generator Relay if your team struggles during objective holds.
- Use Gas Mines if you want control instead of raw burst damage.
↖ If you are fighting Illuminate
- Use HMG Emplacement as the default pick.
- Use Anti-Tank Emplacement if heavy enemies are causing wipes.
- Use Gas or Incendiary Mines in Voteless-heavy missions.
A good rule from actual squad play is this:
if enemies are killing you with numbers, bring HMG or Gas. If they are killing you with armor, bring Anti-Tank Emplacement.
↖ Why These Rankings Hold Up
These rankings are based on the factors that matter most in actual missions:
- Reliability — does it still work when enemies push from awkward angles?
- Faction fit — does it counter the kind of pressure that front actually brings?
- Positioning demand — can we get value without a perfect setup?
- Squad impact — does it help the whole team, not just the user?
That is also why some Stratagems rank lower than players expect. A tool can sound amazing in theory and still disappoint once pathing, terrain, and target behavior get involved.
↖ FAQ
↖ Which Emplacement Stratagem is best overall in Helldivers 2?
The HMG Emplacement is the best overall choice for most players. It is strong across all three factions and stays useful even when fights get chaotic.
↖ Are mine Emplacements worth using?
Yes, but mostly Gas Mines and sometimes Incendiary Mines. Standard anti-personnel and anti-tank mines are much less consistent in live matches.
↖ Is Shield Generator Relay worth bringing?
Yes against Automatons, sometimes against Illuminate, and rarely against Terminids. It is strongest when your squad needs to hold a fixed position under ranged pressure.
↖ Why are Anti-Tank Mines rated so low?
Because they are too dependent on enemy pathing. In real missions, they often miss their ideal targets or fail to deliver enough impact for the slot.
↖ What is the best Emplacement for Automatons?
The two best picks are HMG Emplacement and Anti-Tank Emplacement. Which one is better depends on whether your squad needs flexible firepower or dedicated anti-armor.
↖ Final Take
If we strip away the theory and focus on what consistently works, three Emplacements stand above the rest: HMG Emplacement, Anti-Tank Emplacement, and Gas Mines.
Everything else is more situational. That does not make those tools useless, but it does mean we should pick them for a specific mission plan, not as default choices.
For most players, the cleanest approach is simple:
- HMG Emplacement for broad value
- Anti-Tank Emplacement for armor-heavy fights
- Gas Mines for control and breathing room
That trio gives us the most consistent results across the current game.
Most Popular Posts
- Helldivers 2 Best Solo Loadouts: Ultimate Allround, Bug, Bot & Illuminate Builds Explained
- Helldivers 2 Weapon Customization Guide: Everything You Need to Know
- Helldivers 2 New Illuminate: Flesh Mob, Interloper and Crescent Overseer
- Helldivers 2 Masters of Ceremony Warbond: Is It Worth Buying?
- Helldivers 2 Best Weapons Loadouts for Solo Dominance
- Helldivers 2 Best Weapons for New Illuminate Weakpoint
Popular Category Lists
- Grow a Garden / (286)
- ARC Raiders / (261)
- CoD: Black Ops 7 / (166)
- Monopoly Go / (146)
- MLB 26 / (144)
- Star Citizen / (111)
- Steal a Brainrot / (89)
- Sailor Piece / (68)
- ARK Survival Ascended / (66)
- Diablo IV / (61)
- Forza Horizon 6 / (60)
- Blox Fruits / (60)
- CoD: BLACK OPS 6 / (55)
- Adopt Me / (53)
- Path of Exile 2 / (48)
- Monster Hunter Wilds / (46)
- Windrose / (44)
- Path of Exile / (40)
- Grow a Garden 2 / (37)
- Bee Swarm Simulator / (36)