0
0 Created: Sep 7,2026 | Maplestory Classic
MapleStory Classic Class Choosing & Leveling Guide (1–30 Route & Meso Tips)

Finding the right path in MapleStory Classic comes down to a balance between everyday combat enjoyment and sustainable resource management. Rather than chasing theoretical endgame damage charts, early progression rewards players who match their actual playstyle with efficient grinding habits.

Here is a structured overview of the most dependable class options, high-yield level 1–30 training maps, and budget rules to help you reach your second job without running out of mesos.
- Choose Your Class by Everyday Combat Mechanics
- Match Your Preferences to Practical Archetypes
- Verify Mechanical Nuances Before Investing
- Level 1–30 Training: Kill Speed Beats Mob Level
- Practical Leveling Progression (1–30)
- Levels 1–15: Minimize Travel and Congestion
- Levels 15–25: Spatial Efficiency and Group Dynamics
- Levels 21–30: Assessing the Full KPQ Cycle
- Protect Your Mesos: Economy and Gear Upgrades
- Upgrade Priority Checklist
- Potion Recovery and Efficiency
- FAQ (Frequently Asked Questions)
- What is the most reliable beginner class in MapleStory Classic?
- Where should I train between levels 10 and 20?
- Is Kerning PQ better than solo grinding from level 21 to 30?
- Should I prioritize upgrading weapons or armor first?
- Can I easily reset my AP and SP if I make a mistake?
- Summary and Next Steps
Choose Your Class by Everyday Combat Mechanics
Third-job highlight reels rarely show the hours spent grinding through the first 30 levels. Focus on the core mechanics you enjoy repeating rather than speculative endgame performance.

Match Your Preferences to Practical Archetypes
Review this comparison to align your personal playstyle with class mechanical demands before assigning your early skill points:
| Third-Job Class | Playstyle Strengths | Primary Progression Trade-off |
|---|---|---|
| Chief Bandit | High-tempo melee, dynamic repositioning, meso skills | Requires distinct weapon mastery; high potion consumption early on |
| Hermit | Exceptional single-target ranged burst and mobility | Heavy upkeep costs for throwing stars and continuous gear upgrades |
| Ice/Lightning Mage | Dominant AoE wave clearing and mob freeze control | High MP potion churn; elemental resistances limit certain maps |
| Fire/Poison Mage | Relentless sustained damage and poison mechanics | Positional challenges and stricter cooldown management |
| Priest | Party-wide utility, self-sustain, and holy damage | Dependent on party loops; solo grinding slows outside undead spawns |
| Ranger | Balanced long-range kiting and responsive mobility | Rigid attack spacing when swarmed by fast-closing mobs |
| Sniper | Heavy burst damage and deliberate spacing control | Slower rate of fire; requires precise positional awareness |
| Dragon Knight | Devastating frontline reach with spears and polearms | Sluggish early-game attacks and steep health potion requirements |
| Crusader | Reliable close-range combo scaling and burst | Limited mobility; heavily dependent on constant weapon upgrades |
| White Knight | Versatile elemental coverage and frontline bulk | Demands meticulous elemental planning across different hunting zones |
Core takeaway: Pick a class based on attack cadence and movement feel. Avoid investing in a build whose primary appeal hinges on an unverified or late-game skill.
Verify Mechanical Nuances Before Investing
Hands-on testing data highlights Chief Bandit's fluid attack combinations as exceptionally fun to execute. However, mechanical satisfaction does not guarantee top-tier damage charts—prioritize it for combat rhythm, not DPS promises.
Similarly, past adjustments to Cleric mechanics indicate that traditional undead mob farming may not yield the identical returns of legacy patches. Always verify how baseline skills function in the current build before committing.
Before spending skill or stat points:
- Confirm exact weapon and secondary stat requirements for your planned second job.
- Test combat animations to ensure pacing suits your latency and input style.
- Assume stat and skill resets are limited; build conservatively.
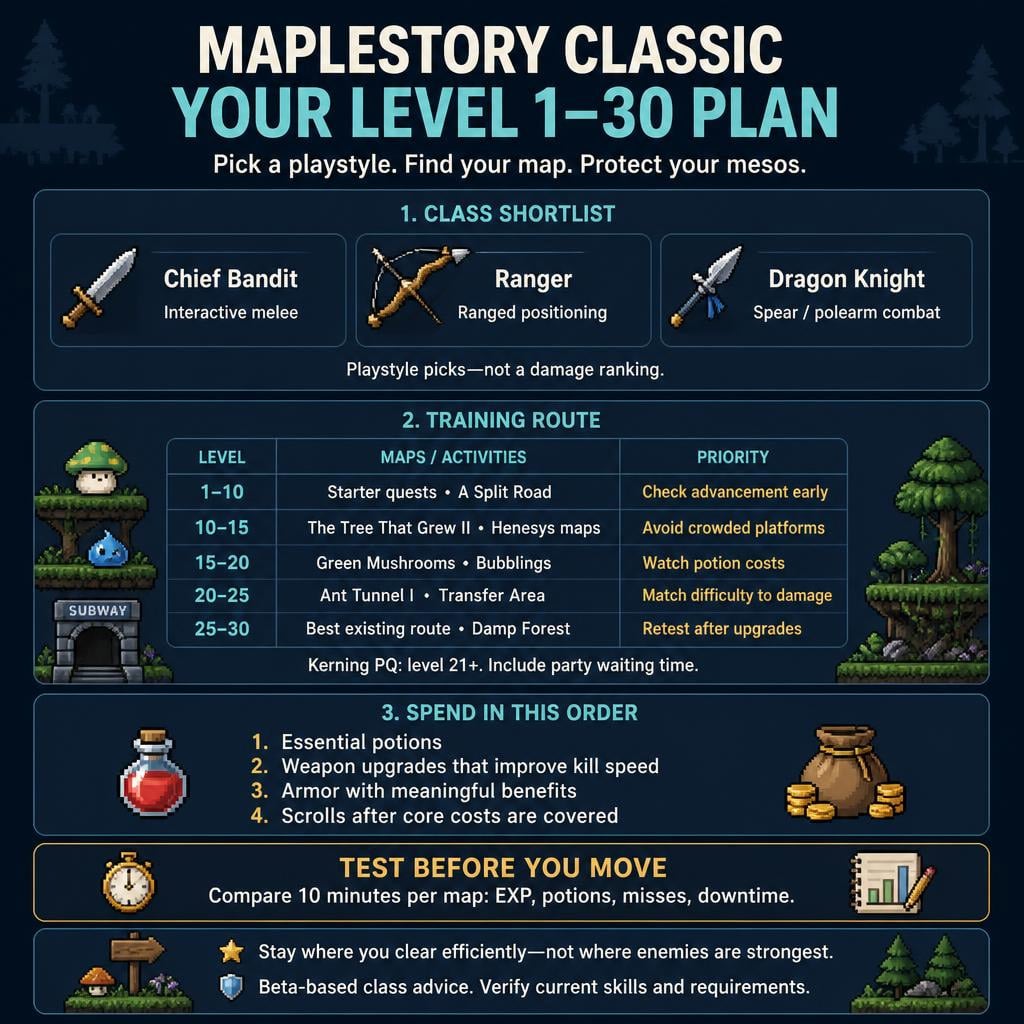
Level 1–30 Training: Kill Speed Beats Mob Level
Grinding higher-level monsters is counterproductive if your miss rate or potion consumption spikes. The most efficient map is the one where your damage output, spawn rates, and recovery costs stay balanced.
Practical Leveling Progression (1–30)
| Level Range | Recommended Maps & Activities | Primary Focus | When to Rotate Out |
|---|---|---|---|
| 1–10 | Maple Island beginner quests; Lith Harbor outskirts | Fast quest turn-ins; meet basic class advancement stat marks | Maple Island mob spawns become heavily contested |
| 10–15 | The Tree That Grew II; Henesys Hunting Ground I | Secure tight platform loops with low mob evasion | Overcrowded channels prevent uninterrupted mobbing |
| 15–20 | Tree Dungeon (Forest Up North IV); Line 1 Area 1 | Compare safe Green Mushroom platforms to Bubbling clusters | Potion consumption outpaces incoming meso returns |
| 20–25 | Ant Tunnel I; Transfer Area; Kerning PQ (from Lv. 21) | Balance mob density against accuracy and knockback safety | Frequent attack misses or HP spikes create prolonged downtime |
| 25–30 | Ant Tunnel deep routes; Damp Forest; dedicated KPQ | Maximize single-hit or two-hit kill efficiency on dense spawns | Upgraded gear enables superior clear rates elsewhere |
Levels 1–15: Minimize Travel and Congestion
On Maple Island, finish standard tutorial tasks and depart as soon as advancement benchmarks are met. Waiting for over-camped starter quest items only slows down your advancement.
Take note of traditional advancement thresholds: Magicians historically advance at level 8, whereas Warriors, Bowmen, and Thieves advance at level 10. Confirm these prerequisites immediately upon character creation to avoid wasted EXP.
Once on Victoria Island:
- Focus on quests directly adjacent to your planned hunting zones.
- Change channels immediately if you are constantly competing for basic spawns.
- Avoid traveling between multiple towns solely to hand in minor quests.
Levels 15–25: Spatial Efficiency and Group Dynamics
Bubblings offer dense mob grouping, but close-range magic contact burns through potions quickly. Green Mushroom platforms provide a safer alternative where knockback keeps incoming damage predictable.
When grouping in Ant Tunnel:
- Divide platforms by player clear speed rather than stacking multiple players on one ledge.
- Ensure lower-level members control upper horizontal runs while high-damage players clear high-density bottom floors.
- Account for party bonus distributions: party experience multipliers only benefit you if overall kill speed outpaces solo clearing.
Levels 21–30: Assessing the Full KPQ Cycle
Kerning Party Quest (KPQ) unlocks at level 21 and serves as a vital bridge toward your second job. Evaluate KPQ runs by the entire time investment—recruitment, stage execution, clear bonuses, and reward utility—not just the completion EXP prompt.
If party downtime or channel lag delays runs, steady grinding on familiar Ant Tunnel platforms remains the safer, more predictable route to level 30.
Protect Your Mesos: Economy and Gear Upgrades
The lowest expenditure does not always equal the fastest progression. Allocate mesos toward upgrades that shorten combat cycles, prevent deaths, or reduce restocking trips.
Upgrade Priority Checklist
Follow this sequence when funds are constrained:
1. Essential Consumables: Never drain your potion reserve to buy incremental gear. Without consumables, training stops completely.
2. Primary Weapon: Upgrade your weapon when it reduces the average number of hits required to kill standard mobs by at least one full swing or shot.
3. Stat-Boosting Armor: Purchase defensive pieces only if incoming damage forces excessive potion spam, or if the item grants indispensable accuracy/primary stats.
4. Scrolls & Cosmetic Gear: Postpone scrolling until your primary training consumables and baseline gear are entirely secured.
Potion Recovery and Efficiency
Avoid overpaying for oversized potions early on. Compare the recovery value directly against your maximum HP/MP pool:
- Calculate HP/MP recovery per meso spent to prevent wasted overhealing.
- Keep a dedicated small stack of higher-tier potions strictly for panic recovery against unexpected burst damage.
- Treat rare equipment and scroll drops as supplementary income rather than relying on them to fund basic supply runs.
FAQ (Frequently Asked Questions)
What is the most reliable beginner class in MapleStory Classic?
No single class universally outperforms every other for new players. Bowmen (Ranger/Sniper paths) offer manageable positioning from range, Warriors provide strong frontline survivability, and Thieves deliver high mechanical agility. Pick based on combat pacing and budget tolerance, as Thieves and Bowmen require steady meso investment for ammunition.
Where should I train between levels 10 and 20?
Start on Henesys Hunting Ground I or The Tree That Grew II for early mob density. Between levels 15 and 20, rotate to Tree Dungeon (Forest Up North IV) for Green Mushrooms or Line 1 Area 1 for Bubblings. Stay on platforms where you can defeat enemies without taking sustained touch damage.
Is Kerning PQ better than solo grinding from level 21 to 30?
Kerning PQ offers excellent EXP and valuable early rewards if you have a coordinated group with minimal queue downtime. However, if party assembly takes longer than 5–10 minutes or runs stall on puzzle stages, grinding in Ant Tunnel I often delivers higher, more reliable hourly EXP.
Should I prioritize upgrading weapons or armor first?
Always prioritize your weapon. Shortening the number of hits needed to defeat a monster reduces both training time and incoming damage. Upgrade armor pieces only when your survivability drops significantly or when an item provides crucial accuracy bonuses needed to hit higher-level targets.
Can I easily reset my AP and SP if I make a mistake?
Stat and skill resets in Classic environments are typically rare, premium, or expensive. Always review second-job secondary stat thresholds (such as DEX for Thieves and Bowmen, or STR for Warriors) before spending points. Follow established stat baselines early to avoid costly corrections later.
Summary and Next Steps
Early progression in MapleStory Classic is a marathon of consistency. Focus on everyday mechanical feel over endgame hype, train on maps where your clear speed is smooth and uninterrupted, and protect your meso reserves by upgrading weapons before luxury armor.
Run consistent 10-minute training trials whenever choosing between two grinding zones, keep your potion consumption manageable, and you will hit level 30 ready for your second job advancement with a solid economic foundation.

I’m Emily Zhang, an American Research Writer at GGWTB covering Korean MMORPGs and games based on classic franchises. My guides focus on class choices, leveling routes, and long-term character progression. I look at what a class needs beyond its starter skills—and which upgrades are worth your materials before the next gear tier arrives.

Most Popular Posts
- MapleStory Classic World CBT2: The No-BS Guide to 3rd Job, Orbis, and Class Reworks
- MapleStory Classic World Early Best Maps, PQ, and Party Spot): The No-BS 1-30 Leveling Guide
- Maplestory Classic Closed Beta #2: 3rd Job Skills, Class Reworks & What to Test First
- MapleStory Classic Early Leveling Guide: Best Maps, Fastest Route, Real Player Tips
- MapleStory Classic World Release Date Guide: Launch Date, Founder Access
- MapleStory Classic World Priest Guide: Skills, Nerfs and Holy Arrow build
Popular Category Lists
- ARC Raiders / (351)
- Grow a Garden / (294)
- CoD: Black Ops 7 / (167)
- Star Citizen / (162)
- MLB 26 / (159)
- Monopoly Go / (152)
- ARK Survival Ascended / (128)
- Steal a Brainrot / (99)
- Blox Fruits / (74)
- Adopt Me / (74)
- Forza Horizon 6 / (72)
- Sailor Piece / (68)
- Grow a Garden 2 / (68)
- Diablo IV / (62)
- CoD: BLACK OPS 6 / (55)
- Aion 2 / (50)
- Path of Exile 2 / (48)
- Monster Hunter Wilds / (46)
- Windrose / (44)
- Donut SMP / (41)