0
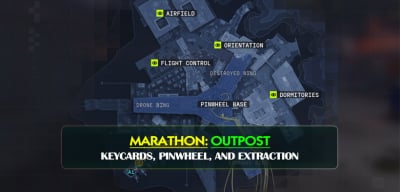
0Marathon Outpost Loot Guide: Best Keycard Route and Main Loot Path
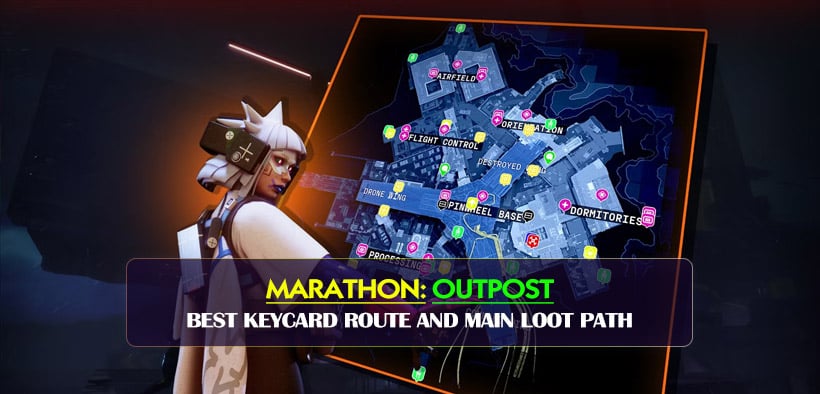
Marathon Outpost is a small map, but it rewards routing, not random looting. The clean way to play it is simple: we gather the right keycards, unlock Pinwheel, push the main red-room objective, then decide whether extra rooms are worth the risk. That matters because the best loot is locked behind fixed mechanics, and once you know the order, the map becomes very consistent.
- What matters most on Outpost
- Keycards and where we usually find them
- Best loot route
- 1. Loot fast, not wide
- 2. Open Pinwheel with 2 green cards
- 3. Push the main loot room
- 4. Open the extra blue-door room if safe
- What to skip first
- Small but important survival tips
- Acid rain
- PvP timing
- Budget your first runs
- FAQ
- How many cards do we need for the main route?
- Where are red cards most often found?
- Is the blue-door room worth opening?
- Are Armories worth it?
- Is acid rain dangerous?
- Conclusion
↖ What matters most on Outpost
| Objective | Cards Needed | Priority | Why It Matters |
|---|---|---|---|
| Open Pinwheel | 2 Green | High | Starts the central loot route |
| Open main loot room | 2 Red + 1 Yellow | Highest | Best repeatable loot on the map |
| Open blue side room | 2 buttons after main terminal | Medium | Bonus loot, lower priority |
| Armory | Likely 2 Green + 1 Yellow | Low | Fine if nearby, not a main target |
| Keycard extract | 1 Red | Situational | Useful if normal extract is unsafe |
The short version is this: Pinwheel gets us in, but the red room is the real payoff.
↖ Keycards and where we usually find them
| Card | Usual Spawn | How Common | Best Use |
|---|---|---|---|
| Green | Tables, shelves, chairs, building interiors | Common | Pinwheel unlock |
| Yellow | Interactive containers inside buildings | Uncommon | Main loot room |
| Red | Rooftops or outdoor spots with antenna markers | Less common | Main loot room, some extracts |
A practical rule helps here:
- If you find 2 green cards early, go straight to Pinwheel.
- If you find 2 red and 1 yellow, stop detouring and push the main room.
- If you are still missing reds, check rooftops before re-looting interiors.
That saves time, and on Outpost, time is usually the difference between a clean run and getting third-partied.
↖ Best loot route
↖ 1. Loot fast, not wide
We usually spend the opening minute getting basic gear and checking nearby card spawns. Green cards are common, so we do not overthink them.
↖ 2. Open Pinwheel with 2 green cards
There are two entrances on opposite sides. Insert the cards, clear the short enemy wave, and the route opens.
| Pinwheel Step | Requirement | Result |
|---|---|---|
| Start event | 2 Green | Opens central access |
| Clear enemies | Short wave | Confirms progress |
| Opposite side | No extra cards | Opens automatically |
This means you only need 2 green cards total, not 4.
↖ 3. Push the main loot room
After moving through the center, head toward the main terminal area. To open the best loot room, we need:
- 2 Red cards
- 1 Yellow card
Expect light resistance:
- 2 turrets
- 1 stronger shielded enemy
- standard AI pressure
From our runs, this room is the most reliable loot source on the map. We usually see strong purple-value loot, plus smaller boxes and occasional key rewards. Not always top-tier golds, but the value is absolutely worth it.
↖ 4. Open the extra blue-door room if safe
After the main terminal is done, press the two side buttons around Pinwheel. That opens a large blue door with extra loot and enemies inside.
This room feels more like a bonus than a core objective. If the map is quiet, take it. If another team is still alive nearby, leave it.
↖ What to skip first
| Optional Content | When to Do It | When to Skip It |
|---|---|---|
| Armory | You already have spare cards and safe space | You still need main-room cards |
| Loot drone | You are close and uncontested | Rooftops are hot |
| Red-card extract | You need a safer exit | You still need red cards for loot |
Armories are not bad, but they are usually not where the best run is decided. If you have to choose, choose the main room.
↖ Small but important survival tips
↖ Acid rain
There is periodic acid or fire rain on the map.
- It does manageable chip damage.
- You can run through it if needed.
- Covered routes between buildings help a lot.
This matters because new players often stop moving when the rain starts. Usually, we just keep rotating unless we are already safe indoors.
↖ PvP timing
Outpost has a small player count, so early fights matter a lot. In our experience, removing one nearby team early makes the entire loot route safer. If you hear fighting close to center, assume another squad is already playing for the same objective.
↖ Budget your first runs
We learned the map fastest by going in cheap first.
| Gear Choice | Recommendation |
|---|---|
| Armor | Green or low-risk blue |
| Weapon | Shotgun or reliable close-range gun |
| Goal | Learn routes before bringing expensive kits |
That approach works because Outpost is more about pathing and timing than raw gear checks.
↖ FAQ
↖ How many cards do we need for the main route?
You need 2 Green to open Pinwheel, then 2 Red + 1 Yellow for the main loot room.
↖ Where are red cards most often found?
Usually on rooftops or outside near antenna-style markers.
↖ Is the blue-door room worth opening?
Yes, but only after the main room is done and the area feels safe.
↖ Are Armories worth it?
Only if they are close and you already have extra cards. They are not the best use of time in most runs.
↖ Is acid rain dangerous?
It is annoying more than deadly. If you have to rotate, you can usually push through it.
↖ Conclusion
The most efficient Outpost runs follow a simple order: grab quick gear, secure 2 green cards, activate Pinwheel, collect 2 red and 1 yellow, open the main room, then leave before greed turns into a bad fight. If you play the map with that mindset, Outpost becomes one of the easiest places to farm steady loot.
Most Popular Posts
- Marathon Outpost Loot Guide: Best Keycard Route and Main Loot Path
- Marathon Outpost Solo Strategy Guide: Keycards, Pinwheel, and Extraction
- Marathon Faction Upgrades Guide: What to Rush for Every Faction (Fast, Practical, No Fluff)
- Marathon vs. Arc Raiders: Key Differences That Define the Genre
- Marathon Beginner Guides for Loadouts, Factions & Survival Strategies
- Marathon Triage Guide: Abilities, Best Team Comps & Combat Medic Tactics
Popular Category Lists
- ARC Raiders / (291)
- Grow a Garden / (286)
- CoD: Black Ops 7 / (166)
- MLB 26 / (150)
- Monopoly Go / (148)
- Star Citizen / (129)
- ARK Survival Ascended / (91)
- Steal a Brainrot / (90)
- Sailor Piece / (68)
- Forza Horizon 6 / (67)
- Diablo IV / (62)
- Blox Fruits / (62)
- Adopt Me / (58)
- Grow a Garden 2 / (57)
- CoD: BLACK OPS 6 / (55)
- Path of Exile 2 / (48)
- Monster Hunter Wilds / (46)
- Windrose / (44)
- Path of Exile / (40)
- Bee Swarm Simulator / (37)