0
0PoE 2 Ritual Farm Guide: Mechanic, Optimize and Strategy
- Davis
- Share
- Path of Exile 2
- 02/14/25
- 8478
Greetings, Exiles! The Ritual Farm in Path of Exile 2 offers players a unique way to engage with challenging encounters while earning valuable rewards. This guide will cover the Ritual mechanic, detailing its functionality, types, and strategies for farming Ritual Currency effectively, to help you farm more divines per hour using the Ritual. Let's dive in!
- What is Ritual?
- Types of Rituals
- Benefits of Farm Ritual
- Pros & Cons
- Ritual Omens
- The True Profit
- The Maze in the Mist
- How to Navigate the Maze Floor?
- Ritual Farming Strategy
- Delirium Synergy
- Deferring Items
- How to Get Your Deferred Items?
- Ritual Atlas (Part 1)
- Ritual Atlas (Part 2)
↖ What is Ritual?
In Path of Exile 2's late game, players can engage in four core League mechanics, one of them being Rituals. You can trigger Rituals by playing maps with Ritual symbols on your atlas.
- Location: Ritual sites have a radius, and randomly spawn within some endgame zones which you will have to map out.
- Encounter: 3-4 Ritual sites, each guarded by mobs await you in every map.
- Activation: Once you defeat the mobs at a site, you can proceed to activate the Ritual:
- The defeated enemies will revive again for a second encounter.
- Your movement and visibility will be heavily restricted, as the surrounding area will darken.
- Combat: Revived enemies, along with certain mechanics props, make battles claustrophobic and frantic.
If you successfully complete all four Ritual sites in a single map, your rewards will improve, along with the difficulty.
↖ Types of Rituals
Every Ritual encounter comes with different mechanics that diversify the fight and make it more challenging.
| Ritual Type | Mechanics | Damage Type |
| Contaminated | Waves of blood cascade across the area, dealing chaos damage if touched | Chaos Damage |
| Smothered | Plants spawn purple orbs that follow players and explode on proximity or timeout | Chaos Damage |
| Infested | Tornadoes of locusts swarm players, dealing damage over time within their radius | Damage Over Time |
| Sapping | Emits gas clouds that slow players, lower resistances, and buff enemy resistances inside them | Debuff/Resistance |
| Tainted | Purple bulbs follow monster paths and explode after a short delay or when stepped on | High Chaos Damage |
Key Notes:
- Each map features a randomly selected singular type of Ritual for the players to complete.
- The revive mechanics allow enemies from prior alters to be brought back to life which amplifies the difficulty greatly.
↖ Benefits of Farm Ritual
Ritual encounters are one of the best ways to earn rewards and currency in endgame, earning your attention and engagement with tremendous incentives.
- Tribute Points: These are the points allocated while killing enemies/participants in Ritual encounters. Use them to obtain rewards from the Ritual Altar.
- Unique Rewards: The multitude of currency options is usually mid tier, although the Omens do stand out as rare and will help you tremendously profit.
- Flexible Options: Increase your chance of obtaining valuable items with the ability to spend your Tribute Points to reroll the reward pool once per map.
↖ Pros & Cons
The Ritual mechanic has merits and demerits making it best for certain players but not for others.
- + High-Profit Potential: Gives access to Divine Orbs, Omens, and other valuable items.
- + No Rarity Requirement: Does not require high item rarity gear making it easier for most players to utilize.
- + Flexible Gameplay: Permits items to be deferred and claimed at a later date when tribute points are high enough.
- - High Initial Investment: Requires a lot of currency upfront – as much as 28 Divine Orbs.
- - Inconsistent Rewards: Profits are based on mechanics that are reliant on luck which means with every session, profits could differ.
- - Complex Optimization: Optimal outcome necessitates precise Atlas passive allocation and possible respecing.
↖ Ritual Omens
Omens are unique to the Ritual mechanic and can provide significant benefits or serve as valuable trade items.
| Omen Type | Effect | Value (Exalted Orbs) | Recommendation | |
|---|---|---|---|---|
| Blue Omens | Refreshment | Refills Life and Mana flasks at 35% Life. | 1 | Skip |
| Resurgence | Refills Life, Mana, and Energy Shield at 35% Life. | 4 | Skip | |
| Amelioration | Protects 75% of experience upon death. | 60 | Always take | |
| Green Omens | Sinestral Alchemy | Crafting-related; low value. | 6 | Avoid |
| Dextral Alchemy | Crafting-related; very low value. | 0.5 | Avoid | |
| Yellow Omens | Sinestral Exal | Crafting-related; moderate value. | 4 | Situational |
| Dextral Exaltation | Crafting-related; low value. | 1 | Avoid | |
| Red Omens | Omen of Corruption | Endgame crafting; high value. | 80 | Take if available |
| Cornation Omens | Low-value crafting item. | ~0 | Skip |


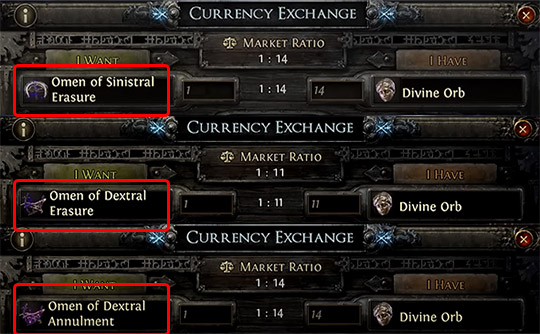
Purple Omens (The Big Money):
Purple Omens are the most valuable, but also the rarest. They only appear in level 80+ maps, requiring T16 maps or map corruption to increase their spawn rate.
| Purple Omen | Value (Divine Orbs) | Recommendation |
|---|---|---|
| Greater Anelment | 4 | Skip |
| Sinestral Eraser | 12 | Always take |
| Dextral Eraser | 10 | Always take |
| Dextral Enement | 10 | Always take |
| Sinestral Enement | 12 | Always take |
| Omen of Whittling | 8 | Take if available |
↖ The True Profit
The real profit that can be made in Ritual farming is in obtaining Purple Omens and the *Audience with the King* rare item.
Key Rewards:
- Audience with the King: Worth about 7 Divine Orbs and allows for the Crux of Nothingness encounter to be unlocked.
- Crux of Nothingness Boss Fight: Rewards and crafting materials are given for defeating the King of the Mist.
Rae Drop Rates:
- Purple Omens are an ultra rare drop despite being 60% more likely to drop in patch 0.1.1.
- Only found in maps 80 and above which means T16 maps or map corruption is needed for reliable farming.
Time Investment:
Elaborate Rituals require great amounts of patience, skill and map clearing techniques to maximize the possibility of valuable Omen drops.
↖ The Maze in the Mist
Misty Maze is an exceptional battle that challenges you to both navigate and fight at the same time.
Key Mechanics:
- Phase 1 - At the start you should fight the boss till you get lured toward the maze.
- The Maze - Find your way through the maze of intertwined vines and roots, and avoid a deadly swarm of locusts.
- Phase 2 - Head back to the arena and finish off the remainder of the boss's health.

↖ How to Navigate the Maze Floor?
- Follow the Wisps: Wisps will point you in the direction of the exit but sometimes they can be misleading.
- Stick to a Wall: Suggest to follow one wall because you are guaranteed to find the exit.
- Look for Clues: The exit is a little distance away from the purple light that is illuminating.
- Movement Speed: Boots with movement speed of thirty percent or higher must be worn to escape in a timely fashion along with Blink skills.
Rewards:
- Unique Items: There is a very high chance that the boss fights provide unique item drops, inguity utils belt remains the most profitable at 20+ Divine Orbs depending on rolls.
- Purple Omens: Rare and expensive drops available at all difficulties.
- Unique Jewel: "From Nothing Diamond" becomes available to drop at max difficulty, selling at over 10+ divines unidentified.

Stratgies:
| Tips | Details |
| Movement Speed | Ensure your character has high mobility to avoid locust damage. |
| Wall-Following | Stick to walls if lost; this ensures you'll find the exit eventually. |
| Calm Mindset | Avoid panicking; missed pathways are easy to overlook in the maze. |
| Exit Indicator | Watch for the purple light near the exit for early direction clues. |
↖ Ritual Farming Strategy
To profit from Ritual farming, a structured approach is essential.
Step 1: Acquire Ritual Tablets
- Source: Ritual tablets drop from enemy packs tied to Ritual sites but are rare due to low drop rates.
- Market Value: Often price-fixed at 50 Exalted Orbs each, even for suboptimal ones.
Step 2: Use Precursor or Overseer Tablets
- Precursor Tablets: Add basic modifiers to Ritual nodes for increased rewards.
- Overseer Tablets: Dropped by map bosses, these enhance Ritual nodes with additional effects like boss spawns or corruption.

Step 3: Target Lost Towers
- Look over your map and find at least two Lost Towers close to each other.
- Use Ritual tablets on these towers to stabilize farming routes.
- Enhance nodes with Precursor or Overseer tablets for greater rewards.
Step 4: Map Level Requirements
| Map Tier | Purpose |
| T15+ | Ensures maps are level 80+ for Purple Omens |
| T11+ | Minimum level (75+) for King encounters in Rituals |

Step 5: Optimize Atlas Tree
Allocate Atlas points into nodes connected with Rituals to maximize rewards or sustain Ritual engagements.
- Splinters of Ritual: So that each engagement gives greater rewards.
- Density of Rituals: More chances within each map.
↖ Delirium Synergy
Combining Ritual farming with Delirium is a highly efficient strategy, as both mechanics require completing maps in their entirety.
Effective Synergy:
- Choose the Right Maps: Use level 15 maps or higher for optimal rewards.
- Prepare Waystones:
- Infuse your Waystones with Delirium modifiers for increased difficulty and rewards.
- Use Distilled Emotions on your Waystones to enhance both Ritual and Delirium farming.
- Farm Both Mechanics Simultaneously:
- Complete Ritual encounters as you progress through the map.
- Collect Simulacrum Splinters from Delirium encounters to build additional currency.
- Optimize Your Playstyle:
- Focus on completing maps quickly but thoroughly.
- Prioritize picking up Omens such as Amelioration or Corruption along the way.
- Look Out for High-Value Items: Keep farming until valuable items like "Audience with the King" or Divine Orbs appear in Ritual rewards.
Pro Tip: If you're new to Delirium mechanics, consider reviewing a dedicated guide to understand its intricacies before combining it with Ritual farming.
↖ Deferring Items
When you see a precious item in a Ritual reward that you would love to claim, but do not have the required tribute points, then the best way forward is to defer it.
How Deferring Works?
- Locks the Item: Deferring guarantees the item will be available in future Rituals within the same map set.
- Reduces Cost: Every deferral decreases the item's cost by 15%.
- Consumes Tribute Points: These moves do spend tribute points, so be strategic with them.
Deferring Strategy:
- Identify Valuable Items: Look for items like Divine Orbs, Purple Omens, or other high-ticket rewards.
- Defer When Necessary: If you can't afford the item outright, defer it instead of skipping it.
- Track Your Progress: Keep an eye on how often the item reappears and its reduced cost over time.
↖ How to Get Your Deferred Items?
Once you've deferred an item, the next step is to generate enough tribute points to claim it when it reappears.
Tribute Generation Strategy:
| Component | Method | Purpose |
| Ritual Tablets | Use tablets that increase tribute generation per encounter | Boosts the total tribute earned per map |
| Waystone Modifiers | Infuse Waystones with pack size modifiers and Distilled Guilt for higher mob density | Increases overall tribute generation by adding more mobs to Ritual encounters |
| Delirium Mechanics | Continue farming Delirium alongside Rituals for additional rewards and currency generation | Ensures consistent progress even if deferred items take time to reappear |


Execution Plan:
- Prepare Maps and Modifiers: Choose maps which are easy to navigate and use pack size modifiers to enhance the mob density increase.
- Play Normally: Execute Rituals normally by trying to get as many tribute points as possible via modifiers and mob kills.
- Be Persistent: Keep grinding for a deferred item until it appears. Rare items such as Purple Omens take a long time to find, but they are very rewarding.
↖ Ritual Atlas (Part 1)
To maximize your gains from the Ritual mechanic, you need to strategically allocate your Atlas passive points.
Key Steps for Ritual Atlas Setup:
1. Tempting Offers (First Two Points)
- Reduces reroll costs by 25%.
- Allows one additional reroll per map.
- Increases your odds of finding high-value items by approximately 50%.
2. Ominous Portents (Next Two Points)
- Increases the chance of Omens appearing in rituals by 50%.
- Although purple Omens are rare, this passive is required to unlock the next critical node.
3. He Approaches (Two Points)
- Converts 40% of revived monsters into Magic and Rare variants.
- Boosts your chance of seeing Audience with the King in ritual rewards by 50%.
4. Optional Nodes: From the Mists (Last Two Points)
- Adds guaranteed extra monsters to rituals, improving tribute generation.
- Alternative: Use Spreading Darkness to ensure maps always contain a fourth ritual. However, this is situational and may not always outperform From the Mists.
Ritual Atlas Passives 1:
| Passive Node | Benefit | Priority | Notes |
|---|---|---|---|
| Tempting Offers | Cheaper rerolls and extra reroll per map | High | Essential for maximizing item chances. |
| Ominous Portents | Increased chance for Omens | Medium | Necessary for unlocking He Approaches. |
| He Approaches | Higher odds for Audience with the King | High | Key for farming big-ticket items. |
| From the Mists | Adds extra monsters to rituals | Optional | Improves tribute generation. |
| Spreading Darkness | Guarantees a fourth ritual per map | Optional | Situational alternative to From the Mists. |

↖ Ritual Atlas (Part 2)
Once you've deferred a high-value item like Audience with the King, you’ll need to focus on generating enough tribute points to claim it. This requires a slight adjustment to your Atlas passive tree.
Optimized Passives for Deferred Items:
1. Promised Devotion
- Deferred items reappear 50% sooner.
- Reduces the cost of deferring items by 50%.
2. Reinvigorated Sacrifices
- Removes the penalty applied to revived monsters during rituals.
- Vastly increases tribute generation, making it easier to claim expensive deferred items.
Ritual Atlas Passives 2:
| Passive Node | Benefit | Priority | Notes |
|---|---|---|---|
| Promised Devotion | Faster reappearance of deferred items; cheaper deferring costs | High | Essential for efficient farming. |
| Reinvigorated Sacrifices | Increases tribute generation by removing penalty on revived mobs | High | Boosts tribute points significantly. |
Although adjusting your Atlas passive tree is not compulsory, you really should do it if you wish to efficiently farm deferred items.
The Ritual system in Path of Exile 2 is hard to master but can be very rewarding if you put in a lot of thought and effort towards using it. It may seem a little pricey at first glance, but for those of sufficient currency and time it actually pays out.
Most Popular Posts
- Path of Exile 2 Witch Class Overview: Blood Mage vs Infernalist
- PoE 2 Passive Tree Guide: Classes and Builds Application
- Path of Exile 2 Mercenary Overview: Witchhunter vs Gemling Legionnaire
- PoE 2 Leech Mechanics: Types, Statistics, Example and Keypoints
- PoE 2 Sanctum Farm Guide: Trial of the Sekhemas
- Path of Exile 2 Warrior Class Overview: Titan vs Warbringer
Popular Category Lists
- Grow a Garden / (286)
- ARC Raiders / (262)
- CoD: Black Ops 7 / (166)
- Monopoly Go / (146)
- MLB 26 / (145)
- Star Citizen / (112)
- Steal a Brainrot / (89)
- Sailor Piece / (68)
- ARK Survival Ascended / (67)
- Diablo IV / (61)
- Forza Horizon 6 / (60)
- Blox Fruits / (60)
- CoD: BLACK OPS 6 / (55)
- Adopt Me / (53)
- Path of Exile 2 / (48)
- Monster Hunter Wilds / (46)
- Windrose / (44)
- Path of Exile / (40)
- Grow a Garden 2 / (40)
- Bee Swarm Simulator / (36)