0
0Pokemon Legends Z-A BEST Team: Gyarados + Excadrill + Gardevoir Full Guides
- Brrte
- Share
- Legends Z-A
- 10/22/25
- 5954
If you've queued into Legends Z-A ranked lately, you've probably felt the floor shaking. Earthquake spam is everywhere—Garchomp, Excadrill, even teams built to funnel EQ pressure with forced switches. What does this mean for you? It means flying/Levitate pivots and immediate punish on grounded stacks are king, and that's where a Gyarados + Excadrill + Gardevoir core shines. I took this exact trio through a run to Rank A Pokemons Team, recorded the bumps along the way (mistimed Megas, greedy Dig usage), and refined the game plan so you can skip the trial-and-error.
- Team at a glance: roles and synergy
- Movesets and items: tested configurations
- Game plan by phases
- Match notes: what actually swung games
- Decision trees you can copy
- Common mistakes and how to fix them
- Micro tips that add free wins
- Upgrades and flex options
- FAQ
- Conclusion
Why this team works:
- - You counter the meta's most common wincon (EQ spam) with an Intimidate flyer that also threatens the EQ users.
- - You pivot into a breaker that loves forced switches (Excadrill with SD pressure and priority ground coverage).
- - You finish with a ranged special carry (Gardevoir) that punishes kiting and snipes runners with Psyshock/moon damage, while Thunderbolt calls out the omnipresent Gyarados.
Let's break down the sets, the flow, and the exact triggers that swing games.
↖ Team at a glance: roles and synergy
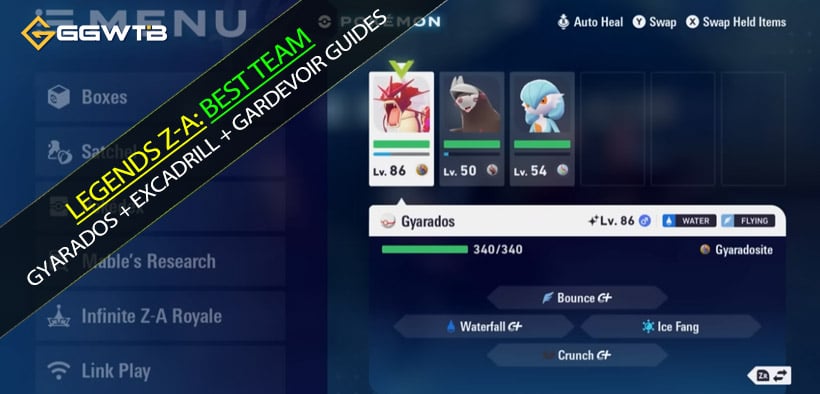
- Gyarados: Anti-EQ pivot, engage/disengage tool, Mega spike duelist.
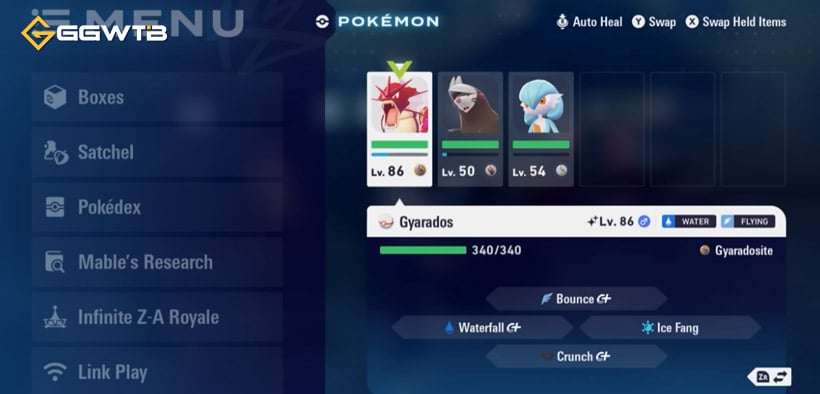
- Why it's core: Intimidate into EQ fields buys you turns; Ice Fang checks Garchomp/Dragonite/Salamence; Bounce gives i-frames for lethal dodges; Waterfall grants wide, reliable STAB with AoE chip; Crunch post-Mega helps secure vs Ghost/Psychic like Gengar.
- This means you can start fights on your terms, erase enemy sand/funnel momentum, and still have burst angles.
- Excadrill: Mid-game ground breaker and finisher.
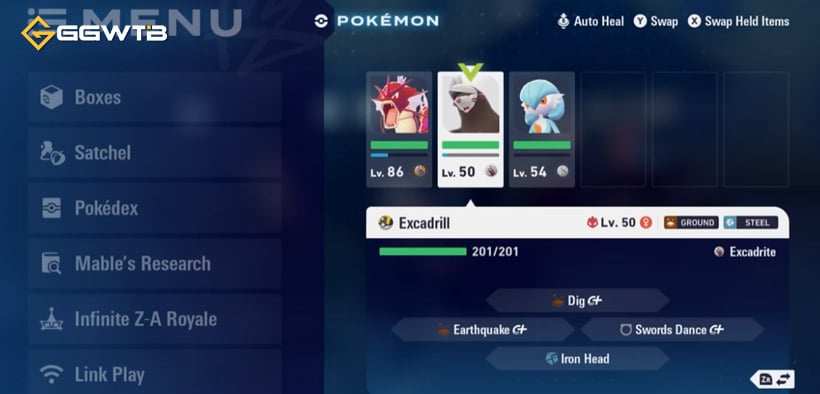
- Why it's core: Swords Dance pressure forces answers; Ground STAB (Earthquake/Drill Run/Dig variant) punishes bunched targets; Iron Head covers Fairies and flinches in clutch. You capitalize on enemies that have burned swaps or are stuck on grounded lanes.
- It's strong but its wind-up can get you carried or sniped—timing is the skill check.
- Gardevoir: Ranged control and catch-all special DPS.
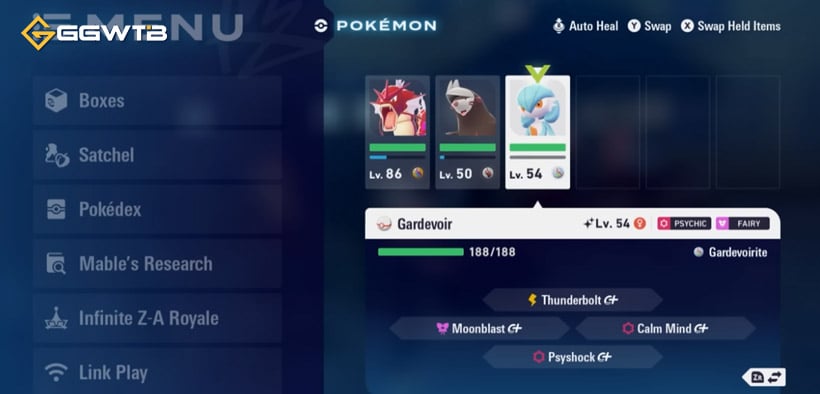
- Why it's core: Moonblast for single-target deletes, Dazzling Gleam for AoE cleanup, Psyshock to punish runners and mixed bulk, Thunderbolt to pin down the meta's common Gyarados.
- With Calm Mind, a +1 Mega Gardevoir becomes absurdly hard to trade into, especially when you manage swaps.
↖ Movesets and items: tested configurations
- Gyarados (Mega-capable)
- Waterfall / Ice Fang / Bounce / Crunch
- Rationale: Waterfall as default engage and finish; Ice Fang is the Garchomp answer; Bounce gives travel + invuln for dodging ults/bursts; Crunch secures vs Gengar/Latent Ghosts and remains good even post-Mega.
- Tip: Don't hoard Mega—use it as an i-frame or to swing a 1v1 you must win now.
- Excadrill (Mega-capable)
- Earthquake or Drill Run / Dig / Swords Dance / Iron Head
- Rationale: EQ is reliable AoE; some prefer Drill Run for safer animation. Dig can be game-winning when called correctly but will get you punished if telegraphed. Iron Head keeps Fairies honest and gives flinch outs.
- If you find yourself dying in Dig wind-up, swap to High Horsepower/Drill Run for consistency and add a Rock move if your room lacks Flying checks.
- Gardevoir (Mega-capable)
- Moonblast / Dazzling Gleam / Psyshock / Thunderbolt (Calm Mind optional over Gleam if your micro is solid)
- Rationale: Moonblast as main nuke; Psyshock snipes evasive targets regardless of kiting; Thunderbolt is your Gyarados tax; Gleam is comfort AoE—drop it for Calm Mind if you trust your spacing.
- If you hit +1 safely, you can delete on reaction; otherwise, play for picks and T-bolt punishes.
↖ Game plan by phases
Opening: Information and leverage
- Start Gyarados on long maps; force early switches with Waterfall pressure. If you see Garchomp/Excadrill/Greninja lanes, Ice Fang and Bounce become priority trades.
- If you spot a soft lane (e.g., Gengar/Emboar without proper peel), call it out by hovering, then commit: Waterfall → Ice Fang → Bounce to dodge retaliation. If you get first blood, pull back; don't eat the revenge EQ.
Mid-game: Mega windows and swaps
- Your first Mega should dodge a lethal or secure a double. Waiting for the “perfect” fight often backfires; I lost a winnable game by holding Mega through two Dig wind-ups—don't repeat that.
- Rotate to Excadrill when:
- If the enemy has blown swaps.
- If you see grounded stacks clumping (rectangle map chokepoints).
- If Gyarados is low and enemies lack immediate air checks.
- Use Swords Dance if—and only if—you're not about to get third-partied. If you notice chaos around you, skip SD and go straight EQ/Iron Head.
End-game: Control and cleanup
- Gardevoir shines with numbers advantage. If you're up, don't ego-peek—kite with Moonblast/T-bolt, punish swaps, save Mega as an escape or snipe tool.
- If behind, look for Calm Mind during enemy cooldown deserts; pick off weakened divers who burned dashes on your teammates.
↖ Match notes: what actually swung games
- Overholding Mega lost a lead: Twice, waiting for the perfect Dig + Mega desync let Delphox/Gengar snipe me. If you're mid-commit and see a burst telegraph, Mega immediately.
- Gyarados carried on small maps: Ice Fang + Bounce chained picks and dodged crucial CC. Waterfall through tight corridors netted back-to-back KOs.
- EQ steamrolls if unchecked: A Mega Garchomp one-shotting through spawns forced us to respect spacing. When that happens, you must play edges and punish on his landing recovery with Moonblast or Waterfall flank.
↖ Decision trees you can copy
- If you see double ground stack (Chomp + Drill):
- Lead Gyarados → Intimidate in → Waterfall chip → Ice Fang threat.
- If they commit EQ: Bounce over the wave; land for pick or force double swap.
- Then rotate Drill to punish grounded clump with EQ; hold SD unless you see clear space.
- If Delphox/Gengar snipers appear:
- Gyarados: Crunch becomes higher priority; Bounce to juke Shadow Ball/Flame lines.
- Gardevoir: Pre-position for Psyshock snipe—don't chase through the middle; use corners.
- If you're getting farmed mid-map:
- Play the outside lanes. Let EQ duels happen center; third-party with Gyarados from angles. If one-shot threat exists, keep Mega ready to i-frame the engage.
↖ Common mistakes and how to fix them
- Mistake: Dig without lane control. Fix: Only Dig when target is locked in animation or after you've baited a swap/cooldown.
- Mistake: Saving Mega “for later.” Fix: Treat Mega like a parry—use it to dodge lethal or confirm a crucial KO.
- Mistake: Gardevoir overextending for snipes. Fix: Snipe with Psyshock/Thunderbolt from range, then reposition; Gleam only when safe.
- Mistake: Fighting EQ in the middle. Fix: Take corners and chokepoints where you can Bounce/EQ from safety and retreat quickly.
↖ Micro tips that add free wins
- Waterfall buffering: Start Waterfall from fog angles; even if they swap, the AoE chips the next target.
- Bounce timing: Don't always land instantly—hang long enough to dodge a telegraphed burst, then land where you get the pick.
- SD etiquette: One SD per clean window is often enough; the second SD is greed unless your team controls vision and aggro.
- Calm Mind windows: After a big EQ trade, many enemies are on cooldown—this is your free +1.
↖ Upgrades and flex options
- Excadrill move swap: If Dig is getting you killed, try Drill Run/High Horsepower; add Rock Slide/Stone Edge if your lobby is air-heavy.
- Gardevoir tech: Calm Mind over Gleam if you can consistently create time; otherwise keep Gleam for safer clears.
- The Garchomp consideration: Given how oppressive Mega Chomp felt in mirror, testing a Chomp-over-Drill variant is valid. If you lack comfort on Drill timing, Chomp's bulk + EQ threat is a simpler, high-floor pivot.
↖ FAQ
Q1: Triple Mega—how do I manage it without griefing?
- Use Mega as a defensive/offensive cancel, not a greed buff. First Mega usually on Gyarados to secure tempo or dodge lethal; second on Gardevoir to convert a +1 fight; Drill only Megas when you've already committed and need the stat swing.
Q2: Is Dig actually good on Excadrill?
- It is—when you pick the timing. If you find yourself getting popped during wind-up, it's not the move, it's the window. Swap to Drill Run for consistency while you learn Dig reads.
Q3: How do I beat enemy EQ spam if they're ahead?
- Stop contesting middle. Play sidelines, force them to spend mobility to reach you, then punish with Bounce landings or Moonblast/T-bolt. Intimidate them first, and stagger swaps to deny clean multi-hits.
Q4: Gyarados mirror feels everywhere—who wins?
- The one who manages Mega as an i-frame and brings Thunderbolt on Gardevoir. If you hold Mega too long, you lose the mirror; if you skip T-bolt, you lose the punish.
Q5: When do I Calm Mind on Gardevoir?
- After big enemy cooldowns (EQ, Shadow Ball, Delphox burst) and when your frontline has line-of-sight. If you can't see two enemy avatars, don't CM—poke instead.
Q6: I keep dying with SD unused—should I drop it?
- Not necessarily. Practice threaten SD: hover, see if they panic swap, then hit raw EQ/Iron Head. Keep SD for moments you've already created space.
↖ Conclusion
You're piloting a core that naturally counterpicks the EQ-first meta while still threatening grounded teams with your own ground pressure. Start with Gyarados to soak and punish, switch to Excadrill to cash in clumps, and close with Gardevoir's ranged control. If you remember two rules, you'll win more games this week: don't hoard Mega, and don't Dig without a window. Add Thunderbolt discipline, Ice Fang respect for dragons, and edge-lane positioning—and that road to Rank A becomes a whole lot shorter.
Most Popular Posts
- Pokemon Legends Z-A Money and EXP Farming Guide: Early, Mid, and Post-Game ZA Royale Routes
- Pokemon Legends Z-A Fast Method to Hunt 6 Shiny Alphas Wild Zone 20 Full Guide
- Pokemon Legends Z-A BEST Team: Gyarados + Excadrill + Gardevoir Full Guides
- How to Shiny Hunt Eevee in Pokemon Legends Z-A: Fast Respawn Route and AFK Bench Method
- Pokemon Legends Z-A Easy & Fast EXP Farm: Level Up Fast and Max Mega Shards
- Fast Farm Mega Shards in Pokemon Legends Z-A: Per-Loop Route, Best Mons, and Respawn Timers
Popular Category Lists
- Grow a Garden / (286)
- ARC Raiders / (264)
- CoD: Black Ops 7 / (166)
- Monopoly Go / (146)
- MLB 26 / (145)
- Star Citizen / (114)
- Steal a Brainrot / (89)
- ARK Survival Ascended / (72)
- Sailor Piece / (68)
- Forza Horizon 6 / (62)
- Diablo IV / (61)
- Blox Fruits / (60)
- CoD: BLACK OPS 6 / (55)
- Adopt Me / (53)
- Path of Exile 2 / (48)
- Monster Hunter Wilds / (46)
- Windrose / (44)
- Grow a Garden 2 / (41)
- Path of Exile / (40)
- Bee Swarm Simulator / (36)