0
0Pokemon Legends Z-A Fast Method to Hunt 6 Shiny Alphas Wild Zone 20 Full Guide
- Lime
- Share
- Legends Z-A
- 11/04/25
- 6384
You can stack six alpha Pokemon in the central area of Wild Zone 20, then loop them for rapid shiny checks. You'll move the original alphas off their spawn links, force the game to refill empty slots, and anchor the state with hard saves and reboots. Below is a clean, field-tested walkthrough with the why behind each step—so you not only copy the route, you understand what keeps it stable.
- Context & Core Idea
- Step-by-Step Setup (From 2 Alphas → 6 Alphas)
- Why This Works (Spawn Logic, Seeds, and Persistence)
- Looping Methods for Shiny Resets
- Pro Tips, Edge Cases, and Recovery
- Practical Odds & Expectations
- Mini Checklist (Do-then-Check)
- FAQ
- Summary
↖ Context & Core Idea
You're exploiting how Legends Z-A manages overworld alpha spawn slots and proximity linking. Normally, two alphas draw from a pool of about 67 species in this central area. By decoupling an alpha from its origin point and nudging the game through a controlled reload, you trigger refill logic repeatedly until six unique alpha slots are present. Once locked, every despawn-respawn cycle re-rolls all six—dramatically increasing shiny odds per cycle.
↖ Step-by-Step Setup (From 2 Alphas → 6 Alphas)
The goal is to move and relink alphas safely while creating a consistent reset anchor.
1) Prime the cycle
- Do this: Sit on a bench in Wild Zone 20 and change time (any time is fine).
- Why: You lock a fresh time slice so mid-setup drift doesn't reset behavior or spawns.
2) Prepare the path
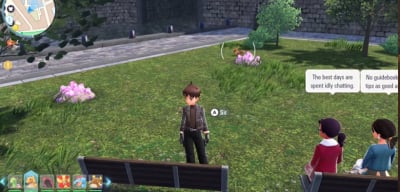
- Clear incidental spawns on the approach from Centrico Pokemon Center to central area.
- Why: Clean lanes prevent aggro distractions or pathing breaks when towing alphas.
3) Move one alpha off its spawn link
- Pull one alpha at a time. Lure it along the path toward the Wild Zone entrance.
- Target: Get it past the first bridge. Wait for the red eye (aggro) to disappear.
- If the red eye won't drop before the gate, step out of the zone once to clear it.
- Then: Hard save immediately after aggro clears.
Because: Past the bridge + de-aggro reduces the game's “link” between the alpha and its central spawn slot, letting the system consider that slot vacant on the next reload.
4) First reboot to shift position
- Close the game fully. Reboot. Load in.
- You should find the moved alpha now sitting partway up the path, closer to the entrance.
5) Establish the reset anchor
- If you're inside the zone, leave to Centrico.
- Walk just past the Pokemon Center—toward the door on the left and the panor on the right.
- Stand at that door area (your “anchor point”). Hard save. Reboot again.
Why: This anchor consolidates a stable re-entry state so repeated reloads don't drag alphas back to core spawns.
6) Reintroduce and stack a new alpha
- Re-enter Wild Zone 20. The moved alpha remains near the entrance.
- Return to central area: the game repopulates the two default alphas under the prism tower.
- Now slowly lead the moved alpha back close to the tower (beside the first pillar works well).
- When aggro drops, hard save → reboot → fast travel to the Pokemon Center → walk back.
- You should now see three alphas in the central area.
Because: You occupied the original moved alpha slot elsewhere, prompting the system to refill, then you re-parked the moved alpha near central, effectively stacking an extra alpha without collapsing the fill logic.
7) Repeat to reach six
- Repeat Steps 3–6 for each new alpha until you have six standing in the central area.
- Success criteria:
- Six alphas are consistently present after fast traveling to the Center and walking back.
- Leaving and re-entering the zone preserves the six-slot stack.
↖ Why This Works (Spawn Logic, Seeds, and Persistence)
- Spawn linking: Alphas are linked to their origin points. Move one far enough and break active aggro; on reload, the game treats that link as unfilled until it refills the slot.
- Refill cascade: Each time you displace and lock an alpha, the system refills what it thinks is missing—letting you ratchet up the count.
- Overworld shiny seeds: A shiny alpha that appears in this configuration remains consistent across reloads until you catch or defeat it. So you can sanity-check, reboot, and come back without losing it.
So what: You're compressing six independent rolls into one screen check—massively increasing shiny throughput.
↖ Looping Methods for Shiny Resets
Two practical ways to reroll all six alphas once the stack is stable.
A) Fast Travel Loop (Reliable, Hands-on)
- Trigger all six by entering the central area.
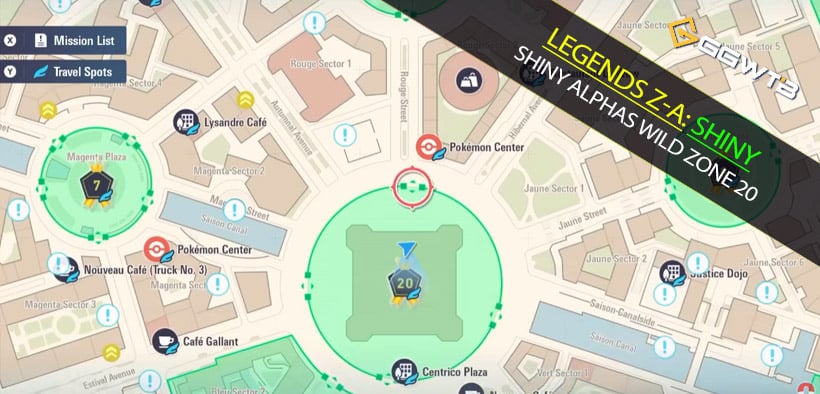
- Fast travel back to the Centrico Pokemon Center.
- Walk back to central; repeat.
- Pros: Resets all six every cycle. Works regardless of which species are present.
- Cons: Manual; more stick time if you're not automating.
B) Bench Method (Half-sweep with automation potential)
- Use the bench near the northern junkyard.
- Change time day→night or night→day to forcibly despawn/respawn the three nearest alphas.
- The other three under the prism tower won't flip from the bench alone.
- Workaround cycle:
1) Bench time-swap to flip the near trio;
2) Walk to central to load the far trio;
3) Return to bench and time-swap again.
- Pros: Pairs well with turbo/macro controllers for semi-automation.
- Cons: Two-phase cycle to hit all six; slightly slower per full reroll.
In overnight automated tests with a macro controller, I've seen multi-shiny outcomes (e.g., one shiny Garchomp, two shiny Delibird, one shiny Simisage in ~6 hours). Your mileage varies with RNG, but six-roll density pays off.
↖ Pro Tips, Edge Cases, and Recovery
- Prefer chasers: Alphas that close the gap are easier to tow. Long-range attackers tend to stall. If one won't move, fast travel away and return to respawn a more cooperative alpha.
- Save discipline: Hard save after every de-aggro and at the anchor point before reboots. This is your safety net against pathing glitches or fainting.
- If an alpha runs home mid-tow: Re-aggro to pull it again, or reboot from your last hard save to retry the step.
- If you faint: Don't sweat it. Reboot and continue from the latest hard save.
- Spacing matters: When re-parking near the tower, avoid crowding other alphas. It reduces accidental aggro while saving.
- Verification check: After each successful stack, a fast travel to Center → walk to central should consistently show one more alpha than before.
↖ Practical Odds & Expectations
- Pool breadth: The central area draws from ~67 alpha species. Cycling six at once accelerates species coverage and shiny attempts.
- Throughput: A clean fast-travel loop can feel like “six checks per ~30–60 seconds” depending on load time and your route discipline; bench half-cycles roughly halve immediate flips unless you do the dual-phase dance.
- Persistence: A shiny alpha that appears is safe across reloads until you catch or KO it, enabling stress-free prep (balls, team slots, clips).
↖ Mini Checklist (Do-then-Check)
1) Bench time change to lock a fresh cycle.
2) Clear path from Center → central.
3) Tow one alpha past the first bridge; wait for red eye to vanish; hard save.
4) Reboot; leave to Centrico; stand at door anchor; hard save; reboot.
5) Return; central repopulates two alphas; tow parked alpha back near tower; de-aggro; hard save; reboot; fast travel Center; verify +1 alpha.
6) Repeat until central shows six alphas after each Center → central loop.
↖ FAQ
Q1: My alpha won't follow; it just lobs attacks from afar. What now?
- Swap it out. Fast travel away and return to roll a new alpha. Chasers are vastly more manageable for the tow.
Q2: The red eye never drops before the entrance. Am I stuck?
- Step outside the zone briefly to clear aggro, then save outside. You can still proceed with the displacement.
Q3: After reboot, the alpha snapped back to central. Did I lose the stack?
- That means the de-aggro save or anchor save wasn't clean. Redo the tow: ensure de-aggro past the bridge, then hard save, then reboot, then anchor save + reboot.
Q4: Can I automate the bench method?
- Yes. A turbo/macro controller can toggle day/night on a loop with a short walk segment to touch central spawns between toggles. Test timings to avoid desync.
Q5: If I catch or KO an alpha, will I break the six-stack?
- Yes. The configuration is permanent until you remove one. If you do, you'll need to repeat the stacking process to restore six.
Q6: Is it okay to leave the Wild Zone or fast travel around during hunts?
- Yes. The six-stack persists across zone transitions as long as you don't catch/KO them.
↖ Summary
You're leveraging spawn-link decoupling and controlled reloads to expand the central area from two to six alphas, then running tight loops to flip six shiny rolls per cycle. Tow one alpha at a time past the bridge, save after de-aggro, establish the door-side anchor, reboot twice to force refills, and re-park near the tower. Verify each increment with a Center → central walk. Once it's six, pick your loop—fast travel for full sweeps or the bench's dual-phase reset if you're automating—and let the RNG flow.
Most Popular Posts
- Pokemon Legends Z-A Money and EXP Farming Guide: Early, Mid, and Post-Game ZA Royale Routes
- Pokemon Legends Z-A Fast Method to Hunt 6 Shiny Alphas Wild Zone 20 Full Guide
- Pokemon Legends Z-A BEST Team: Gyarados + Excadrill + Gardevoir Full Guides
- How to Shiny Hunt Eevee in Pokemon Legends Z-A: Fast Respawn Route and AFK Bench Method
- Pokemon Legends Z-A Easy & Fast EXP Farm: Level Up Fast and Max Mega Shards
- Fast Farm Mega Shards in Pokemon Legends Z-A: Per-Loop Route, Best Mons, and Respawn Timers
Popular Category Lists
- Grow a Garden / (286)
- ARC Raiders / (277)
- CoD: Black Ops 7 / (166)
- MLB 26 / (149)
- Monopoly Go / (148)
- Star Citizen / (127)
- Steal a Brainrot / (90)
- ARK Survival Ascended / (84)
- Sailor Piece / (68)
- Forza Horizon 6 / (66)
- Diablo IV / (62)
- Blox Fruits / (61)
- Adopt Me / (56)
- CoD: BLACK OPS 6 / (55)
- Grow a Garden 2 / (53)
- Path of Exile 2 / (48)
- Monster Hunter Wilds / (46)
- Windrose / (44)
- Path of Exile / (40)
- Bee Swarm Simulator / (37)