


 0
0ARC Raiders Best Blueprint Route: Easy Spaceport Cold Snap Farming Guide
- KIVRI
- Share
- ARC Raiders
- 03/19/26
- 519
If your goal is to farm blueprints consistently in ARC Raiders, this Spaceport Cold Snap route is one of the best loops to run. It works because the path links several strong loot zones in one clean rotation, giving us solid blueprint odds, good cash value, and enough flexibility to recover even if one building has already been looted. After repeated runs, this route has proven reliable for pulling out 5–6 blueprints, plus keycards and six-figure loot value in a good raid.
- Why This Blueprint Route Works
- Recommended Loadout Before We Enter
- Utility We Recommend
- What to Prioritize
- Route Breakdown: Best Farming Path
- Start with the Tower Near Maintenance Hangar
- Why It's Worth Checking
- Quick Rule
- Departure Building: One of the Best Blueprint Spots
- First Stop: The Back Breach Room
- Do Not Skip Suitcases
- Best Clear Order
- Rooftop Check: Small Bonus, Low Time Cost
- What We Look For
- Arrival Building: The Second Core Blueprint Zone
- Why Arrival Is Strong
- Priority Inside
- South and North Trench Towers: Great Late-Run Value
- Why These Towers Matter
- Why Utility Matters Here
- Practical Rule
- Hidden Case Near Extraction
- Why It's Worth Checking
- Inventory Management: How We Keep the Run Efficient
- Main Rule
- Simple Loot Priority
- Why Cold Snap Is So Good for Blueprint Farming
- FAQ
- Is Spaceport during Cold Snap really one of the best blueprint farming routes?
- Do we need keys for the trench towers?
- Should we loot every suitcase?
- What if Departure or Arrival is already looted?
- How many stims should we bring?
- Is this route only good for blueprints?
- Final Takeaway
↖ Why This Blueprint Route Works
This route is strong because it does not depend on one lucky room.
Instead, we chain together multiple high-value locations:
- Opening Tower near Maintenance Hangar
- Departure Building
- Arrival Building
- South/North Trench Towers
- Hidden case near extraction
That matters because even if one stop is contested or partially cleared, the raid can still be profitable.
| Metric | Typical Result |
|---|---|
| Blueprints extracted | 5–6 |
| High-value keycards | 1–2 |
| Loot value before loadout | 100k+ |
| Weapon crates checked | 4–7 |
| Security breach chances | Multiple per run |
The pattern here is simple: this is not only a blueprint route. It is also a reliable money-making route if we manage our bag properly.
↖ Recommended Loadout Before We Enter
To run this route well, we want mobility and access, not unnecessary weight.
↖ Utility We Recommend
Bring:
- 1 Snap Hook
- 2–3 Ziplines
- 10–15 Stims
- A relatively light base kit
Why this setup?
- Snap Hook helps with fast vertical movement and awkward entry angles.
- Ziplines make tower access much easier.
- Stims help turn a far spawn into a still-playable run.
If you spawn far away, stims often make the difference between arriving too late and still contesting the right building.
↖ What to Prioritize
When inventory space starts getting tight, use this order:
1. Blueprints
2. Keycards
3. High-value compact loot
4. Attachments
5. Only the best weapons
If you pick up too many average weapons early, the route slows down fast. That is where a good raid starts turning into a clumsy one.
↖ Route Breakdown: Best Farming Path
Let's go through the route in order.
↖ Start with the Tower Near Maintenance Hangar
If we spawn near Maintenance Hangar, the nearby tower is a strong first stop.
↖ Why It's Worth Checking
This tower can spawn:
- Security Breach
- Weapon Crate
- Extra side loot
An early breach or weapon crate gives the run immediate value. If neither appears, we move on quickly and keep the route flowing.
↖ Quick Rule
- If the tower is untouched: loot it fully.
- If the doors are already open: do a quick check and rotate out.
- If you get heavy early: stop taking average guns.
This tower is a bonus opener, not a place to waste time.
↖ Departure Building: One of the Best Blueprint Spots
Departure Building is one of the most reliable blueprint locations on this route.
↖ First Stop: The Back Breach Room
We like to start with the back room because it often gives us:
- Several red containers
- A possible security breach
- A weapon crate at the back
This room is efficient because the loot is tightly grouped. Less walking, more opening.
↖ Do Not Skip Suitcases
This is one of the easiest mistakes to fix.
In our testing, suitcases are better for blueprints than many players think, especially on routes like this where every extra roll matters. If you are farming blueprints seriously, suitcases should be part of the route.
↖ Best Clear Order
1. Breach room first
2. Lower floor
3. Upper floor
4. Side rooms
5. Weapon crate
6. Roof check if safe
| Loot Source | Blueprint Potential | Why It Matters |
|---|---|---|
| Red containers | High | Fast, consistent value |
| Lockers | Medium-High | Often ignored |
| Suitcases | Medium | Better than expected |
| Weapon crate | Medium-High | Buffed and worth checking |
| Security breach | High | Great burst loot |
Departure rewards a full clear. If you rush it, you usually leave value behind.
↖ Rooftop Check: Small Bonus, Low Time Cost
After clearing Departure, a quick roof check can be worth it if the area is quiet.
↖ What We Look For
Possible backpack spawns on the roof.
They do not show up every raid, but they are worth checking when nearby because the time cost is low. If you hear fighting or footsteps, skip the roof and rotate.
↖ Arrival Building: The Second Core Blueprint Zone
Arrival Building is the next major stop and often just as productive as Departure.
↖ Why Arrival Is Strong
This building gives us:
- Dense container clusters
- Extra weapon crate chances
- Good side rooms
- A strong way to recover value if the first building was weak
A breached room does not always mean everything is gone. Many players loot one section and leave.
↖ Priority Inside
- Upper floor first
- Container clusters
- Side rooms
- Weapon crate
- Lower floor cleanup
- Roof if safe
If you find open crates, empty med bags, and a lot of opened containers, then the building is probably compromised. At that point, rotate fast.
↖ South and North Trench Towers: Great Late-Run Value
These towers are excellent because many players skip them or reach them late.
↖ Why These Towers Matter
They can still contain:
- Red containers
- Lower-level value
- Strong late-run loot
And just as importantly, they are not always key-dependent in practice.
↖ Why Utility Matters Here
With Snap Hook and Zipline, we can access these towers much more efficiently.
That means:
- Less wasted time
- Better entry options
- More value even late in the raid
↖ Practical Rule
- If you hear someone looting below: take free loot and leave.
- If upper sections are open but lower areas sound active: do not overcommit.
- If the rear weapon crate is already looted: assume the area is compromised.
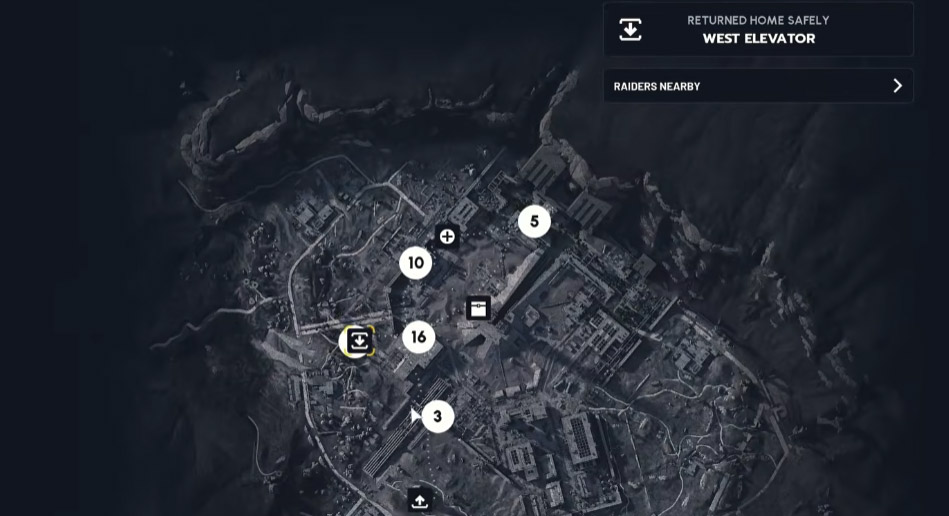
↖ Hidden Case Near Extraction
On the way out, check the hidden case under the Launch Towers.
This spot can spawn:
- Weapon crate
- Grenade case
↖ Why It's Worth Checking
It is quick, close to the exit path, and can still give a final blueprint or compact high-value item.
This is the kind of detail that improves the average value of the route over time.
↖ Inventory Management: How We Keep the Run Efficient
A strong loot route falls apart fast if we handle weight poorly.
↖ Main Rule
Do not carry too many weapons too early.
Once you are heavily encumbered:
- Rotations get slower
- Escapes get worse
- You miss containers
- The route stops feeling smooth
↖ Simple Loot Priority
| Keep First | Drop First |
|---|---|
| Blueprints | Low-value ammo stacks |
| Keycards | Redundant low-tier meds |
| High-value compact items | Weak duplicate guns |
| Strong attachments | Bulky low-profit loot |
| Top-tier weapons only | Situational junk |
If you are slow inside a building, that is manageable.
If you are slow between buildings, that is a problem.
↖ Why Cold Snap Is So Good for Blueprint Farming
After running this event repeatedly, one thing stands out: Cold Snap feels unusually consistent for blueprints on Spaceport.
Why?
- Loot-heavy buildings are easy to chain
- Premium containers feel more rewarding
- The route naturally supports fast building-to-building movement
That makes blueprint farming feel less random and more repeatable.
↖ FAQ
↖ Is Spaceport during Cold Snap really one of the best blueprint farming routes?
Yes. For many players, it is one of the most reliable setups because it combines strong buildings, smooth rotations, and multiple blueprint-capable container types.
↖ Do we need keys for the trench towers?
Not always. If you bring Snap Hook and Zipline, you can often access the important upper sections without relying fully on keys.
↖ Should we loot every suitcase?
Usually yes. Suitcases are easy to ignore, but they are better than they look for blueprint farming, especially on dense indoor routes.
↖ What if Departure or Arrival is already looted?
Rotate quickly. If Departure is gone, move to Arrival. If both are heavily looted, shift focus to the trench towers and the hidden extraction-side case.
↖ How many stims should we bring?
10–15 stims is a very solid range for this route, especially if you want to recover from poor spawns and reach the main buildings faster.
↖ Is this route only good for blueprints?
No. It is also a strong loot-value route. If you manage your weight well, it is completely realistic to extract with blueprints, keycards, and 100k+ loot value in the same run.
↖ Final Takeaway
This Spaceport Cold Snap route works because it is stable, efficient, and easy to repeat. We start with the opening tower, clear Departure and Arrival for the highest blueprint density, use Snap Hook and Zipline to get extra value from the trench towers, and finish with the hidden case near extraction. The result is simple: more blueprint chances, strong loot value, and fewer wasted raids even when part of the map has already been hit.

Most Popular Posts
- ARC Raiders Riven Tides Key Room Guide: Best Hotel Keys, Loot Routes, Secure & Crane Storage
- ARC Raiders Damage Fireflies Trial Guide: Best Farm Method on Buried City Night Raid
- ARC Raiders Riven Tides Update: New Map & Items, ARC Turbine, Rewards, and Best Early Strategy
- ARC Raiders Bettina Guide: Best Build, Buffs, and How to Use It Against ARC
- Arc Raiders Season 4 Riven Tides Update, Rewards, Safe Skins, and Release Timeline
- ARC Raiders Solo Search Supply Drops Guide: Best Buried City Route, Beacon Locations
Popular Category Lists
- Grow a Garden / (286)
- ARC Raiders / (262)
- CoD: Black Ops 7 / (166)
- Monopoly Go / (146)
- MLB 26 / (145)
- Star Citizen / (112)
- Steal a Brainrot / (89)
- Sailor Piece / (68)
- ARK Survival Ascended / (67)
- Diablo IV / (61)
- Forza Horizon 6 / (60)
- Blox Fruits / (60)
- CoD: BLACK OPS 6 / (55)
- Adopt Me / (53)
- Path of Exile 2 / (48)
- Monster Hunter Wilds / (46)
- Windrose / (44)
- Path of Exile / (40)
- Grow a Garden 2 / (40)
- Bee Swarm Simulator / (36)


