0
0 Created: Dec 6,2025 | ARC Raiders
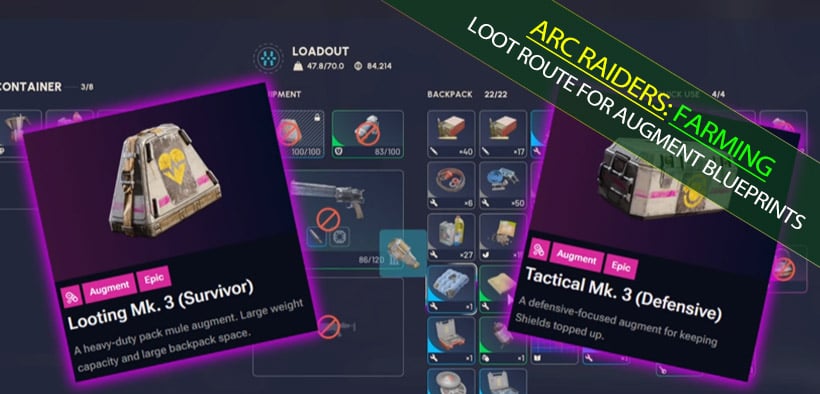
Arc Raiders BEST Farming Loot Route For Augment MK3 Survivor Blueprints

If you've been grinding Arc Raiders, you know exactly what that feeling is like—especially when it comes to the most sought-after items in the entire game: the MK3 Survivor or the MK3 Defensive Augment Blueprints.
Many players think blueprint drops are pure RNG (random number generation), a total roll of the dice. But as someone who has run this specific route over 40 times, I can tell you with confidence: It is indisputably not completely random.
I'm going to show you the absolute best place to farm them, and I'm going to teach you a strategy that is optimal, completely risk-free, and frankly, a little bit crazy. Ready? Let's break the game.
The Core Strategy: Never Extract
This might sound weird at first, but you need to shift your mindset. With this strategy, you are never trying to extract. Literally, never, ever.
To get the MK3 Survivor, your goal is to loot the target room as many times as possible in the shortest amount of time.
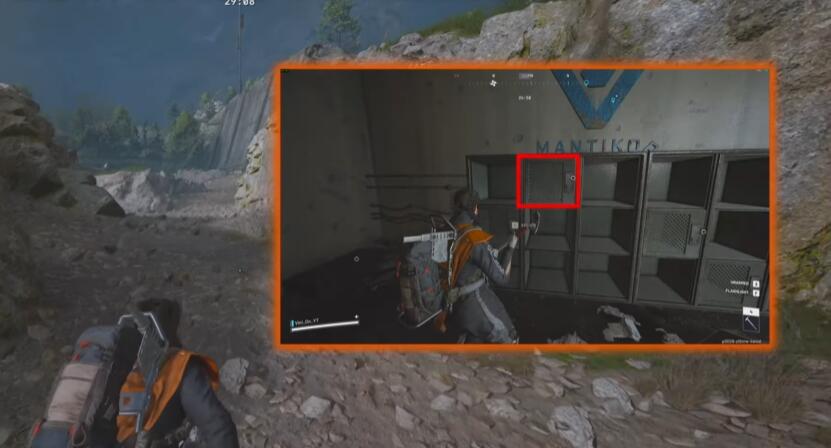
Every raid should look like this:
1. Sprint directly to the breach door.
2. Loot the room by the 26-minute mark.
3. Throw any blueprints immediately into your Safe Pocket.
4. Surrender immediately and repeat.
Why Go Naked?
To maximize efficiency, you should go in completely naked. No shield, no guns, no augment. At most, bring a single Stim for stamina.
This offers two massive advantages:
Instant Resets: If you get a bad spawn or someone beats you there, you can surrender instantly with zero cost.
The Golden Spot: Reinforced Reception
The location we are targeting is the Breachable Room underneath Reinforced Reception.
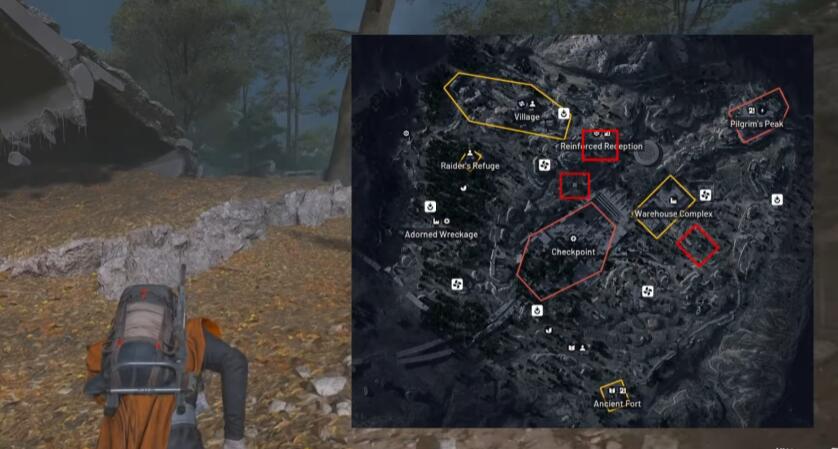
Getting There
There are four main ways to get underground depending on your spawn, three of which involve ziplines. Your goal is to enter through the bottom-middle section of the map.
Critical Timing
The 27-Minute Mark: You need to arrive at the breach door before the timer hits 27 minutes. If you are later than that, you likely aren't the first one there.
Loot Priority
As soon as you breach the room, hit the containers on the wall first. In my experience, these specific containers have the highest drop rate for blueprints.
The Proof: 10-Run Test Analysis
I didn't just want to tell you this works; I wanted to prove it. I performed a 10-run test using this exact method.
Here is the breakdown:
- Total Time: Approximately 1 hour and 15 minutes (including failed attempts and late spawns).
- 4 Glow Stick Blueprints.
- 1 MK3 Survivor Augment Blueprint (The Holy Grail).
Is the Loot Random?
This is the key takeaway. In this specific room, I have never looted a blueprint that wasn't a Glow Stick or an Augment.
What does this mean?
It means the loot table for this room is specific. Just like the Assembly Workshop on Stella Montus or the old Bobcat event, this spot is designed to drop these specific items. You won't find trash blueprints here—it's either the Glow Stick or the high-tier Augment you are looking for.
Frequently Asked Questions (FAQ)
Q: What if I get there and someone is already looting?
A: If you brought a melee weapon (like a pickaxe), you can try to catch them off guard while they loot. I've taken people down this way. However, since you have zero risk, if you aren't confident, just surrender and start the next run. It's faster.
Q: Why not bring a cheap gun just in case?
A: You can, but it slows you down mentally and adds prep time in the menu. Remember, we are aiming for 10+ runs per hour. Anything that slows your cycle is bad. Plus, once that blueprint is in your safe pocket, it doesn't matter if you die.
Q: Doesn't surrendering ruin my stats or economy?
A: Who cares about stats when you have the MK3 Survivor? As for economy, since you are bringing in nothing, you are losing nothing. It is pure profit.
Final Verdict
I know there will be people in the comments saying, My wife's boyfriend knows a guy at Embark and he says it's all RNG.
You can believe that if you want, but the data speaks for itself. I have run this room roughly 50 times now. I have secured duplicate Defensive blueprints and finally the Survivor blueprint. The method works because it leverages speed and volume over survival.

Most Popular Posts
- ARC Raiders Update 1.42: Phantom Targets Farming Guide (Glitched Wasps, Rewards, Regional Conditions)
- ARC Raiders Hullcracker Blueprints: Fastest Way to Complete The Major's Footlocker
- ARC Raiders Best Pop Trigger Strategy: Fast Phantom Targets Damage Guide
- ARC Raiders Subway Skin Guide: Unlock the Subterranean Outfit
- ARC Raiders Spaceport Open Containers Guide: 19K+ Solo Trial Route
- ARC Raiders Looting Mk. 3 Survivor Blueprint Guide: Best Blue Gate Route and Drop Locations
Popular Category Lists
- ARC Raiders / (343)
- Grow a Garden / (292)
- CoD: Black Ops 7 / (167)
- Star Citizen / (160)
- MLB 26 / (159)
- Monopoly Go / (152)
- ARK Survival Ascended / (126)
- Steal a Brainrot / (98)
- Blox Fruits / (74)
- Adopt Me / (73)
- Forza Horizon 6 / (72)
- Sailor Piece / (68)
- Grow a Garden 2 / (68)
- Diablo IV / (62)
- CoD: BLACK OPS 6 / (55)
- Path of Exile 2 / (48)
- Monster Hunter Wilds / (46)
- Aion 2 / (45)
- Windrose / (44)
- Donut SMP / (41)