


 0
0ARC Raiders Best PvE Items & Coins Route after Riven Tides Update Guides
- KIVR
- Share
- ARC Raiders
- 04/30/26
- 404
Riven Tides can feel rough the first few times you load in. It is currently one of the hardest maps in ARC Raiders, with heavy ARC patrols, awkward sightlines, and plenty of places where one bad fight turns into a full disaster.
After running this route repeatedly as a solo player, the safest pattern I've found is simple: start with low-risk Items, rotate through Customs House underground, hit Stacking Yard for the big value, then extract before greed ruins the run.
- Quick Route Overview
- Recommended Loadout
- Step 1: Start at Tennis Court
- Step 2: Go Under Customs House
- Why We Skip the Hotel
- Step 3: Loot Through Weighing Checkpoint
- Step 4: Hit Stacking Yard
- Step 5: Optional Crane and Ship Area
- What to Keep and What to Drop
- ARC Threat Tips
- Extraction Plan
- Example Loot From a Strong Run
- FAQ
- Is Riven Tides good for solo players?
- What is the best place to start this route?
- Do I need a Hatch Key?
- Should I fight the Turbine?
- What should I prioritize when my bag is full?
- Can this route really make 130K coins?
- Summary
This guide keeps the route practical. We are not trying to clear the whole map. We are trying to leave alive with blueprints, weapons, crafting materials, and a bag that can realistically hit 100K+ coins on a good run.
↖ Quick Route Overview
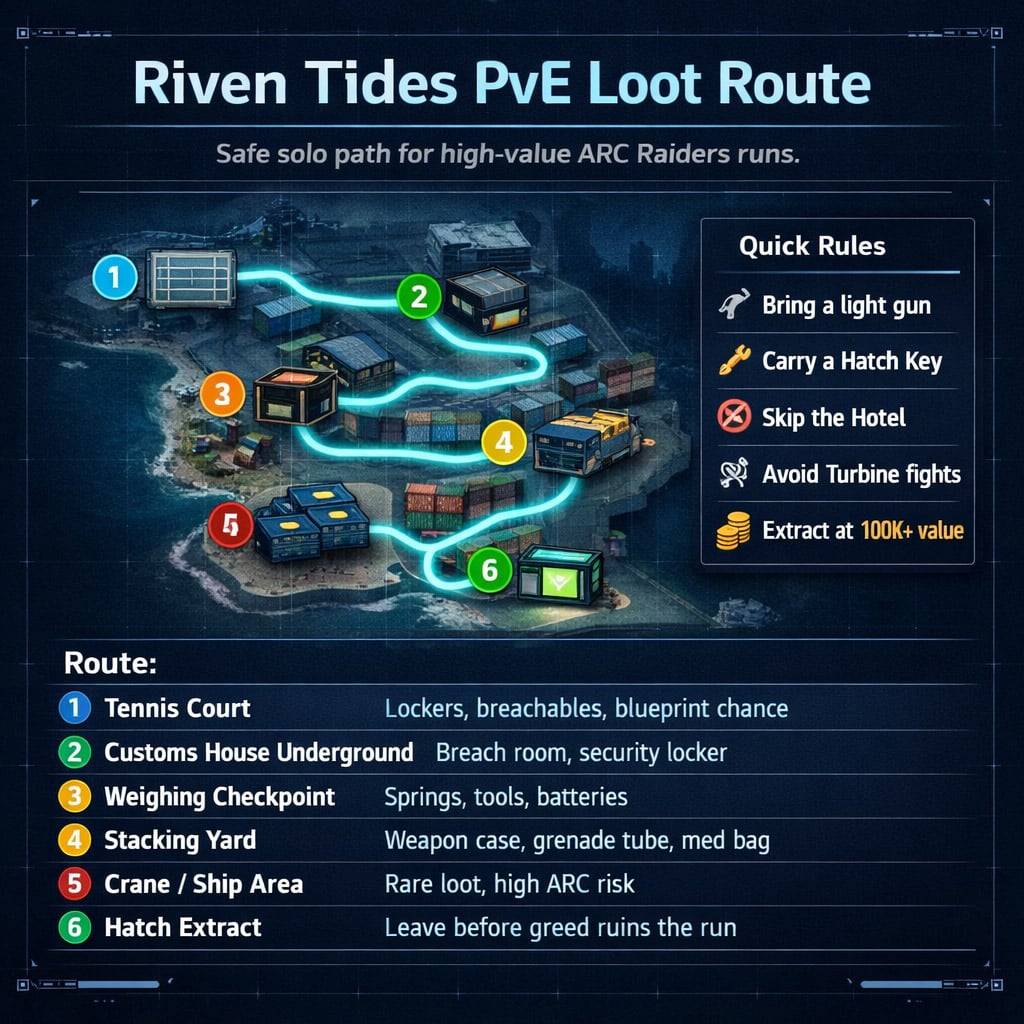
This route works because it avoids the most chaotic PvP-heavy areas while still touching several strong Items zones.
| Step | Location | Main Items | Risk |
|---|---|---|---|
| 1 | Tennis Court | Lockers, trash cans, breachable containers, blueprint chance | Low |
| 2 | Customs House Underground | Breach room, security locker, weapon parts | Low-Medium |
| 3 | Weighing Checkpoint | Side containers, batteries, springs, tools | Medium |
| 4 | Stacking Yard | Weapon case, grenade tube, med bag, dense containers | Medium-High |
| 5 | Crane / Ship Area | Security locker, breachables, weapons, rare materials | High |
| 6 | Hatch or Nearby Extract | Safe exit route | Depends on timer |
The route is strongest when you keep moving. If you stop to Items every single weak item, you will end up overweight before the best containers.
↖ Recommended Loadout
Even though this is a PvE route, do not enter Riven Tides without a gun. The ARC presence is too dense, and sooner or later you will need to remove a turret, wasp, hornet, or firefly.
| Slot | Recommendation | Why It Helps |
|---|---|---|
| Weapon | Anvil or another light, reliable gun | Good enough for ARC without adding too much weight |
| Ammo | One full stack | Covers small fights and extraction trouble |
| Key item | Hatch Key | Saves the run when overweight or chased |
| Healing | Adrenaline shots, basic meds | Helps reposition and move faster late |
| Backpack focus | Carry capacity if available | More room for weapons and materials |
The Anvil is my preferred pick because it is light and dependable. You do not need the exact same weapon, but you do need something that can handle small ARC threats quickly.
If you spawn into a loud lobby or hear fighting near Stacking Yard early, play slower and let other players pull the ARC attention first.
↖ Step 1: Start at Tennis Court
Tennis Court is one of the best starts for this route. It is usually calmer than the center of the map, and it has enough Items to make the first two minutes worthwhile.
Check:
- Locker room
- Blue lockers
- Trash cans
- Breachable floor containers
- Small nearby rooms
This area can produce blueprints, key cards, springs, duct tape, and useful materials. It will not always be stacked, but it is fast and relatively safe.
| Item | Priority | Reason |
|---|---|---|
| Blueprint | High | Always worth taking |
| Key card | High | Useful, but can be dropped later if needed |
| Springs | High | Great crafting value |
| Duct tape | Medium | Good if it stacks |
| Rope / low-value junk | Low | Skip when space gets tight |
If Tennis Court is dry, do not waste time searching every corner. Loot the obvious spots and rotate.
↖ Step 2: Go Under Customs House
From Tennis Court, move toward Customs House, but focus on the underground section. This is one of the best parts of the route because it has good loot without feeling as contested as the Hotel.
Your main target is the breachable room underneath Customs House.
| Loot Spot | What to Look For |
|---|---|
| Breach room | Security locker, weapons, gun parts |
| Desks | Ammo and electrical components |
| Shipping containers | Batteries, cables, crafting materials |
| Platform area | Ammo box, grenade tube, possible weapon case |
The security locker is the big reason we come here. In my runs, this room has been one of the most reliable places for weapon parts and solid crafting value.
Also, check both sides of shipping containers. Riven Tides hides a lot of loot on container walls, and it is very easy to walk past money without noticing.
↖ Why We Skip the Hotel
The Hotel can have loot, but for this route it is usually not worth the trouble.
| Problem | Why It Matters |
|---|---|
| More players | Higher chance of PvP |
| More ARC | Easy to get trapped indoors |
| Slower looting | Breaks the route timing |
| More noise | Fighting attracts attention |
If your goal is a consistent solo PvE run, skip the Hotel. Customs House and Stacking Yard give better value for the risk.
↖ Step 3: Loot Through Weighing Checkpoint
After Customs House, rotate through the Weighing Checkpoint area. This section is not always exciting, but it is great for stacking value.
Look for:
- Side containers
- Springs
- Rusted tools
- Magnets
- Batteries
- Power cables
- Gun parts
| Loot | Keep? | Note |
|---|---|---|
| Springs | Yes | High crafting value |
| Gun parts | Yes | Especially heavy or complex parts |
| Rusted tools | Maybe | Valuable but heavy |
| Batteries | Maybe | Keep if needed for upgrades |
| Random bulky junk | No | Drop early |
This is where you should start managing weight. If your bag is already getting full, stop picking up medium-value items unless they stack.
↖ Step 4: Hit Stacking Yard
Stacking Yard is the main money area of the route. It has the best loot density, but it is also where the run gets more dangerous.
Check:
- Container side panels
- Grenade tube spawns
- Weapon case spawn
- Backpack spawn
- Med bag spawn
- Blue containers
- Upper crane access points
| Spawn | Possible Loot | Priority |
|---|---|---|
| Weapon case | Tiered weapons, gun parts | High |
| Grenade tube | Trigger grenades, Snap Blast, Wolfpack chance | High |
| Med bag | Healing, cloth, antiseptic | Medium |
| Blue containers | Augments, weapon parts | Medium-High |
| Side containers | Materials, event items, weapons | Medium |
In one of my better runs, this section helped push the bag past 100K coins before extraction. Multiple Tier 2 weapons, gun parts, and rare materials can spawn here if the containers are kind.
The catch is ARC pressure. If you see a Turbine nearby, do not fight it. Rotate around it. This route is about profit, not heroics.
↖ Step 5: Optional Crane and Ship Area
If you still have time, ammo, and space, move toward the upper crane or ship-side loot spots. This area can be very profitable, but it is also where many runs become messy.
You can find:
- Security lockers
- Breachable containers
- Medical containers
- Weapon attachments
- Rare crafting parts
- Event items
- More weapons
| Go There If… | Avoid It If… |
|---|---|
| You have 6+ minutes left | You are already overweight |
| ARC patrols are spread out | Firefly / Hornet groups are nearby |
| You still have ammo | You are low on heals |
| You have a hatch key | Extract is far and timer is low |
This is where I have seen some of the best value spikes, including rare trinkets, multiple weapons, and complex gun parts. But once your bag is heavy, your escape gets slower. If you are already holding strong loot, leaving is the smart play.
↖ What to Keep and What to Drop
Riven Tides gives you a lot of okay loot. The trick is making room for the great loot.
| Priority | Examples | Decision |
|---|---|---|
| Top priority | Blueprints, rare weapons, legendary trinkets | Always keep |
| High | Tier 2 weapons, complex gun parts, advanced electrical components | Keep |
| Medium | Springs, heavy gun parts, good attachments | Keep if stacked |
| Situational | Rusted tools, batteries, water filters | Keep only if needed |
| Low | Low-value single items, bulky junk | Drop first |
A simple rule: if an item is heavy, does not stack, and is not rare, it needs to justify its backpack space.
For example, rusted tools are useful, but they are heavy. If you find a Tier 2 weapon or rare crafting part, the tools may need to go.
↖ ARC Threat Tips
You do not need to kill everything. In fact, trying to clear the map is one of the fastest ways to lose the run.
| ARC Enemy | Best Response |
|---|---|
| Wasp | Kill if close |
| Hornet | Kill if it keeps following |
| Firefly | Avoid when possible |
| Sentry turret | Destroy if blocking your route |
| Sentinel | Kill quickly if it sees you |
| Turbine | Avoid completely |
If you hear multiple flying ARC units together, slow down. Let them move past, then cross. One small fight can snowball quickly on this map.
↖ Extraction Plan
Bring a Hatch Key if you can. It makes this route much safer, especially when you are overweight.
| Situation | Best Move |
|---|---|
| Bag is already valuable | Extract early |
| You are 15–25 lb overweight | Use adrenaline and head out |
| Timer is under 3 minutes | Stop looting |
| ARC is stacked near your path | Rotate wide |
| Players are fighting nearby | Wait or use another exit |
A good Riven Tides run does not need to end with a full map clear. If you are holding blueprints, weapons, rare parts, or 100K+ value, protect the bag and leave.
↖ Example Loot From a Strong Run
This route can vary a lot, but a strong solo run can look like this:
| Category | Example Result |
|---|---|
| Loot value | 100K–130K+ coins |
| XP | Around 30K |
| Weapons | Multiple Tier 2 guns |
| Rare finds | Blueprint, legendary trinket |
| Materials | Springs, gun parts, advanced components |
| Utility | Grenades, ammo, healing items |
Not every run will hit 130K. That usually requires good weapon spawns and clean routing. But the route is consistent enough that even average runs feel worthwhile.
↖ FAQ
↖ Is Riven Tides good for solo players?
Yes, but only with a safe route. Riven Tides is dangerous because of ARC density, not because every area is impossible. If you avoid the Hotel and manage your weight, solo runs are very doable.
↖ What is the best place to start this route?
Tennis Court is the best starting point. It has quick loot, blueprint potential, and a safer opening than central map areas.
↖ Do I need a Hatch Key?
You can run without one, but I strongly recommend bringing one. A Hatch Key can save the run when you are overweight, low on time, or being pushed by ARC.
↖ Should I fight the Turbine?
No. Avoid it. Fighting a Turbine wastes ammo, time, and usually attracts more trouble than the loot route needs.
↖ What should I prioritize when my bag is full?
Keep blueprints, rare weapons, legendary trinkets, Tier 2 guns, complex gun parts, and advanced materials. Drop bulky low-value items first.
↖ Can this route really make 130K coins?
Yes, on a strong run. My best results with this path reached around 130K+ coins, but that depends on weapon cases, security lockers, and rare material spawns.
↖ Summary
This Riven Tides PvE route is built for players who want strong loot without gambling every run in the busiest parts of the map. Start at Tennis Court, move through Customs House underground, build value at Weighing Checkpoint, then hit Stacking Yard for the main payout.
The route works because it gives us a clear plan: loot fast, avoid the Hotel, skip unnecessary ARC fights, manage weight early, and extract once the bag is worth protecting.
Played cleanly, this is one of the most reliable solo-friendly ways to farm blueprints, weapons, crafting materials, XP, and 100K–130K+ coin runs on Riven Tides.

Most Popular Posts
- ARC Raiders Riven Tides Key Room Guide: Best Hotel Keys, Loot Routes, Secure & Crane Storage
- ARC Raiders Damage Fireflies Trial Guide: Best Farm Method on Buried City Night Raid
- ARC Raiders Riven Tides Update: New Map & Items, ARC Turbine, Rewards, and Best Early Strategy
- ARC Raiders Bettina Guide: Best Build, Buffs, and How to Use It Against ARC
- Arc Raiders Season 4 Riven Tides Update, Rewards, Safe Skins, and Release Timeline
- ARC Raiders Solo Search Supply Drops Guide: Best Buried City Route, Beacon Locations
Popular Category Lists
- Grow a Garden / (286)
- ARC Raiders / (262)
- CoD: Black Ops 7 / (166)
- Monopoly Go / (146)
- MLB 26 / (144)
- Star Citizen / (111)
- Steal a Brainrot / (89)
- Sailor Piece / (68)
- ARK Survival Ascended / (66)
- Diablo IV / (61)
- Forza Horizon 6 / (60)
- Blox Fruits / (60)
- CoD: BLACK OPS 6 / (55)
- Adopt Me / (53)
- Path of Exile 2 / (48)
- Monster Hunter Wilds / (46)
- Windrose / (44)
- Path of Exile / (40)
- Grow a Garden 2 / (38)
- Bee Swarm Simulator / (36)


