


 0
0ARC Raiders Blueprint Farm Guide: Best Buried City Route for Fast Blueprints
- KIVR
- Share
- ARC Raiders
- 06/01/26
- 226
If you want faster progress in ARC Raiders, farm blueprints. Not random junk. Not low-value rooms. Blueprints unlock long-term crafting power, and Buried City is still one of the most reliable maps for it.
- Best ARC Raiders Blueprint Farm: Why Buried City Works
- Best Buried City Blueprint Route
- Hospital: Best Opening Blueprint Spot
- Parking Garage: Quick Weapon and Material Check
- Space Travel: Best Mid-Route Profit Spot
- Pharmacy, Red Tower, and Santa Maria Houses
- Pharmacy
- Red Tower
- Santa Maria Houses
- Pointy Roof and Jump-Over Room
- Pointy Roof Building
- Jump-Over Room
- Grandioso and Library: Final Sweep Before Extract
- Loot Priority for Blueprint Farming
- Fast Inventory Rules
- Security Breach Rules
- ARC Enemy and PvP Rules
- ARC Enemies
- PvP
- Best Spawn Decisions
- Expected Results Per Run
- FAQ
- What is the best map for blueprint farming in ARC Raiders?
- What is the best Buried City blueprint route?
- How many blueprints can you get per run?
- Are security breaches worth checking?
- When should you extract during a blueprint farm?
- Summary
The goal is simple: hit dense loot spots, check every security breach, keep high-value materials, and extract before greed kills the run.
↖ Best ARC Raiders Blueprint Farm: Why Buried City Works
Buried City is strong because it does not rely on one lucky container. The map stacks lockers, drawers, breach rooms, weapon cases, trinkets, and crafting materials close together.
Even a low-blueprint run can still pay well.
| Value Source | What to Farm | Why It Matters |
|---|---|---|
| Blueprints | Lockers, drawers, containers | Crafting progression |
| Security Breaches | Breach rooms | Weapons, parts, rare loot |
| Trinkets | Mixtapes, albums, watches, cards | Fast cash |
| Materials | Springs, wires, sensors, gun parts | Crafting and upgrades |
| Weapon Cases | Guns and attachments | Use, sell, or dismantle |
A solid run usually gives 1–3 blueprints if you move fast and hit the right rooms.
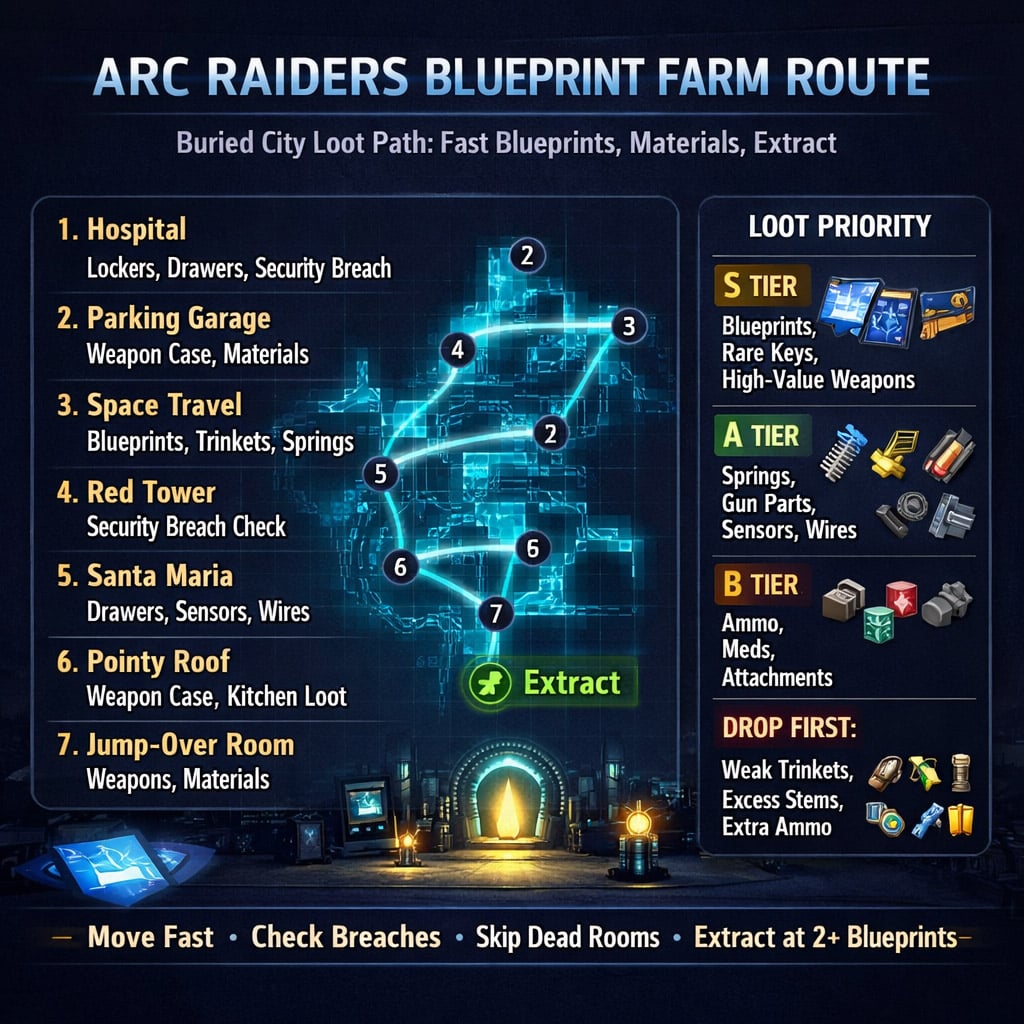
↖ Best Buried City Blueprint Route
Do not full-clear the map. Run the route. Skip dead rooms. Rotate fast.
| Order | Location | Priority Loot |
|---|---|---|
| 1 | Hospital | Lockers, drawers, security breach |
| 2 | Parking Garage | Weapon case, breachable containers |
| 3 | Space Travel | Lockers, trinkets, blueprint rolls |
| 4 | Pharmacy | Quick containers, medical loot |
| 5 | Red Tower | Security breach, weapon case |
| 6 | Santa Maria Houses | Drawers, breach room, materials |
| 7 | Pointy Roof Building | Drawers, kitchen loot, gun case |
| 8 | Jump-Over Room | Weapons, containers, materials |
| 9 | Grandioso / Library | Final blueprint checks |
| 10 | Extract | Leave with profit |
If you spawn near Hospital, start there.
If you spawn near Warehouses, rush Jump-Over Room or Pointy Roof first.
The first player into these rooms usually gets the best loot.
↖ Hospital: Best Opening Blueprint Spot
Hospital is the safest high-value start. It has enough loot density to save a bad spawn.
| Check This | Priority | Reason |
|---|---|---|
| Red Lockers | High | Blueprint and trinket chance |
| Desk Drawers | High | Blueprint rolls |
| Security Breach | Very High | Best upside |
| Trash Cans | Medium | Springs and small value |
| Medical Crates | Medium | Defibs, meds, utility |
Player tip: check upper floors. Breach spawns can appear higher than expected.
If Hospital is looted, do not cope-loot empty rooms. Grab missed drawers and rotate.
↖ Parking Garage: Quick Weapon and Material Check
Parking Garage is not the main blueprint spot. It is a fast value stop.
Prioritize:
- Weapon case
- Breachable containers
- Backpack / medical crate
- Springs, gun parts, ammo
- Loose trinkets
If you hear fighting inside, decide fast:
| Situation | Play |
|---|---|
| You have no blueprint | Third-party only if clean |
| You have blueprints | Avoid the fight |
| You are low on meds | Rotate out |
| Dead body nearby | Quick loot, then move |
Do not die for a maybe-gun when you already have progression loot.
↖ Space Travel: Best Mid-Route Profit Spot
Space Travel is where many runs turn profitable. It has lockers, drawers, trinkets, weapon spawns, and security breach potential.
| Loot Type | Keep Priority |
|---|---|
| Blueprints | S |
| Lance Mixtape / Music Album | A |
| Springs / Wires / Sensors | A |
| Gun Parts | A |
| Weapons / Attachments | A-B |
| Low trinkets | C |
If Space Travel is half-looted, still check side rooms. Many players rush the obvious lockers and miss drawers, trash cans, or small containers.
That is free money.
↖ Pharmacy, Red Tower, and Santa Maria Houses
These stops are fast checks. The value is good, but only if you do not waste time.
↖ Pharmacy
Hit it only if it is on your route.
Check:
- Drawers
- Medical containers
- Loose materials
- Quick blueprint rolls
If it is stripped, leave instantly.
↖ Red Tower
Red Tower is mainly for the security breach.
| Check | Why |
|---|---|
| Security breach | Highest value |
| Weapon case | Good profit |
| Leftover gun parts | Often missed |
| Drawers | Blueprint chance |
↖ Santa Maria Houses
Santa Maria is underrated. Players often open one room and leave half the value behind.
Prioritize:
- Security breach
- Drawers
- Sensors
- Wires
- Springs
- Backpacks
- Radios
- Keys / modules
If another player looted badly, punish it. Clean the leftovers and move.
↖ Pointy Roof and Jump-Over Room
These two spots are swing locations. Sometimes dry. Sometimes they save the run.
↖ Pointy Roof Building
Check:
- Drawers
- Kitchen loot
- Toasters
- Weapon case
- Security breach
If you get nothing, leave. No ego looting.
↖ Jump-Over Room
Always check this room if safe.
| Why It Matters | Result |
|---|---|
| Often missed | Free loot |
| Fast to access | Low time cost |
| Can spawn weapons | Big value spike |
| Good material density | Reliable fallback |
| Fits route naturally | No bad detour |
If you spawn near it, rush it early.
↖ Grandioso and Library: Final Sweep Before Extract
Grandioso and Library are late-route bonus checks. Good value, but dangerous if the raid is already old.
Look for:
- Blueprints
- Security breach
- Weapon case
- Trinkets
- Drawers
- XP taps
If your bag has 2+ blueprints or strong material stacks, leave. Late greed gets people killed.
↖ Loot Priority for Blueprint Farming
Your backpack decides your profit. Stop carrying trash.
| Tier | Keep | Drop For |
|---|---|---|
| S | Blueprints, rare keys, high-value weapons | Almost nothing |
| A | Springs, gun parts, sensors, wires, premium trinkets | Blueprints / weapons |
| B | Duct tape, ammo, meds, attachments | A-tier stacks |
| C | Weak trinkets, excess stems, random materials | Anything better |
| Drop First | Single low-value items, extra ammo | Materials or blueprints |
↖ Fast Inventory Rules
- Blueprint beats almost everything.
- Springs stack well. Keep them.
- Gun parts are worth space.
- Sensors and wires are strong crafting value.
- Do not hoard stems.
- Drop weak trinkets first.
If you are overweight, drop the worst single item. Do not slow-walk across the map unless your bag is stacked.
↖ Security Breach Rules
Security breaches are mandatory checks on this route.
| Rule | Reason |
|---|---|
| Check every known breach room | Best loot upside |
| Re-check opened breaches | Players miss parts |
| Loot fast | Breaches attract players |
| Prioritize weapons and parts | Best slot value |
| Leave under heavy ARC pressure | Survival beats one container |
Opened breach does not mean empty breach. Bad looters leave good money behind all the time.
↖ ARC Enemy and PvP Rules
You are farming blueprints, not proving a point.
↖ ARC Enemies
| Threat | Response |
|---|---|
| Turrets | Jiggle peek between bursts |
| Ticks | Kill only if blocking loot |
| Comet / Pop threats | Avoid or clear fast |
| Rocketeer | Skip unless safe |
| Heavy ARC pressure | Rotate out |
↖ PvP
| Situation | Best Play |
|---|---|
| No blueprint yet | Take only clean fights |
| 1 blueprint | Play safer |
| 2+ blueprints | Extract soon |
| Dead body nearby | Quick loot, expect third party |
| Extract active | Assume campers |
Most blueprint runs die because players get greedy. Not because the route is bad.
↖ Best Spawn Decisions
| Spawn | First Move |
|---|---|
| Near Hospital | Rush Hospital |
| Near Warehouses | Rush Jump-Over / Pointy Roof |
| Near Space Travel | Start Space Travel |
| Near Red Tower | Check breach, then Santa Maria |
| Late spawn | Hit nearest value room, then extract path |
Do not force the same opening every raid. Adapt to spawn and lobby pace.
↖ Expected Results Per Run
| Run Type | Blueprints | Result |
|---|---|---|
| Poor | 0 | Materials and XP only |
| Average | 1 | Good progress |
| Strong | 2 | Very profitable |
| Excellent | 3+ | Extract immediately |
The goal is not a miracle every raid. The goal is consistent extraction with blueprints, materials, and sellable value.
↖ FAQ
↖ What is the best map for blueprint farming in ARC Raiders?
Buried City is one of the best blueprint farm maps because it has dense loot routes, many drawers and lockers, frequent security breach checks, and strong backup profit from materials.
↖ What is the best Buried City blueprint route?
Start with Hospital, rotate to Parking Garage, Space Travel, Pharmacy, Red Tower, Santa Maria Houses, Pointy Roof, Jump-Over Room, then finish at Grandioso / Library before extracting.
↖ How many blueprints can you get per run?
Most clean runs produce 1–3 blueprints. Some runs are dry. Strong runs can give more, but do not stay too long chasing perfect RNG.
↖ Are security breaches worth checking?
Yes. Security breaches are some of the best loot checks in Buried City. They can give weapons, parts, attachments, materials, and high-value leftovers from bad looters.
↖ When should you extract during a blueprint farm?
Extract when you have 2+ blueprints, a full bag of A-tier materials, or valuable weapons. If the raid is late, stop looting and leave.
↖ Summary
The best ARC Raiders blueprint farm right now is a fast Buried City route built around Hospital, Space Travel, security breaches, Santa Maria, Jump-Over Room, Grandioso, and Library.
Move fast. Check drawers and lockers. Prioritize blueprints, springs, gun parts, sensors, wires, weapons, and premium trinkets. Skip dead rooms. Avoid bad fights.
Extract when the bag is good. That is how this route pays raid after raid.

Most Popular Posts
- ARC Raiders Riven Tides Key Room Guide: Best Hotel Keys, Loot Routes, Secure & Crane Storage
- ARC Raiders Damage Fireflies Trial Guide: Best Farm Method on Buried City Night Raid
- ARC Raiders Riven Tides Update: New Map & Items, ARC Turbine, Rewards, and Best Early Strategy
- ARC Raiders Bettina Guide: Best Build, Buffs, and How to Use It Against ARC
- Arc Raiders Season 4 Riven Tides Update, Rewards, Safe Skins, and Release Timeline
- ARC Raiders Solo Search Supply Drops Guide: Best Buried City Route, Beacon Locations
Popular Category Lists
- Grow a Garden / (286)
- ARC Raiders / (262)
- CoD: Black Ops 7 / (166)
- Monopoly Go / (146)
- MLB 26 / (144)
- Star Citizen / (112)
- Steal a Brainrot / (89)
- Sailor Piece / (68)
- ARK Survival Ascended / (67)
- Diablo IV / (61)
- Forza Horizon 6 / (60)
- Blox Fruits / (60)
- CoD: BLACK OPS 6 / (55)
- Adopt Me / (53)
- Path of Exile 2 / (48)
- Monster Hunter Wilds / (46)
- Windrose / (44)
- Path of Exile / (40)
- Grow a Garden 2 / (40)
- Bee Swarm Simulator / (36)


