0
0ARC Raiders Blueprint Farming: The Stella Montis Night Raid Loop & Fast Reset Strategy
- KITE
- Share
- ARC Raiders
- 01/17/26
- 2234
Blueprint farming in ARC Raiders only feels like a lottery when we loot like tourists. Once we treat blueprints like a math problem—reward type, container table, and rolls per minute—the whole system becomes predictable enough to grind efficiently.
We have combined data from targeted map runs and high-density Night Raid loops to build a system that respects your time. The goal isn't to extract every raid; the goal is to pull the slot machine lever as many times as possible on the tables that actually matter.
Before we jump in, here are the core rules we'll use to keep this actionable:
1. If it's a quest reward, then stop farming containers for it.
2. Notclear the building,butroll the specific container.
3. Do less fighting, do more resetting.
- 1) The 10-Second Check: Reward vs. Loot
- 1.1 What to check (fast)
- 2) Container Rules: Roll the Right
- 2.1 Practical Container Priority
- 2.2 The Rule That Makes This Click
- 3) The Stella Montis Night Raid Loop (Volume Farming)
- 3.1 The Freshness Test
- 3.2 The Route: Medical vs. Assembly
- 4) Targeted Hunting: Map & Event Specifics
- 4.1 Map Target Cheat Sheet
- 4.2 The Surrender Loop (For Augments)
- 5) Discipline: Don't Lose the Blueprint to Greed
- 5.1 The 2-Minute Risk Cap
- 5.2 Social Trading
- FAQ
- Q1: How do we keep our blueprint info patch-proof?
- Q2: Is it really worth resetting a raid just because a few doors are open?
- Q3: Which containers should I absolutely ignore?
- Q4: Why do people say Event Raids are better?
- Summary
↖ 1) The 10-Second Check: Reward vs. Loot
This is the hours-saver: some blueprints aren't meant to be farmed from containers at all. They are tied to progression sources.
↖ 1.1 What to check (fast)
If you are about to grind a specific blueprint, do this quick classification:
Quest / Task Reward: If it's a reward, container farming is just cardio. Stop looting trash cans and start completing the objective.
Trials Reward: Weekly 3-star clears provide a steady stream of mixed pools (weapons, augments, attachments).
Event / Condition Bias: Multiple groups report higher rare odds during events (like Electromagnetic Storms). You time your runs instead of brute-forcing normal raids.
You'll notice that veteran players often ignore random loot piles. Which means they know exactly which source drops their target and ignore the rest.
↖ 2) Container Rules: Roll the Right
Most players clear rooms. We clear container types.
Why? Because blueprint drops are effectively rolls on different loot tables. Your time budget is limited, so do fewer low-value rolls, do more high-relevance rolls.
↖ 2.1 Practical Container Priority
These are the leanings observed across hundreds of reference runs.
| Container Type | What It Leans Toward | When We Prioritize It |
|---|---|---|
| Suitcases / Trash Cans | Attachments, Utility items | If you are chasing attachments or broad utility pools. |
| Augment / Gun-Part Containers | Augment BPs, Gun parts | If augments are the target (fast, focused runs). |
| Raider Containers (Med bags, Weapon caches, Ammo cases) | Weapon BPs + Gun-part BPs | If you want weapon BPs without wasting rolls on trash. |
| Drawers / Cabinets | Mixed pool (High volume) | Essential for volume farming in places like Pharmacy or Admin. |
↖ 2.2 The Rule That Makes This Click
Not: Loot everything in a good building.
But: Loot only containers that match today's target blueprint category.
If you are hunting augments, you skip most clutter and route between augment containers fast. If you are hunting weapon blueprints, you treat weapon caches and ammo cases like your main objective.
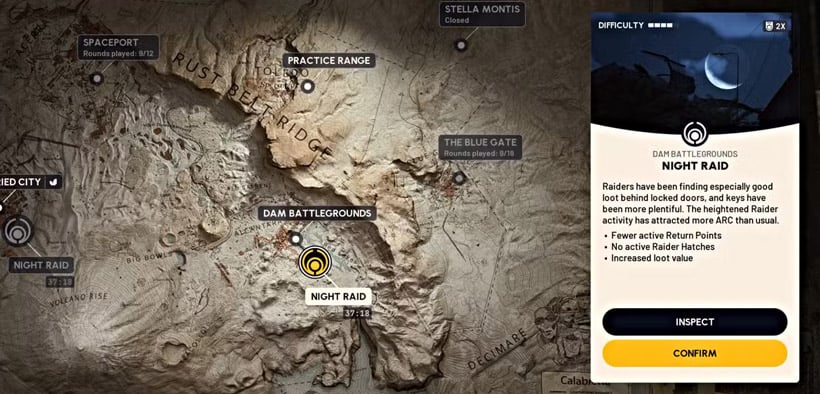
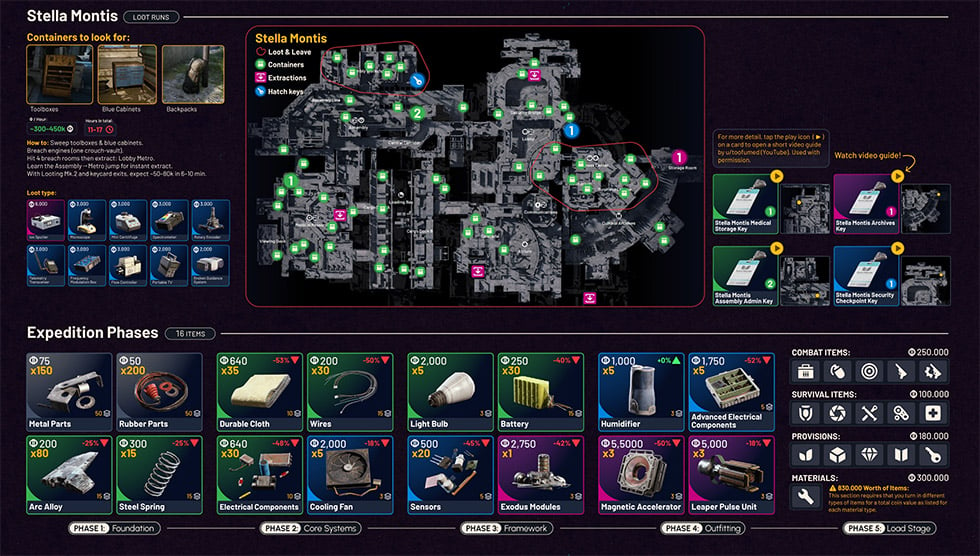
↖ 3) The Stella Montis Night Raid Loop (Volume Farming)
This is the most consistent method for raw blueprint volume. Night Raids offer high density, but they require speed.
↖ 3.1 The Freshness Test
The fastest blueprint farmer isn't the fastest runner—it's the fastest decision-maker. If you see multiple containers already opened near spawn, then reset.
Use this simple threshold to judge your raid in the first 20 seconds:
| What we see | What it means | What we do |
|---|---|---|
| 0–1 opened containers | Likely fresh | Commit to the loop. |
| 2–3 opened containers | Path is being vacuumed | Hard reset and reroll. |
| Doors open + drawers empty | Deeply pillaged | Reset instantly. |
↖ 3.2 The Route: Medical vs. Assembly
We don't force a route; we take what the spawn gives us to maximize efficiency.
1. First: If you spawn near Medical, hit the high-value lower rooms and sweep the drawers.
2. Then: If you spawn near Assembly, sprint there immediately. It has high container density per square meter.
3. Finally: Loot every relevant container (drawers, bins, cabinets) without ego.
Why do we do this? Because one run might give you zero blueprints, and the next might give you seven. The only way to smooth out that variance is to maximize the number of containers you open per hour.
↖ 4) Targeted Hunting: Map & Event Specifics
When you need a specific item (like the Anvil Splitter or Snap Hook), you stop playing for volume and start playing for Location Tags.
↖ 4.1 Map Target Cheat Sheet
Use this as a compass, not a guarantee. These are the hotspots repeatedly reported by the community.
| Map | Target Area / Event | Often-Chased Blueprints |
|---|---|---|
| Buried City | Pharmacy Building (Drawers), Apartments (Grandioso) | Anvil Splitter (check every pharmacy drawer), Wolfpack, Tempest. |
| Bluegate | Security Breach Areas, Locked Gate Event | Bobcat (during events), Augment-focused rooms. |
| Dam Battlegrounds | Research & Admin (Drawers), Roof Crate Paths | Snap Hook (especially during Electromagnetic Storms), Kinetic Converter. |
| Stella Montis | Night Raid (General Density) | Affilion (reported more frequently here after recent patches). |
↖ 4.2 The Surrender Loop (For Augments)
If your goal is purely checking for a specific augment blueprint on a map like Bluegate:
1. Sprint to the breachable underground room or high-value pocket.
2. Loot the wall containers immediately.
3. Pocket any blueprint you find.
4. Surrender/Reset.
It feels weird to die on purpose, but if you are strictly farming, the time spent extracting is time lost on your next roll.
↖ 5) Discipline: Don't Lose the Blueprint to Greed
Blueprint farming fails most often at the end: someone gets the drop… and then donates it to the lobby because they got greedy.
↖ 5.1 The 2-Minute Risk Cap
High-threat moments happen.
If a Shredder is camping your doorway, then rotate or leave.
If you've spent 2 minutes stuck in one room fighting AI, then you are losing blueprint rolls elsewhere.
↖ 5.2 Social Trading
One of the most underrated accelerators is the Blueprint Black Market. In Night Raids, you will run into players who have what you need.
Offer specific trades via VoIP: Do you need the Wolfpack BP?
Swap duplicates. A duplicate for you might be the final piece for them.
↖ FAQ
↖ Q1: How do we keep our blueprint info patch-proof?
We only count a blueprint as confirmed when it lands in our inventory. Rumors are noise. Focus on Map + Location Tag + Container Type. Even if loot tables shift, the logic (Medical items in Medical tags) usually remains consistent.
↖ Q2: Is it really worth resetting a raid just because a few doors are open?
Yes. If the easy loot near the spawn is gone, the high-value loot deep inside is likely gone too. You are better off spending 2 minutes loading into a fresh map than 15 minutes scavenging leftovers.
↖ Q3: Which containers should I absolutely ignore?
Ignore anything that doesn't match your target. If you are hunting weapon blueprints, stop opening suitcases. It dilutes your focus and fills your inventory with trash that prevents you from picking up what matters.
↖ Q4: Why do people say Event Raids are better?
Events (like Electromagnetic Storms) often concentrate the loot pool or unlock specific areas (like the Locked Gate). We treat events as high-leverage windows and plan our gaming sessions around them.
↖ Summary
We get consistent blueprint progress when we stop treating ARC Raiders like a scavenger hunt and start treating it like an operations game. Verify the source (Reward vs. Loot), target the specific container tables, and abuse the Freshness Test to ensure you are only playing on maps rich with potential.
If you follow one simple operating rule—pick one blueprint category per session, loot only the matching containers, and reset fast when the raid isn't cooperating—you will feel the difference in your stash within the very first hour.

Most Popular Posts
- ARC Raiders Riven Tides Key Room Guide: Best Hotel Keys, Loot Routes, Secure & Crane Storage
- ARC Raiders Riven Tides Update: New Map & Items, ARC Turbine, Rewards, and Best Early Strategy
- ARC Raiders Bettina Guide: Best Build, Buffs, and How to Use It Against ARC
- Arc Raiders Season 4 Riven Tides Update, Rewards, Safe Skins, and Release Timeline
- Best ARC Raiders Attachments for Every Weapon: Complete Weapon Mod Guide
- ARC Raiders Turbine Boss Guide: Spawn Time, Weak Points, Best Weapons, and Loot
Popular Category Lists
- Grow a Garden / (286)
- ARC Raiders / (277)
- CoD: Black Ops 7 / (166)
- Monopoly Go / (148)
- MLB 26 / (148)
- Star Citizen / (126)
- Steal a Brainrot / (90)
- ARK Survival Ascended / (83)
- Sailor Piece / (68)
- Forza Horizon 6 / (66)
- Diablo IV / (62)
- Blox Fruits / (61)
- Adopt Me / (56)
- CoD: BLACK OPS 6 / (55)
- Grow a Garden 2 / (51)
- Path of Exile 2 / (48)
- Monster Hunter Wilds / (46)
- Windrose / (44)
- Path of Exile / (40)
- Bee Swarm Simulator / (37)