0
0Bee Swarm Simulator Blue Hive Guide: Best For All Levels, Amulets Stats, Mutations, More
- NELSO
- Share
- Bee Swarm Simulator
- 01/17/26
- 11213
Blue Hive isn't a single copy-paste forever build—it's a tuning problem. Once we treat it like tuning (capacity vs. conversion vs. uptime), honey/hour becomes something we can diagnose and fix instead of guessing. Below is a structured, experience-backed guide we use to stabilize blue performance at different levels, choose the right amulet stats, and avoid the most common overfill/underfill traps.
- 1) Blue Hive Progression
- 1.1 Early Blue (few mythics)
- 1.2 Midgame Blue (about level 13–18)
- 1.3 Endgame Blue (level 18–20+, higher resources)
- 2) Hive Composition Templates
- 2.1 Template A — Midgame Baseline
- 2.2 Template B — Endgame Diamond-Blue Variant
- 3) The Real Honey/Hour Fix
- 3.1 What overfill and underfill actually mean
- 3.2 One-change tuning table
- 4) Alt Accounts (Tadpole Alts)
- 4.1 Alt hive direction
- 5) Mutations: What to Put on What?
- 5.1 Priority logic
- 6) Beequip Loadout: What to aim for?
- 6.1 A realistic blue core beequips list
- 7) Amulets: Stat Priority Cheat Sheets
- 7.1 Supreme Star Amulet (SSA)
- 7.2 Ant Amulet
- 7.3 Stick Bug Amulet
- 7.4 Moon Amulet
- 7.5 Robo Challenge Cog Amulet
- 7.6 King Beetle & Shell Amulets
- FAQ
- 1) Should we run Diamond Bee early?
- 2) What's the safest Tadpole count?
- 3) Do we need Fuzzy Bee in a blue hive?
- 4) Why is Balloon Blessing such a big deal?
- 5) Convert mutations feel boring—are they really that good?
↖ 1) Blue Hive Progression
Different levels don't just change your stats—they change what's efficient. If you build like endgame while you're still early, you often spend months owning good bees but earning mediocre honey/hour.
↖ 1.1 Early Blue (few mythics)
If you don't have enough Tadpole/Buoyant yet, we progress with cheap, consistent engines:

- Bubble Bee as a stand-in for Tadpole (keeps bubble-related gameplay online).
- Frosty Bee as a stand-in for Buoyant (helps blue collection and steadier field uptime).
- Baby Bee as a temporary source for Baby Love (boosts pollen/time and smooths runs).
Because early blue is usually limited by setup stability (tokens, uptime, basic conversion), not by perfect mythic ratios, this path gets you into macro-ready honey faster.
↖ 1.2 Midgame Blue (about level 13–18)
Here's the baseline many strong blue hives orbit around:
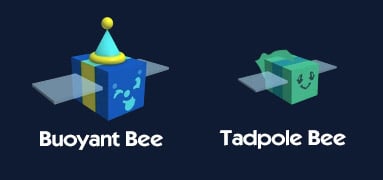
- 20 Buoyant
- 10 Tadpole
- Plus standard supports (music/commander, etc.)
This works because Buoyant stabilizes balloon value and conversion rhythm, while Tadpole drives bubbles and field consistency. The exact support bees can flex based on what you own and what your beequips cover.
↖ 1.3 Endgame Blue (level 18–20+, higher resources)
Diamond Bee is powerful, but it's not a beginner shortcut. The reason is simple: the famous conversion bonus is only crazy when you already have the engine to feed it—high capacity handling, strong conversion loops, and consistent buff uptime.

If you're level 20+ (or close) and you run at least one well-built alt, Diamond-Blue starts to make sense.
↖ 2) Hive Composition Templates
We treat these as templates, not commandments. If you're making more honey but keep overfilling, you're allowed to break the template intelligently.
↖ 2.1 Template A — Midgame Baseline
A practical baseline is:
| Category | Recommended Core | Why it works | When we change it |
|---|---|---|---|
| Buoyant Bee | ~20 | Balloon economy + smoother convert rhythm | If you're underfilling, add Buoyant |
| Tadpole Bee | ~10 (don't go under ~7 or above ~13) | Bubble uptime + field consistency | If you're overfilling hard, reduce Tadpole slightly |
| Support bees | Enough for Focus/Melody/Marks | Buff uptime is honey/hour | If beequips cover buffs, you can reduce supports |
Rule-of-thumb tuning
- If you discover constant overfill (bags full, balloons wasted), then reduce some pollen push (often Tadpole) or increase conversion consistency.
- If you discover underfill (balloons weak, blessing low, conversion idle), then increase field production stability (often add Buoyant or fix buff uptime).
↖ 2.2 Template B — Endgame Diamond-Blue Variant
A common endgame direction:
- Buoyant Bee: ~12–16
- Diamond Bee: ~8–13
- Tadpole Bee: ~7–8 (can go lower only with extreme fill control + strong alt support)
Why this works:
- Diamond increases conversion-side payoff, and that means every good convert cycle becomes more valuable.
- The trade-off is you're more sensitive to bad uptime: if your buffs/nectars/balloon blessing are sloppy, Diamond-Blue feels worse than baseline.
↖ 3) The Real Honey/Hour Fix
We use one simple loop: measure → classify → adjust one knob at a time.
↖ 3.1 What overfill and underfill actually mean
- Overfill: your collection outpaces conversion/capacity handling; you waste potential because you're capped too often.
- Underfill: your balloon/blessing/value doesn't ramp; you're leaving long-run scaling on the table.
This matters because blue earns big when runs stabilize and balloons stack value.
↖ 3.2 One-change tuning table
| If you notice… | Likely cause | Change first | Don't do this |
|---|---|---|---|
| Bags fill constantly, balloon value feels capped | Too much raw pollen vs. conversion rhythm | Drop 1–2 Tadpoles or remove a non-essential bee; improve convert-focused mutations | Don't slash Tadpoles below ~7 unless you truly know why |
| Balloon blessing stays low | Weak long-run scaling and/or inconsistent balloon cycles | Add Buoyant or improve uptime (music/focus) | Don't chase Diamond-Blue early hoping it fixes blessing |
| Buffs (Focus/Melody) drop often | Support coverage too thin | Add/keep Music; use beequips that grant missing buffs | Don't rely on RNG alone for critical buffs |
| Server/group requires pollination | Social constraint | Keep a Fuzzy (or coordinate alts) | Don't run Fuzzy with no practical benefit/requirements |
↖ 4) Alt Accounts (Tadpole Alts)
If you're serious about endgame blue optimization, alts aren't extra—they're part of the machine. They're mainly there to stabilize field value (pollination, token environment, consistency) so the main hive can run leaner.
↖ 4.1 Alt hive direction
We've gotten the best results from alts that focus on:
- Multiple Fuzzy (often ~4–6 per alt in coordinated setups) for pollination coverage
- Core blue supports and token consistency
- Enough Tadpoles to keep bubbles flowing
Why: if the field is juiced, your main hive can swap utility fillers into pure value.
↖ 5) Mutations: What to Put on What?
Mutations are where many blue hives quietly lose honey/hour. People spend huge on random stats, then wonder why runs feel unstable.
↖ 5.1 Priority logic
Because blue's big money often hinges on efficient conversion cycles, we prioritize Convert Amount / Convert Rate on key bees.
| Bee Type | Best mutation priority | Why | Budget fallback |
|---|---|---|---|
| Mythics (Buoyant/Tadpole) | Convert (20%+) | Conversion stability boosts realized honey | Any Convert you can afford |
| Tadpole | Convert (or Move Speed if you're rich) | Convert is universally useful; speed is luxury | Convert first |
| Diamond (endgame) | Convert-focused | Scales with conversion-at-hive gameplay | Convert first |
Experience note: when we switched pretty-looking mutations to convert-first on core mythics, our runs became more consistent even before total pollen increased. Consistency is an underrated multiplier.
↖ 6) Beequip Loadout: What to aim for?
Beequips are a huge part of whether you can safely reduce support bees (like Music) without losing uptime.
↖ 6.1 A realistic blue core beequips list
We prioritize beequips that either:
- cover missing buffs (Focus/Melody/haste-like uptime),
- improve blue collection/conversion rhythm,
- or provide reliable value per hour in macro.
A strong target pool includes items such as:
- Pine cones, elf caps, toy drums
- lip balm, candy ring, snow tiara
- reindeer antlers, bead lizard, paper angel
- pink shades (especially if they help cover Focus), whistle, paper clip, kazoo
- peppermint antennas, beret, beesmas top, snow globe
- toy horn, festive wreath, charm bracelet
What this means in practice:
If you discover your beequips already cover key buffs reliably, then you can often drop one support bee and add a value bee—without breaking your run.
↖ 7) Amulets: Stat Priority Cheat Sheets
Amulets decide whether your hive feels smooth or feels spiky. We pick stats that stabilize blue's main loop: blue scaling + conversion + ability uptime.
↖ 7.1 Supreme Star Amulet (SSA)
Target stats (high priority):
- Blue Pollen
- Convert Rate
- Bee Ability Rate
- Critical Chance
- Pollen
↖ 7.2 Ant Amulet
Target stats:
- Critical Chance
- Critical Power
- Blue Pollen
- Pollen
- White Pollen (as a flexible filler)
↖ 7.3 Stick Bug Amulet
Target direction:
- Blue Pollen (or up to ~10% Pollen if that's what you can land)
- Options you may accept depending on rolls:
- Blue Bee Attack / Bee Attack
- Blue Bomb Pollen (or Bomb Pollen if needed)
↖ 7.4 Moon Amulet
Targets:
- Honey per Pollen (aim high; e.g., ~8% if possible)
- Bonus treats/white pollen as acceptable add-ons depending on your roll quality
↖ 7.5 Robo Challenge Cog Amulet
Targets:
- Blue Pollen
- Bubble Pollen
- Ability Token Lifespan
- Instant Blue Conversion
- Blue Bee Attack (or generic attack if forced)
↖ 7.6 King Beetle & Shell Amulets
- King Beetle: prioritize Convert Rate, Bee Attack, and useful blue-field pollen (bamboo/blue flower, depending on your farming pattern and tad sink needs).
- Shell: prioritize Convert Amount (top-end rolls are huge), with Pollen as an acceptable secondary.
Here's the compact view:
| Amulet | Best stats to chase | Why it matters for blue |
|---|---|---|
| SSA | Blue Pollen, Convert Rate, Ability Rate, Crit Chance, Pollen | Core scaling + stable conversion |
| Ant | Crit Chance, Crit Power, Blue Pollen, Pollen | Makes field cycles more valuable |
| Stick | Blue Pollen / Pollen, (Blue) Bomb Pollen, Attack | Adds blue-specific value without breaking builds |
| Moon | Honey per Pollen | Direct hourly gain lever |
| Cog | Blue Pollen, Bubble Pollen, Token Lifespan, Instant Blue Convert | Better token value + smoother loops |
| King Beetle | Convert Rate, Attack, blue-field pollen | Helps conversion & targeted farming |
| Shell | Convert Amount (or Pollen) | Better end-of-loop payoff |
↖ FAQ
↖ 1) Should we run Diamond Bee early?
If you're early-to-mid blue, Diamond usually underperforms because you're missing the supporting ecosystem (high blessing consistency, strong conversion rhythm, and often alt support). If you're level 20+ and stable, Diamond-Blue becomes a real upgrade path rather than a flex pick.
↖ 2) What's the safest Tadpole count?
We've had the most stable results staying between ~7 and ~13 Tadpoles.
If you discover you're constantly overfilling, then trimming toward the lower end can help. If you discover your bubble uptime feels weak, then move upward.
↖ 3) Do we need Fuzzy Bee in a blue hive?
If your macro group/server requires pollination, keeping one can be worth it. If you don't have the support (or you're not benefiting from pollination), Fuzzy often becomes dead weight—especially without strong synergy or external coordination.
↖ 4) Why is Balloon Blessing such a big deal?
Because it's one of the clearest indicators that your long-run blue engine is working. If blessing stays low, it usually signals either underfill, buff downtime, or a build that spikes but doesn't sustain.
↖ 5) Convert mutations feel boring—are they really that good?
Yes. Convert-focused mutations don't look flashy, but they turn more of your collected value into realized honey. If you discover your runs look strong but honey/hour doesn't match, conversion consistency is often the missing link.
When we build a Blue Hive, the biggest risk isn't that our setup isn't trendy—it's treating it like a fixed, one-size-fits-all answer. A more stable approach is to first lock in a template that fits your stage (early substitutes → midgame 20 Buoyant + 10 Tadpole → only consider Diamond-Blue in the endgame), then use an overfill/underfill diagnosis to fine-tune your bee ratios, mutation priorities, and amulet stat choices. This way, you make fewer changes, but each change has more impact—and your honey per hour climbs more consistently.

Most Popular Posts
- Bee Swarm Simulator Progression Guide: Best Gear Order from Early Game to Endgame
- Bee Swarm Simulator Bee Bear Quest Guide: Best Fields, Blooms, Stickers & Petal Cub Tips
- Bee Swarm Simulator Planters Guide: Best Fields, Nectar, Growth Times, and Buying Order
- How to Make 20B+ Pollen in Hive Hub as a Blue Hive in Bee Swarm Simulator
- Bee Swarm Simulator Best Mythic Bee: Ranked for Every Hive
- BSS Beesmas Update This Week: BBM Quest, Honeyday, Timer Extension, and Best Prep Guide
Popular Category Lists
- Grow a Garden / (286)
- ARC Raiders / (277)
- CoD: Black Ops 7 / (166)
- Monopoly Go / (148)
- MLB 26 / (148)
- Star Citizen / (126)
- Steal a Brainrot / (90)
- ARK Survival Ascended / (82)
- Sailor Piece / (68)
- Forza Horizon 6 / (66)
- Diablo IV / (62)
- Blox Fruits / (61)
- Adopt Me / (56)
- CoD: BLACK OPS 6 / (55)
- Grow a Garden 2 / (51)
- Path of Exile 2 / (48)
- Monster Hunter Wilds / (46)
- Windrose / (44)
- Path of Exile / (40)
- Bee Swarm Simulator / (37)