


 0
0ARC Raiders Powered Descender Guide: How to Jump Higher, Loot Faster, and Stop Wasting It
- KIVR
- Share
- ARC Raiders
- 05/07/26
- 670
The Powered Descender is not just a fall-damage gadget. Used properly, it is one of the best traversal tools in ARC Raiders.
Most players waste it by jumping first and activating it while falling. That only slows descent.
The real tech is simple:
Activate first → Jump after.
- Powered Descender Basics
- Biggest Mistake: Jumping Before Activation
- Wrong Use
- Correct Use
- Best Movement Combo
- Best Uses for Powered Descender in ARC Raiders
- Rooftop Loot Routes
- Loot Run Value
- Powered Descender Boost Meter: What It Can and Cannot Do
- Powered Descender vs Snap Hook
- Best Maps and Areas for Powered Descender
- PvP Uses for Powered Descender
- Use It To
- Do Not Use It When
- Where to Find the Powered Descender Blueprint
- How to Craft the Powered Descender
- Best Turbine Compressor Sources
- Powered Descender Repair Cost
- Quick Powered Descender Cheat Sheet
- FAQ
- Is the Powered Descender worth using in ARC Raiders?
- How do you jump higher with the Powered Descender?
- What is the best Powered Descender combo?
- Can the Powered Descender stop fall damage from any height?
- Where do you get the Powered Descender blueprint?
- How do you craft the Powered Descender?
- How do you repair the Powered Descender?
- Is Powered Descender better than Snap Hook?
- Summary
That turns the Powered Descender into a short vertical boost. You can reach rooftops, chimneys, ledges, skylight rooms, and awkward loot spots without wasting time on stairs or failed mantles.
↖ Powered Descender Basics
The Powered Descender is an Epic gadget added with the Riven Tides update. It has a limited boost meter and durability, but its utility is huge if you use it for movement instead of only emergency landings.
| Use | Input | Result |
|---|---|---|
| Jump higher | Activate → Jump | Vertical boost |
| Cross small gaps | Sprint → Activate → Jump | Forward boost |
| Slow fall | Fall → Activate | Safer landing |
| Escape PvP | Activate → Jump to cover | Breaks line of sight |
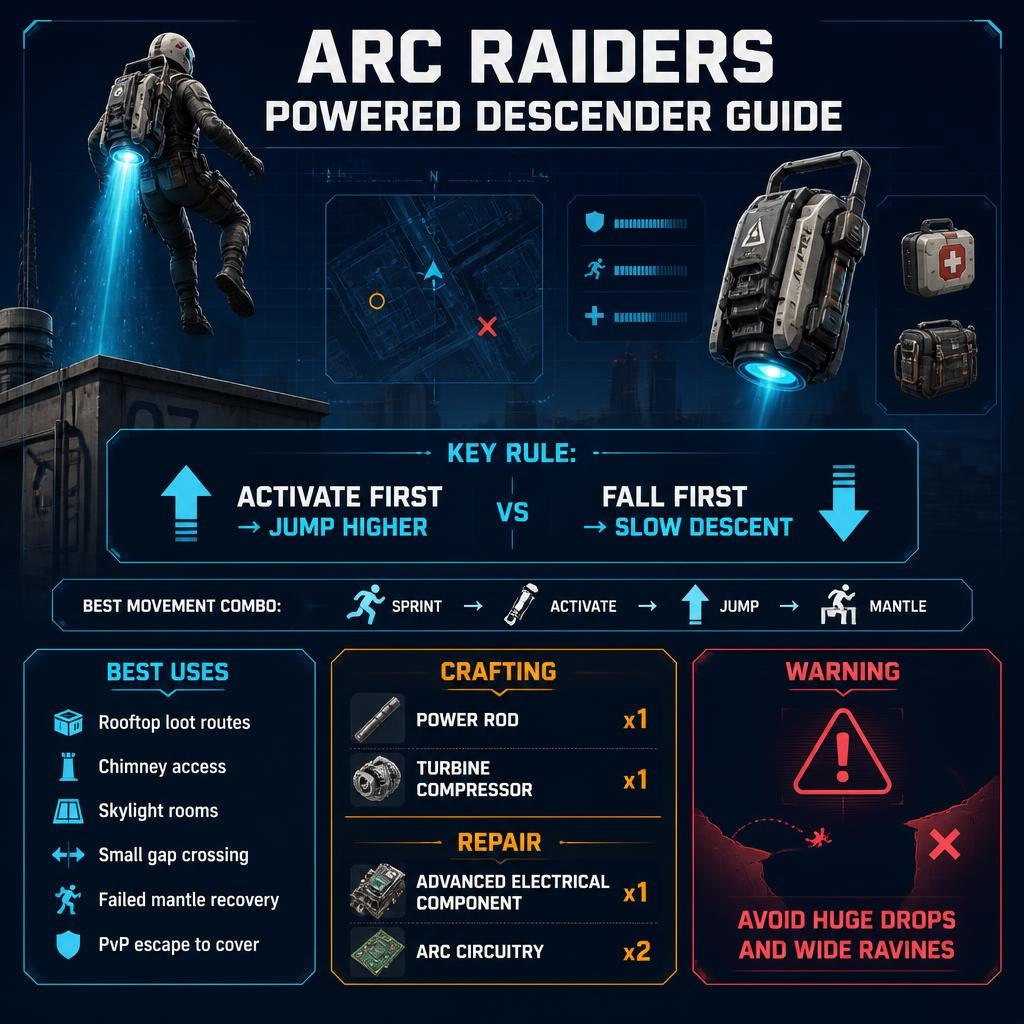
Key rule:
If you want height, activate before jumping.
If you want fall control, activate after falling.
↖ Biggest Mistake: Jumping Before Activation
This is where most players get it wrong.
↖ Wrong Use
Jump → Activate
You float downward. It works for landing, but you get no real lift.
↖ Correct Use
Activate → Jump
You get pulled upward. This lets you mantle ledges that normally feel just out of reach.
↖ Best Movement Combo
Sprint → Activate → Jump → Mantle
Use this for rooftops, small gaps, broken walkways, and fast loot routes.
| Timing | What Happens | Use Case |
|---|---|---|
| Jump first | Slows descent | Dropping down |
| Activate first | Boosts upward | Climbing ledges |
| Sprint first | Adds distance | Crossing gaps |
| No target | Wastes fuel | Bad habit |
If you keep falling short, you are probably activating too late.
↖ Best Uses for Powered Descender in ARC Raiders
The Powered Descender saves time in places where normal movement feels sticky. Rooftops, chimneys, ledges, and awkward mantles are where it earns its slot.
↖ Rooftop Loot Routes
Use it to reach:
- Open skylight rooms
- Chimney loot spots
- High rooftops
- Broken roof gaps
- Upper-floor ledges
- Shortcuts between buildings
This matters because every failed mantle costs time. Time gets you third-partied.
If you miss a rooftop jump, do not run the long way around. Pull the gadget, activate, jump back up, and keep moving.
↖ Loot Run Value
| Problem | Powered Descender Fix |
|---|---|
| Ledge is slightly too high | Activate → Jump |
| Rooftop gap is annoying | Sprint → Activate → Jump |
| Mantle keeps failing | Boost into the ledge |
| Chimney route is awkward | Use vertical lift |
| No Snap Hook equipped | Use Descender as budget mobility |
This is not flashy. It is practical. Faster routes mean more loot and less exposure.
↖ Powered Descender Boost Meter: What It Can and Cannot Do
The Powered Descender has a limited boost meter. When it runs out, the engine cuts and you drop.
Treat it like a short burst, not a full parachute.
| Situation | Risk | Verdict |
|---|---|---|
| Small ledge boost | Low | Best use |
| Rooftop gap | Medium | Strong with sprint |
| Medium building drop | Medium | Usually safe if timed |
| Huge tower drop | High | Bad idea |
| Wide ravine crossing | High | Take another route |
Do not trust it from extreme height. If the boost dies mid-fall, you are going straight into the dirt.
If the drop looks stupid, it probably is.
↖ Powered Descender vs Snap Hook
The Snap Hook gives better direct vertical access. The Powered Descender is cheaper, quieter in terms of loot value, and less likely to make other players chase your kit.
| Gadget | Best Strength | Weakness |
|---|---|---|
| Powered Descender | Boosts ledges, gaps, rooftops | Limited fuel |
| Snap Hook | Direct vertical pull | Higher-value target |
| Zipline | Safe fixed movement | Route dependent |
| Stairs/Ladders | Reliable | Slow and predictable |
Use Snap Hook for hard vertical climbs.
Use Powered Descender for fast loot movement and route correction.
For normal raids, the Descender is often enough.
↖ Best Maps and Areas for Powered Descender
The gadget gets better on vertical maps. If your route has roofs, ledges, and gaps, bring it.
| Area Type | Value | Why |
|---|---|---|
| Buried City rooftops | High | Chimneys, skylights, roof gaps |
| Riven Tides routes | High | Vertical loot paths, blueprint farming |
| Industrial rooftops | High | Lots of awkward mantles |
| Flat open terrain | Low | Few boost targets |
| Huge drops | Risky | Boost meter can fail |
Best use case: loot-heavy rooftop routes.
Worst use case: giant drops and open fields.
↖ PvP Uses for Powered Descender
The Powered Descender is not a weapon, but it wins fights by fixing positioning.
↖ Use It To
- Boost over cover.
- Reach high ground.
- Escape a bad angle.
- Break line of sight.
- Cross a gap while chased.
- Take a roof before enemies expect it.
↖ Do Not Use It When
- You have no target ledge.
- You are already getting beamed in the open.
- You are trying to cross a huge gap.
- You need instant cover and the animation will expose you.
Rule: boost toward cover, height, or a teammate. Never boost just to move faster in open space.
↖ Where to Find the Powered Descender Blueprint
Farm the Powered Descender blueprint in Riven Tides. Prioritize containers tied to utility and technical loot.
| Location | Container | Why Farm It |
|---|---|---|
| Stacking Yard | Green drawers | Strong gadget loot pool |
| Tennis Courts | Lockers | Good blueprint chance |
| Poolside Area | Lockers | Worth checking on route |
Blueprint drops are RNG. Run fast routes, hit the right containers, and reset.
↖ How to Craft the Powered Descender
Craft it at the Utility Station after unlocking the blueprint.
| Material | Amount | Source |
|---|---|---|
| Power Rod | 1 | Craft in Refiner |
| Turbine Compressor | 1 | ARC Turbines / ARC Couriers |
The Turbine Compressor is the bottleneck.
↖ Best Turbine Compressor Sources
| Source | Risk | Notes |
|---|---|---|
| ARC Turbines | High | Noisy, attracts players |
| ARC Couriers | Medium | Safer option for solos |
If you are solo, farm ARC Couriers first. If you have a squad and enough ammo, take Turbines.
↖ Powered Descender Repair Cost
The Powered Descender has 100 durability. Heavy use burns it down quickly, but repairs are manageable.
| Repair Material | Amount | Source |
|---|---|---|
| Advanced Electrical Component | 1 | Refiner |
| ARC Circuitry | 2 | Refiner |
Expected repair timing:
| Usage Style | Repair Frequency |
|---|---|
| Light movement | Every few raids |
| Frequent rooftop boosting | About every 2–3 raids |
| Constant boost spam | Check after each raid |
Repair it before it gets low. A broken Descender at the wrong ledge is how a clean loot run turns into a long walk.
↖ Quick Powered Descender Cheat Sheet
| Goal | Input | Result |
|---|---|---|
| Climb higher | Activate → Jump | Vertical lift |
| Cross rooftops | Sprint → Activate → Jump | Distance boost |
| Save a fall | Fall → Activate | Reduced fall damage |
| Escape PvP | Activate → Jump to cover | Line-of-sight break |
| Fix missed mantle | Activate → Jump again | Route recovery |
Memorize this:
Activate first for height. Activate late for descent.
That one timing change makes the gadget twice as useful.
↖ FAQ
↖ Is the Powered Descender worth using in ARC Raiders?
Yes. The Powered Descender is worth using for rooftop loot routes, ledge boosts, gap crossing, and PvP escapes. Its best value comes from movement, not fall protection.
↖ How do you jump higher with the Powered Descender?
Use Activate → Jump. If you jump first, the gadget mostly slows your fall. Activate before jumping to get vertical lift.
↖ What is the best Powered Descender combo?
The best combo is Sprint → Activate → Jump → Mantle. Use it for rooftop gaps, broken paths, and ledges that are barely out of reach.
↖ Can the Powered Descender stop fall damage from any height?
No. It has limited boost. It can help with medium drops, but extreme towers and huge ravines can still kill you if the meter runs out.
↖ Where do you get the Powered Descender blueprint?
Farm Riven Tides, especially Stacking Yard green drawers, Tennis Courts lockers, and Poolside lockers.
↖ How do you craft the Powered Descender?
Craft it at the Utility Station with Power Rod x1 and Turbine Compressor x1.
↖ How do you repair the Powered Descender?
Repair it with Advanced Electrical Component x1 and ARC Circuitry x2. Both are manageable through Refiner crafting.
↖ Is Powered Descender better than Snap Hook?
Not for pure vertical access. Snap Hook climbs better. But Powered Descender is cheaper, flexible, and excellent for normal loot movement.
↖ Summary
The Powered Descender is strongest when used as a Powered Ascender.
Use:
- Activate → Jump for height.
- Sprint → Activate → Jump for distance.
- Fall → Activate for landing control.
Best uses:
- Rooftop loot routes
- Chimney access
- Skylight rooms
- Small gap crossing
- Failed mantle recovery
- PvP escapes
Craft it with Power Rod x1 and Turbine Compressor x1. Repair it with Advanced Electrical Component x1 and ARC Circuitry x2.
If your route has rooftops or awkward ledges, bring it. It saves time, cuts detours, and turns bad movement into clean movement.

Most Popular Posts
- ARC Raiders Riven Tides Key Room Guide: Best Hotel Keys, Loot Routes, Secure & Crane Storage
- ARC Raiders Damage Fireflies Trial Guide: Best Farm Method on Buried City Night Raid
- ARC Raiders Riven Tides Update: New Map & Items, ARC Turbine, Rewards, and Best Early Strategy
- ARC Raiders Bettina Guide: Best Build, Buffs, and How to Use It Against ARC
- Arc Raiders Season 4 Riven Tides Update, Rewards, Safe Skins, and Release Timeline
- ARC Raiders Solo Search Supply Drops Guide: Best Buried City Route, Beacon Locations
Popular Category Lists
- Grow a Garden / (286)
- ARC Raiders / (262)
- CoD: Black Ops 7 / (166)
- Monopoly Go / (146)
- MLB 26 / (144)
- Star Citizen / (111)
- Steal a Brainrot / (89)
- Sailor Piece / (68)
- ARK Survival Ascended / (66)
- Diablo IV / (61)
- Forza Horizon 6 / (60)
- Blox Fruits / (60)
- CoD: BLACK OPS 6 / (55)
- Adopt Me / (53)
- Path of Exile 2 / (48)
- Monster Hunter Wilds / (46)
- Windrose / (44)
- Path of Exile / (40)
- Grow a Garden 2 / (38)
- Bee Swarm Simulator / (36)


