


 0
0ARC Raiders Shotgun Vulcano & Il Toro Maxed Builds and Cost Analysis
- KIVRI
- Share
- ARC Raiders
- 01/20/26
- 1665
When we put the Vulcano and Il Toro head-to-head with their absolute best weapons setups, the surprise isn't that one is strictly stronger—it's that they behave like two completely different genres of violence.
Many players treat them as interchangeable close-range options, but that's a mistake. After extensive testing, it became clear: Vulcano plays like a close-range DPS hose (think AA12 energy), while Il Toro is the classic peek-shot shotgun that deletes people only when you control distance and timing.
If you are about to drop 30,000 credits on a loadout, you need to know which one fits your hands. Here is how we decide which one to bring, upgrade, and build around.
- 1. What Each Gun Is Actually Doing
- 2. The Most Expensive Builds (What We Are Running)
- Why These Parts Matter
- 3. Performance: Real Fights, Real Outcomes
- 4. The Economy: Is Level 4 Worth It?
- 5. Situational Pick: Which One Should You Bring?
- 6. How We Pilot Them (Micro-Play)
- FAQ
- Closing Notes
↖ 1. What Each Gun Is Actually Doing
Let's start with the identity, because it determines everything else—your attachments, your positioning, and even how you take corners.
The Vulcano is a DPS (Damage-Per-Second) Weapon
This gun is about volume. Fast follow-up shots allow us to correct our aim mid-fight. It is incredibly forgiving in scrappy 1v2 or 1v3 situations because we keep outputting damage while moving.
Why this matters: DPS weapons win when fights are messy, continuous, and out in the open.
The Il Toro is a Burst (Damage-Per-Shot) Weapon
With a slower fire rate, every trigger pull is a high-stakes decision. It shines when we can peek, shoot, break line of sight, and repeat.
Why this matters: Burst weapons win when you control the tempo, the angles, and the cover.
This means: We don't just ask which gun has better stats? We ask which type of fight are we trying to force?
↖ 2. The Most Expensive Builds (What We Are Running)
Below are the attachment packages we tested as maxed-out concepts. These aren't budget builds; these are for when you want every advantage possible.
| Weapon | The Most Expensive Core | What It Fixes | What It Enables |
|---|---|---|---|
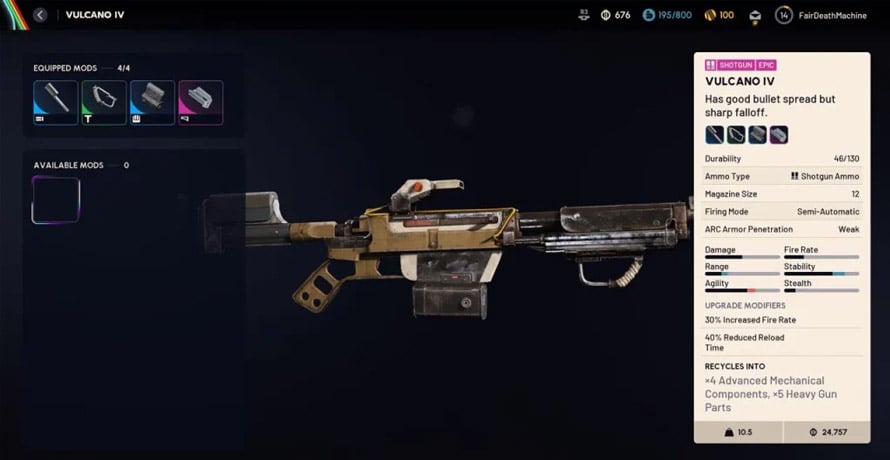
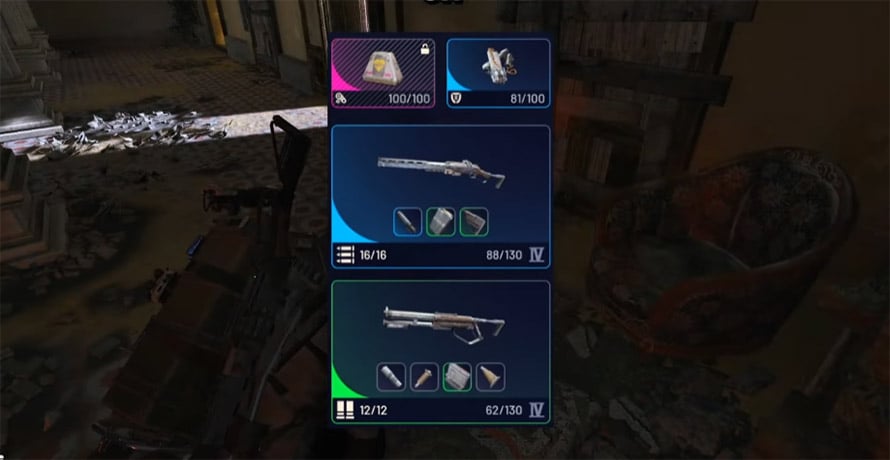
| Vulcano | Shotgun Choke 3 + Horizontal Grip + Extended Shotgun Mag 3 + Kinetic Converter | Spread/Recoil + Ammo Capacity + Fire Rate | Sustained pushing and fast multi-knock chains. |
| Il Toro | Shotgun Choke + Extended Shotgun Mag + Grip + (Optional) Kinetic Converter | Range Consistency + Reload Safety | Peek-burst kills, corner control, and hit-and-hide rhythm. |
↖ Why These Parts Matter
- The Choke: Tighter dispersion means more pellets land on the target. This makes range a reality rather than just a feeling.
- Horizontal Grip: On the Vulcano, this is a massive quality-of-life upgrade because recoil stacks up fast at high rates of fire.
- Extended Mag: This reduces the most dangerous moment in any shotgun fight—reloading while an enemy face-checks you.
- Kinetic Converter: A percentage-based fire-rate increase is much more noticeable on a high-ROF weapon. It feels significantly more impactful on the Vulcano than the Il Toro.
↖ 3. Performance: Real Fights, Real Outcomes
We care about outcomes you will actually feel in a raid: time to down, consistency, and how often a gun rescues you from a mistake.
Vulcano (Maxed) — AA12 Mode
With the Kinetic Converter, Extended Mag, and control attachments, the Vulcano transforms into a different weapon entirely. In high-intensity PvP environments, we have had runs where the Vulcano stacks double-digit player kills (e.g., 11 in a single raid) simply because it keeps deleting targets before they can reset.
The Reality: Fast shots reduce the penalty of imperfect tracking. If your first shot is slightly off, your second and third arrive fast enough to secure the win anyway.
Il Toro (High-End) — Shotgun Discipline
The Il Toro wins when we commit to a strict cover rhythm: step out → land a heavy shot → step back → heal/plate → repeat.
The Reality: When the fight becomes a continuous spray duel—multiple enemies, open space, or an opponent with strong tracking—the slower fire rate makes missed shots feel brutal. The Il Toro rewards geometry more than raw aggression.
↖ 4. The Economy: Is Level 4 Worth It?
This is where the conversation gets interesting. We have seen these practical cost anchors in our runs:
Vulcano Level 1: ~10,000 credits
Vulcano Level 4: ~30,000 credits
The feel difference from Level 1 to Level 4—especially with the Kinetic Converter—is not incremental; it is transformational.
| Upgrade Choice | Approx Cost | Power Jump (Practical) | When It's Best |
|---|---|---|---|
| Vulcano L1 | ~10k | Strong Baseline | Budget PvP runs or learning shotgun routes. |
| Vulcano L4 | ~30k | AA12 Tempo & Control | Aggressive squads, hot-dropping, and farming PvP. |
| 3× Vulcano L1 | ~30k Total | More Attempts, Less Risk | If you die early often or want volume reps. |
Our Decision Rule:
If you are consistently reaching PvP hotspots and surviving long enough to take multiple fights, upgrade to L4. You will convert more encounters into wins. However, if you are still losing kits to early ambushes, buy three L1s and spend the difference on meds and armor.
↖ 5. Situational Pick: Which One Should You Bring?
Here are the clean If / Then rules we use to decide before a raid.
Choose the Vulcano if...
You expect multiple back-to-back engagements. The sustained DPS and mag value will carry you.
You find yourself in tight interiors where fights are continuous and messy.
Your aim is good, but not perfect. The higher rate of fire gives you more correction shots.
Choose the Il Toro if
You are confident playing cover and corners. The single-shot punish is unmatched here.
You often take fights where you can break line of sight (door frames, stairs, head-glitches).
You are disciplined with timing—shoot, reset, re-peek. In these hands, the Il Toro feels unfair.
↖ 6. How We Pilot Them (Micro-Play)
This isn't theory. These are the habits that change outcomes in the heat of the moment.
Vulcano Micro-Plan
1. Pre-aim chest level and start firing the moment they commit to the fight.
2. Strafe and track. Do not panic-jump into missed pellets; keep your feet moving but your aim steady.
3. If you crack or knock one target, immediately swing to the second. The Vulcano is strongest when chaining kills.
Il Toro Micro-Plan
1. Hold tight angles and force the enemy to enter your lane.
2. One shot, then break sight. Use the door, the corner, or the stair lip immediately after firing.
3. If you miss, do not double down in the open. Reset immediately, because your fire rate will not bail you out of a bad position.
↖ FAQ
1. Is the Vulcano basically better than the Il Toro?
In straight-up brawls where both players stay exposed, the Vulcano often looks better because DPS forgives mistakes. The Il Toro can still win, but only if you are peeking correctly and landing that first heavy shot.
2. Does the Kinetic Converter matter on both?
Yes, but it is felt much more on the Vulcano. A percentage increase on a faster base fire rate changes the flow of a fight dramatically, whereas the Il Toro gains are real but subtler.
3. What are the must-have attachments?
For the Vulcano, the Choke, Extended Mag, and Kinetic Converter are the core; the grip is a comfort pick that keeps it controllable. For the Il Toro, the Choke and Extended Mag are the biggest consistency boosts.
4. Which one is better for solo play?
Solo play often involves uneven fights (1v2, 1v3) and requires rapid re-targeting. That tends to favor the Vulcano. However, if you are a patient solo player who plays doors and cover effectively, the Il Toro can be devastating.
↖ Closing Notes
The Vulcano and Il Toro do not compete on the same axis. The Vulcano is the best SMG-shaped shotgun—it wins through sustained pressure, fast corrections, and chain potential. The Il Toro is the true shotgun—it wins through positioning, timing, and brutal single-shot punishment.
If you build and pilot them according to their identity, both become top-tier weapons. If you force one to play like the other, that is when they start feeling inconsistent. Choose the one that matches your habits, not just the one with the highest price tag.

Most Popular Posts
- ARC Raiders Riven Tides Key Room Guide: Best Hotel Keys, Loot Routes, Secure & Crane Storage
- ARC Raiders Damage Fireflies Trial Guide: Best Farm Method on Buried City Night Raid
- ARC Raiders Riven Tides Update: New Map & Items, ARC Turbine, Rewards, and Best Early Strategy
- ARC Raiders Bettina Guide: Best Build, Buffs, and How to Use It Against ARC
- Arc Raiders Season 4 Riven Tides Update, Rewards, Safe Skins, and Release Timeline
- ARC Raiders Solo Search Supply Drops Guide: Best Buried City Route, Beacon Locations
Popular Category Lists
- Grow a Garden / (286)
- ARC Raiders / (262)
- CoD: Black Ops 7 / (166)
- Monopoly Go / (146)
- MLB 26 / (144)
- Star Citizen / (111)
- Steal a Brainrot / (89)
- Sailor Piece / (68)
- ARK Survival Ascended / (66)
- Diablo IV / (61)
- Forza Horizon 6 / (60)
- Blox Fruits / (60)
- CoD: BLACK OPS 6 / (55)
- Adopt Me / (53)
- Path of Exile 2 / (48)
- Monster Hunter Wilds / (46)
- Windrose / (44)
- Path of Exile / (40)
- Grow a Garden 2 / (38)
- Bee Swarm Simulator / (36)


