0
0ARC Raiders Solo Skill Tree Build: Fast XP, Mobility, Carry Weight
- KITE
- Share
- ARC Raiders
- 12/21/25
- 8989
Playing solo in ARC Raiders is less about perfect aim and more about staying mobile, looting fast, avoiding bad fights, and extracting safely. My build does exactly that: it front-loads XP and stamina so you scale quickly, then locks in carry-weight and weapon-weight perks so you stop getting punished by over-encumbrance, and finally adds the escape tools that keep you alive when a third party shows up.
Below is a structured, level-by-level approach with the same mindset I use in real solo runs: get strong early, stabilize mid-game, then add optional money-printing tools.
- Main Build Philosophy
- Skill Priority Roadmap (Level 1 → 75+)
- Phase 1 — Snowball Early (Levels 1–15): XP + Stamina foundation
- Phase 2 — Carry Weight Core (Levels 15–30): stop losing money to encumbrance
- Phase 3 — Loot Faster, Exit Safer (Levels 30–40): information + emergency tools
- Phase 4 — Armor Comfort + Combat Mobility (Levels 38–55): survive the messy fights
- Phase 5 — Get to Cover Tech (Levels 55–75): stamina recovery + dodge synergy
- Optional Late-Game Investment: Security Breach (Worth it, with realistic expectations)
- When I take Security Breach
- A concrete earning example (10-run sample)
- The trade-off
- What I Skip (and why)
- Point Allocation Cheat Sheet (Practical Order)
- FAQ
- 1) If I'm brand new, what's the single best first skill?
- 2) I keep getting over-encumbered after winning fights—what should I prioritize?
- 3) Is Traveling Tinkerer really worth points for solo?
- 4) Should I rush Security Breach early?
- 5) What if I prefer a slower, angle-holding playstyle?
- How this build wins raids
↖ Main Build Philosophy
Solo has one brutal rule: you don't get revived. So every point should either:
- make you level faster (more skill points sooner),
- keep you moving (stamina + mobility),
- let you loot more per raid (carry weight + weapon weight),
- reduce time exposed (faster looting / faster info),
- improve emergency exits (crafting + breach value + get-to-cover tech).
If a perk is nice but doesn't change survival odds or income pace, I treat it as filler.
| Step | When (approx.) | Skill | Target Rank | Why I take it (solo logic) | What it changes in raids |
|---|---|---|---|---|---|
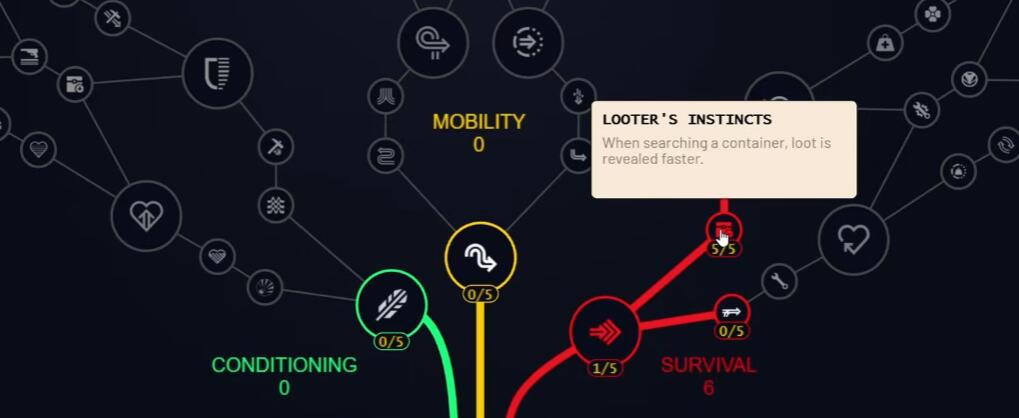
| 1 | Level 1–6 | Looter's Instinct | Max (6/6) | XP is power. This accelerates your entire tree early. | You level fast just by interacting with containers/loot routes. |
| 2 | Level 7–15 | Youthful Lungs | Max | Stamina is your universal defense stat. | Longer rotations, longer escapes, fewer forced fights. |
| 3 | Level 7–20 | Nimble Climber | 1 point early | Cheap mobility value; later becomes a gateway for movement perks. | Cleaner vertical routes and fewer stuck moments. |
| 4 | Level 10–25 | Marathon Runner | Build toward max | Running efficiency compounds across every raid. | You can reposition more without stamina bankruptcy. |
| 5 | Level 15–30 | Silent Scavenger | Max | Solo deaths often start with they heard me first. | Safer looting and smoother rotations near squads. |
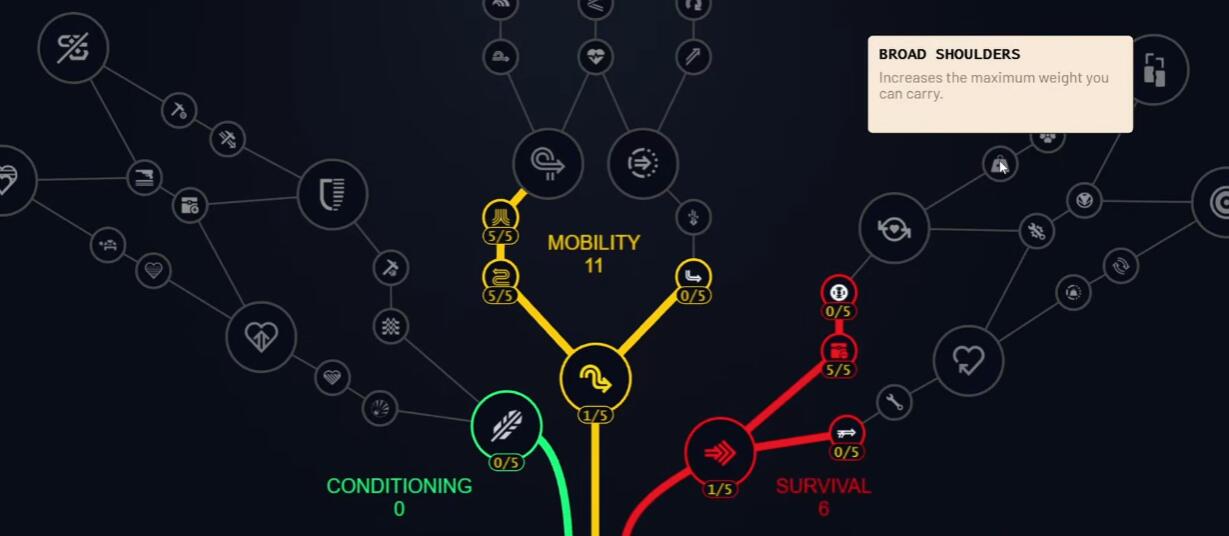
| 6 | Level 20–35 | Broad Shoulders | Max | One of the best solo economy perks—carry more, extract richer. | Less over-encumbered, fewer I must drop loot decisions. |
| 7 | Level 25–40 | Looter's Luck | Max | Body looting is high-risk; speed matters. | Faster grab and go off dead players in bad spots. |
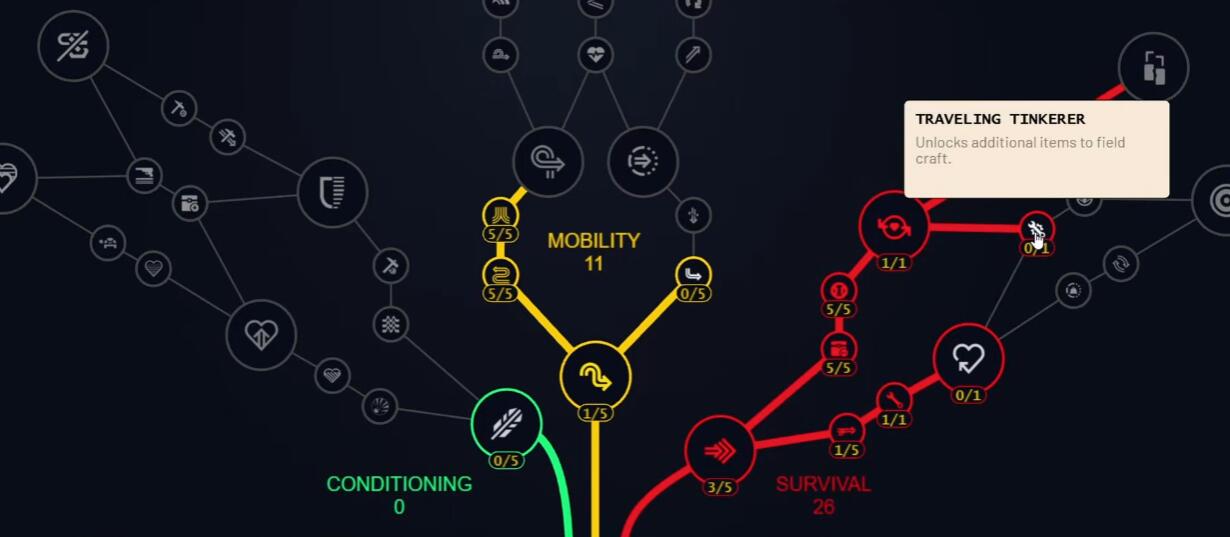
| 8 | Level 30–45 | Traveling Tinkerer | Unlock/useful ranks | Solo needs emergency tools/consumables to stabilize and extract. | More I can fix this now moments instead of gambling extracts. |
| 9 | Level 38–55 | Used to the Weight | Max | As you wear better shields, efficiency becomes mandatory. | Better movement/handling with heavier protection. |
| 10 | Level 40–60 | Fight or Flight | Max | Solo fights are about reset windows, not long trades. | More reliable disengage/reposition tempo. |
| 11 | Level 50–70 | Loaded Arms | Max / priority | Weapons are heavy; solo loot value is often extra guns. | Carry more firepower/loot without speed penalties. |
| 12 | Level 55–75+ | Burden Roll | Unlock + take | Shield breaks are the most lethal seconds; this protects that moment. | Your first dodge after shield break is dramatically safer. |
| 13 | Level 55–75+ | Carry the Momentum | Unlock + take | Turns a dodge into a guaranteed distance burst. | Shield breaks → roll → sprint window → cover becomes repeatable. |
| 14 | Level 55–75+ | Survivor Stamina | Take | Getting hurt usually deletes stamina regen; this fixes that. | Faster recovery while hurt, fewer deaths mid-escape. |
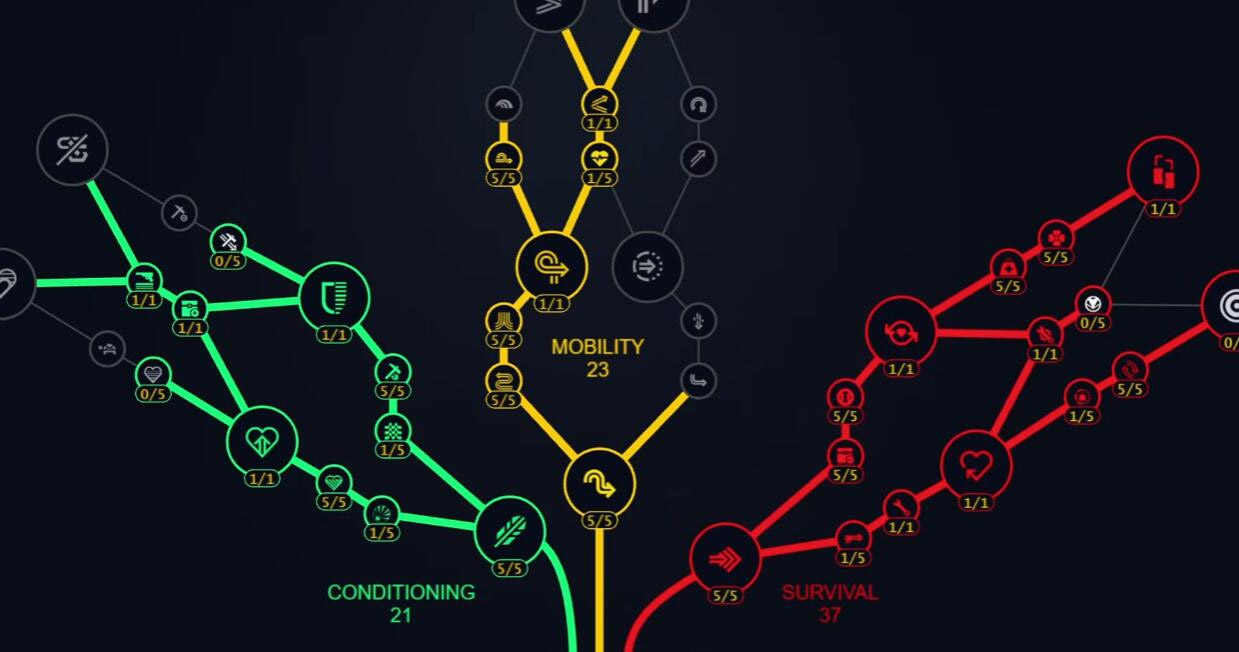
↖ Skill Priority Roadmap (Level 1 → 75+)
↖ Phase 1 — Snowball Early (Levels 1–15): XP + Stamina foundation
Early game is where most solos fall behind because they loot slowly and move like a fridge. I fix that first.
| Stage | Skills to Target | Suggested Points | Why it matters (solo) | What you do differently in raids |
|---|---|---|---|---|
| 1–6 | Looter's Instinct | Max ASAP (6) | Every container/body interaction becomes faster progression | Spawn in → touch every container you pass, even already-looted ones, because XP stacks over time |
| 7–15 | Youthful Lungs (stamina max) + 1 point in Nimble Climber + 1 point in Marathon Runner | Max Youthful Lungs first | Stamina is your second health bar as a solo | You reposition more, disengage more, and you stop arriving to fights already exhausted |
Why Looter's Instinct first?
Because early skill points compound. If you level faster in week one, you're effectively earning interest on every raid after that.
If you start with Expedition bonus points:
Then Looter's Instinct becomes almost free to max, which accelerates everything else. If you don't have those points, you still rush it—this is one of the few perks that pays you back immediately.
↖ Phase 2 — Carry Weight Core (Levels 15–30): stop losing money to encumbrance
At this point your raids start failing for a dumb reason: you win a fight or find good loot, then you can't carry it without moving like a snail.
| Goal | Skills | Points | Why |
|---|---|---|---|
| Unlock carry-weight perks | Silent Scavenger (max), Inrange Crafting (1), Agile Croucher (2) | As needed to reach unlock thresholds | This is a pathing cost to reach the perks that actually change raid outcomes |
| Must-have carry perk | Broad Shoulders | Max | +10 carry weight when maxed; this is pure loot per raid |
Broad Shoulders is a solo economy perk.
It increases your extraction value because you physically bring more stuff home. More value per raid means you can afford better shields/weapons sooner, which increases survival, which… loops back into more value. That's the kind of closed-loop synergy you want.
↖ Phase 3 — Loot Faster, Exit Safer (Levels 30–40): information + emergency tools
Now you're fighting more players and looting more bodies in the open. Time exposed = death.
| Skill | Priority | Why it's good now | Solo scenario it solves |
|---|---|---|---|
| Looter's Luck | Max | Faster reveal on bodies/containers reduces standing still time | You down someone in a hot area → you can grab key items and move before the third party arrives |
| Traveling Tinkerer | Take | Lets you craft Herbal Bandages and especially a Hatch Key | If you find a blueprint or high-value item on a budget kit, you can extract safer instead of gambling on public extract |
This is where your playstyle changes:
If you find yourself thinking I need to get out right now, then crafting your own exit tool is not a luxury—it's a raid win condition.
↖ Phase 4 — Armor Comfort + Combat Mobility (Levels 38–55): survive the messy fights
Once you're commonly running blue/purple shields, you want perks that let you reset fights instead of dying during the first scramble.

| Skill | Suggested Action | Why it matters |
|---|---|---|
| Used to the Weight | Max | Running better shields without stamina/handling pain keeps you agile in real fights |
| Fight or Flight | Max | Helps you reposition and survive pressure; solos live on movement windows |
| Loaded Arms | Max (must-have) | Dramatically reduces weapon weight—huge for double-weapon setups and post-fight looting |
Loaded Arms + Broad Shoulders = I loot more and still move like a human.
If you hate being over-encumbered (I do), this combo is the backbone of the build.
↖ Phase 5 — Get to Cover Tech (Levels 55–75): stamina recovery + dodge synergy
This is where solos stop dying to chip damage and bad timing. You're building a reliable break contact button.
| Skill | Points | What it does in practice | Why solos love it |
|---|---|---|---|
| Survivor Stamina | Take | Faster stamina regen when critically hurt | You will get tagged, often; this turns panic into an actual escape |
| Unburdened Roll | Take | Reduces stamina strain around dodge usage | More dodges without draining dry |
| Burden Roll | Take | If shield breaks, your first dodge shortly after costs no stamina | Shield pop → free dodge → you're already moving to cover |
| Carry the Momentum | Take | After sprint dodge roll, sprinting doesn't consume stamina briefly | Combines with Burden Roll to create a clean disengage window |
| Three Deep Breaths | Max | Stamina recovery after stamina-draining actions (like dodge) | Keeps the loop going instead of one dodge then dead |
The combo that saves raids:
Shield breaks → free dodge (Burden Roll) → stamina-free sprint window (Carry the Momentum) → stamina recovery (Three Deep Breaths).
That chain is how you survive being third-partied without a teammate.
↖ Optional Late-Game Investment: Security Breach (Worth it, with realistic expectations)
↖ When I take Security Breach
I spec into Security Breach once my core solo engine is online (XP, stamina, carry weight, weapon weight, escape tools). At that stage, breach becomes a repeatable income layer.
↖ A concrete earning example (10-run sample)
In one test block I ran 10 daytime Spaceport runs focused on breaches only (minimal extra looting). Results were roughly:
- ~240k total value across 10 runs (~24k/run average)
- Loot included: 3 epic weapons, 5 blue weapons, 4 green weapons
- Plus ammo, utility grenades, and recyclable parts (useful for repairs and crafting)
That doesn't mean every 10 runs will look identical—RNG is still RNG—but it was strong enough that I consider it worth a slot for a solo who wants consistent stash growth.
↖ The trade-off
Breach can be dynamic (sometimes not present). If you find yourself annoyed by empty stops, then prioritize consistency perks first and treat breach as optional.
↖ What I Skip (and why)
Some perks look fun but don't pay rent for my solo style.
| Skill/Branch | Why I skip it | When I'd reconsider |
|---|---|---|
| Slide-focused perks (e.g., sliding further) | Sliding is stamina-taxing now; extra distance rarely beats stamina economy | If you play hyper-aggressive close-range and your route is built around slide peeks |
| Hold angle longer style perks | Solo success is usually rotate + disengage, not long ADS holds | If you are a disciplined angle-holder with a squad or you play pure overwatch |
If you discover you're dying while holding angles (not while rotating), then those ADS perks gain value—but that's a different build identity.
↖ Point Allocation Cheat Sheet (Practical Order)
Here's the clean do this, then this sequence I follow.
| Order | Focus | Skills to complete |
|---|---|---|
| 1 | Fast XP | Looter's Instinct (max) |
| 2 | Stamina baseline | Youthful Lungs (max), then Marathon Runner (max), Nimble Climber (start) |
| 3 | Carry weight | Broad Shoulders (max) |
| 4 | Faster looting | Looter's Luck (max) |
| 5 | Safer extracts | Traveling Tinkerer (take) |
| 6 | Armor comfort | Used to the Weight (max) |
| 7 | Combat movement | Fight or Flight (max) |
| 8 | Loot capacity without slow | Loaded Arms (max) |
| 9 | Dodge + stamina loop | Burden Roll + Carry the Momentum + Three Deep Breaths (max) |
| 10 | Optional economy layer | Security Breach |
If you have fewer bonus points:
Then the first thing I trim is finishing a less critical rank (for example, leaving one perk at 4/5) to afford the unlock path to something that changes raid outcomes (like breach or the dodge loop).
↖ FAQ
↖ 1) If I'm brand new, what's the single best first skill?
Looter's Instinct. If you find yourself leveling slowly, then this fixes the root cause because it turns normal looting into progression. More levels earlier means you unlock the rest of the build sooner.
↖ 2) I keep getting over-encumbered after winning fights—what should I prioritize?
Broad Shoulders + Loaded Arms.
If you notice you're leaving good loot behind or dying while waddling to extract, then these two perks convert won fight into won raid.
↖ 3) Is Traveling Tinkerer really worth points for solo?
Yes—because it changes your extraction options.
If you pull a blueprint or a high-value item on a cheap kit, then crafting a Hatch Key is often the difference between clean profit and public extract coin flip.
↖ 4) Should I rush Security Breach early?
Not before your survival engine.
If you're dying frequently, breach loot doesn't matter because you won't extract it. Get stamina + carry weight + dodge loop online first, then add breach for income scaling.
↖ 5) What if I prefer a slower, angle-holding playstyle?
Then you'll get less value from my mobility-first choices.
If you find your deaths happen while rotating (caught in the open), stick to this build. If your deaths happen while holding angles (out-aimed or out-traded), then consider ADS/accuracy comfort perks instead.
↖ How this build wins raids
This solo skill tree is built around a simple loop: level faster → move longer → carry more → loot faster → disengage cleaner → extract safer. The perks aren't just good individually; they stack into a practical raid rhythm where you're exposed less, stuck less, and paid more per successful run.

Most Popular Posts
- ARC Raiders Riven Tides Key Room Guide: Best Hotel Keys, Loot Routes, Secure & Crane Storage
- ARC Raiders Damage Fireflies Trial Guide: Best Farm Method on Buried City Night Raid
- ARC Raiders Riven Tides Update: New Map & Items, ARC Turbine, Rewards, and Best Early Strategy
- ARC Raiders Bettina Guide: Best Build, Buffs, and How to Use It Against ARC
- Arc Raiders Season 4 Riven Tides Update, Rewards, Safe Skins, and Release Timeline
- ARC Raiders Solo Search Supply Drops Guide: Best Buried City Route, Beacon Locations
Popular Category Lists
- Grow a Garden / (285)
- ARC Raiders / (260)
- CoD: Black Ops 7 / (166)
- Monopoly Go / (146)
- MLB 26 / (142)
- Star Citizen / (109)
- Steal a Brainrot / (89)
- Sailor Piece / (68)
- ARK Survival Ascended / (64)
- Forza Horizon 6 / (59)
- Diablo IV / (59)
- Blox Fruits / (59)
- CoD: BLACK OPS 6 / (55)
- Adopt Me / (51)
- Path of Exile 2 / (48)
- Monster Hunter Wilds / (46)
- Windrose / (44)
- Path of Exile / (40)
- Grow a Garden 2 / (37)
- Bee Swarm Simulator / (36)