


 0
0ARC Raiders Stella Montis Guide: Secret Loot Spots, Hidden Jumps, and Fast Rotation Routes
- KIVR
- Share
- ARC Raiders
- 04/24/26
- 981

Stella Montis is one of those ARC Raiders maps that rewards players who know the little things. On paper, it is just another loot route with a few vertical layers. In practice, it has hidden containers, off-angle weapon crate spawns, and movement shortcuts that save time, reduce noise, and sometimes save the raid outright. If we learn a few key spots, we can loot faster, rotate safer, and stop walking into the same predictable angles as everyone else.
- Why Stella Montis is worth learning properly
- Best secret loot spots on Stella Montis
- Loading Bay / Cargo Dock A hidden stash
- Control Room upper lift container
- Assembly Line upper crate route
- Assembly side room hidden loot
- Security Bridge lower ledge
- Quick loot summary
- Best hidden jumps and shortcuts
- Lobby breach shortcut
- Upper lobby drop routes
- Opposite breachable door bypass
- Assembly ledge climbs
- Quick shortcut summary
- Best route choice by playstyle
- What usually gets players killed here
- FAQ
- What is the best secret loot spot on Stella Montis?
- Do I need a Zipline or Snap Hook on Stella Montis?
- Is Stella Montis good for solo players?
- Are the hidden jumps really worth learning?
- Final thoughts
↖ Why Stella Montis is worth learning properly
This map has a lot of small advantages that add up over time.
From our own runs, the players who do well here usually are not just the best shots.
They are the ones who know:
- where hidden containers can spawn
- which jumps skip slow doors and stairs
- where rats like to sit after looting
- when a mobility tool is worth bringing
That matters because on Stella Montis, efficiency is profit. A shortcut that saves five seconds may not sound huge, but over multiple raids it means less exposure, cleaner rotations, and more consistent extracts.
↖ Best secret loot spots on Stella Montis
These are the spots most worth checking if you want practical value without turning every raid into a parkour exam.
↖ Loading Bay / Cargo Dock A hidden stash
This is one of the better hidden spots early in a run.
- Jump the fence near Cargo Dock A
- Follow the edge down into the tucked corner
- Check the hidden containers and nearby container tops
This area is worth knowing because it is close to ARC Raiders loot that often favors:
- grenades
- explosive materials
- blueprint spawns
If you drop into the lower section, a Snap Hook helps a lot for getting back out cleanly.
↖ Control Room upper lift container
A simple one, but easy to miss.
- Take the lift up in Control Room
- Check the top corner platform
- Expect a container, and occasionally better value
The real danger here is not the loot. It is the angle control. Players sometimes loot this and then sit on the nearby pipes waiting for the next person to walk in.
↖ Assembly Line upper crate route
This is one of the better weapon crate locations on the map.
- Best accessed with Zipline or Snap Hook
- Can be reached with parkour, but it is awkward
- Often worth checking because there may be extra ammo or side containers nearby
From experience, this is one of those spots where bringing the right tool is simply better than forcing the free jump and risking health or time.
↖ Assembly side room hidden loot
Newer players miss this all the time.
- Go to the second floor in Assembly
- Drop into the tucked side area
- Check for hidden containers and possible high-roll loot
Because spawns are randomized, this room can occasionally feel much better than expected.
↖ Security Bridge lower ledge
This is a good example of efficient looting.
- Drop to the lower ledge in Security Bridge
- Check the weapon crate spawn
- Jump across for the medic bag if the area is clear
The nice part is that this spot also helps with extraction routing, so it is not just a detour for loot.
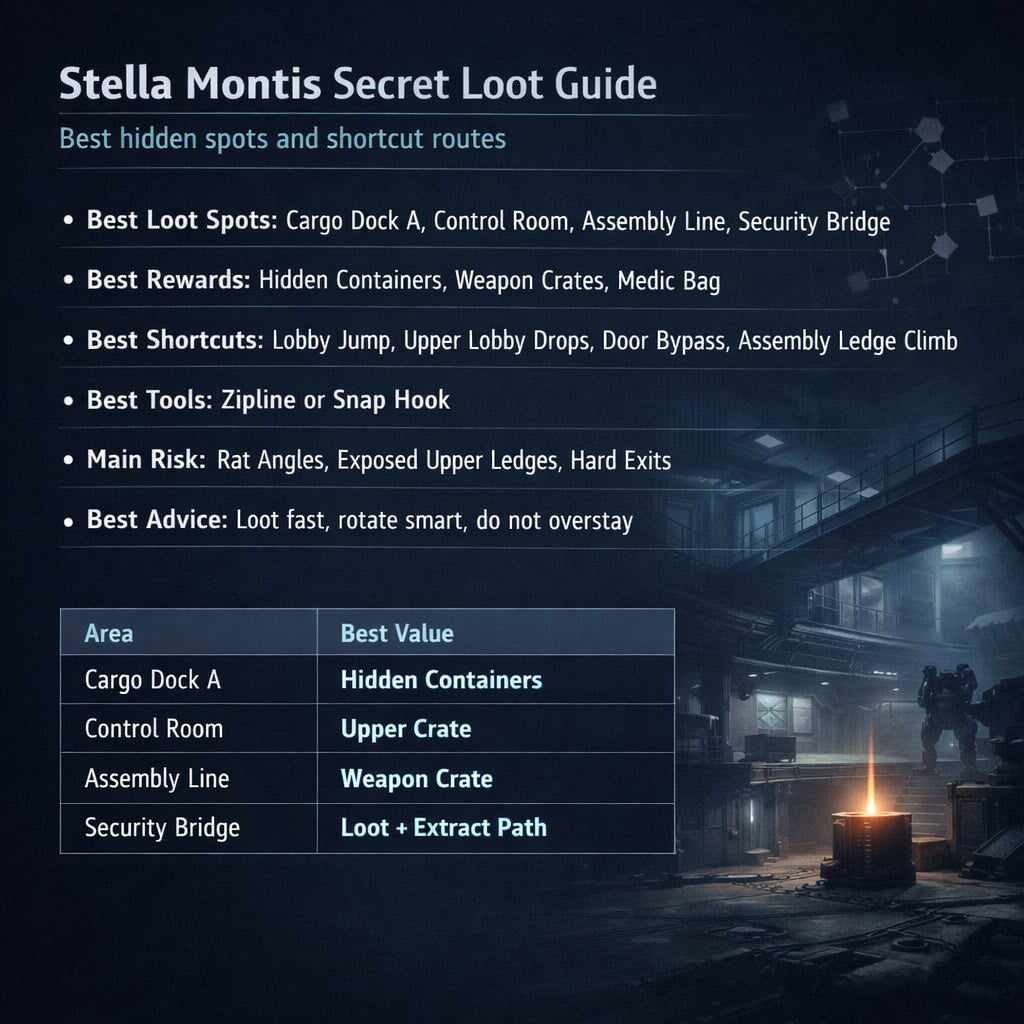
↖ Quick loot summary
| Area | What to Check | Why It's Worth It |
|---|---|---|
| Loading Bay / Cargo Dock A | hidden containers | strong utility and explosive loot potential |
| Control Room | upper lift platform | easy hidden container or better spawn |
| Assembly Line top | weapon crate, ammo | high-value loot if you have mobility |
| Assembly side room | hidden containers | often skipped by other players |
| Security Bridge | weapon crate, medic bag | fast loot plus better extract path |
↖ Best hidden jumps and shortcuts
This is where Stella Montis really becomes easier to play.
↖ Lobby breach shortcut
Instead of slowly breaching or climbing through, you can jump the opening faster with the right angle.
Why this matters:
- less noise
- less exposure
- faster entry if enemies or ARC threats are nearby
This is especially useful when the normal route would leave you stuck in a slow animation.
↖ Upper lobby drop routes
If you are already on the higher lobby levels, you can drop down through ledges instead of taking the full stair route.
That means:
- quicker extract rotations
- less predictable movement
- better escape options when a fight starts above you
↖ Opposite breachable door bypass
There is also a way to mount in from the outside instead of forcing the other breachable door.
This is one of those small but real advantages. Less noise often means one less second for another squad to react.
↖ Assembly ledge climbs
Around Assembly, there are a few ways to climb into upper areas without using the obvious stairs.
If you keep getting held at normal entrances, these alternate climbs are worth practicing. They will not win every fight, but they do stop you from entering every fight the same way.
↖ Quick shortcut summary
| Shortcut | Main Benefit | Best Use |
|---|---|---|
| Lobby jump entry | faster, quieter entry | pushing through danger quickly |
| Upper lobby drops | faster descent | rotating to extract |
| Door bypass | avoids noisy breach | sneaky entry |
| Assembly ledge climbs | alternate angle | beating stair campers |
↖ Best route choice by playstyle
Not every run should follow the same path.
| Playstyle | Best Focus | Suggested Areas |
|---|---|---|
| Solo looting | safe hidden value | Loading Bay, Security Bridge |
| Hybrid raids | loot plus angle control | Assembly, Control Room |
| Fast extract run | route efficiency | Lobby drops, Security Bridge |
| New players | simple repeatable spots | Loading Bay, Assembly side room |
If you notice your raids are getting more PvP-heavy, then shift away from long loot detours and favor spots that also improve your exit path.
↖ What usually gets players killed here
Most deaths on Stella Montis are not because the spots are bad. They happen because players overstay.
Watch out for:
- looting upper ledges too long
- dropping into corners without an exit tool
- assuming hidden loot spots are safe
- ignoring rat angles near pipes and beams
A simple rule helps here: if a hidden crate is already looted, assume someone may still be nearby.
That mindset alone saves a lot of bad second entries.
↖ FAQ
↖ What is the best secret loot spot on Stella Montis?
For consistent value, Loading Bay near Cargo Dock A is one of the best. For higher upside, Assembly Line is usually stronger if you have the mobility tools to access it safely.
↖ Do I need a Zipline or Snap Hook on Stella Montis?
Not every run, but they are very useful. Several loot spots and shortcuts become much easier and safer when you bring one.
↖ Is Stella Montis good for solo players?
Yes, especially if you focus on hidden containers and efficient rotations instead of forcing every high-risk crate.
↖ Are the hidden jumps really worth learning?
Yes. Even the simple ones matter because they reduce noise, save time, and make your movement less predictable.
↖ Final thoughts
Stella Montis is one of the better maps in ARC Raiders for players who like squeezing value out of map knowledge. The hidden loot spots are useful, but the real edge comes from combining them with smarter movement. Learn a few reliable stash locations, add one or two shortcut jumps to your route, and your runs will feel cleaner almost immediately.
If we had to narrow it down, the best starting points are simple: learn the Cargo Dock A stash, the Assembly upper crate route, and the Lobby shortcuts first. Those three alone make Stella Montis much easier to loot and much harder for other players to read.

Most Popular Posts
- ARC Raiders Riven Tides Key Room Guide: Best Hotel Keys, Loot Routes, Secure & Crane Storage
- ARC Raiders Damage Fireflies Trial Guide: Best Farm Method on Buried City Night Raid
- ARC Raiders Riven Tides Update: New Map & Items, ARC Turbine, Rewards, and Best Early Strategy
- ARC Raiders Bettina Guide: Best Build, Buffs, and How to Use It Against ARC
- Arc Raiders Season 4 Riven Tides Update, Rewards, Safe Skins, and Release Timeline
- ARC Raiders Solo Search Supply Drops Guide: Best Buried City Route, Beacon Locations
Popular Category Lists
- Grow a Garden / (286)
- ARC Raiders / (262)
- CoD: Black Ops 7 / (166)
- Monopoly Go / (146)
- MLB 26 / (144)
- Star Citizen / (111)
- Steal a Brainrot / (89)
- Sailor Piece / (68)
- ARK Survival Ascended / (66)
- Diablo IV / (61)
- Forza Horizon 6 / (60)
- Blox Fruits / (60)
- CoD: BLACK OPS 6 / (55)
- Adopt Me / (53)
- Path of Exile 2 / (48)
- Monster Hunter Wilds / (46)
- Windrose / (44)
- Path of Exile / (40)
- Grow a Garden 2 / (38)
- Bee Swarm Simulator / (36)


