


 0
0ARC Raiders Swamp Trials Solo Guide: Best Loadout, Snitch Scanner Route, and Score Strategy
- KITE
- Share
- ARC Raiders
- 04/17/26
- 601
If you're trying to clear the Destroy ARC Enemies in the Swamp trial solo in ARC Raiders, the run is really about efficiency, not style points. We had our best results on Dam Battlegrounds during an electromagnetic storm, using Hydrodomes as the main hold point and rotating Snitch Scanners carefully instead of spamming them.
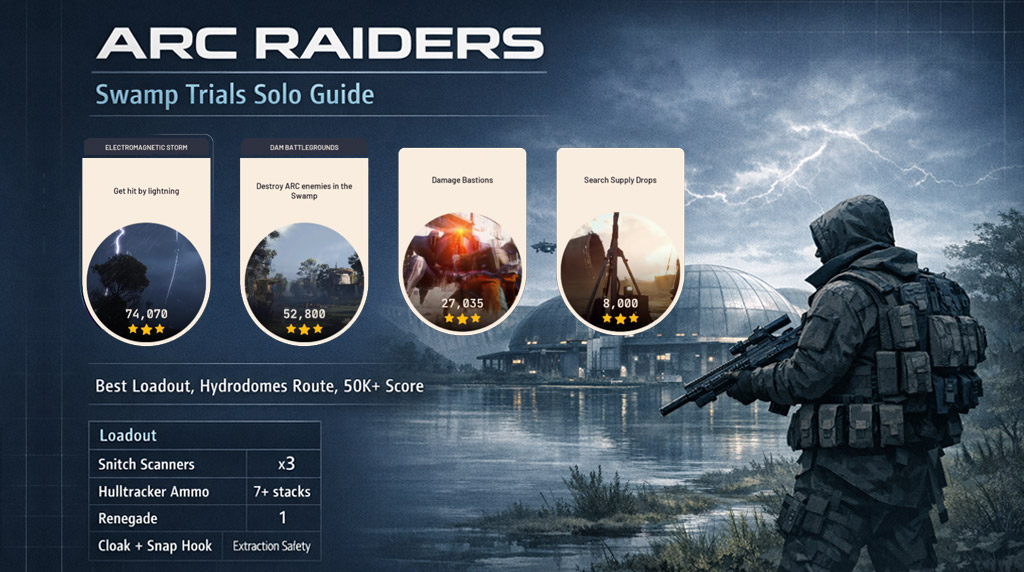
Using this route and setup, we pushed 52,800 points solo. The reason it works is simple: every ARC enemy is worth 400 points, so the trial rewards fast, low-risk kills much more than long fights against heavy targets. Once you understand that, the whole strategy becomes much cleaner.
- Best Solo Loadout for Swamp Trials
- Loadout takeaway
- Best Places to Farm Snitch Scanners
- Fastest farming method
- Where to Go in the Swamp
- Why Hydrodomes are the best spot
- Scoring: What Actually Matters
- What this means in practice
- How to Use Snitches for Extra Points
- Best way to play Snitches
- How to Use Snitch Scanners Without Wasting Them
- The pacing that worked best for us
- Weapon Tips and Ammo Management
- Ammo warning
- What Not to Do
- Wolf Packs are not a core strategy
- Do not overfocus heavy targets
- Do not leave extraction planning until late
- Extraction Tips That Save Runs
- FAQ
- What is the best solo location for the Swamp Trial in ARC Raiders?
- How many points is each ARC enemy worth?
- How many Snitch Scanners should we bring?
- Is the Hullcracker better than the Renegade?
- Are Wolf Packs worth bringing?
- What is the biggest mistake in this trial?
- Final Thoughts
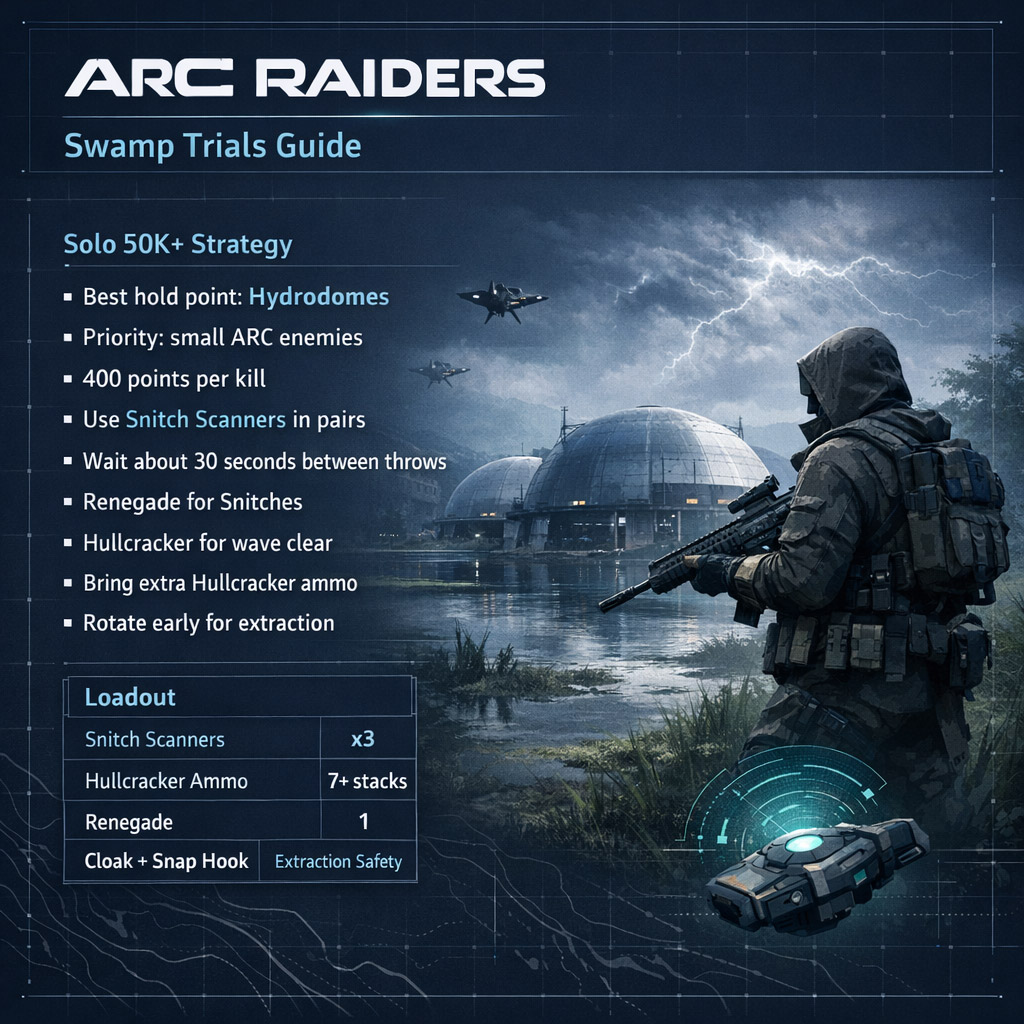
↖ Best Solo Loadout for Swamp Trials
This setup gave us the most consistent results. A few slots are flexible, but the core is hard to replace.
| Item | Recommended Amount | Why It Matters |
|---|---|---|
| Snitch Scanners | 3 full rows | Main source of repeatable kills |
| Hullcracker | 1 | Best for fast enemy cleanup |
| Hullcracker Ammo | 7+ stacks | You burn through it faster than expected |
| Renegade | 1 | Better than Hullcracker for Snitches |
| Medium Ammo | 1 stack | Enough if you loot extra from Hornets |
| Healing / Shields | A few | Covers mistakes and swarm pressure |
| Adrenaline Shots | 1 stack | Helps recover tempo mid-run |
| Photoelectric Cloak | 1 | Strong emergency reset tool |
| Snap Hook | 1 | Good mobility, especially late |
| Wolf Packs | Optional | Not necessary, low value in most runs |
↖ Loadout takeaway
The one thing we would change after testing this more: bring more Hullcracker ammo instead of Wolf Packs. On paper Wolf Packs look useful, but in actual runs they rarely add enough value to justify the slot.
↖ Best Places to Farm Snitch Scanners
Before you even queue for the Swamp trial, it helps a lot to stock up on scanners. We had the best luck in these two locations:
| Map | Position | Why It Works |
|---|---|---|
| Buried City | Behind Old Town | Good Snitch visibility and fast farming loop |
| Blue Gate | Overlook Airshaft | Easy sightlines on multiple Snitch spawns |
↖ Fastest farming method
The cleanest method was:
1. Aggro the Snitch with a weapon like the Renegade
2. Tag it at least once
3. Let it come close
4. Finish it with a Seeker Grenade
That combo made scanner farming much faster and more consistent than trying to brute-force every Snitch the same way.
↖ Where to Go in the Swamp
Once the run starts, head straight to the Hydrodomes.
Yes, the trial covers the full swamp area, but the Hydrodomes consistently gave us the best enemy density and the easiest fights to control. That matters because this challenge is not about exploring the whole map. It is about turning one strong position into as many safe kills as possible.
↖ Why Hydrodomes are the best spot
- Good concentration of ARC enemies
- Easy rooftop positioning
- Better visibility on incoming spawns
- Safer angles when solo
We had especially good results playing on top of the Hydrodomes. Enemies often seemed to search inside or path awkwardly, which gave us free shots before they fully locked on.
↖ Scoring: What Actually Matters
The scoring rule is the biggest reason this strategy works:
- Every kill is worth 400 points
- Enemy type does not matter
That means a Tick and a much tougher ARC target pay the same. So if you are chasing a high score, your priority should be easy kills, not impressive kills.
Here's the simple math:
| Source | Points |
|---|---|
| 1 ARC kill | 400 |
| 1 Snitch Scanner stack | 2,400 |
| 1 full row of scanners | 9,600 |
| 3 full rows | 28,800 |
↖ What this means in practice
A huge part of your score is already built into the scanners you bring.
The rest comes from:
- Natural enemy spawns around Hydrodomes
- Snitches that call reinforcements
- Clean uptime without wasted movement
That is why this challenge feels much easier once the pacing clicks.
↖ How to Use Snitches for Extra Points
Snitches are not just scanner drops. If you handle them correctly, they are one of the best score boosts in the run.
↖ Best way to play Snitches
Instead of killing them instantly:
1. Aggro the Snitch
2. Let it begin calling reinforcements
3. Kill it right after the call starts
4. Clear the spawned enemies
5. Pick up the scanner it drops
If timed well, one Snitch can give:
- 2 Wasps
- 1 Hornet
- 1 Snitch Scanner
- Roughly 2,400 total points
That is a big return for a short interaction, which is why we always treated nearby Snitches as high-priority targets.
↖ How to Use Snitch Scanners Without Wasting Them
This is the part a lot of players get wrong.
If you throw too many Snitch Scanners too quickly, some of them can fail to call in reinforcements. Once that starts happening, the whole run gets messy and inefficient.
↖ The pacing that worked best for us
- Throw 2 scanners
- Wait about 30 seconds
- Throw the next set after the previous cycle settles
| Scanner Use | Recommendation |
|---|---|
| Throw count | 2 at a time |
| Wait time | Around 30 seconds |
| If a scanner fails | Pause and reset the rhythm |
This spacing kept our reinforcements consistent and stopped the area from becoming cluttered with unusable scanner drops.
↖ Weapon Tips and Ammo Management
The Hullcracker should do most of the heavy lifting, but we did not love it for Snitches. It can miss awkward targets, and it does not always one-shot them when timing matters.
The Renegade ended up feeling more reliable for Snitch control.
| Weapon | Best Use |
|---|---|
| Hullcracker | Main wave clear |
| Renegade | Snitches and utility shots |
↖ Ammo warning
This run is more ammo-hungry than it looks.
A good rule from testing was:
1 Hullcracker ammo stack can disappear on roughly 1 row of scanners
So if you bring 3 rows of scanners and only 7 stacks of ammo, your margin is not huge once natural spawns and mistakes enter the picture. We ran dry near the end of one strong run, which is why we now rate extra Hullcracker ammo higher than most optional gear.
↖ What Not to Do
A few things looked good on paper and were much worse in actual runs.
↖ Wolf Packs are not a core strategy
We tested Wolf Packs to clear airborne groups over the Hydrodomes. The problem is they do not always finish Hornets and Fireflies cleanly. If they leave targets alive, you can aggro a full swarm at once, which is exactly how stable runs turn into panic runs.
↖ Do not overfocus heavy targets
Because every enemy gives the same 400 points, spending too much ammo and time on heavy ARC enemies usually lowers your efficiency.
↖ Do not leave extraction planning until late
One of the easiest ways to ruin a strong run is getting greedy and rotating too late.
↖ Extraction Tips That Save Runs
There is one detail here that caught us off guard: Snap Hook and Photoelectric Cloak appear to share cooldown. That matters a lot if you rely on both during the final rotation.
| Extraction Risk | How to Handle It |
|---|---|
| Late rotation | Leave earlier than you think you need to |
| Snap Hook used recently | Check cloak availability before committing |
| Too many enemies near extract | Save cloak for the final crossing |
| Downed near extraction | Stay still to slow health drain |
That last point is important. If you go down near extraction, do not crawl unless you have to. Staying in place drains health more slowly and can be enough to preserve the run if the elevator is already coming in.
↖ FAQ
↖ What is the best solo location for the Swamp Trial in ARC Raiders?
The Hydrodomes are the best hold point in our testing because they give strong visibility, solid enemy density, and safer rooftop angles for solo play.
↖ How many points is each ARC enemy worth?
Each kill gives 400 points, no matter what type of ARC enemy you kill.
↖ How many Snitch Scanners should we bring?
For score-focused runs, 3 full rows is a strong target. That is enough to build a major part of a 50K+ run if you use them well.
↖ Is the Hullcracker better than the Renegade?
For general clearing, yes. For Snitches, not always. We had better consistency using the Renegade to control Snitch timing.
↖ Are Wolf Packs worth bringing?
Usually not. They are optional at best and can make the run less stable if they pull too many enemies at once.
↖ What is the biggest mistake in this trial?
The most common issue is poor pacing: using scanners too quickly, wasting ammo on heavy targets, or rotating to extraction too late.
↖ Final Thoughts
The cleanest way to solo this trial is to keep the plan simple: farm scanners ahead of time, play Hydrodomes, pace your reinforcements, and prioritize easy kills. That is what turns the run from a scramble into something repeatable.
From our experience, the players who post strong scores here are not forcing flashy plays. They are managing tempo, ammo, and positioning better than everyone else.

Most Popular Posts
- ARC Raiders Riven Tides Key Room Guide: Best Hotel Keys, Loot Routes, Secure & Crane Storage
- ARC Raiders Damage Fireflies Trial Guide: Best Farm Method on Buried City Night Raid
- ARC Raiders Riven Tides Update: New Map & Items, ARC Turbine, Rewards, and Best Early Strategy
- ARC Raiders Bettina Guide: Best Build, Buffs, and How to Use It Against ARC
- Arc Raiders Season 4 Riven Tides Update, Rewards, Safe Skins, and Release Timeline
- ARC Raiders Solo Search Supply Drops Guide: Best Buried City Route, Beacon Locations
Popular Category Lists
- Grow a Garden / (286)
- ARC Raiders / (262)
- CoD: Black Ops 7 / (166)
- Monopoly Go / (146)
- MLB 26 / (144)
- Star Citizen / (111)
- Steal a Brainrot / (89)
- Sailor Piece / (68)
- ARK Survival Ascended / (66)
- Diablo IV / (61)
- Forza Horizon 6 / (60)
- Blox Fruits / (60)
- CoD: BLACK OPS 6 / (55)
- Adopt Me / (53)
- Path of Exile 2 / (48)
- Monster Hunter Wilds / (46)
- Windrose / (44)
- Path of Exile / (40)
- Grow a Garden 2 / (38)
- Bee Swarm Simulator / (36)


